|
|
|
|
|
| Author |
|
|
Registered

Join Date: Apr 2005
Location: Virginia
Posts: 142
|
Front Wheel Bearing Replacement
Hello all, thanks to members here I diagnosed my front end grumble issue as a bad right front wheel bearing. Have two replacement bearing sets on the way (thought it best to do both sides while I'm at it) but had a couple questions:
Sounds like the procedure isn't brain surgery but any special tips for removing the old ones? Do I need to grease the new ones before install? What is the worst thing that can happen if I can't get to this over the next couple of weeks and I drive her a a couple times in the meantime? I don't want a bad bearing to cause another problem to develop! (Unfortunately what little near-term wrenching time I have handly is going towards addressing some issue with my dairly driver BMW 535i) Hope everyone has a safe and happy Thanksgiving!
__________________
1986 911 Cabriolet 1991 BMW 535i 1991 BMW 325iC 2005 Chevy Tahoe Z71 2004 Mercedes C240 4Matic 1989 Ford F-150 (for the dirty work) 2004 New Holland TZ-24DA (kicks real grass!) |
||
 11-19-2005, 07:54 AM
|
|
|
Registered

Join Date: Sep 2005
Location: Tustin, CA
Posts: 225
|
Im also tackling this project today! Any tips would be great!
Mike
__________________
Currently Porsche-less |
||
|
11-19-2005, 08:04 AM
|
|
|
Registered
Join Date: Jan 2001
Location: So. Cal.
Posts: 9,141
|
Your new bearings will come without grease, so of course you will have to grease them with a molydenum disulfide or synthetic bearing grease. I use a big set of channel locks to get the bearing cover off. After that, you must take the nut off, pull the wheel, put the bearings in, and replace the nut. The nut is tightened down just enough so that you can move the washer under it by prying it with a screw driver using a bit of pressure. Do a search. You'll find tons of threads.
__________________
Marv Evans '69 911E |
||
|
11-19-2005, 08:20 AM
|
|
|
Registered
Join Date: Oct 2004
Location: PICKERING ONTARIO
Posts: 567
|
THE WORST THING THAT COULD HAPPEN IS THAT YOUR WHEEL COULD FALL OFF.Not as dangerous but costly would be that your race will weld to the spindle therefore costing you a new strut assembly.ask me how Iknow,don't drive,Marty
|
||
|
11-19-2005, 08:30 AM
|
|
|
Registered
Join Date: May 2002
Location: St Louis
Posts: 4,211
|
This should get you started.
It may not be as simple as you thought,,, or it may be. Hammer and punch OR heat and press special tools etc. front wheel bearing install? edit: grease the new ones definitely... put a wad of grease in your palm and press the edge of the bearing into it until it pushes out the other side. |
||
|
11-19-2005, 09:39 AM
|
|
|
Registered
|
You have to decide if you are a hot hub proponent or not. I personally ensured the hubs were hot prior to removal and insertion of the bearings. The only tip I can give that I haven't seen on the thread is you need to be careful when checking the pressure washer for free movement. If you use a small screwdriver to slide the washer back and forth it is real easy to snag the bearing race cage and distort the cage.
__________________
Steve F 69 911 71 911 87 Carrera 2004 RAM 1500 4x4 "Hemi" |
||
|
11-19-2005, 11:40 AM
|
|

|
|
Registered
Join Date: Apr 2005
Location: Virginia
Posts: 142
|
Thanks to all for your help. If anything it gives me pause to think through this project a bit before I dive in. Not sure I really have the terminology down to even grasp what each part is and how to ensure I don't damage something in the process. I may nust explore having this done at a local shop. Makes the valve adjustment on the Bimmer today sound like an oil change...
__________________
1986 911 Cabriolet 1991 BMW 535i 1991 BMW 325iC 2005 Chevy Tahoe Z71 2004 Mercedes C240 4Matic 1989 Ford F-150 (for the dirty work) 2004 New Holland TZ-24DA (kicks real grass!) |
||
|
11-19-2005, 04:24 PM
|
|
|
Registered
Join Date: May 2002
Location: St Louis
Posts: 4,211
|
Quote:
oh.. and if you get stuck an urgent post to this place. |
||
|
11-20-2005, 12:00 AM
|
|
|
Somatic Negative Optimist
|
Do a search on this board but, all would be easier if you get a Bentley Repair Manual: Great descriptions with pictures!
It's best to do the front brakes at the same time meaning: Rotor, calipers, pads if necessary. If the brakes haven't been done for a while, this is the time. It's a pretty nice job to do it all and that way your front will be good for a long time. 
__________________
1980 Carrerarized SC with SS 3.2, LSD & Extras. SOLD! 1995 seafoam-green 993 C2, LSD, Sport seats.  Abstract Darwin Ipso Facto: "Life is evolutionary random and has no meaning as evidenced by 7 Billion paranoid talking monkeys with super-inflated egos and matching vanity worshipping illusionary Gods and Saviors ". ")
Last edited by Gunter; 11-20-2005 at 08:53 AM.. |
||
|
11-20-2005, 08:49 AM
|
|
|
Registered

|
Rick, I don 't think anyone is trying to "scare him off". But he admitted he didn't know he had to grease the new wheel bearings before installing and he doesn't feel that confident that he understands the terminology. He should proceed with caution as this is a safety related job. Just my $.02
__________________
Dan in Pasadena '76 911S Sahara Beige/Cork |
||
|
11-20-2005, 09:51 AM
|
|
|
Registered

|
Not trying to hijack this thread but I wanted to throw this out to your guys, I'm ready to be blasted for my idea but this idea but I think it has merit.
Once you've packed the bearing with grease, got the seals installed, you are ready to tighten the nut and check the movement of the washer for proper tightness. All of the good work you've done prior to this can be destroyed if you get this step wrong. Too tight and you burn a bearing, long enough and you'll weld it to the race (I've seen it happen). Too loose and it will wear out the assembly and destroy it as well. So, lots of experience setting the tightness of the adjusting nut and checking the movement of the washer (not just by me but by guys who have done them many times) has given us an idea. A properly set bearing will not heat up as it's running the proper adjustment. Too tight and you can actually feel the heat from the cap over the hub assembly. So, we've determined that 5 thousands is about the right amount of play at the top of the rotor- if you grab the rotor from the vents top and bottom and rock, you should feel some slight movement, this translates to 5 thousands. So, we made a bracket that attaches firmly to the strut and has a piece that allows firm attachment of a dial indication. It should be within .5 inch of the edge of the rotor. Once you adjusted the tension on the bearing to allow 5thou of movement of the dial indicator, you good to go. Check the washer and you find it moves with slight sideways pressure. Torque the adjuster down to 10 ft.lbs and bolt the wheel back on. Drive the car and you find the bearing cool and comfortable. Now, I'll get a lock of flack for this for lots of reasons but it works for me and is very repeatable. I like non-subjective measurements, repeatable and consistant. The pros will laugh at this because they've adjusting wheel bearings for so long they do it in their sleep. I don't and like a method that I can be sure will give me regular results. Now, it works on 911's through 1989. Obviously on later cars with larger diameter rotors, you've got a different situation. Flame away, just thought I'd post it. Photos:  
__________________
Bruce Herrmann 97 C4S '04 330i '08 Cayenne S '07 4.8 X-5 Last edited by GIBSON; 11-20-2005 at 05:03 PM.. |
||
|
11-20-2005, 05:01 PM
|
|
|
Registered

Join Date: Nov 2004
Location: Greater Metropolitan Nimrod, Oregun
Posts: 10,040
|
so... you don't rotate the rotor -- hence runout is not added to the axial play (?)
__________________
"A man with his priorities so far out of whack doesn't deserve such a fine automobile." - Ferris Bueller's Day Off |
||
|
11-20-2005, 05:04 PM
|
|

|
|
Registered
|
I just check the movement in several positions, it should be similar or you've got some other problems... And, I never take the measurement alone, always check to be sure the movement of the washer is correct, but so far it always has been.
If you think about it, run-out is not a factor in this measurement. Whatever spot you pick on the rotor is going to allow you to measure the 5 thousands movement you are looking for. Of course this set-up allows for a nice way to check run-out as well. But for purposes of this measurement, pick any spot on the caliper for the reading, it's going to give you the numbers that will tell you how tight the bearing nut is.
__________________
Bruce Herrmann 97 C4S '04 330i '08 Cayenne S '07 4.8 X-5 Last edited by GIBSON; 11-20-2005 at 05:30 PM.. |
||
|
11-20-2005, 05:08 PM
|
|
|
Registered
Join Date: Apr 2005
Location: Virginia
Posts: 142
|
I have the Bentley for the e34 and have been impressed with the photos and details provided. I don't have a problem following such guides/manuals and consider such "opportunities" as learning points and confidence builders. I've tackled a few things on the Bimmer so far but this project - and yes on my dear 911 - is a bit more sobering. That said I have also never really mucked with a front end beyond routine brake maintenance, the safety issue does concern me as well as causing a problem that could damage the hub. I'm researching this a bit more and may take the plunge on the 911 Bentley version....not just for this project. No offense taken as I really am embarking on serious DIY projects for the first time. I'm just glad I have this board to help me along the way - even if it is a recommendation to have the work done professionally.
__________________
1986 911 Cabriolet 1991 BMW 535i 1991 BMW 325iC 2005 Chevy Tahoe Z71 2004 Mercedes C240 4Matic 1989 Ford F-150 (for the dirty work) 2004 New Holland TZ-24DA (kicks real grass!) |
||
|
11-20-2005, 07:00 PM
|
|
|
Registered
Join Date: Feb 2001
Location: Somerset, NJ USA
Posts: 269
|
the hardest part may be trying to get the dust cap off. What a show stopper if you can't get it off.
__________________
1984 911 Euro Cabriolet 1988 928 S4 with Murf Supercharger S1 |
||
|
11-20-2005, 07:24 PM
|
|
|
Registered
Join Date: Sep 2004
Location: Wisconsin
Posts: 44

|
Don't forget to put in new races especially if you have a cooked bearing. Make sure the races are completely seated also. I pound mine out with a hammer/punch and then pound in new ones with a hammer and appropriate size race driver.
|
||
|
11-20-2005, 07:38 PM
|
|
|
Registered

Join Date: Oct 2003
Location: Sacramento, CA
Posts: 666
|
Gibson, your idea is great but your clearance in my opinion is too loose. As you stated, too tight will burn up but your .005 at the rotor translates to a bunch at the tire not to mention the wobble of the rotor will push the calipers pistons in and give you a softer brake feel. Most performance applications require less than .002 of total rotor runout and you just added another .005. Just my opinion though, I run zero clearance.
When I really see problems is when someone beats the races out with a punch, damaging the seat and the new races go in slightly cocked. Then people tighten up the bearing excessively to get the play out because of the misalignment problem. If the races are installed properly, you can tighten the nut with two fingers and get all the play out. Zero clearance will not burn up the bearings if the races are installed straight.
__________________
Paul S "Those who say it cannot be done should not interrupt the people doing it" |
||
|
11-20-2005, 07:41 PM
|
|
|
Registered
Join Date: May 2002
Location: St Louis
Posts: 4,211
|
Quote:
We had one vote for too much clearance. Your empirical method seems pretty sound. Any one else weigh in? |
||
|
11-20-2005, 09:42 PM
|
|
|
Registered
|
Paul, I understand your concerns. My reason for starting this project was that bearings I thought were adjusted correctly using the standard method were producing heat beyond which I thought was appropriate. This was not caliper/brake pad heat showing up on the rotor, but heat from the bearing housing.
Not being one who like subjective measurements (I use a dial gauge on my valve adjustments as well, eliminating the "feel" portion of the adjustment). So, this is an attempt on my part to produce more reliable, reproduceable results. I understand your concern on the "looseness" of the bearing. I have found, however, that this measurement gives a washer that responds to lateral pressure as it should. I used to think that the proper way to adjust these washers was to lever the screwdriver against the bearing housing and try to slide the washer to see if it was tight enough. When I learned that the movement of the washer was to be just by the action of the screwdriver against the washer and just pressure from your hand (not levered against anything) I realized I was setting things too tight. I know this is a radical approach - don't try it unless you think it will improve your chances of getting an even, proper torque on the wheel bearing. If you feel that 5 thou is too loose, use 3-4 but from my experience, I've had good results with 5. Just an idea, if you like your current adjustment method, stay with it. I just think it's a good idea to check for heat in this bearing assembly after you've installed new bearings or repacked you old ones. You could probably use the magnetic stand with flexible arm to mount the dial indicator but I felt that the rigid frame would give more predictable results. Another trick most of you probably already know, leave the allen head wrench in the nut for the adjuster to make your small adjustments for tightness- you can just turn the rotor slightly the appropriate direction, it will tap on the allen wrench and rotate the adjusting nut in whatever direction you need. Easier than tapping on the nut with a screwdriver and hammer to rotate it.
__________________
Bruce Herrmann 97 C4S '04 330i '08 Cayenne S '07 4.8 X-5 |
||
|
11-21-2005, 11:49 AM
|
|
|
Registered
Join Date: Apr 2005
Location: Virginia
Posts: 142
|
Ordered the Bentley
Thanks once again to all that threw their $.02 in. I've order the Bentley manual and will review the replacement procedure and decide which way to go. I really want to take a shot at this and most comments and related threads have been encouraging! Certainly it has got to be better than holiday shopping!! I'll be sure and holler for help here if indeed I need it. Hope all had a nice Thanksgiving.
__________________
1986 911 Cabriolet 1991 BMW 535i 1991 BMW 325iC 2005 Chevy Tahoe Z71 2004 Mercedes C240 4Matic 1989 Ford F-150 (for the dirty work) 2004 New Holland TZ-24DA (kicks real grass!) |
||
|
11-26-2005, 05:57 AM
|
|


 1969 and 1971 Porsche 911T/E 2.0L and 2.2L
 ME 262 (SOLD)
 Colibri
 Gas Mizer
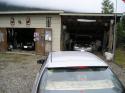 Mileage King
 Dog Bus
 1987 Porsche 944 2.5
 1973 Porsche 911S 2.4S
