|
|
|
|
|
| Author |
|
|
Registered
Join Date: Apr 2005
Location: Foat Wuth
Posts: 408
|
2 Stage Defogger Switch - Wiring
I'm stymied and need help!
Rear Defogger switch, 2 stage (911.613.145.00) Has 4 terminals, numbered on the switch as: 1, 2, 3 and 4. # 3 is clearly ground (brown wire) - since it also runs to the outside of the bulb lamp # 1 would be positive (black wire), I'm pretty sure Here's how continuity checks: A. Switch push in all the way ('Off'): No continuity between any terminals B. Switch pulled out 1 notch: Continuity # 1 to # 2 (only) C. Switch pulled out 2 notches: Continuity # 1 to # 4 AND # 1 to # 3 For this 1980, looking at wiring diagrams from both Bentley and the Porsche shop manuals, I can't determine the connections for the other 2 terminals on the switch. The wiring diagrams show 'Terminal 58' getting a Black/Blue wire (for "Interior Lights") and the 'other' terminal getting a Grey/Green wire (from the electric mirror harness), with a Black wire attachment (to the Rear Window Defogger RELAY). Is 'Terminal 58' the switch terminal # 2 or # 4? Seems to me like the switch lamp ought to be 'on' whether the 1st or 2nd stage (notch) of the switch is on - but according to the continuity - it's only on for the 2nd stage. Yea, this is a long way around asking how to wire this switch in... Hoping for help, thanks, Jim
__________________
1980 911SC - 2nd Rebuild in Process - 2005 Porsche Cayenne Turbo - 2013 VW R ________________________ 2000 BMW X5 - 1996 BMW 530i - Toy 4 Runner (x2 or 3) - 1987 Toy Supra - 1988 Honda Si - 1984 El Camino Super Sport - MGA - MGB - Fiat 124 Spyder - Fiat 128 Wagon - 1962 Karmann Ghia - 1951 VW - 1953 Willys Jeepster w/Chevy 286 - 1995 Volvo 960 - 2006 VW GTI |
||
 12-09-2005, 12:17 PM
|
|
|
Registered

Join Date: Dec 1999
Location: TX USA
Posts: 9,804

|
__________________
Warren Hall, Jr. 1973 911S Targa ... 'Annie' 1968 340S Barracuda ... 'Rolling Thunder' |
||
|
12-09-2005, 12:23 PM
|
|
|
Registered
Join Date: Apr 2005
Location: Foat Wuth
Posts: 408
|
Thanks Warren - but, sad to say I need more hand holding...
Your referral thread, while primarily regards the relay - rather than the switch - does have a diagram of the switch wiring. Problem is your switch diagram has 6 terminals (including the lamp), while mine has 5 terminals (including the lamp), and for I'm guessing the older cars - with different colored wires and maybe terminal numbers...so I'm still confused. Help!
__________________
1980 911SC - 2nd Rebuild in Process - 2005 Porsche Cayenne Turbo - 2013 VW R ________________________ 2000 BMW X5 - 1996 BMW 530i - Toy 4 Runner (x2 or 3) - 1987 Toy Supra - 1988 Honda Si - 1984 El Camino Super Sport - MGA - MGB - Fiat 124 Spyder - Fiat 128 Wagon - 1962 Karmann Ghia - 1951 VW - 1953 Willys Jeepster w/Chevy 286 - 1995 Volvo 960 - 2006 VW GTI |
||
|
12-09-2005, 12:38 PM
|
|
|
Registered
Join Date: Dec 1999
Location: TX USA
Posts: 9,804
|
Jim,
Ok, that diagram was from an '82 SC, so yours would be the earlier version, as used from '75, I hope. The relay is the same part ... just a different diagram version, probably from a different 'new hire' engineer! The relay diagram error started with this early schematic, BTW! Try this one: 
__________________
Warren Hall, Jr. 1973 911S Targa ... 'Annie' 1968 340S Barracuda ... 'Rolling Thunder' |
||
|
12-09-2005, 01:59 PM
|
|
|
Registered
Join Date: Apr 2005
Location: Foat Wuth
Posts: 408
|
I'm sure I'm missing something - or not understanding - but this drawing, as well as the Bentley, seems to me to be showing a single stage switch (for a single stage relay and heating).
But, if I'm wrong and this drawing is right for wiring this switch, AND the numbers correspond to the numbers on the switch (with the exception of the '0' on the drawing above, versus '3' on the swtich), then I could assume (scary) that my: Terminal # 1 = Black (+ power) Terminal # 2 = Blue/Black Terminal # 3 / # 0 = Brown (Ground) Terminal # 4 = Grey/Green with a Black wire to the Relay What I'm trying to use is: Porsche shop: Current Flow Diagram, 911SC, USA, Model 78 Porsche shop: Current Flow Diagram, 911SC, USA, Model 81, Part III Bentley 911SC Elec Wiring Diagrams - Defogger and your schematics, All to start the installation of all dash switches and gauges into a brand new wiring harness.
__________________
1980 911SC - 2nd Rebuild in Process - 2005 Porsche Cayenne Turbo - 2013 VW R ________________________ 2000 BMW X5 - 1996 BMW 530i - Toy 4 Runner (x2 or 3) - 1987 Toy Supra - 1988 Honda Si - 1984 El Camino Super Sport - MGA - MGB - Fiat 124 Spyder - Fiat 128 Wagon - 1962 Karmann Ghia - 1951 VW - 1953 Willys Jeepster w/Chevy 286 - 1995 Volvo 960 - 2006 VW GTI |
||
|
12-09-2005, 02:31 PM
|
|
|
Registered

Join Date: Dec 2003
Location: Arapahoe County, Colorado, USA
Posts: 9,032
|
Perhaps this will help. This is the 911 Workshop
Manual Supplement XXXIX, 1981, page 0.1-3/85. This basically extends the 78 main diagram. The prior diagrams only show the single stage rear window heater. I think this is pretty accurate all the way back to 70 model. If you need, I can post the connector locations.  " "© Dr. Ing. h.c. F. Porsche A.G. If you need, I can e-mail you this at 9.2M resolution. Do you need the wire colors made clearer? Remember to note the error that Warren found in the Rear Window Defogger Relay. This diagram has the error. I reverse engineered the relay. I confirm Warrens correction. I need to clean up the circuit diagram and will post it here. It will be helpful if you can photo-document the wiring from your 911. This is an area that Porsche was slightly shy on documentation. Images at the switch and the connections to the window will help. Best, Grady gradyclay@hotmail.com |
||
|
12-09-2005, 02:56 PM
|
|

|
|
Registered
Join Date: Apr 2005
Location: Foat Wuth
Posts: 408
|
Thanks!
As soon as the missus finishes dragging me out to dinner I'll take and post pics of the switch and the current area of interest of the harness. Yes, please: I'll need a clearer/finer schematic to pick up the detail of wire colors, etc. jimd@transpec.com
__________________
1980 911SC - 2nd Rebuild in Process - 2005 Porsche Cayenne Turbo - 2013 VW R ________________________ 2000 BMW X5 - 1996 BMW 530i - Toy 4 Runner (x2 or 3) - 1987 Toy Supra - 1988 Honda Si - 1984 El Camino Super Sport - MGA - MGB - Fiat 124 Spyder - Fiat 128 Wagon - 1962 Karmann Ghia - 1951 VW - 1953 Willys Jeepster w/Chevy 286 - 1995 Volvo 960 - 2006 VW GTI |
||
|
12-09-2005, 03:06 PM
|
|
|
Registered
Join Date: Apr 2005
Location: Foat Wuth
Posts: 408
|
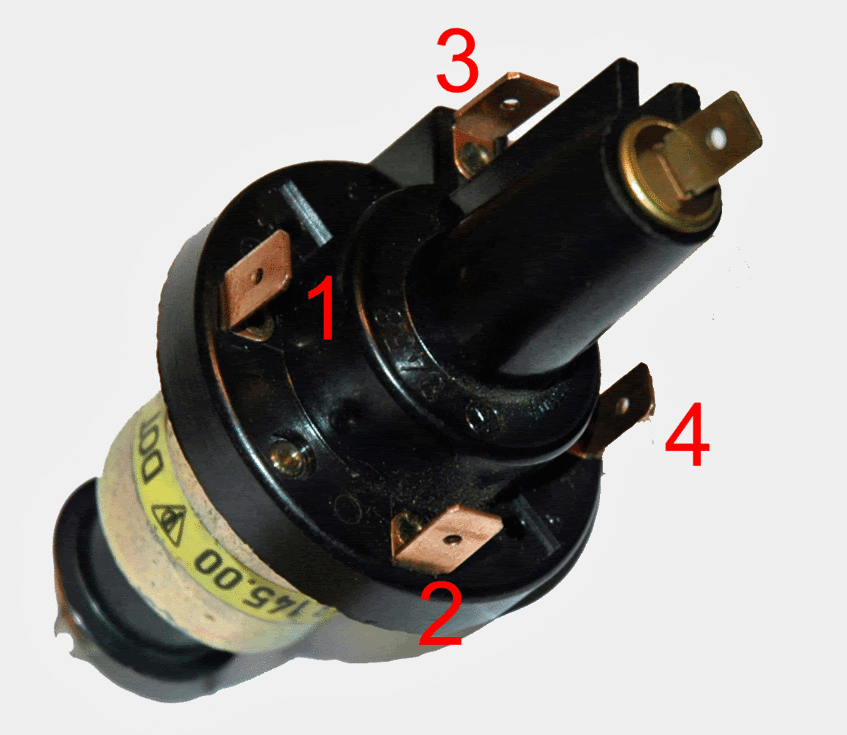
Here's a photo of the rear window defogger switch, number labeled as is the switch:
__________________
1980 911SC - 2nd Rebuild in Process - 2005 Porsche Cayenne Turbo - 2013 VW R ________________________ 2000 BMW X5 - 1996 BMW 530i - Toy 4 Runner (x2 or 3) - 1987 Toy Supra - 1988 Honda Si - 1984 El Camino Super Sport - MGA - MGB - Fiat 124 Spyder - Fiat 128 Wagon - 1962 Karmann Ghia - 1951 VW - 1953 Willys Jeepster w/Chevy 286 - 1995 Volvo 960 - 2006 VW GTI |
||
|
12-09-2005, 06:24 PM
|
|
|
Registered
Join Date: Apr 2005
Location: Foat Wuth
Posts: 408
|
Grady - Please allow me to take you up on both offers:
> Post connector locations > Email schematic at 9.3m resolution Thanks! Jim Disharoon jimd@transpec.com
__________________
1980 911SC - 2nd Rebuild in Process - 2005 Porsche Cayenne Turbo - 2013 VW R ________________________ 2000 BMW X5 - 1996 BMW 530i - Toy 4 Runner (x2 or 3) - 1987 Toy Supra - 1988 Honda Si - 1984 El Camino Super Sport - MGA - MGB - Fiat 124 Spyder - Fiat 128 Wagon - 1962 Karmann Ghia - 1951 VW - 1953 Willys Jeepster w/Chevy 286 - 1995 Volvo 960 - 2006 VW GTI |
||
|
12-09-2005, 06:31 PM
|
|
|
Registered
Join Date: Apr 2005
Location: Foat Wuth
Posts: 408
|
Grady - upon further reveiw - your schematic is the same as Warren's in the link. So, the schematic - for me - isn't helping...
__________________
1980 911SC - 2nd Rebuild in Process - 2005 Porsche Cayenne Turbo - 2013 VW R ________________________ 2000 BMW X5 - 1996 BMW 530i - Toy 4 Runner (x2 or 3) - 1987 Toy Supra - 1988 Honda Si - 1984 El Camino Super Sport - MGA - MGB - Fiat 124 Spyder - Fiat 128 Wagon - 1962 Karmann Ghia - 1951 VW - 1953 Willys Jeepster w/Chevy 286 - 1995 Volvo 960 - 2006 VW GTI |
||
|
12-10-2005, 05:48 AM
|
|
|
Registered
Join Date: Dec 1999
Location: TX USA
Posts: 9,804
|
Jim,
The pic/diagram I posted above is indeed for a two-stage defoster! The big confusion is that it includes a front windshield heater circuit, too. If you leave out the J-47 relay, J-45 diode, and Z-2 heating grid .... the circuit applies to your car! There is a mistaken assumption in your postings! Terminal #3 is NOT ground ... it is a switched power signal to the 2-stage relay for the second position/detent! The Brown ground wire needs to go to the center terminal of the lamp -- the unlabeled 5th terminal of your switch picture. The #2 & #3 terminals need to be jumpered together ... in order for the lamp to be illuminated in both switch positions. The relay terminal #86 [corrected diagram below] needs to be connected to terminal #2 or #3 of the switch. The wire color can be determined at the relay socket terminal. Likewise, the wire color for relay terminal 87a to switch position two -- terminal #4, can also be determined at the relay socket.  If you have the factory service manual, here is the page you need to be looking at: 
__________________
Warren Hall, Jr. 1973 911S Targa ... 'Annie' 1968 340S Barracuda ... 'Rolling Thunder' |
||
|
12-11-2005, 01:21 PM
|
|
|
Registered
Join Date: Apr 2005
Location: Foat Wuth
Posts: 408
|
Super thanks Warren~! I think we're getting there now!
I do have this 'Additional current flow diagram' for the rear defogger...I didn't look 'early' enough in my book to find it...but I've got it now. What you've noted makes a LOT of sense. I'll be working on this, if not tonight, tomorrow and I'll try to decipher and apply the meaning of it all. Really, really appreciate the additonal help and the effort it represents. As I noted above, I'm installing ALL new harnesses completely thru the car. So far it's turning out to be a probably too ambitious project based on a too optimistic expectation that the schematics compared to the harnesses and the components would make discernable and logical sense... I'm still confident, but I'm currently performing an organizational effort to help: > Photos of each harness with each terminal numbered > Spread sheets describing each wire (color code, size) and termination (number of wires, terminal type and size) > Tracking and adding 'to' and 'from's with schematic codes per the Porsche diagrams A long way around the block, but so far it looks like it will pay off in understanding and application. You'll be seeing more cries for help from me...let me know when you reach your tolerance level... Thanks again, Jim
__________________
1980 911SC - 2nd Rebuild in Process - 2005 Porsche Cayenne Turbo - 2013 VW R ________________________ 2000 BMW X5 - 1996 BMW 530i - Toy 4 Runner (x2 or 3) - 1987 Toy Supra - 1988 Honda Si - 1984 El Camino Super Sport - MGA - MGB - Fiat 124 Spyder - Fiat 128 Wagon - 1962 Karmann Ghia - 1951 VW - 1953 Willys Jeepster w/Chevy 286 - 1995 Volvo 960 - 2006 VW GTI |
||
|
12-11-2005, 02:13 PM
|
|
|
Registered
Join Date: Dec 1999
Location: TX USA
Posts: 9,804
|
JIm,
Here is an edited version of the ['75 - '80] schematic without the windshield defogger option:  Good luck! p.s. The two-stage defogger was always standard on Targas with fixed glass rear window, so this schematic may apply to all early cars, too. I have not checked to see if my car has a different switch, or not. I do know that it has the same relay which I disasembled [NOS spare] displayed here: 
__________________
Warren Hall, Jr. 1973 911S Targa ... 'Annie' 1968 340S Barracuda ... 'Rolling Thunder' Last edited by Early_S_Man; 12-11-2005 at 06:37 PM.. |
||
|
12-11-2005, 04:25 PM
|
|
|
Registered
Join Date: Apr 2005
Location: Foat Wuth
Posts: 408
|
Warren - Your help has achieved the desired result - I can wire this defogger switch! Hurray and Thanks!
One final question, though: The 'main' wiring schematic shows the wire from the Relay 86 terminal connecting at the switch with the Grey/Green from the Electric Outside Mirror Defogger. Any reason not to 'piggy back' that Grey/Green terminal onto the Switch terminal (# 2 or # 3) along with the Wire fromt he Relay # 86 terminal? Continued thanks! Jim
__________________
1980 911SC - 2nd Rebuild in Process - 2005 Porsche Cayenne Turbo - 2013 VW R ________________________ 2000 BMW X5 - 1996 BMW 530i - Toy 4 Runner (x2 or 3) - 1987 Toy Supra - 1988 Honda Si - 1984 El Camino Super Sport - MGA - MGB - Fiat 124 Spyder - Fiat 128 Wagon - 1962 Karmann Ghia - 1951 VW - 1953 Willys Jeepster w/Chevy 286 - 1995 Volvo 960 - 2006 VW GTI |
||
|
12-12-2005, 10:20 AM
|
|
|
Registered
Join Date: Dec 2003
Location: Arapahoe County, Colorado, USA
Posts: 9,032
|
I took this one apart:
 I think it is from a 70. Here is the controller circuit board and a draft of the circuit: I need to check for accuracy and draw a nice version. (Ill edit out this version.)   Warren, What is Q1? It is in the same case as Q2 and has three wires, one is NC. I drew in a Zenier diode but it probably acts as a temperature sensor. Can you please write a description of the functioning of the circuit, my skills are receding memory. Best, Grady |
||
|
12-12-2005, 01:17 PM
|
|
|
1-6-2-4-3-5-1-6-2-4-3-...
|
My 1970 has a single stage circuit.
Photshopping of SL35 off of http://members.rennlist.org/911pcars/WiringDiag.htm  35: heater switch 51: heater relay The heated window is bottom left. [edit] I measured its resistance at ~25MOhms [/edit]
__________________
'70 911E Coupe, Webers 40IDA Last edited by pope; 03-21-2008 at 03:23 AM.. |
||
|
03-20-2008, 04:29 PM
|
|
|
Registered
Join Date: Sep 2005
Location: South Surrey, BC
Posts: 4,536
|
subscribed
|
||
|
03-20-2008, 10:44 PM
|
|
|
Registered User
|
Help
Hi guys
Just looking at inställning ny defogger switch I seems it only pulls out one notch and also the dial seems to turn a notch I have a two stage heater at the rear windshield with relay and cables installed In the frunk the only relevant cables I can find are four cables Black Black white green white-this has a piggyback connector on it Blue black My switch has 6 tabs 1 2 3 15 31 58 Anyone help me join the dots here I can't see any red power cables remaining I'm guessing I steal this of the cig lighter?  
|
||
|
06-04-2016, 11:37 PM
|
|

|
|
ROW '78 911 Targa
|
Turn function is for mirror defrost. You need a two stage switch.
Green white may be for the mirror? Keep digging in the schematics.
__________________
Dennis Euro 1978 SC Targa, SSI's, Dansk 2/1, PMO ITBs, Electric A/C Need a New Wiring Harness? PM or e-mail me. Search for "harnesses" in the classifieds. |
||
|
06-05-2016, 12:38 AM
|
|
|
Registered User
|
Quote:
The cable in question Is definitely terminated going through the tunnel...in that tunnel loom there is 2 green whites and one white green it's much thicker that the other cables It's the white green cable I don't know where it goes from the tunnel |
||
|
06-05-2016, 12:56 AM
|
|


 1970 Porsche 911E
 Heinz
Heinz

