|
|
|
|
|
| Author |
|
|
Registered
Join Date: May 2005
Location: Houston
Posts: 5,477
|
Slow&Rusty's 48hour Coilover Conversion \ Suspension Refresh
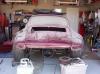
Well..I have a big weekend planned..refresh my entire front suspension, detail and convert the car to coilovers from Rebel S Racing (RSR Projects Home). I worked closely with Clint from Rebel S Racing and he was wonderful, patient and great \ honest to work with, his products speak for themselves.
The car is an '89 930 with 60K and has never had any suspension work. Car is a 100% street car that will never be tracked and the spring ratings on the coilovers were chosen to be progressive compliant and match this application. I have owned this car for 6+years and it has been (sadly) sitting for most of the past 2years, it will be driven after this project is completed hopefully this weekend...cross fingers! The plan is keep the stock sway bars - RSR bushings - New rubber sway bar bushings - New ball joints with all new OEM Lemforder wedge pins, catle nuts and lock washers - New tie rod kit with anti-rub spacer - New front RSR coilovers (250# Eibach with 200# Bilstein tender spring) with restored housings, reinforced (gusset plates welded) housings and revalved Bilsteins - New rear RSR coilovers (150# Eibach Spring) on new Bilstein Rear Sport Shock - Rennline dual bar strut brace - Sand and paint wheel wells - Powder coat - New stainless fasteners - Detail wheels The rear RSR coilovers will be used in conjunction with the stock and re-indexed torsion bars to address the squat issues these cars have a tendency to have under hard acceleration. The first set of pictures are the front suspension tear down from a previous weekend (you can see the tire rub on the inner fender). I had previously added the 993 Turbo brakes in the summer of 2007. Enjoy the pics. questions, comments, feedback please add. Wheels removed and 23years of driving, stock fender wheel wells:    Underside of car:    Front Torsion Bars coming out..easy:  Separating the front ball joint from the strut housing..stubborn:  A-Arms out, sway bar and shields: 
__________________
Ole Skool - wouldn't have it any other way Last edited by slow&rusty; 06-04-2011 at 05:00 AM.. |
||
 06-04-2011, 04:54 AM
|
|
|
Registered
Join Date: May 2005
Location: Houston
Posts: 5,477
|
Front bushing Removal..fun with fire..and not that tough really:
  Ball Joint Removal..little tricky but not bad:   $15 4x4 Hub tool from Advance Auto Parts and my Impact Gun..life saver on this step:   Sanding Down Wheels Wells and removing dirt..sweaty..wow!   
__________________
Ole Skool - wouldn't have it any other way |
||
|
06-04-2011, 04:55 AM
|
|
|
Registered
Join Date: May 2005
Location: Houston
Posts: 5,477
|
Primed:
   Painted:   All the hose brackets getting ready for sanding (wire brushing) and painting 
__________________
Ole Skool - wouldn't have it any other way |
||
|
06-04-2011, 04:55 AM
|
|
|
Registered
Join Date: May 2005
Location: Houston
Posts: 5,477
|
Everything back from the powdercoaters:
        
__________________
Ole Skool - wouldn't have it any other way |
||
|
06-04-2011, 04:56 AM
|
|
|
Registered

|
Hey. Thanks for posting. I see something of this in my future.
__________________
"... changing without pain or agony not only in bulk and shape but in color too, approaching the color of wind ...." -- William Faulkner |
||
|
06-04-2011, 05:00 AM
|
|
|
Registered
Join Date: May 2005
Location: Houston
Posts: 5,477
|
Quote:
__________________
Ole Skool - wouldn't have it any other way |
||
|
06-04-2011, 05:02 AM
|
|

|
|
Registered
Join Date: Jun 2004
Location: Siesta Key, Florida
Posts: 1,240
|
Outstanding Yasin. I will be converting to coilovers in the near future and will be watching with interest for any pointers you may have...
__________________
JP 86 930/4 tribute beasty 81 sc beach beater 55 Belair 40 Ford pickup |
||
|
06-04-2011, 10:31 AM
|
|
|
Registered
Join Date: May 2005
Location: Houston
Posts: 5,477
|
Well yesterday's progress was not great (sadly)...had huge problems trying to remove the tie rods AND so decided to remove the rack, and then stripped the allen head bolts on the U-clamp in the Smugler's box. Hoping to use a bolt out to address that this morning and get back into it today! Looks like this project will spill over to next weekend.
Some pics of the new parts: I painted and clear coated each hose clamp:  All new stainless hardware and fasteners:  Rennline twin bar aluminum strut brace:     Yasin
__________________
Ole Skool - wouldn't have it any other way |
||
|
06-05-2011, 03:58 AM
|
|
|
300hp 1800lbs is the goal

|
Sub'd
__________________
The '66 912 Bastardization project has begun. Note to PO's: LAY OFF THE FREAKING BONDO!!!! The science was settled: Earth was flat. Galileo : Flat Earth denier. 
|
||
|
06-05-2011, 04:25 AM
|
|
|
Registered
|
What a terrific project; love the pictures too. Keep up the good work.
__________________
'71 914-6 #0372 '17 Macan GTS |
||
|
06-05-2011, 06:28 AM
|
|
|
Registered
Join Date: May 2005
Location: Houston
Posts: 5,477
|
Got the rounded allen bolts out that secures the U-Clamp for the splined steering shaft in the Smugler's Box (yessss..sweet victory! thank-you bolt extractor!) and started reassembling the control arms (notice the rubber bung to seal the control arm end as the Torsion bars will not be going back in.
    Yasin
__________________
Ole Skool - wouldn't have it any other way Last edited by slow&rusty; 07-08-2011 at 08:30 PM.. |
||
|
06-05-2011, 08:46 AM
|
|
|
Registered
|
Very nice, clean work. Kudos! One issue though: did you powder coat the bushing surface on the a-arms? If so, you'll likely have trouble getting the new bushings on.
|
||
|
06-05-2011, 09:19 AM
|
|
|
Registered
Join Date: May 2005
Location: Houston
Posts: 5,477
|
Quote:
Ok..so got the steering rack out of the car...  I fought and fought and fought with the tie rods and removing them using pipe wrenches, cheater bars, crescent wrenches, tie rod wrenchl from Smart Racing that I bought from our host, standing on the damn cheater bars and putting all my body weight on the cheater bars...and nothing..no budge..nada..I even heated the crap out of the tie rods..arghh!! By the end of it my T-shirt was drenched in sweat and I was riddled with frustration. 1+hours later still nothing..with being pissed off, in a last minute vain attempt I cracked out my angle grinder and put a fresh metal cutting wheel on it and then began some surgery... I cut the tie rod right at the point where it is mated to the rack, took a couple of minutes, my thinking was to use a drill and an easy (EZ Out) on the remaining threads into the rack and remove it that way..then to my surprise / shock after I cut the tie rod off the threaded section came off in my hand..sweet.   I then reassembled the new boots on the tie rods, hint on this, easy too that takes 1 minute...use two plastic bicycle tire irons to slip the outer part of the boot against the rubber bung and a tie wrap to keep it all in place and prevent air from getting under the boot, analogous to changing a tire on a bike really just smaller, better than using a screwdriver and risking damage to the new boot or it slipping and taking some skin and flesh out of your fingers or hands!.  Making progress! Yasin
__________________
Ole Skool - wouldn't have it any other way |
||
|
06-05-2011, 12:09 PM
|
|
|
Almost Banned Once
Join Date: Feb 2009
Location: Adelaide South Australia
Posts: 38,665

|
Quote:
__________________
- Peter |
||
|
06-05-2011, 05:29 PM
|
|
|
Registered
Join Date: May 2005
Location: Houston
Posts: 5,477
|
Quote:
__________________
Ole Skool - wouldn't have it any other way |
||
|
06-05-2011, 07:32 PM
|
|
|
Registered
Join Date: May 2005
Location: Houston
Posts: 5,477
|
Well making some progress in the Texas heat today (98% humidity!!), if all goes well I might have it all done by tomorrow...pics coming.
__________________
Ole Skool - wouldn't have it any other way |
||
|
06-11-2011, 09:05 AM
|
|
|
Been There Done That
|
so how are supporting the front end while you are doing all the work? I didnt see any jack stands in any of the photos?
|
||
|
06-11-2011, 10:10 AM
|
|
|
Registered
Join Date: May 2005
Location: Houston
Posts: 5,477
|
Quote:
__________________
Ole Skool - wouldn't have it any other way |
||
|
06-11-2011, 11:45 AM
|
|

|
|
Registered
Join Date: Feb 2008
Location: Marietta GA
Posts: 2,560
|
Quote:
|
||
|
06-11-2011, 12:23 PM
|
|
|
Registered
|
slow&rusty,
Great thread! How's the progress?? I'll be very curious how you think it handles with the new suspension after you get it sorted out. PM sent with a question. Steve East Tennessee |
||
|
06-18-2011, 08:00 AM
|
|


 SC Targa
 1984 BMW 633CSi
 s500
s500
 '66 Bastardization
 Salvage Talon
 pksystems 97 Talon TSi AWD
 The little UTE that could.
 2005 Legacy 2.5GT Wagon
 Michael's Six
 Blue Meanie
 Hers
Hers 911
911 Audi A4
 Black '87 Carrera
 Black '87
