|
|
|
|
|
| Author |
|
|
muck-raker

Join Date: Jan 2009
Location: Coastal PNW
Posts: 3,059
|
Replacing Tee Fuel Line
 ^^^^THIS.^^^^ I've heard what a PITA it is to replace this thing is, especially "in situ". Hoping some of the P-car studs here have some decent pointers for me "while I'm in there". 
__________________
STONE '88 Cabriolet, using EP Slick 20w50 partial synthetic Snake Oil...just as Rommel intended.  Deny Everything; Admit Nothing; and Always Make Counter-accusations 
|
||
 04-09-2013, 03:49 PM
|
|
|
Schleprock
Join Date: Sep 2000
Location: Frankfort IL USA
Posts: 16,640
|
You can do it with the engine in the car. I've done a few.
There's ample room under the manifold if you remove the throttle return springs and disconnect the throttle linkage. But if you're a bigger guy, it can be tougher to jam yourself into the engine compartment to get back there. You have to remove a few things to get at the back of the engine, big guy or not. Air cleaner & airflow meter, heater blower motor are a must and I venture to guess that if your A/C system is still in place, those hoses and the condensor under the engine lid make it a bear to get back there. Then i'd recommend lowering the engine to get better access.
__________________
Kevin L '86 Carrera "Larry" |
||
|
04-10-2013, 09:04 AM
|
|
|
Red Line Service
|
Do it correctly, don't cut corners. R&I the entire intake manifold (this can be done with the motor in the car) replace the 12 intake gaskets, the 6 intake insulators (these crack occasionally), and ABSOLUTELY replace the fuel return cross-over hose between the pressures regulators, pt #930-110-411-03. I've seen this hose leaking many times not long after the supply line is replaced. Also the hose you have pictured is NOT a factory style hose. The long length to the fuel filter should be about 80% metal line. The line you have may be "easier" to install, but may wear through eventually, and also can potentially interfere with the throttle linkage. Also if your car is 84-85 replace the intake manifold M
8 washers with the later style 999-025-152-02 thicker washers, this prevents the manifold nuts from loosening up.
__________________
Marc Bixen/Red Line Service West Los Angeles, Ca. www.redlneservice.net / info@redlineservice.net Podcast:"Marc Bixen Live" https://www.youtube.com/channel/UC4DPQbCjH3OQ_h1iUcsrFfA |
||
|
04-10-2013, 10:43 AM
|
|
|
Project Addicted
Join Date: Jul 2012
Location: Eastern Shore. MD
Posts: 919
|
Pre-medicate.....
Can be done and the more you take out, the easier it will be. I did it out of the car and have plenty of pics but you can see where it goes before you pull the old one.
__________________
Jon 1966 912 1976 911 3.4 Backdate Project 1986 944 |
||
|
04-10-2013, 05:40 PM
|
|
|
muck-raker
Join Date: Jan 2009
Location: Coastal PNW
Posts: 3,059
|
Ehhh, too late. I went in there this afternoon and finished it early this evening.
Set the A/C aside, removed the heater blower and AFM to throttle body elbow and associated hoses. Left everything else in, for the most part. The hardest part was the bracket behind the throttle body that holds the hard fuel line in place. What a freaking PITA. That, and removing the old tee as a unit. I couldn't do it, so I cut the hard line with a bolt cutter and removed the old line in 2 pieces. The new one (Thanks, Len!!!) went in smoothly (so far). I haven't been able to test for leaks yet because I'm waiting for my alternator rebuild to be finished...maybe tomorrow. I took a boatload of pix, so if anybody is interested, I'd be happy to post my procedures on this thread for future reference. Marc, I totally agree with your assessment on not "cutting corners". Honestly, I probably need to just drop the entire motor and deal with a dozen little minor "while you're in there's". And I will, in due time. I just happened to notice that I was getting some cracks in my old tee after I pulled my alternator for a rebuild...otherwise, I'd have just done the alternator and said "screw it" to everything else. I'm retiring next year, so I imagine I'll have plenty of time and zero money to get around to doing everything I want to do.  I was also thinking about blinging out the fan, but I've already spent more money than I wanted to. And I'm just not a "blingy" type of guy. So I knocked off a bunch of crap and cleaned up the fan and housing with good ol' Scotchbrite and Gibbs. I like the clean, industrial look, and Ferry would be proud.
__________________
STONE '88 Cabriolet, using EP Slick 20w50 partial synthetic Snake Oil...just as Rommel intended. Deny Everything; Admit Nothing; and Always Make Counter-accusations
|
||
|
04-10-2013, 06:57 PM
|
|
|
Project Addicted
Join Date: Jul 2012
Location: Eastern Shore. MD
Posts: 919
|
I threw a little bit of rattle can spray paint on mine to clean it up a bit. Not blingy but a wee bit of eye candy.
__________________
Jon 1966 912 1976 911 3.4 Backdate Project 1986 944 |
||
|
04-10-2013, 07:03 PM
|
|

|
|
muck-raker
Join Date: Jan 2009
Location: Coastal PNW
Posts: 3,059
|
looks good. That heater blower delete looks interesting...are you the one who did that thread on how to fabricate that?
__________________
STONE '88 Cabriolet, using EP Slick 20w50 partial synthetic Snake Oil...just as Rommel intended. Deny Everything; Admit Nothing; and Always Make Counter-accusations
|
||
|
04-10-2013, 07:32 PM
|
|
|
Project Addicted
Join Date: Jul 2012
Location: Eastern Shore. MD
Posts: 919
|
Yup, I will admit to that. Works good to!!
Plenty of air blowing thru the system without the booster fan.
__________________
Jon 1966 912 1976 911 3.4 Backdate Project 1986 944 |
||
|
04-10-2013, 08:19 PM
|
|
|
Schleprock
Join Date: Sep 2000
Location: Frankfort IL USA
Posts: 16,640
|
I agree with Marc that this job is not one to cut corners on. That fuel line is obviously a critical one (what fuel line isn't, right?) being right on top of the engine. A local friend of mine Ray had a similar situation with a 944 Turbo. Same deal with the fuel line- leaky crimp & swivel design used on that engine too. His car literally burned to the ground right down the street from his house. The "crime scene outline" caused by the fire was still on the pavement up for quite a long time until the city got around to re-paving the streets in his area.
 Good point about the routing of the custom line. I think some of the spiral wrap or some sacrificial vaccuum hose is adequate to prevent any chaffing. There should be no worries about the hose quality itself. Len (Boxster GT) uses top quality Cohline hose and has all the proper equipment for building OEM quality hoses. He makes great oil & fuel lines. Marc brings up a good point about the intake manifold washers. With all that sandwiching going on via the two gaskets and plastic insulators, it's easy for the stack of stuff to compress and you lose the tightness of the manifold fastening. Years ago I bought some heavy belleville spring washers. These are not the wave washer type. They're the cupped type. McMaster-Carr I reduced the OD of them on the bench grinder to allow them to clear the tight fit alongside the intake manifold runners. Worked pretty good, as I haven't found them loose. Probably did the washer installation around 8 yrs ago.
__________________
Kevin L '86 Carrera "Larry" |
||
|
04-11-2013, 07:21 AM
|
|
|
muck-raker
Join Date: Jan 2009
Location: Coastal PNW
Posts: 3,059
|
Absolutely, Kevin. I'm due for an intake gasket replacement, I believe. Marc does a great job of explaining the job and its inherent issues, as well as outlining the best parts to use to avoid those issues. Big thumbs up.
I will also tend to a couple of small issues in the Traingle of Death, and a few vacuum hoses that look to be original. The fuel line was definitely 25 years old, as well as having the original alternator. I figure in about another 25 years, I'll have a concourse-type vehicle, LOL. I'll go ahead and add some pix and some comments about the job as I get time. I've got a date with an old, dead palm tree in my back yard that I'm turning into a Tiki with a chainsaw and chisels.
__________________
STONE '88 Cabriolet, using EP Slick 20w50 partial synthetic Snake Oil...just as Rommel intended. Deny Everything; Admit Nothing; and Always Make Counter-accusations
|
||
|
04-11-2013, 07:48 AM
|
|
|
Schleprock
Join Date: Sep 2000
Location: Frankfort IL USA
Posts: 16,640
|
Don't ask me how I came across this. Was goofing off on youtube last week and somehow stumbled across it
Palm tree falls on bakkie - YouTube Be careful with that palm tree!
__________________
Kevin L '86 Carrera "Larry" |
||
|
04-11-2013, 07:57 AM
|
|
|
muck-raker
Join Date: Jan 2009
Location: Coastal PNW
Posts: 3,059
|
LOL!!! I guess pulling it down with the P-car is a bad idea then. Back to the drawing board....
__________________
STONE '88 Cabriolet, using EP Slick 20w50 partial synthetic Snake Oil...just as Rommel intended. Deny Everything; Admit Nothing; and Always Make Counter-accusations
|
||
|
04-11-2013, 12:09 PM
|
|
|
muck-raker
Join Date: Jan 2009
Location: Coastal PNW
Posts: 3,059
|
So, I didn't refer to my Bentley manual and I don't believe this job is covered in Wayne's project book, so I decided to go in blind and just freeball it. If anybody has suggestions on how to do it better, feel free to add to the thread.
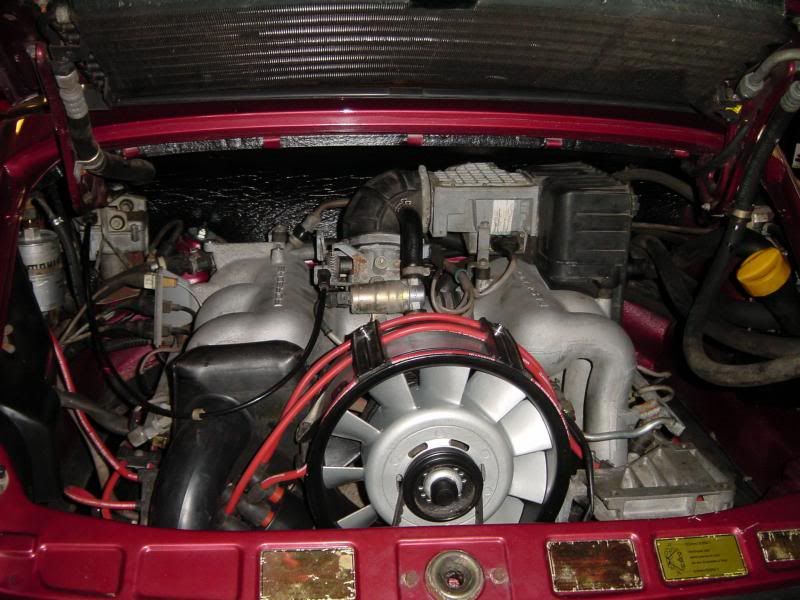
First step: try and find out every single place where this tee line is connected, and what might need to be removed beforehand. If you have A/C (I don't), then it needs to be moved out of the way. Next, I removed the heater blower motor so I could get a better view of the hardline part of the tee. There's 3 10mm nylock nuts that hold it down, 2 on one side and one on the other:  Don't forget to disconnect the plug to the heater motor:  You have the option of moving the hot air cowl out of the way. I did. It is connected by 2 10mm screws behind the cowl, and 1 at the center bottom:  I went ahead and removed the 2 10mm screws that hold in the sensor harness bracket and moved it out of the way:  Below the ICV, a 10mm bolt that holds the tee to the center of the intake manifold will need to be removed: 
__________________
STONE '88 Cabriolet, using EP Slick 20w50 partial synthetic Snake Oil...just as Rommel intended. Deny Everything; Admit Nothing; and Always Make Counter-accusations
|
||
|
04-11-2013, 05:45 PM
|
|
|
muck-raker
Join Date: Jan 2009
Location: Coastal PNW
Posts: 3,059
|
Now, to start removing the tee fuel line. The tee connects at the 2 fuel rails, and the top of the fuel filter. Very little fuel will escape from the lines as you disconnect them, but you may want to lay a couple of rags down for peace of mind.
I started at the right fuel rail with a 19mm open end wrench. You'll want to put a wrench on the fuel rail connector as well so as not to fk up the fuel rail:  Next up was the left-hand fuel rail:  And lastly, the top of the fuel filter:  Now comes the fun part, which must've been the "PITA" that so many posters who have done this job "in situ" in the past may have referred to. The hardline part of the original factory tee goes straight back under the throttle body, then takes a 90 degree left-hand turn towards the fuel filter. However, it is held in by a great little German bracket that is almost impossible to get to. This is what it looks like:  It would be enough of a beeotch to get a wrench on that little 10mm nut, right? HA HA. After a couple of attempts to loosen that "nut", I figured out that it's a permanent nut that's attached to that bracket. No big deal, I'll just take a 10mm mini socket wrench behind it and do it by feel. No go. Maybe an 8mm? Nuh uh, too small. 9mm? Nope, too big. Damn it, I don't have an 8.5mm ANYTHING. About 15 minutes into this, I'm getting really pissed and decide to crack a beer and calm down. After a nice cold Guinness, the beer starts working its magic and I have a revelation: let's grab a mirror and find out exactly what the hell I'm dealing with back there. The mirror reveals that I need a 4mm allen head!! Here's what it looks like in the mirror:  It's not easy...you're working blindly in very limited space, and it takes a lot of little turns and an equal amount of patience. I decided to pull the AFM to throttle body elbow and the hoses that connect to it for more elbow room:  This is what the offending bolt and bracket look like, after removing the hardline from the tee: 
__________________
STONE '88 Cabriolet, using EP Slick 20w50 partial synthetic Snake Oil...just as Rommel intended. Deny Everything; Admit Nothing; and Always Make Counter-accusations
Last edited by kidrock; 04-11-2013 at 06:21 PM.. |
||
|
04-11-2013, 06:19 PM
|
|
|
muck-raker
Join Date: Jan 2009
Location: Coastal PNW
Posts: 3,059
|
Then, the second part of the PITA: the actual removal of the old tee. There's a big throttle linkage and bracket under the intake manifold and throttle body that won't allow easy manipulation in one direction or the other. I found that it moves toward the front of the car best, so after another 15 minutes of frustration, I decided to take a bolt cutter and cut the hardline. VOILA, it's out:
 A closer look at the old tee shows the beginnings of a potential fire hazard:  PHEW!!! Now to put the new one in and put everything back in it's original place. Here's a pic of Len's tee (Thanks Len!!) gently and easily sliding into place, just like making love:  And, everything's bolted back in. I'd been wanting to do this job for awhile, and decided to take care of it while my alternator is being rebuilt. Another little job I decided to take care of was my fan and housing. A little Scotchbrite, a little Gibbs Penetrant and a bit of elbow grease resulted in this:  I would love to tell you all that the installation went perfect and leak-free. Unfortunately, I have not yet tested it because the little old German man who is rebuilding my alternator is taking a little longer than expected. With some time on my hands today, I decided to pay due homage by fabricating an idol to the Porsche Gods:  I'll fill you guys in once I get everything back together...hopefully, soon. I've been taking a lot of heat at work about my sexuality lately, due to driving the wife's Miata. 
__________________
STONE '88 Cabriolet, using EP Slick 20w50 partial synthetic Snake Oil...just as Rommel intended. Deny Everything; Admit Nothing; and Always Make Counter-accusations
|
||
|
04-11-2013, 06:42 PM
|
|
|
Schleprock
Join Date: Sep 2000
Location: Frankfort IL USA
Posts: 16,640
|
Your old line is actually the new style- double crimped and no swivels. Nonetheless, you were right in replacing it, as evidenced by the aged rubber fuel line.
Great job! I remember that pesky clamp with the socket head bolt......... what a dirty SOB that little clamp is.....
__________________
Kevin L '86 Carrera "Larry" |
||
|
04-12-2013, 05:27 AM
|
|


