|
|
|
|
|
| Author |
|
|
Registered

Join Date: Apr 2002
Location: Santa Clara, CA
Posts: 5,668
|
Project Elephant: "While you are in there"
The plan was to completely update the suspension and brakes, install some safety equipment, shoot a quick coat of paint, then get out on the track. Not concourse stuff, just the basics.
I removed the front suspension for a quick cleanup and the upgrades. The wheel wells had been sprayed with undercoating by the PO, which I hate. I figured as long as I had the suspension out, and I was going to repaint anyway, I might as well clean up the wheel wells and spray them now. Simple enough. Oh, then there was a nagging rust spot in the wheel well. Since I was going to paint the wells, I had to weld in a repair first. Got that done. Then I decided that if I was going to repaint the wells, I might as well pull the fenders and do it right. And gee, while you're at it you might as well spray the trunk too. That means pulling the tank. With the tank out I might just as well do that center fill cap through the hood I've been scheming. One thing leads to another. and I find myself here: 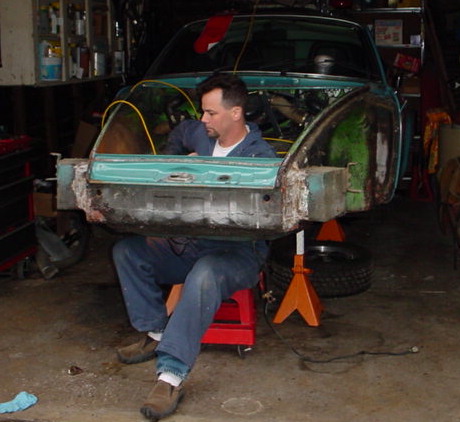 Scraping out rust proofing material and fiberglass crap put in be a well intended, but misguided, PO. As I scrapped and worked the heat gun I couldn't help but think about how little time it took to put that crap on there, and how long it is taking me to fix the damage. It seems some rust in the corners had been "fixed" by slapping quick fiberglass patches on then gooping on thick rustproof material to hide the patch. Now it's all gone, and I'll be welding in proper patches. Which leads me to a question. Where can I buy pre-formed patch panels for the section highlighted here: 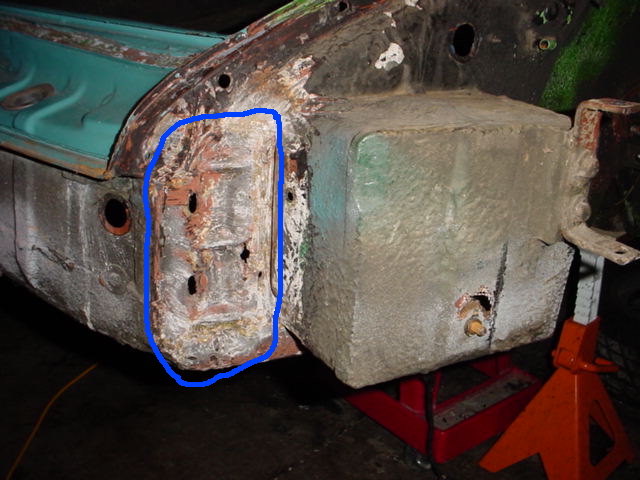 I can form my own, but I'd rather just buy properly shaped pieces. The project grows. No big deal, it will just take a bit longer to complete.
__________________
Chuck Moreland - elephantracing.com - vonnen.com Last edited by Chuck Moreland; 12-26-2002 at 07:22 PM.. |
||
 12-26-2002, 07:19 PM
|
|
|
SCWDP- Shock and Awe Dept

|
I hear you Chuck! Although none of my project has ever taken me to the depths you are right now but Im sure time will change all that. I am getting ready to install some X-mas presents and that will require replacing the rear bushings. Im sure Ill find some more to do once its all apart. Have fun!
__________________
Ryan Williams, SCWDP '81 911SC Targa 3.6 '81 911SC Coupe 3.2 #811 '64 VW Camper Bus, lil' Blue |
||
|
12-26-2002, 07:51 PM
|
|
|
Senior Member
Join Date: Jun 2000
Location: N. Phoenix AZ USA
Posts: 28,977
|
Chuck,
Sorry to see all the rust but my old 72 was the same way but much worse. I ended up using a sand blaster and a butane torch to clean a lot of it off but its messy as well. Any chance to find the sheetmetal off of a wrecked car? BTW, did you "find the bird" while in there??  Joe
__________________
2021 Subaru Legacy, 2002 Dodge Ram 2500 Cummins (the workhorse), 1992 Jaguar XJ S-3 V-12 VDP (one of only 100 examples made), 1969 Jaguar XJ (been in the family since new), 1985 911 Targa backdated to 1973 RS specs with a 3.6 shoehorned in the back, 1959 Austin Healey Sprite (former SCCA H-Prod), 1995 BMW R1100RSL, 1971 & '72 BMW R75/5 "Toaster," Ural Tourist w/sidecar, 1949 Aeronca Sedan / QB Last edited by Joeaksa; 12-26-2002 at 09:06 PM.. |
||
|
12-26-2002, 08:53 PM
|
|
|
Registered
Join Date: Mar 1999
Location: Vancouver,Wa.
Posts: 4,457
|
Over on the 914 side of the house, we call this "Dirk Wright's Disease".
Long story....he drove himself to madness with a 914. In the text books, it's the "While I'm there syndrome"
__________________
JPIII Early Boxster |
||
|
12-26-2002, 09:03 PM
|
|
|
Administrator

Join Date: Feb 2000
Location: Los Angeles
Posts: 13,334
|
Quote:

__________________
Jack Olsen 1972 911 My new video about my garage. A video from German TV about my 911 |
||
|
12-26-2002, 09:18 PM
|
|
|
Registered
Join Date: Apr 2002
Location: Santa Clara, CA
Posts: 5,668
|
Quote:
The rust is really just a couple of spots in the corner. The two holes in the front are for bolts to hold the bumper. The rear hole is, well it's a hole! From rust. As I've been stripping things down I have found some old rust repair that I was not aware of. However, except for the hack job in these corners, it has all been done very well. Finding a clean section from a wrecked car is unlikely. This section is notorious for rust. I'll fab my own if I can't find a supplier of new patch panels. I looked here: http://www.restoration-design.com/index1.html They make a lot of this stuff, but don't list the section I need. Jack, I think you know something about projects that keep creeping.
__________________
Chuck Moreland - elephantracing.com - vonnen.com |
||
|
12-26-2002, 09:36 PM
|
|

|
|
Hilbilly Deluxe

|
Chuck, looks like it is coming along well.
I am just starting a big project myself, and I am a little frightened of the "while-you-are-in-theres". Here is where I'm at, at the middle of 3 leisurely days of working, about 10 hours total effort.  After this pic, I finished removing the alternator and fan, as well as the CIS system. Tomorrow the fan shroud, and if I can scrounge up the tool, the cam sprockets, valve covers, and rockers. Planning on stripping it down to the case this weekend, and see what I have for P&Cs. What I found so far: -Many small oil leaks, -Tranny fluid leak around the input shaft, -I removed the exhaust system, and I could see a trail of oil running down from the exhaust valve guides.  -The car has been outside for the last couple months, and it has a water leak. There was standing water on the drivers floorboard, and condensation on the inside of the windows and gauges and the drivers door pocked was damp inside. Not sure where the leak is, but I am thinking drivers window. -I need a new drain plug for my 915. I had the bright idea that it would be easier to drain the transaxle after it was out of the car (WTF was I thinking). -The drain plug was a little mangled from before, and I couldn't get it off, so I took out the fill plug and turned it on it's side to drain. While it was on its side, I worked at the drain plug and was able to get it out. You can see it draining on jackstands in the picture. -Dropping the engine the second time is much faster then the first. I worked for about 5 hours Monday, and got everything unhooked. All that was left was to unbolt the 4 mount bolts and it was out. I'll post more details when I know more. Here is the obligatory Jack-Olsen-one-handed-digital-self-portrait (from the end of day 1):  Tom |
||
|
12-27-2002, 12:11 AM
|
|
|
Author of "101 Projects"

|
Hmm, we might have it here:
http://www.pelicanparts.com/catalog/shopcart/911M/por_911M_chasis_main.htm -Wayne
__________________
Wayne R. Dempsey, Founder, Pelican Parts Inc., and Author of: 101 Projects for Your BMW 3-Series 101 Projects for Your Porsche 911 How to Rebuild & Modify Porsche 911 Engines 101 Projects for Your Porsche Boxster & Cayman 101 Projects for Your Porsche 996 / 997 SPEED READ: Porsche 911 Check out our new site: Dempsey Motorsports |
||
|
12-27-2002, 12:42 AM
|
|
|
Registered
Join Date: Apr 2002
Location: Santa Clara, CA
Posts: 5,668
|
Wayne, I didn't realize you had patch panels. But I don't see the one I need. Looks like the hammer and tin snips will get a workout.
Tom, so you are biting the bullet. Have you decided to rebuild or is this exploratory surgery?
__________________
Chuck Moreland - elephantracing.com - vonnen.com |
||
|
12-27-2002, 09:31 AM
|
|
|
Hilbilly Deluxe
|
Quote:
Tom |
||
|
12-27-2002, 09:59 AM
|
|
|
MBruns for President
|
I hate it when that happens. Of course, my wife does too. The - I'll be in in 15 minutes turns into 2 hours! Sigh...
__________________
Current Whip: - 2003 996 Twin Turbo - 39K miles - Lapis Blue/Grey Past: 1974 IROC (3.6) , 1987 Cabriolet (3.4) , 1990 C2 Targa, 1989 S2 |
||
|
12-27-2002, 10:44 AM
|
|
|
Registered

|
Hey Chuck, Looks like your doing it right! I was wondering about these patches...and what it is you mean. I've never done this.
Are you going to cut out the bad areas and fab up pieces to fill the voids and weld in place or are you going to use doublers on the inside? or outside? Jorge (Targa Dude) 
|
||
|
12-27-2002, 03:49 PM
|
|
|
Registered
Join Date: Nov 2002
Posts: 1,955
|
Is the gas tank as easy to remove as it would appear? A couple connections and bolts and lift it right out?
|
||
|
12-27-2002, 03:59 PM
|
|
|
Senior Member

Join Date: Mar 2000
Location: Lacey, WA. USA
Posts: 25,311
|
Yes, the gas tank is that easy.
I re-ringed my KS P&Cs at 182K miles and the rings seated nicely.
__________________
Man of Carbon Fiber (stronger than steel) Mocha 1978 911SC. "Coco" |
||
|
12-27-2002, 05:06 PM
|
|
|
Certified Pre-Owned
Join Date: Aug 2002
Location: Nanny State
Posts: 3,132
|
Hey Chuck!
Looks like a hoot in there...not sure what your undercoating is, but if its the latex factory-like stuff (similar to Wurth StoneGuard), see if you can drum up a hot knife. Something that looks like a puddy knife that'll do a few hundred degrees should help really speed along the removal of that stuff. I recently pulled the fuel tank on my '84 and stripped all the factory coating off with a heat gun. Best success was just heating a puddy knife really hot and then scraping away... BG
__________________
'84 Carrera Coupe |
||
|
12-27-2002, 05:18 PM
|
|
|
Registered

Join Date: Jun 2000
Location: St-Georges, Québec
Posts: 844
|
restauration
Hello All,
it is my second restauration project on 911 car my first is a targa all what i have is hole except the rust every where... i lost one winter to repair it changing susp. pan and rockers and floors rust was all around ... a nigthmare... i sold it ! my next one is verry nice coupé, i removed the undercoat with heat gun and i have nice clean metal it is a enjoyment... it's not the same car of my rusty targa, it is fun to work on it when i thing to my first 911... your pics remind me my work on my car... Raynald
__________________
1960 356 BT-5 Aetna blue 1973 911 RS récréation 1960 VW panel Dove blue 1971 914 barn find ! |
||
|
12-27-2002, 05:59 PM
|
|
|
Registered
Join Date: Apr 2002
Location: Santa Clara, CA
Posts: 5,668
|
Jorge,
Yes, I'll be cutting away any cancer and welding in fresh metal. Raynald, Your picture is where I plan to be in a couple weeks time. Smells like........victory.
__________________
Chuck Moreland - elephantracing.com - vonnen.com |
||
|
12-27-2002, 08:29 PM
|
|
|
I would rather be driving

Join Date: Apr 2000
Location: Austin, TX
Posts: 9,108
|
Chuck,
I have been repairing the same area on my 71 project. AFAIK, there are no panels available. The front bumper mount is a extra thick area attached to the inner fender well in front of the batt, box. That area is part of the entire fender well stamping. The easiest thing is to fab your own panel to replace any cut out rust. flat sheet stock should work well in that area. watch out for that curve outward just past the mounting holes for the bumper. good luck Jamie
__________________
Jamie - I can explain it to you. But I can not understand it for you. 71 911T SWT - Sun and Fun Mobile 72 911T project car. "Minne" - A tangy version of tangerine #projectminne classicautowerks.com - EFI conversion parts and suspension setups. IG Classicautowerks |
||
|
12-28-2002, 07:04 PM
|
|
|
Author of "101 Projects"
|
You guys are truly an inspiration. While many people tell me that they would never have the patience to write a book, I doubt that I would have the patience to do a ground-up restoration like the ones shown here...
Amazing... -Wayne
__________________
Wayne R. Dempsey, Founder, Pelican Parts Inc., and Author of: 101 Projects for Your BMW 3-Series 101 Projects for Your Porsche 911 How to Rebuild & Modify Porsche 911 Engines 101 Projects for Your Porsche Boxster & Cayman 101 Projects for Your Porsche 996 / 997 SPEED READ: Porsche 911 Check out our new site: Dempsey Motorsports |
||
|
12-28-2002, 07:28 PM
|
|


 1981 Porsche 911SC Targa 3.6

 1982 Porsche 911SC Coupe 3.2
 Porsche 959
 1973 911 RSR Clone
 1972 Porsche 911 RS Clone
 2000 Porsche Boxster 3.4
 2003 MINI Cooper S
 1987 Porsche 962C
 1988 Porsche 962C
 1980 Porsche 935
 1986 Porsche 962
 1987 Porsche 962GTi-106b
 2000 Lola B2k/10
 Jamaican Rally Car
 Porsche 962C
 1960 BMW 700 HotRod
 1991 Porsche 962 Can Am (Interserie)
 1958 Porsche 356 Speedster
 1957 Mercedes 190 SLR Project
 Daimler Ferret
 American La France Lil Mo Fire Engine
 Pantera Group 4
 Alfa Romeo 1900C Touring Superleggera
 Alpine A110
 Perana Z-One Zagato
 Dauer 962 LeMans
 Porsche 962-108B
 Adams Probe 16
 Zagato Testadoro 750
 Gone to California
 Turbo
Turbo 1977 Porsche 911S 2.7 Modified

