|
|
|
|
|
| Author |
|
|
Registered
Join Date: Dec 1969
Location: Monterey, CA, USA
Posts: 214
|
Some history first:
I have driven my 73 2.0 w/ dual Weber 44 IDF's less than 5k in 17 years and the guy I bought it from had it non-op for 10 years before I purchased it. Around 2006 I sent my motor to Mike DiBernardi at Original Customs for a Raby 2056. I had the motor installed at Don Jackson Racing in Phoenix. I traveled about 6 days per week and sometimes longer which is why I didn't do much of my own work and didn't have time to drive it. I believe it leaked from day 1. I didn't drive it enough and didn't want to spend money returning it to Mark or Don Jackson. I was told by a local shop that the leak appeared to be coming from the oil pump because it looked like the rebuilder didn't use a gasket, just a poor sealant job. I found last week however that the pushrod seals were to blame. I also replaced the oil pump gaskets for good measure. My transaxle has leaks too. I have new bushings and seals in hand. Fast forward: I don't travel anymore, I am living in California again, and I need to drive it now but not with leaks. Last week I pulled the engine and transaxle out to deal with the leaks. 1st... DON'T ever use anything on the pushrod seals! What a pain in the @$$ to clean up after that stuff! It took longer to clean up the hardenned goop than it took to replace the seals... and it was a pain to pull the tubes out. Sealants harden and defeat the sealing quality of the o-rings! Let O-rings do what O-rings do! To my stupid questions: 1. My oil filler has nothing connected to the breather which has spewed oil everywhere. To where should a hose be connected? Should I install an oil catch? Which one? 2. What grade nuts and bolts should I use? I want to replace old nuts/bolts now that my motor is nice N' purdy. For the fan shroud and air diverters, I am using 8.8. Is this okay? Where should I be using 10.9? 3. Where can I get the heat exchanger nuts locally that have a 8mm 1.25 thread with a 10mm head? The 13 mm heads that were on mine are difficult to clear with a socket and I realized that they were not fully torqued for that reason. 4. I poured myself a Margarita when I started this post and now I am too numb to think of a 4th question... really. 5. Still nothing. 6. Does Extenze really work? Thanks in advance for your feedback. |
||
 08-24-2013, 12:23 AM
|
|
|
Retired, finally
|
You lost me when you said you had a Raby. I'm in a jealousy inspired stupor.
__________________
2009 Porsche Cayenne Turbo S; 2019 Corvette Grand Sport Coupe; 1998 Porsche Boxster; 1989 Toyota Supra ChumpCar; 1989 Alfa Romeo Spider; 1977 Porsche 911S Targa 3.2L"Bwunhilde II" chimera; 1970 Datsun 240Z 2.9L "dogZilla" project |
||
|
08-24-2013, 05:13 AM
|
|
|
Resident Electrician
|
1) Connect to the air cleaner
2) 8.8 are fine 3) try Bolt Depot - Nuts and Bolts, Screws and Fasteners online 4) Try Avion Tequilla 5) Yes 6) I hope so.
__________________
Current Project: 73 914, 1.8t, ~300hp, 930 Brakes, Roll Cage Past Projects: 69 911, converted to C2 wide body cabriolet 3.2L 72 914, Ford 5.0L V8 EFI |
||
|
08-24-2013, 09:01 AM
|
|
|
Registered
Join Date: Dec 1969
Location: Monterey, CA, USA
Posts: 214
|
Connect to the air cleaner? You mean one of the air filters? There is no provision on the air filters so do I need to modify the covers or filter element?
|
||
|
08-24-2013, 09:58 AM
|
|
|
Registered
Join Date: Apr 1999
Location: Newbury Park, CA 91320
Posts: 1,523
|
Sorry Frank someone has to say it -- pictures please of your car. It sounds like a really interesting car and your history with it. Some of us only have the dreams of our 914s ever being completed much less running. You can not imagine how inspiring it is to see nice 914s. jim
|
||
|
08-24-2013, 10:44 AM
|
|
|
Registered
Join Date: Dec 1969
Location: Monterey, CA, USA
Posts: 214
|
Jim... trust me, it's not as nice as I unintentionally made it sound here. It has left me stranded more times than I care to count but at each incident I have been able to correct the problem. It's the least desirable method for diagnosing an issue albeit the most common.
 I will post some pics though. |
||
|
08-24-2013, 04:02 PM
|
|

|
|
Resident Electrician
|
Quote:
__________________
Current Project: 73 914, 1.8t, ~300hp, 930 Brakes, Roll Cage Past Projects: 69 911, converted to C2 wide body cabriolet 3.2L 72 914, Ford 5.0L V8 EFI |
||
|
08-24-2013, 07:38 PM
|
|
|
914 Geek

|
With a carb conversion, you're just likely to spit oil into the intake if you plumb that PCV line to an air cleaner. Better to use a "breather box" or catch bottle of some type. I do not know which are better. You also want to tie in the lines from the tubes that go into the rocker boxes, or they'll leak oil as well.
For holding non-stressed parts, practically any grade hardware is good enough. 8.8 is just fine for most applications on the car. I don't know of any heat exchanger nuts that have a 10mm head. We carry ones with a 12mm head, which is a little easier to find room for than the stock 13mm head. Also, using a 1/4" drive socket can help; those tend to have thinner walls than the standard 3/8" drive ones. --DD
__________________
Pelican Parts 914 Tech Support A few pics of my car: http://www.pelicanparts.com/gallery/Dave_Darling |
||
|
08-25-2013, 11:53 AM
|
|
|
Lorenzoscribe
Join Date: May 2011
Location: Pittsburgh
Posts: 51
|
Breather
I made a catch can out of an aluminum water bottle that came with a bracket to mount to a bicycle frame. Close out shop for like $5.00. I cut the handle off the lid, drilled a hole in the middle of it and mounted a breather in the hole. The breather element I bought at Pep Boys designed for a small block Chevy. Look in the bling aisle.
From there I drilled a hole near the top of the bottle and put a white plastic 90 degree fitting that secures on the inside of the bottle. I bought that at Lowes. After mounting the bracket to the firewall, I snapped in the bottle and connected it to the oil breather with a piece of clear hose. Works great. Although with the paranoia in California, I'd check to see if something like that is legal. Larry Steckel |
||
|
08-25-2013, 01:51 PM
|
|
|
Registered
Join Date: Dec 1969
Location: Monterey, CA, USA
Posts: 214
|
Some photo's as promised:
Motor & Transaxle without carbs - Front 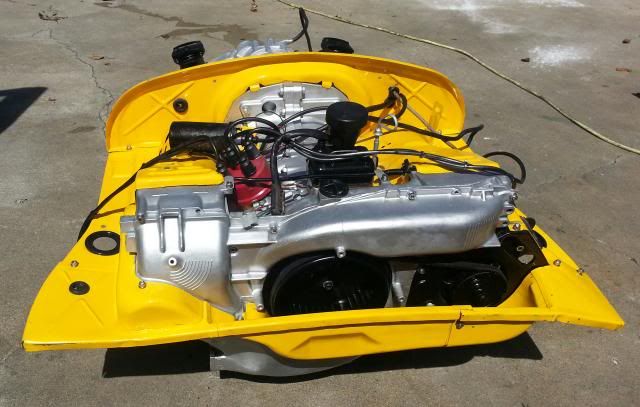 Motor & Transaxle without carbs - Side 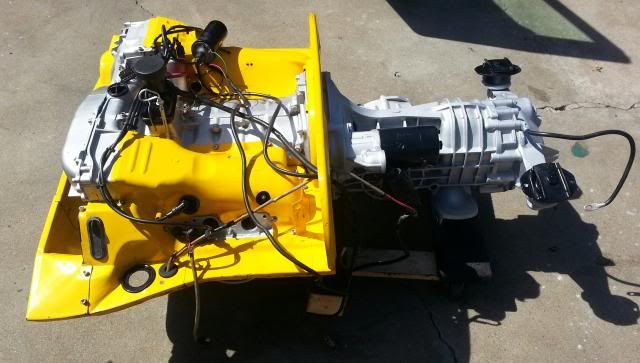 Miscellaneous:   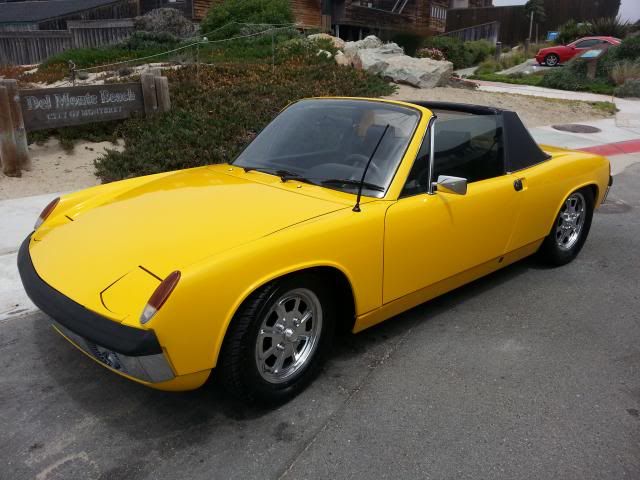 Interior - Double-DIN Custom Center Console: 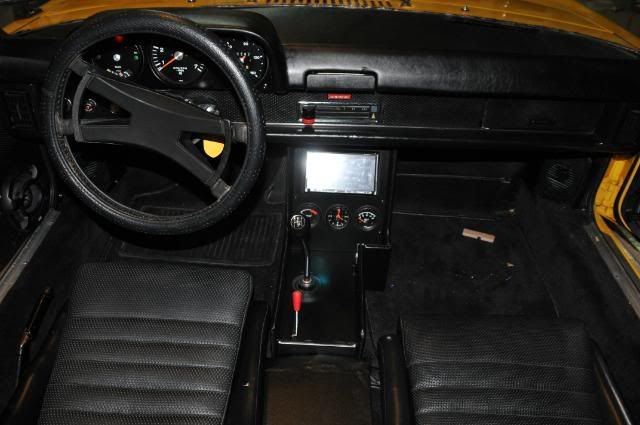 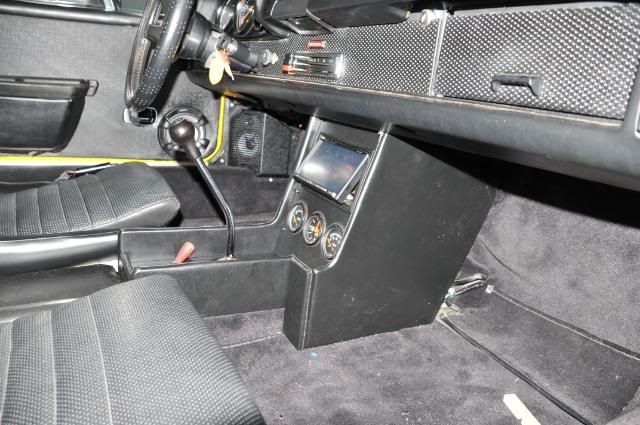
Last edited by frank; 08-25-2013 at 11:59 PM.. |
||
|
08-25-2013, 11:51 PM
|
|
|
Registered
Join Date: Dec 1969
Location: Monterey, CA, USA
Posts: 214
|
Thanks everyone for all the input... I will have to come back to the Oil Catch question during the carb rebuilds.
Can you point me to the rocker boxes? I may not be clear on that. Also, my carbs are connected to eachother via a hose near the base. Is this correct? I will revisit the carb setup and post pics once I have the motor and carbs in. Shoud be in the next couple days. |
||
|
08-26-2013, 12:41 AM
|
|
|
914 Geek
|
Rocker box == where the rocker arms live, the area you see when you take the valve cover off. There should be a tube sticking up out of there on each head, unless they have been plugged or are 70-71 or 75-76 heads.
The hose near the base is probably for balancing the pressures in the manifolds. It isn't required, but can help smooth out the pulses in the intake a bit. --DD
__________________
Pelican Parts 914 Tech Support A few pics of my car: http://www.pelicanparts.com/gallery/Dave_Darling |
||
|
08-26-2013, 06:50 AM
|
|
|
Registered
Join Date: Dec 1969
Location: Monterey, CA, USA
Posts: 214
|
Thanks Dave... I wanted to ensure we were talking about the heads since mine have no ports... apparently plugged up.
I did some research on the oil catch. It's a very simple system: oil vapor / mist in, condensed, collected, and cleaner air back out. The issue still exits as to where to connect the exhaust hose from the oil catch. I guess I will look for something that has an air cleaner / filter as the exhaust instead of an outlet for a hose. Tip: The oil catches come in all sizes and prices. Get one with a baffle. The baffle will give oil vapor and mist something to which it can stick. Otherwise the mist will just pass through the can's outlet. I reqd that you can use steel wool in the cheaper cans without baffles but I would advise against it if you are venting the catch back to the intake because some wool could break loose and damage your motor. I found some baffled oip catches between $15 and $50 that I would trust. Last edited by frank; 08-26-2013 at 09:35 AM.. |
||
|
08-26-2013, 09:30 AM
|
|
|
Registered
Join Date: Dec 1969
Location: Monterey, CA, USA
Posts: 214
|
Does anyone know what the little plastic screw is for at the front of the impeller housing? Just curious. If you are facing the front of the motor there is a little white plastic screw that goes into a threaded hole near the top left of the housing.
|
||
|
08-29-2013, 08:09 PM
|
|
|
Registered
Join Date: Dec 1969
Location: Monterey, CA, USA
Posts: 214
|
I keep forgetting to post this question so here it is now...
I noticed that the bellows is missing from my dual carbed motor. The flaps are always in the open position as a result. My motor does neecdto warm up for quite some time before it starts running right but I always thought it was just a chracteristic of the era's cars. Is the bellows typically removed on carbed motors? Should a I replace it? If I need to replace it does anyone know what VW part x-references with it? I would also neecdthe linkage. BTW... what I believed would be a simple 2 day effort to remove the motor and replace the push rod and oil pump seals has turned into a full-blown motor and engine bay dress-up. Since my first post I have: - Replaced the push-rod tube seals - Learned how to adjust the valves and applied my learnings - Replaced the oil pump gaskets - Replaced all slotted cheesehead screws with allen cheeseheads in engine tin and exhaust - Pressure washed and painted the motor & transaxle - Cleaned and painted the engine bay. - Repaired a broken weld on the muffler heat shield - Undercoated the rear - Painted the exhaust silver (Will help me find leaks in the future) - Refurbished the relayboard - Rebuilt both carbs - Disassembled, painted, and reassembled just about every part I touched during this process. Tomorrow I am replacing the driver-side rear wheel bearing. All the others were replaced about 2k miles ago. I think that once the bearing is in I can put the motor back in. I have all new shift bushings in hand to replace in the process. I believe I have all new heater hoses that will help me finally get some heat in there. I sure hope I remember how it all goes back together and that my valves don't get ruined when I start her up. |
||
|
08-29-2013, 10:37 PM
|
|
|
Registered
Join Date: Dec 1969
Location: Monterey, CA, USA
Posts: 214
|
Heat exchanger question:
My heat exchangers have gaps at the ends of the chambers that feed hot air to the the cabin where air will obviously escape and possibly draw bad air. Are those gaps supposed to be sealed? I am thinking of using some Quick Steel to seal the gaps. Any thoughts? |
||
|
08-29-2013, 10:42 PM
|
|
|
914 Geek
|
It is best if you run the thermostat. It should help speed up your warm-up cycle at least a little.
Not sure exactly what you're talking about with the heater. More description, or pictures? --DD
__________________
Pelican Parts 914 Tech Support A few pics of my car: http://www.pelicanparts.com/gallery/Dave_Darling |
||
|
08-30-2013, 10:15 AM
|
|
|
Registered
Join Date: Dec 1969
Location: Monterey, CA, USA
Posts: 214
|
Okay, I will install a thermostat after this marathon of work is complete.
I will post some pics of the heat exchangers tomorrow while I work on replacing the rear whewl bearing. I am going to try and put the drivetrain back in tomorrow as well. Thanks again for the feedback. |
||
|
08-31-2013, 09:40 PM
|
|

|
|
Registered
Join Date: Dec 1969
Location: Monterey, CA, USA
Posts: 214
|
Some pics of the gaps in the heat exchanger warm air chambers:
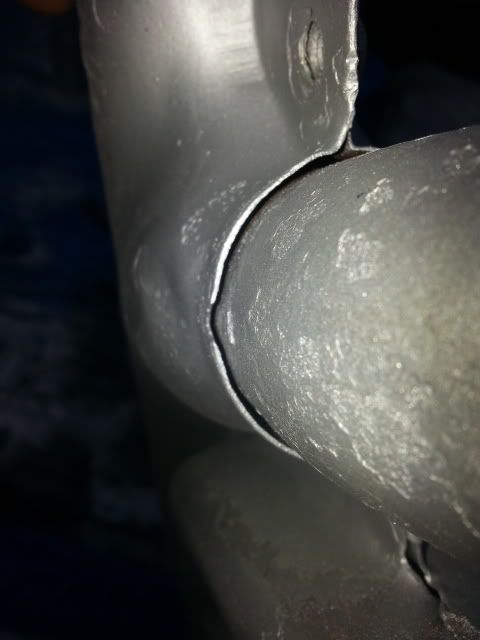 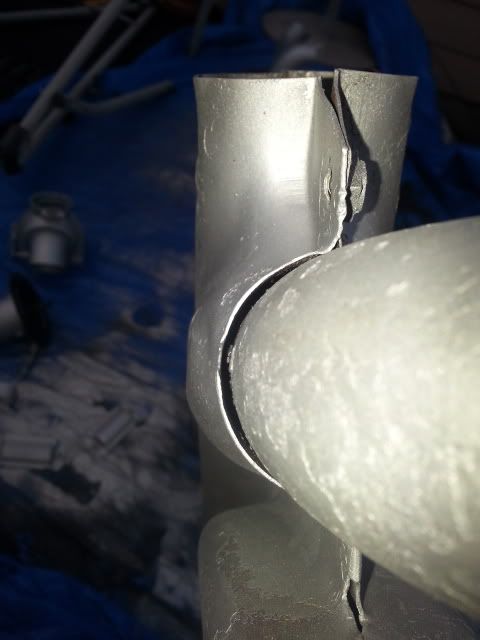 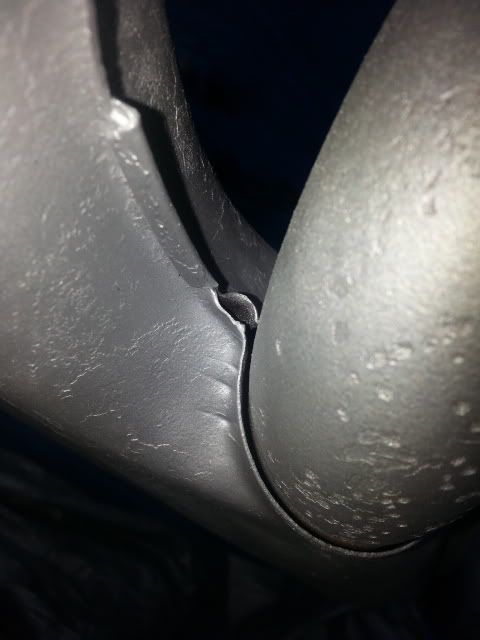 Should I seal these up? |
||
|
09-02-2013, 10:16 AM
|
|
|
Registered
Join Date: Dec 1969
Location: Monterey, CA, USA
Posts: 214
|
Well, I have so far replaced every seal that was leaking and all my shift bushings. I degreased, cleaned, and painted every part of the drive train except the carbs. I undercoated the rear and will complete the front soon enough.
As usual I have discovered opportunities to fix things I for which I had no intention. I found that my rear caliper pistons were stuck. Only the inside pads had wear. The outside pads look brand new. So I will have to figure that situation out. I installed some replacement interior pieces I had been storing. I replaced all the vinyl / pads around the windshield... no more cracks!  and after about 4 or 5 years without visors... I will be able to drive it without my cap down to the top of my shades... although that's a good look for me. and after about 4 or 5 years without visors... I will be able to drive it without my cap down to the top of my shades... although that's a good look for me. The carbs are in and I gave my son the project of building an oil catch. When he was done he walked out of the house to show me and said "Dad, I think I just built a bong." So yeah, I just gave a 16 year old some self miss-guided inspiration. 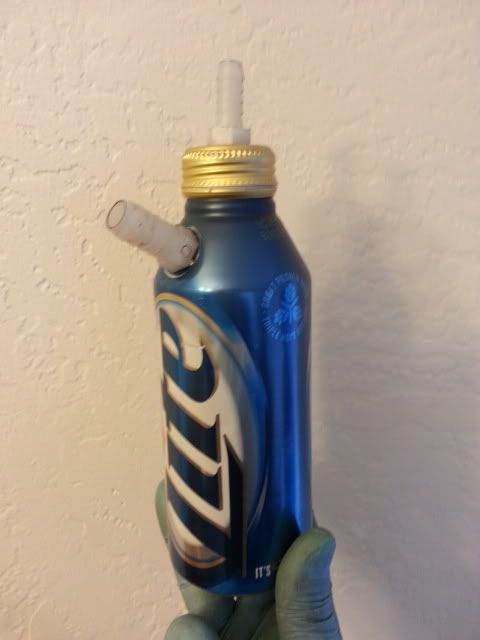 I must have a wiring issue because I touched the hot cable from the starter to the + terminal of my battery and the starter kicked in. The solenoid however did not. I was just trying to test the rewiring of my horn so I didn't have everything yet connected. I will hopefully get the wiring sorted out too. Last edited by frank; 09-16-2013 at 08:59 PM.. Reason: Added photo of Oil Catch |
||
|
09-16-2013, 10:46 AM
|
|


 Bwunhilde II
 Alfadite
 Sasquach
 74 Porsche 914 2.0
