|
|
|
|
|
| Author |
|
|
Registered
|
I pulled the measurements from the chassis drawings to more easily calculate the diagonal distances. Here for reference.
The first image show the dimensions from the chassis drawings (hopefully I read everything correctly). The second image show the diagonals. The smaller circles at the top are the front and inner front suspension mounts holes. The outer holes of the front mount are not shown. The larger circles are the 12mm suspension mounts.  
Last edited by Coultl; 02-03-2024 at 03:50 PM.. |
||
 01-14-2024, 04:42 PM
|
|
|
Registered
|
I did mine pretty much as shown in the video you linked.
Your dimensions look good. I measured everything as carefully as possible. It came out well.  
__________________
Ed 1973.5 T |
||
|
01-15-2024, 09:17 AM
|
|
|
Registered
|
Interesting that your diagram shows the distance between the front mounts as 653.5 and the diagram I have (below) shows it at 656. At any rate, I don't think this is as critical of a dim bc the suspension does not mount directly to this location. I will use the inner mounting bolts for my main reference points. These are referenced in all drawings.

Last edited by Coultl; 01-15-2024 at 02:10 PM.. |
||
|
01-15-2024, 01:55 PM
|
|
|
Registered
|
Took measurements off the car. Some seem a mm or so out of spec but my setup isnt hyper precise. All are on the short side which leads me to believe its how Im measuring. The diagonals are within a mm of each other which is good to see.
Below is the tram gauge I made for the job using 1/2 square steel tube and some tram points I 3D printed. 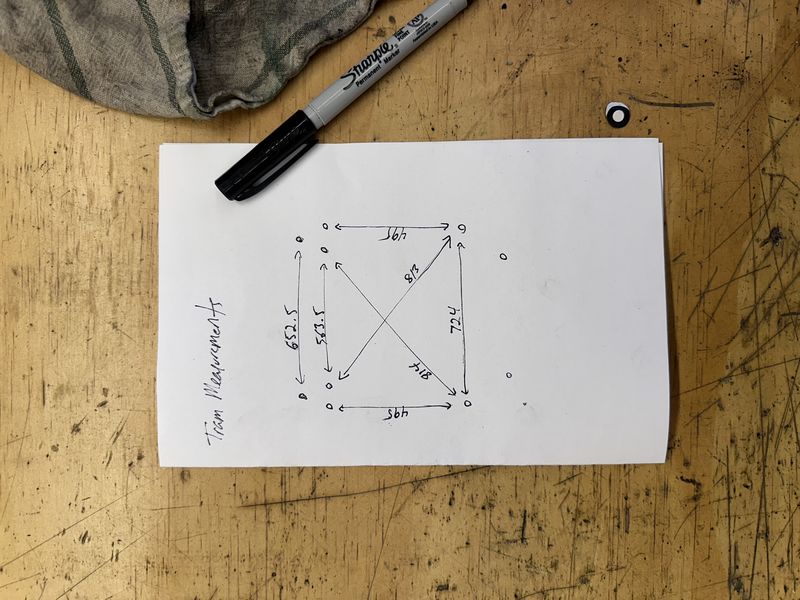  
|
||
|
01-15-2024, 02:04 PM
|
|
|
Registered
|
Going through some very similar repairs on the bumper bracket area. Ordered replacement panels yesterday and prepping for an overall wheel well refresh.
  Nice work and detail so far!
__________________
'81 911 SC '03 BMW M3 (Sold) '64 VW Beetle, 2332, 48 IDA (Sold) Instagram: @j_smallwood |
||
|
01-16-2024, 09:12 AM
|
|
|
Registered
|
Nice! Looks like it might be the same color as mine. I cut the bracket into a two pieces and that made it easier to locate the welds that were not filled drilled through.
Below is the spot weld drill Im using as well as the panel chisels. Good stuff so far.  
|
||
|
01-16-2024, 05:53 PM
|
|

|
|
Registered
Join Date: Oct 2016
Location: WA
Posts: 379
|
Coultl, I did mine with RD parts using the RD video. I used measurements from the car before pan replacement to aid in alignment, plus the trick of installing the front control arms and beam to ensure it's in the right spot. I'm able to run all the bolts in by hand. I'd recommend the self-aligner kit Elephant builds if you're concerned about alignment here. If you're careful with disassembly the sheet metal will show you where it wants to be. I know that sounds dumb, but if the car wasn't wrecked and you're careful, you're halfway there.
      
|
||
|
01-17-2024, 11:06 AM
|
|
|
PCA Member since 1988
|
That looks like nice work.
__________________
1973.5 911T with RoW 1980 SC CIS stroked to 3.2, 10:1 Mahle Sport p/c's, TBC exhaust ports, M1 cams, SSI's. RSR bushings & adj spring plates, Koni Sports, 21/26mm T-bars, stock swaybars, 16x7 Fuchs w Michelin Pilot Sport A/S 3+, 205/55-16 at all 4 corners. Cars are for driving. If you want art, get something you can hang on the wall! |
||
|
01-17-2024, 02:43 PM
|
|
|
Registered
|
Albackus36, nice work! What did you use for the underbody / fronk coating? Looks great.
|
||
|
01-18-2024, 06:09 PM
|
|
|
Registered
|
Great thread, looking forward to updates.
Coultl, how do you plan to manage the elevation / datum, measurements of the suspension pan Rob |
||
|
01-19-2024, 06:41 AM
|
|
|
Registered
|
Here's a thread from years back if it gives you any insight.
http://forums.pelicanparts.com/paint-bodywork-detailing-forum/565023-talk-me-through-rust-repair-please.html
__________________
Ed 1973.5 T |
||
|
01-19-2024, 06:59 AM
|
|
|
Registered
Join Date: Oct 2016
Location: WA
Posts: 379
|
Thanks for the kind words guys. Repair took me about 8 months solo in my garage. I have a background in auto refinishing and light structural repair before going into engineering.
I used U-POL Raptor tintable bed-liner sprayed out of a shutz style gun using a basic 30gal garage compressor. I tinted the bottom with a few drops of Dove grey; The almond milk color of the U-POL with a dash of grey matched the tank and existing underside pretty well. I tinted the topside with a pint of mixed base coat from a local autobody supplier. The color matches better in person. The flash in the photo gives it away. General notes on bed-liners: 1) They hate to be sprayed thick. They will crack over time if too much is laid on and its easyish to do with a schutz gun which has minimal metering. 2) Do an initial thin brush coating in corners and hard to reach areas. Apply a more general application overall including the hard to reach areas on a 2nd pass. You will over apply in the hard to reach areas if you use the Schutz to blast extra in there. 3) Superglue squirted through a small tip is a good way to address smaller undercoat cracks. squirt it in until it starts to come back out. You then know your crevice is filled and will not allow moisture in. Larger cracks or delaminations need to be pulled off and repaired. 4) You do not want moisture between your undercoating and structure so prep here is very important. Keep going Coultl. Your 3D printed tools and jig ideas are cool. |
||
|
01-19-2024, 10:03 AM
|
|
|
Registered
Join Date: Oct 2016
Location: WA
Posts: 379
|
One more thing to note. I don't see a lot of folks supporting the nose while performing this repair. The nose of a 911 is a noodle. You take the tank and some of the support metal out and it will sag. Heck, It will sag with everything in and cantilevered off the forward jack points. Leave your bumper struts in if possible and support them with trailer jacks to stabilize the front of the car while you repair it. Leave the supports in until all the welding or ideally the repair is complete.
|
||
|
01-19-2024, 10:12 AM
|
|
|
Registered
|
Made progress on the inner fender. I’m waiting on a few parts I had laser cut to make a suspension pan jig so I figured I’d do this first.
I cut out the rusted area as well as the area that the bumper bracket mounted to. Grinding down those spot welds would have been an huge pain, so I just replaced the whole area. I tried to find the best spot for the cut to allow me to access/grind/finish the welded seam. It’s going to be a pain up top but seems like I have enough room. I didn’t remove the fender yet as I want to keep the front end together and rigid until I replace the suspension pan. Drilling out the spot welds on the inner support was so much easier than the spot welds on the bumper mount. I was happy to see that the plate behind the inner fender looked new. I expect to find more rust as I dig in but not this time! I lined up the cut piece with the new panel from Restoration Design and fixed it with a couple self tapping screws. I then scribed a line 1.5mm(ish) from the edge and cut. Somehow the panel is perfect top to bottom but too short front to back. The old ‘measure once and cut twice’ trick… It will take a little more work, but will be fine. Lastly, I painted the hidden surfaces with weld through zinc primer and tacked it in place. Next up will be TIGing it all up, grinding/finishing the welds. Feels good to finally get over cutting into the car. I little terrifying at first.   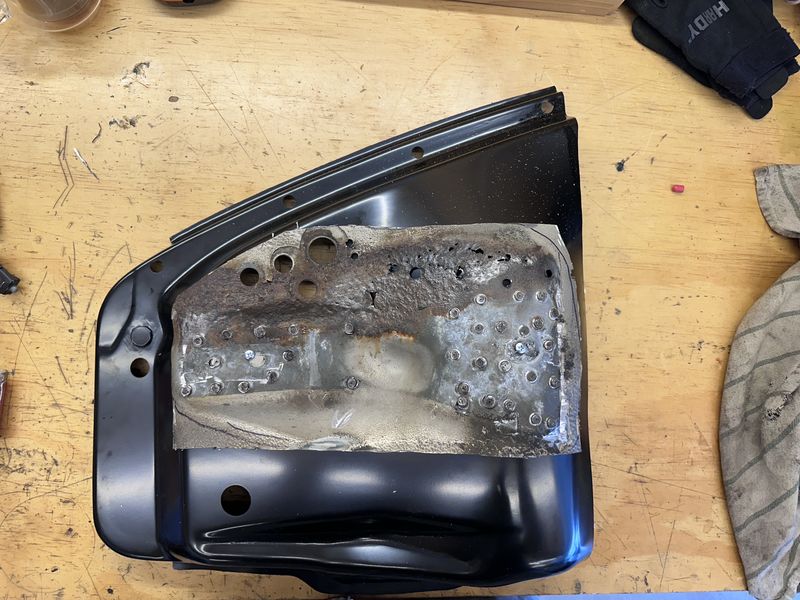 
Last edited by Coultl; 01-21-2024 at 09:33 PM.. |
||
|
01-21-2024, 06:18 PM
|
|
|
Registered
Join Date: Jun 2000
Location: bottom left corner of the world
Posts: 22,871
|
Skilled engineering. Well done.
|
||
|
01-21-2024, 07:23 PM
|
|
|
Registered
|
Restoration Hardware sells Porsche metal? Sweeet, I will have to tell my wife! Great work, must feel awesome not to be doing any more chopping.
|
||
|
01-21-2024, 09:03 PM
|
|
|
Registered
|
Ha, my mistake!
|
||
|
01-21-2024, 09:32 PM
|
|
|
Registered
|
Nice work!
__________________
'81 911 SC '03 BMW M3 (Sold) '64 VW Beetle, 2332, 48 IDA (Sold) Instagram: @j_smallwood |
||
|
01-22-2024, 05:47 AM
|
|

|
|
Registered
|
Finished up the welding, ground the welds flat, and put some primer on. Feels good to wrap this panel up! I still need to weld the new bumper bracket on, but I might do that after I tackle the suspension pan.
One thing I’ve realized is that laying down TIG welds when you have perfect access and visibility is like cheating. So much more challenging with your head inside a wheel well. No screw ups but not the prettiest welds. Not important as they were just ground down anyway. The seams visible in the photos are the edges where I removed the underbody coating. The welded seam is not visible. Grinding took some patience but worked out fine. I also did some work on the inside/frunk to make the weld undetectable. Probably went a little overboard as the underbody coating will cover it all up. Next up, suspension pan.   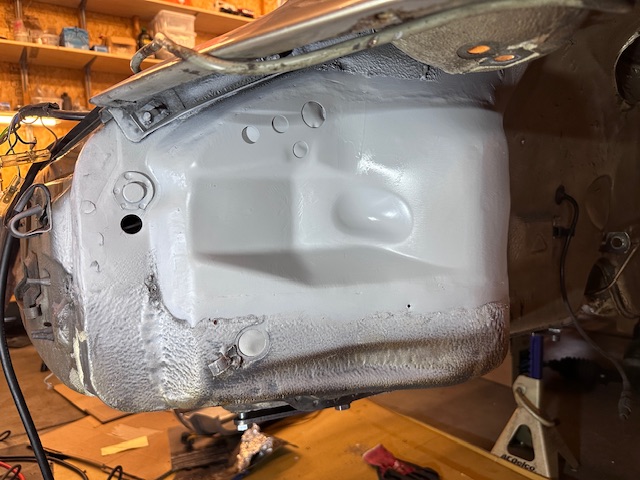
Last edited by Coultl; 02-03-2024 at 03:06 PM.. |
||
|
02-03-2024, 01:12 PM
|
|
|
Registered
|
A few more photos. The grinding tools I used. The 3/8” belt grinder is incredible for hard to reach areas. Other photo is of the bumper mount held in place with the 3D printed jig. Tempting to weld this up now…
  
Last edited by Coultl; 02-03-2024 at 02:14 PM.. |
||
|
02-03-2024, 02:11 PM
|
|


 911 Coupe
 Tojo
Tojo URS6
URS6
 The Other Woman
 Jacky
Jacky 1973 Porsche 911S
