|
|
|
|
|
| Author |
|
|
Registered
Join Date: Dec 2007
Posts: 6,275
|
Decided this wasn't a projected I wanted to tackle. However I want to put in a good word for EASY (easy.com)
4060 Harlan St. Emeryville, CA 94608 Hours: Monday through Friday, 9 am to 5 pm Alternate Saturday's, 9am-1pm Tel: 510.653.3279 Fax: 510.653.3178 Email: info@easypor.com and Frank's of Berkeley (franksofberkeley.com) | 1935 Addison Street, Berkeley, CA 94704 | 510.548.1434 | email: info@franksofberkeley.com Jim at EASY acquired the windshield for me and recommended Bob at FRANK'S for the installation.They are a couple of real nice guys who have been in the business for awhile it was a pleasure doing business with them. 
|
||
 12-03-2009, 08:43 PM
|
|
|
Registered
Join Date: Jun 2009
Location: East Bay - S.F. Bay Area
Posts: 65
|
Thanks for the tip. Mind if I ask about the cost? I'm in the East Bay too and have been thinking of getting this done.
|
||
|
12-03-2009, 10:54 PM
|
|
|
Registered
Join Date: Sep 2009
Location: North of You
Posts: 9,160
|
It really isn't very hard. I did mine yesterday. Under an hour.
|
||
|
12-04-2009, 05:48 AM
|
|
|
Somatic Negative Optimist
|
Did the search and read the chapter in Wayne's 101.
But.........................not clear on the placement of the cord (s) I understand the cord is started from the center bottom of the seal allowing a 6-8" extra, going all the way around in the groove and ending up again on the bottom allowing again extra length to pull on later? So, when you place the window/seal on the metal edge in the opening, how do you keep the ends of the cord on the bottom in place so they're accessible later from the inside? Wayne's book on page 194 mentions a diagram but there is no diagram showing the placement of the cord (s) How do?
__________________
1980 Carrerarized SC with SS 3.2, LSD & Extras. SOLD! 1995 seafoam-green 993 C2, LSD, Sport seats.  Abstract Darwin Ipso Facto: "Life is evolutionary random and has no meaning as evidenced by 7 Billion paranoid talking monkeys with super-inflated egos and matching vanity worshipping illusionary Gods and Saviors ". ")
|
||
|
12-04-2009, 10:26 AM
|
|
|
Happiest when Tinkering
Join Date: Jun 2007
Location: Missouri
Posts: 4,752
|
I paid 50 bucks to a window installer to come to my house install the new alu. trim and then install the windshield and they pumped silcon in until it came out the edges so I know I wont have the rust problem later I had when I took it out.
__________________
" Porsche there is no substitute" I always liked that saying. Air cooled is the only way to go! 76 911 C.R.A.P. Gruppe #2 BIG time TURBO C.R.A.P. Bitz EFI/EDIS Now MegaSquirt 3 76 Blazer also restored by me |
||
|
12-04-2009, 11:25 AM
|
|
|
Registered
|
Quote:

__________________
78 SC 911 Targa - 3.2SS, PMO 46, M&K 2/2 1 5/8 HEADERS, 123 DIST, PORTERFIELD R4-S PADS, KR75 CAMS, REBEL RACING BUSHINGS, KONI CLASSICS |
||
|
12-04-2009, 11:51 AM
|
|

|
|
Registered
Join Date: Sep 2009
Location: North of You
Posts: 9,160
|
1. If you have the antenna in the windshield mark the centre wire location relative to the body before removing the windshield, as a reference point for re-installing. Up down on the windshield will set itself, side-to-side needs to be done right.
2. I put some black silicone in each corner, 4" or 6" in each direction out from the corner. 3. Put some dish soap on the seal and on the frame, but not in the siliconed areas. 4. Run a string from the bottom right all the way around, leaving about 24" extra on each end. 5. Do the same again with a second string. 6. Put the windshield onto the car, make sure it is centred. INSERT THE ANTENNA LEAD INTO THE DASH NOW. 7. Lay the strings on the dash. 8. Push the windshield in gently at the bottom first. then up the side and across the top. (a helper is required) Pull either string across the bottom, allowing the seal to flip over the steel edge of the window frame. 9. Don't allow the first string to pull the second string out. 10. Now work your way up the two sides with the two strings starting at the bottom corner. Go 6" at a time up each side and keep the progress close on each side. 11. Work your way across the top from each corner to the middle, pushing the window seal in from the outside as you move across the windshield. 12. You might have to flip the outer seal from time to time, the outer edge can get trapped inside the opening, it should lay on the outside of the window frame. Use a soft thin plastic spatula and work your way along. 13. After making sure the outer seal is in place remove the rest of the string as a 'second chance' to seat the seal properly across the top and down the side. Last edited by 1990C4S; 12-04-2009 at 12:49 PM.. |
||
|
12-04-2009, 12:40 PM
|
|
|
Registered
Join Date: Jun 2009
Posts: 11
|
The installation: install new weather-strip/gasket to the w/s, apply silicone grease to the groove where the aluminum trim goes and press that into place fully and carefully - you can bend it easily. Use DOW 111 compound which is a silicone grease [from McMaster-Carr] on the w/s and the windshield opening [after you have removed all the foreign stuff there].
Using a 1/8 nylon cord stuffed into the groove where the pinch weld will go, cross over at the bottom and with two assistants set the w/s into place at the bottom. This is where the experience counts. Someone has to know where to push, how much to push and slap and the inside guy has to be the cord puller and verbal guide. Pull the cord ends evenly while your assistants push and slap to keep it going where it's supposed to go. Pull the cord all the way around until they meet at the top. Do not use any silicone adhesive anywhere on the gasket/trim...once you get the w/s seated you can "stretch" the oem w/s gasket to fit the corner gaps. |
||
|
12-04-2009, 12:48 PM
|
|
|
Registered
Join Date: Sep 2009
Location: North of You
Posts: 9,160
|
Quote:
Personally, I think you should use silicane regardless, but technically it isn't required. Better to have some goop extra unseen goop than a leak IMO. |
||
|
12-04-2009, 12:51 PM
|
|
|
Happiest when Tinkering
Join Date: Jun 2007
Location: Missouri
Posts: 4,752
|
Quote:
__________________
" Porsche there is no substitute" I always liked that saying. Air cooled is the only way to go! 76 911 C.R.A.P. Gruppe #2 BIG time TURBO C.R.A.P. Bitz EFI/EDIS Now MegaSquirt 3 76 Blazer also restored by me |
||
|
12-04-2009, 01:11 PM
|
|
|
Registered
Join Date: Sep 2009
Location: North of You
Posts: 9,160
|
The theory is that the metal trim can be bent/shaped the force the rubber out and create a proper seal. I don't buy it. And I have the rust repairs to show it.
I really don't see any harm in silicone, the seal can't be re-used anyhow. |
||
|
12-04-2009, 01:30 PM
|
|
|
Happiest when Tinkering
Join Date: Jun 2007
Location: Missouri
Posts: 4,752
|
Quote:
__________________
" Porsche there is no substitute" I always liked that saying. Air cooled is the only way to go! 76 911 C.R.A.P. Gruppe #2 BIG time TURBO C.R.A.P. Bitz EFI/EDIS Now MegaSquirt 3 76 Blazer also restored by me |
||
|
12-04-2009, 01:33 PM
|
|

|
|
Registered
Join Date: Dec 2007
Posts: 6,275
|
Quote:
|
||
|
12-04-2009, 08:24 PM
|
|
|
Registered
Join Date: Dec 2007
Posts: 6,275
|
Quote:

|
||
|
12-04-2009, 08:52 PM
|
|
|
Somatic Negative Optimist
|
Quote:
That way one would only have 2 string-ends on the inside dash instead of 4 but still have the possibility of a second chance to go around another time if needed. What am I missing? 
__________________
1980 Carrerarized SC with SS 3.2, LSD & Extras. SOLD! 1995 seafoam-green 993 C2, LSD, Sport seats. Abstract Darwin Ipso Facto: "Life is evolutionary random and has no meaning as evidenced by 7 Billion paranoid talking monkeys with super-inflated egos and matching vanity worshipping illusionary Gods and Saviors ".
|
||
|
12-05-2009, 08:14 AM
|
|
|
Registered
|
Quote:
Other sites have interactive point systems, so you can gauge someones actual technical expertise and based upon there rating and points versus their post count. It would be kind of neat to see a rating under someones avatar.
__________________
78 SC 911 Targa - 3.2SS, PMO 46, M&K 2/2 1 5/8 HEADERS, 123 DIST, PORTERFIELD R4-S PADS, KR75 CAMS, REBEL RACING BUSHINGS, KONI CLASSICS |
||
|
12-05-2009, 06:01 PM
|
|
|
Registered
|
Quote:
If you were on the first string and as you were sealing a section and the seal popped back out in a place you could immediately grab the second string and go back over that area vs. having to go all the way around before getting to your second try with the one string method. You could always wrap one string twice and then add a single string then you would have the best of both worlds.
__________________
78 SC 911 Targa - 3.2SS, PMO 46, M&K 2/2 1 5/8 HEADERS, 123 DIST, PORTERFIELD R4-S PADS, KR75 CAMS, REBEL RACING BUSHINGS, KONI CLASSICS |
||
|
12-05-2009, 06:06 PM
|
|
|
Dixie Region R Gruppe
|
Quote:
Phillip
__________________
Instagram @phillipkj4 1980 911 SC Backdated Viper Green 1992 Ferrari 348TB |
||
|
12-05-2009, 06:06 PM
|
|
|
Registered
Join Date: Sep 2009
Location: North of You
Posts: 9,160
|
Quote:
|
||
|
12-05-2009, 06:09 PM
|
|


 ME 262 (SOLD)
 Colibri
 Gas Mizer
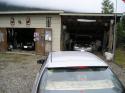 Mileage King
 Dog Bus
 Stella
 1979 Porsche 911 3.0
 Backdated 911
 1968 Porsche 912
 1974 Porsche 914
