|
|
|
|
|
| Author |
|
|
Registered

Join Date: Dec 2003
Location: Arapahoe County, Colorado, USA
Posts: 9,032
|
Eric,
Great progress.  Please post some images of the chassis where the torsion bar tube ends connects. Strength here is critical. On the LWB torsion bar tube, there appears to be the dimples (green circles below) to clear the trailing arm (banana) bolts.  I dont see any on your new tube. These are important so you can remove the M14 bolt without first having to remove the transmission from the chassis. While this feature was never on a SWB (I think introduced in 1971), it is very useful to not have to remove the transmission & engine to remove the trailing arm. When you make these dimples, make sure there is clearance inside for the largest possible torsion bar. Beginning with the 73RS and with all 911s from 74, there are two reinforcements (violet illustration below) between the torsion bar tube and the rear end of the tunnel sheet metal. This takes the load from the suspension without having the torsion bar tube trying to bend. This also takes the torque from the bars partially away from the (side) chassis and spreads the load.   Porsche should have had these reinforcements from 1963! Here are useful threads: http://forums.pelicanparts.com/porsche-911-technical-forum/162568-cracked-torsion-bar-tube.html http://forums.pelicanparts.com/porsche-911-technical-forum/181297-how-thick-torsion-bar-tube-steel.html You should be able to find these parts cut from a 74-> 911. The two reinforcement ears used to be available as a spare part. The 73 RS (and RSR) was more extensive with a plate extending forward through the seam and to and alongside the shift adjust opening. Looking good!  Please keep the pictures coming. Best, Grady
__________________
ANSWER PRICE LIST (as seen in someone's shop) Answers - - - - - - - - - - - - - - - - $0.75 Answers (requiring thought) - - - - $1.25 Answers (correct) - - - - - - - - - - $12.50 |
||
 10-30-2011, 12:21 PM
|
|
|
Registered
Join Date: Nov 2010
Location: Minneapolis, MN
Posts: 21
|
Oh Oh, Rust...
Thanks everyone for all the encouraging feedback!
Unfortunately, one of the side effects of me neglecting the thread for so long and bringing everyone up to date, is I could always get a suggestion that is great, but too late....But, life just gets in the way. This is the big reason why I had to find someone who could do this for dad and I. Good catch on the dimples. You can tell Grady is paying attention!. The LWB tube does have dimples for the aforementioned purpose. But, they were in the wrong place once the SWB tube mounts were welded on. They were patched to restore the appearance of the stock SWB tube. Originally, I couldn't care less about the LWB dimples in the SWB tube, but I was convinced that they should be patched over to restore stock appearance. The parameters we setup for the project were:
One thing I have learned about Aaron, is that he is very restoration focused. He has quite the eye for detail. Generally, we went back to stock in most places unless there was a significant performance or reliability benefit or not. For example, in this case, we left the 3 drain holes in the LWB tube and primed and painted its interior. Aaron never mentioned the reinforcements found on the '73 and '74. That's just one of those things that will have to go on the "next time" list... Anyway, in order to install the torsion tube, A section of the interior wall of the main structural member on each end of the torsion tube had to be removed. This opens up one of the infamous bare steel internal compartments. Frankly, this was one of the most frightening things for me, because at this point we had already got in fairly deep, and it would be possible to find out at this point that the car was in worse shape than we expected. Here is what we saw: Drivers side:  Passenger side: 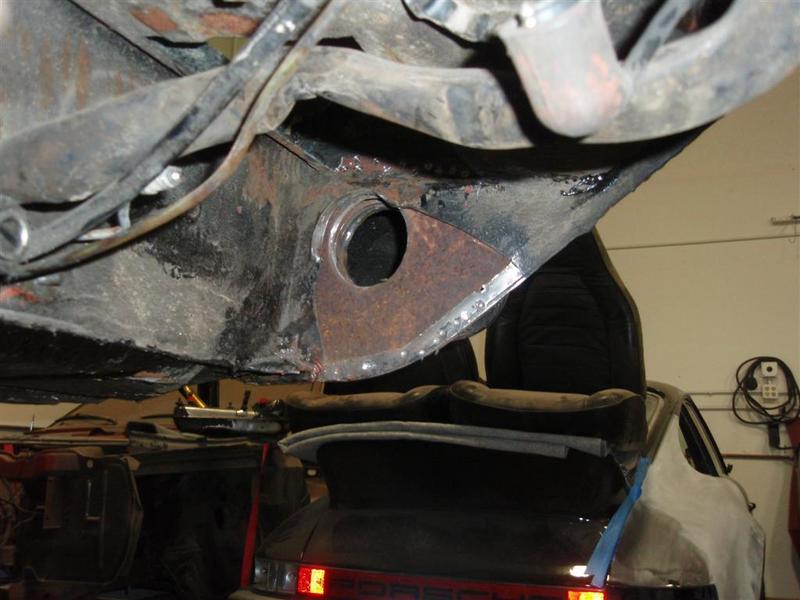 In these pictures you can also see rectangular holes that were cut in the bottom of the rear seat pans to get access to the top of the tube. The overall assessment of this was: rust yes, Swiss cheese definitely not. You can definitely see some scale present, but you can also see some (small) patches of un-oxidixed metal in the first picture. The next picture shows the inside of one of the removed sections:  So this is the point of one of those decisions that you make and may forever wonder if you made the right one. The opinion was that the rust was not to bad, and Aaron has seen much much much worse. It really appeared that in this section at least, that the rust was superficial. Here is came down to money and the goals of the project. If we decided to chase this rust, the budget will explode beyond our abilities and the time would extend unacceptably. In light of the strength of the frame in the near to mid term, pragmatism won. Instead, the cavity was sand blasted and protected before being sealed back up. Aaron located some reproduction pieces to replace the sections cut away. You can see them in the next picture, along with the torsion tube before the brackets were welded in place.  The next two pictures show the torsion tube located in place before being welded to the body. I am impressed by what is possible with a Celete jig. And after seeing it done this way, I wonder how one would accomplish this without one.   Next time, I'll show off the completed body work and perhaps some cool engine pictures. |
||
|
10-30-2011, 10:53 PM
|
|
|
Registered

|
sub
__________________
Jim 911 Mint Green "RSC" #mintgrun 911 Gentlemen's Rallye 85 Carrera GP White 2012 C63 AMG Mars Red |
||
|
10-30-2011, 11:20 PM
|
|
|
Registered
Join Date: Nov 2010
Location: Minneapolis, MN
Posts: 21
|
Back in Black
I was looking through my pictures, trying to find a good shot of may car on the Celete jig:
 This is the coolest thing. It turns out that the car was off just a few millimeters from either the original manufacture or the crash in 75. But no more !  As part of the repair, we decided everything underneath the car should be cleaned up. The pan was actually in really good shape, all things considered. The original undercoat held up well for the first 8 years when the car still saw snow and ice. Here is a good shot of the area underneath the front end before: 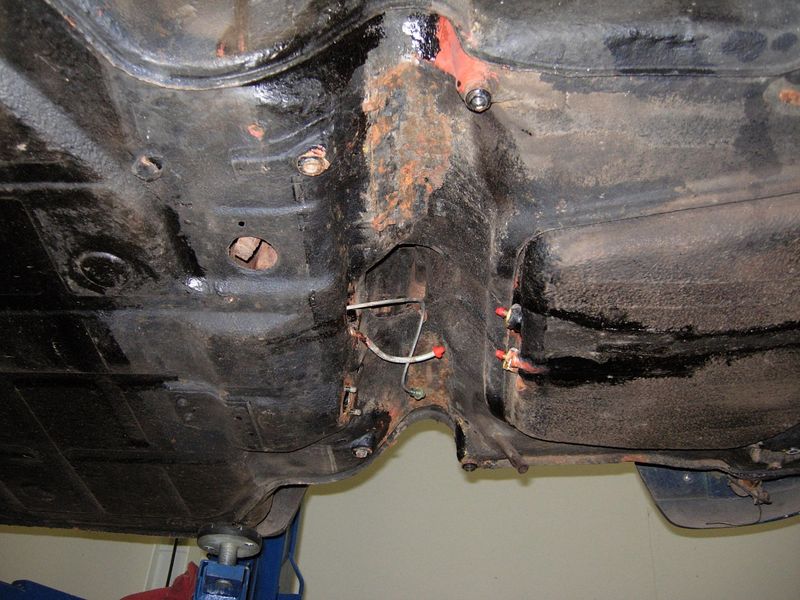 Now after the rust was all cleaned up, any suspect undercoating removed, new undercoating applied:  And here is the area around the torsion tube after the bottom was repaired and with the suspension reassembly started.   The pictures do not do this justice. The bottom of this car is gorgeous. All of the suspension components were removed, sandblasted, and painted or powder coated. I am going to have to invest in a lift, just so I can show it off. I swung by again today, and got these last few pictures. These are the original rotors.    I am keenly aware that I can take no credit for what you see in these pictures. This work was done through no skill of my own. I just thought it was so neat to see the way this problem was approached. I read the posts showing what some members of this forum are doing in their garage and I am floored. This is not easy, and I appreciate it. I am sharing all this not to show off what I have, but to share, as much as I can, in the excitement that I imagine all classic 911 owners feel in their cars. And I can't wait until I see my dad drive off in his car. This will be great. |
||
|
10-31-2011, 08:32 PM
|
|
|
Registered
Join Date: Jan 2007
Location: Tidewater Va
Posts: 674
|
I don't think that anyone will say you are showing off, We all love threads like this and at the very least appreciate the photo documentation. I say thank you and keep up the good work.
__________________
75 911s 86 951 sold to make room for baby seat 09 335i 6MT NVH |
||
|
11-01-2011, 06:24 AM
|
|
|
Registered
Join Date: Jul 2007
Location: Eugene, OR
Posts: 948
|
Might be cheaper to buy some mirrors and throw them on the garage floor. Thanks for posting updates. Fun project to follow.
__________________
John Thompson Eugene, Oregon |
||
|
11-01-2011, 06:43 AM
|
|

|
|
Midwest R Gruppe
|
Great to see you save this car Roscoe. Aaron is definitely the right choice. You are very fortunate to have him in your hometown.
__________________
Scott 69E Coupe 2.2S LtWt 73.5T Coupe |
||
|
11-01-2011, 07:09 AM
|
|
|
UnRegistered User
|
How did I miss this one?
Cool car, great colour and a great story. Looks like you are doing it right!
__________________
Bill K. "I started out with nothin and I still got most of it left...." 83 911 SC Guards Red (now gone) And I sold a bunch of parts I hadn't installed yet. Last edited by billybek; 11-01-2011 at 04:06 PM.. |
||
|
11-01-2011, 10:37 AM
|
|
|
Registered
Join Date: Nov 2010
Location: Minneapolis, MN
Posts: 21
|
Mirrors! I love it. But, how will I justify buying a lift now?
You know, I am lucky that Aaron is so close. It only adds about 15 minutes to my drive time home from work to swing by and talk about the next steps. While it only adds 15 minutes of drive time - it is hard to get out of there in a timely manner. There is so much to see and learn. And admire, there are some beautiful cars there. |
||
|
11-01-2011, 11:57 AM
|
|
|
Registered
Join Date: Apr 2007
Location: I live on the road, I just stay here sometimes...
Posts: 7,104
|
Fantastic!
__________________
73 RSR replica (soon for sale) SOLD - 928 5 speed with phone dials and Pasha seats SOLD - 914 wide body hot rod My 73RSR build http://forums.pelicanparts.com/porsche-911-technical-forum/893954-saving-73-crusher-again.html |
||
|
11-01-2011, 12:31 PM
|
|
|
Registered
Join Date: Nov 2010
Location: Minneapolis, MN
Posts: 21
|
Coming Together
This is one of my favorite pictures from last week.
 I can't get over how beautiful they are. 44 years ago, those heads were new. They look every bit as good today. Of course, now you can't see them anymore. The engine is almost fully assembled, and man does it clean up well. All the sheet metal you see is original. It has just been cleaned up and powder coated.  In 1987, my dad put stainless steel heater manifolds on. A good investment, I think. We decided to leave the original oil on the crankcase because it looks so good.  This scrape is where the manifold hit the ground when the torsion tube failed. I think we'll leave that there...  Oh and we have brakes all around now: 
|
||
|
11-02-2011, 09:19 PM
|
|
|
"farking Porsche hero"
|
Wow, nice comeback! Looks like you took it to the right place.
__________________
Rich '66 911 #303872 '07 Cayman '17 Macan '58 Land Rover S2 88" |
||
|
11-03-2011, 06:46 AM
|
|

|
|
Registered
Join Date: Jul 2010
Location: Italy
Posts: 576
|
very very good work, very very nice car
I like a lot that the car has its original paint and interiors I'm envious
|
||
|
11-03-2011, 06:56 AM
|
|
|
Registered
Join Date: Apr 2007
Location: I live on the road, I just stay here sometimes...
Posts: 7,104
|
All I can say is WOW!
__________________
73 RSR replica (soon for sale) SOLD - 928 5 speed with phone dials and Pasha seats SOLD - 914 wide body hot rod My 73RSR build http://forums.pelicanparts.com/porsche-911-technical-forum/893954-saving-73-crusher-again.html |
||
|
11-03-2011, 07:00 AM
|
|
|
Registered
Join Date: Nov 2010
Location: Minneapolis, MN
Posts: 21
|
Test Drive
My dad was happy today.
 The engine sounds so good. After 24 years! We took it out on the road a bit. Almost there. Just a few adjustments to go. |
||
|
11-08-2011, 10:33 PM
|
|
|
Registered
|
I've just found your thread. What a great story and wonderful to see the road test photo. I hope the car remains in your family for several more generations
__________________
Al 1981 911SC coupe - Arrow Blue Slowly evolving for track days |
||
|
11-09-2011, 02:18 AM
|
|
|
Registered

Join Date: May 2003
Location: The Beave, OR
Posts: 6,288
|
Great stuff, congrats! Would love to see more photos or even video if you can do it.
__________________
Doug Currently Between Porsches PART OF MY SOUL: '09 Boxster 2.9 PDK, '86 911, '76 912E, '06 Cayman S, '90 911 C4, '74 911, '78 911 Targa, '01 Boxster, '70 911T, '99 Boxster (#2), '72 911T, '88 911, '99 Boxster (#1), '84 911 Turbo Look, '73 911 Targa, '88 944 |
||
|
11-09-2011, 04:38 AM
|
|
|
Registered
|
Great work, Great car, realy glad to see you decided to just get what was actualy needed done, The car is is now in a good working condition so that you can use it and have some fun in it.
Anthony. |
||
|
11-09-2011, 04:47 AM
|
|
|
Midwest R Gruppe
|
Roscoe, the next time you are at Aaron's, can you ask him the exact procedure he used to redo your underbody? And what specific products? I am looking to do that to a car and yours looks so good. Thanks.
__________________
Scott 69E Coupe 2.2S LtWt 73.5T Coupe |
||
|
11-09-2011, 05:38 AM
|
|
|
Registered
Join Date: Dec 2001
Location: Minneapolis, Minnesota
Posts: 292
|
Scott....the underside was sprayed with a black Dupont epoxy primer...then black Wurth SKS over that. The earlier cars (pre-70ish) are a little easier because they don't seem to have any, or as much wax sprayed on the underside. On the later cars, you really have to spend a lot of time cleaning...de-greasing....or even stripping to metal.
Aaron
__________________
Aaron Hatz Flat Six, inc. Follow us on Facebook https://www.facebook.com/flatsixinc |
||
|
11-11-2011, 11:49 AM
|
|


 Mintgrun RSC
 1969 Porsche 911E
 1983 Porsche SC
 1966 Porsche 911
 1981 Porsche 911SC coupe
 2000 Land Rover Defender 110
 Eggy
Eggy
