|
|
|
|
|
| Author |
|
|
Registered User
|
77 911s Internal Oil Thermostat
I hoping that someone has experienced my problem, and can help me find a solution!
After conclusively determining that my internal oil thermostat was failing to open, I decided on a partial engine drop to provide access to replace the part. Finally, after having to remove "layers" of hoses, wire harnesses, aux air tube, etc. (as most of you well know), I finally had access to the thermostat. I was a little surprised at how easily the nuts came off, since the thermostat had never been changed (I'm the car's original owner) and I was anticipating corrosion. Naturally, "Murphy" stepped in at this point. The thermostat is absolutely frozen in place. First, I used a Craftsman 90degree flat blade screwdriver to attempt prying the thermostat up. It wouldn't budge. By removing the coldstart fuel injector and associated parts from the airbox, I gained enough working room to admit a mini Stanley prybar (7/8" wide, 7" long). Although I'm able to get the blade under the thermostat lip, the prybar bends, but the thermostat doesn't give.  I suspect that the O-Ring has hardened and adhered to the engine. Gradual over-temperature increase over the years probably contributed to this. I don't think heat on the thermostat will help (and in any case, a torch would probably do more damage than good). Aside from trying to make a tool sort of like a bearing puller, I don't have any good ideas for freeing the thermostat. I've avoided using a lubricant such as WD-40 around the thermostat lip (possibly it would manage to get to the O-ring and loosen it), since I didn't want to make the thermostat lip slippery. Nevertheless, I'm going to try that next. I'd greatly appreciate suggestions from members of this forum! At this point, completely removing the engine is not an option. If it comes to that, I'll have to reassemble everything and take the car to a shop. Patrick Martin |
||
 02-15-2012, 07:23 AM
|
|
|
Registered
Join Date: Apr 2010
Location: New Orleans, LA
Posts: 1,493
|
don't use wd-40. use kroil or pb blaster. I would also use a punch and hammer and give it a couple good whacks.
__________________
1982 911SC, Mocal oil cooler, Bilsteins, Carrera tensioners, backdated heat, factory short shift, Seine gate shift, turbo tie rods, pop off. 2005 Mercedes-Benz C230 kompressor sport 6-speed (daily driver) |
||
|
02-15-2012, 08:04 AM
|
|
|
76 911S Targa
Join Date: Oct 2010
Location: Idaho
Posts: 1,150
|
There looks to be a little play between the thermostat housing and the studs which pass through it. Follow Shumicats advice and gently work the thermostat back and forth with what little play you have. It should eventually work up. Maybe a tool you can slip over the part and gently work it back and forth with intermittent pulling using the prybar?
__________________
76 911S, 2.7, Bursch Thermal Reactor Replacements, Smog Pump Removed, Magnecors, Silicone Valve Cover Gaskets, 11 Blade Fan, Carrera Oil Cooler, Turbo Tie Rods. |
||
|
02-15-2012, 08:53 AM
|
|
|
Functionista

Join Date: Jul 2011
Location: CO
Posts: 7,717
|
I don't think propane heat would hurt much as you will be replacing o-ring.
Propane from small torch cannot melt aluminum.
__________________
Jeff 74 911, #3 I do not disbelieve in anything. I start from the premise that everything is true until proved false. Everything is possible. |
||
|
02-15-2012, 08:53 AM
|
|
|
Functionista
Join Date: Jul 2011
Location: CO
Posts: 7,717
|
Oh... and the problem with prying is you proabably don't have room to pry on each side at the same time.
Prying on one side rarely works.
__________________
Jeff 74 911, #3 I do not disbelieve in anything. I start from the premise that everything is true until proved false. Everything is possible. |
||
|
02-15-2012, 08:56 AM
|
|
|
Targa, Panamera Turbo
Join Date: Aug 2004
Location: Houston TX
Posts: 22,366
|
is that a ROW or US version?
__________________
Michael D. Holloway https://simple.m.wikipedia.org/wiki/Michael_D._Holloway https://5thorderindustry.com/ https://www.amazon.com/s?k=michael+d+holloway&crid=3AWD8RUVY3E2F&sprefix= michael+d+holloway%2Caps%2C136&ref=nb_sb_noss_1 |
||
|
02-15-2012, 09:09 AM
|
|

|
|
Registered User
|
First of all, my most sincere thanks for the replies and suggestions!
To schumicat and Targalid, I'll give the pb blaster, a punch and hammer a try (though, there is almost no room to swing anything). There does appear to be few tenths of a millimeter or so of play between the thermostat and studs; I'll try to use this, but am fearful of damaging the studs. I also have acetone (which I intend to use to clean the area before actually removing the thermostat -- this may be more effective in reaching and softening the O-ring). To manbridge 74, you are absolutely correct that I don't have room to pry both sides, in fact I can't reach the "other" side at all without removing the airbox. I appreciate the limitations of prying one side only, but that's pretty much all I have now. My concern with the torch was potential damage to hoses and wire bundles nearby. To LubeMaster77, the car is US. I'm also considering making a pry tool out of rebar or a long allen wrench that I'll grind down and harden after fabrication. This would be a short "L" shaped wedge that I can rotate along the short axis of the "L", rather than back from the tip. As it is, using the prybar pictured, I estimate that I applied a lifting force on the lip of at least 350 pounds. With a rotational pry that I fabricate, I may be able to increase this to 900 or more. |
||
|
02-15-2012, 09:30 AM
|
|
|
Registered User
|
The old thermostat is out and the new one in! For the possible benefit of others, this is what I did:
(1) I decided to use acetone to both wash the engine surface, removing loose debris and any 'sticky stuff', and to help soften the presumed hardened O-ring, assuming that the acetone could penetrate. I poured approximately 6 ounces of acetone through a funnel to direct the flow, trying to direct the flow under the thermostat lip. (2) I modified my pry bar by adding a 'ring' made from a heavy duty cardboard staple (copper coated steel). Using a vice grip, the staple was firmly attached near the claw of the pry bar (see photo). The theory of this was to provide a pivot point much closer to the pry tip, about 1/4 inch, versus the ordinary pry bar pivot near the bottom of the "L" shape. This lever action multiplied the applied force by about four times versus what I had before.  . In addition, I clamped a vice grip on the end of the pry bar, increasing the length by about a factor of 2. These changes made the modified pry capable of about 8 times greater lifting force. . In addition, I clamped a vice grip on the end of the pry bar, increasing the length by about a factor of 2. These changes made the modified pry capable of about 8 times greater lifting force.(3) Following the suggestions to whack the thermostat with a punch, I hit it twice in a direction to close the slight clearance with the studs and once directly on top. I saw no perceptible movement, but I think this helped (I'll clarify later). (4) I then applied my modified pry, and while pushing with what I'd guess to be 50 pounds (applying a pry force of about 32*50 = 1600 pounds), I heard a loud crack and the thermostat shot out.  After removing the thermostat, I inspected it closely. (see photo) 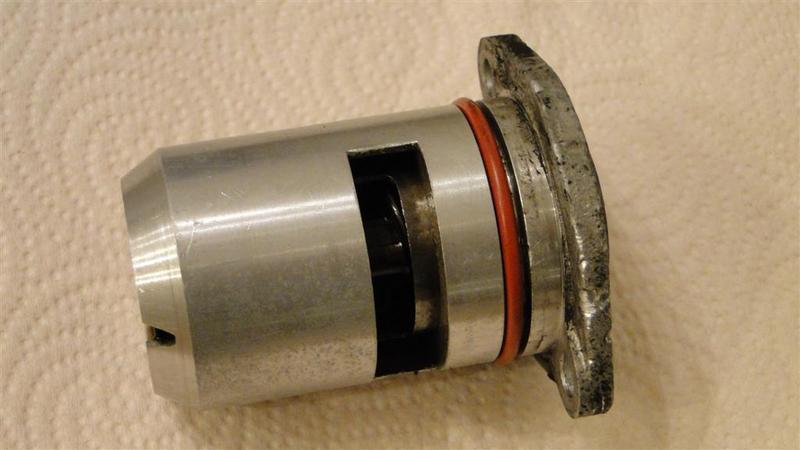 To my surprise, the O-ring was in "perfect" condition, not at all hardened or stuck. What I did find was a layer of hard 'varnish', possibly from cooked oil, that had coated the space between the thermostat lip and the engine. (some or most of the 'varnish' wiped away while the thermostat was being prepared for a photo). It appears to have been this hardened on deposit that was holding the thermostat. I think the acetone application helped dissolve the coating, that the punch blows helped weaken the bond, and these measures in combination with the greatly increased pry force broke the 'varnish' bond. If you look at the removed thermostat closely, along the lower right hand flange, a gouge mark from the pry can be seen on the bottom of the flange lip, and just below this on the outer flange a narrow mark from the punch. The O-ring felt and looked 'new'. Thanks again for everyone's quick and helpful advice. I hope I'll be able to pass the favor on. Patrick Martin |
||
|
02-15-2012, 07:00 PM
|
|
|
Registered User
|
For Manbridge 74, since the problem evidently was a 'varnish' holding the thermostat, your suggestion of propane heat might also have broken the bond ...
|
||
|
02-15-2012, 07:19 PM
|
|
|
Functionista
Join Date: Jul 2011
Location: CO
Posts: 7,717
|
Glad to hear you got it out.
I was thinking that some aluminum shielding like some cut up pieces of old license plate might have helped with keeping heat from wiring.
__________________
Jeff 74 911, #3 I do not disbelieve in anything. I start from the premise that everything is true until proved false. Everything is possible. |
||
|
02-15-2012, 07:36 PM
|
|
|
Registered User
|
Engine Oil Thermostat Removal
I re-posted this here because it has some good info. In my experience the engine does not need to be dropped for thermostat replacement:
I just purchased my first 911 SC and it also had a known oil overheating issue when driven hard. The car was 95% restored so I bought it anyway and decided to tackle the project. Under normal conditions the oil temp would remain at about 210, but when driven hard the oil pressure gauge would begin to twitch and act erratically (due to cavitation) and the oil temp would rise to nearly 300! Here's what I did to troubleshoot (in order) with the problem persisting until the final step: 1) I grabbed the front trombone cooler to check for heat. It was getting hot so the external oil thermostat was OK. 2) I removed the fan to check that the engine oil cooler ramp was free of blockages. It was partially clogged with sludge, so I blasted two cans of degreaser on it and on the cooler itself (from the the top down). During reassembly make sure you properly orient the shroud behind the alternator. Also clean your fan while it's out (sand blast, then powder coat and polish). Unfortunately all of this didn't prevent the overheating (still saw 280 on the oil), but it did improve the looks of my engine bay. Photos below. 3) Assuming it to be the engine oil thermostat, I removed it. On this car there is no need to drop the engine. I did it in 2 hours with an endoscope, a mirror, and a few extensions. First pull the AAR vacuum pipe, the intake air plenum and disconnect the breather hoses from the oil tank to help gain access from the lower right side of the CIS. Pulling the thermostat out of the hole was the hardest part, but since the thermostat is lipped you can use a $10 O-ring gasket removal hook to pop it out. I checked the thermostat using a stove (see photo below) and it was functioning perfectly. Also, replace your gasket with the green one pictured. 4) At this point, with everything properly sorted I was almost resigned to the fact that this was a design flaw and I would never be able to track the car... until I read the TSB mentioned in this thread. The 78 and early 79 models shipped with an improper oil pressure relief valve and a bad sump pickup which caused the sump to flood, improperly scavenge, and cavitate. I replaced the rubbish with these parts, solving the issue: 999-064-026-01-M260 Oil Pressure Relief Cap 930-107-533-01-M100 Oil Pressure Relief Sleeve 930-107-531-01-M260 Oil Pressure Relief Spring (Vertical) 930-107-314-00-M253 Engine Oil Sump Screen PEL-RW-SP Vintage Aluminum Sump Plate I can't believe it took me almost a week to figure that out. This is my very first Porsche, and although I have lots of experience building small block Fords this is definitely not the same. I'm glad I have experience, because this thing is an incredible mess of vacuum and oil lines! Elegant engineering though. Oil cooler air ramp on right  Alternator wiring in case you forgot what goes where  Man, that is NASTY!  Now we're cooking with gas!  The engine oil thermostat is somewhat difficult to remove, but with skill it can be done with no drop, partial or otherwise.  Here it is functioning to spec. Fully open at about 186.  This is what makes all that hard work worthwhile. Very rewarding! 
__________________
I'll take the 911 over the F/A-18 Hornet any day! |
||
|
03-18-2013, 03:03 PM
|
|
|
Eva
|
Quote:
Interestingly, I read this thread 2 years ago, and as i was experiencing (not as high but about 240, needle a bit above 10 oclock) the same thing when the car was being pushed or in traffic, the temp would just climb. So, last year I replaced the OPRV and everything else listed, with fingers crossed it was a good thing to do but no change in temp. I was also fortunate enough to source a complete, sans fan, Carrera cooler from a fellow Pelican and install it thinking the trombone just sucked. That was late in the'14 season and Ionly got to drive it twice the cooler, but 70F ambient or below, it brought the temp needle down to right about 9 oclock, perfect! Until, yesterday, 88F, jump on the highway and everything is acting as normal...until the temp kept rising. Go to the 9 oclock point and stayed for about 10mins of 70ish mph/3k cruising...then continued to creep up, i pushed the car a bit and it went a little higher. Ride home, took back roads and the needle stayed even with the T on Temp (9oclock) where it should be. with the information given considerdd im thinking my internal tstat, original, isnt working as it should
__________________
'78 SC Targa ~Brynhild~ Insta: @911saucy "The car has been the cave wall on which Industrial Man has painted his longings and desires." -Eddie Alterman- |
||
|
05-09-2015, 09:30 AM
|
|


 911 SC
 Eva
Eva Das Eos-Gone But Not Forgotten...
 Battle Wagon

