|
|
|
|
|
| Author |
|
|
Registered
|
The Itchy and Scratchy Show
Good Morning All,
Yesterday (Saturday 4/25) I applied to majority of the required fiberglass cloth to the dash, let it cure a few hours then did initial trimming and shaping. That covered ca. 90% of the targeted areas - those where I'd removed the external vinyl down to the foam - with two large-ish pieces of cloth; this morning, I've added smaller pieces to cover the remaining areas, mostly due to their tighter radii.  Statement of the Obvious: this is loathsome work, and those who've used fiberglass (I am a relative neophyte) will understand why I wasn't shooting any photos mid-process: gloved hands full of stickiness and simultaneously working to keep improving the work at hand while not accidentally making it worse.  Once the cloth was on and the exterior coat of resin applied, I had to make cuts to accommodate the defroster vent openings. Wet resin is both sticky and slippery; the cloth will move around when you're doing tasks like cutting slits before it cures.  Once I'd reached that point where I told myself to stop messing with it, I gingerly carried the dash outside to let the sun (currently only making rare appearances here in New England) improve the curing process. If one side looks greener than the other, two cans of the same product from the same manufacturer had different tints. 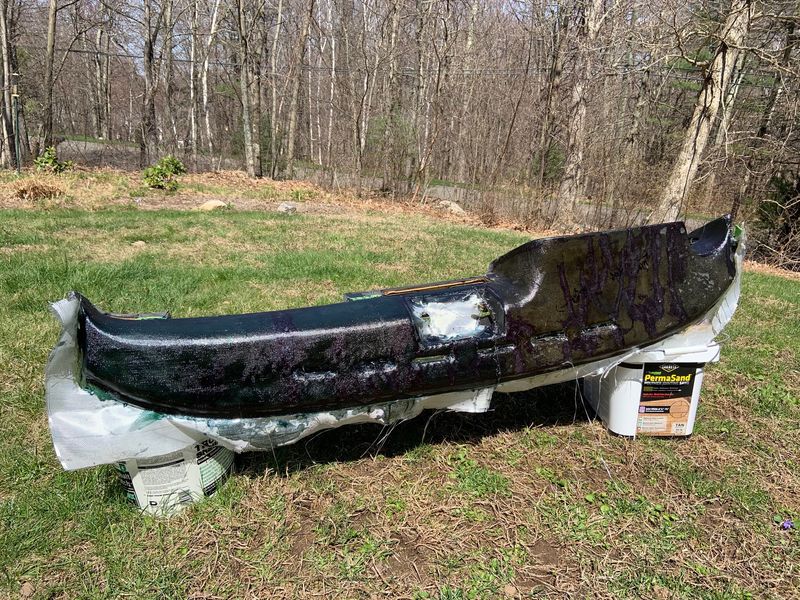 For initial trimming and shaping I used scissors and my Dumore mini grinder (having grown disgusted with the lack of durability baked into Dremel products, the Dumore is a serious bit of kit, made in Wisconsin) with a cutting wheel, then 40 grit Norton BlueFire abrasive paper on a Makita palm sander and an assortment of hand sanding pads. This project would be a fool's errand without having a good supply of high quality, North American-produced abrasives ... don't be fooled by the "value-priced" imported dross.   This morning I applied the final pieces of FG cloth then added a thin coat of resin over the work I'd shaped yesterday.  While body fillers rely on similar chemistry and make the same smells, I'm looking forward to putting the FG and related materials away as soon as this part of the job is complete. I do not know how folks (boat makers, surf board whisperers, et al) can work with this stuff daily. Following the fine tuning of today's work, it'll be time to start adding/shaping/adding/shaping flexible fillers to get the shape and then details right. I preferred overhauling the torque tube, but this project still has some miles to go. John |
||
 04-26-2020, 07:50 AM
|
|
|
Registered
|
Nice work, thanks for posting!
|
||
|
04-26-2020, 08:17 AM
|
|
|
Registered
|
Id hoped to be sanding by now but the 45F temps and cold rain outside creating humidity arent making the garage the ideal curing zone today. Bringing it into the living quarters wouldnt be a prudent domestic move ...
|
||
|
04-26-2020, 01:15 PM
|
|
|
Registered
Join Date: May 2008
Posts: 1,713
|
Something you might think about for the future relative to doing fume-y and/or toxic refinishing projects indoors is to drill a hole (either 4" or 6") in your house's basement band-joist (assuming you have a basement) and installing a vent fan.
I have two basement vent-fans in my house...one in my photographic darkroom, which has a 3x16ft. epoxied plywood sink which makes a great platform for applying finishes as well. The other vent fan is over the cat-litter box. We no longer have a cat...so this area is now my "go to" for off-season finishing, gluing-up, parts cleaning, etc. At any rate...install is very easy involving a hole saw/drill attachment, a "weather head" vent pipe, a bit of expanding foam, and some flexible dryer hose if to reach down a bit towards your work surface. Oh...and the fan motor can either be a simple "in line" helper-fan (used in forced air heating systems), or something more powerful like the vent-axia (rated as "fire-safe," not likely to ignite a flash-over associated with flammable/volatile solvents, etc.) which I have in my darkroom. Do get a variac transformer for a more powerful fan so you can turn it down a bit! |
||
|
04-27-2020, 05:17 AM
|
|
|
Registered
|
OK944, thats a great idea, especially for winter projects when the garage is too cold. Thanks, John
|
||
|
04-27-2020, 08:44 AM
|
|
|
Registered
Join Date: Feb 2009
Location: Park Hills, KY
Posts: 2,459
|
years ago I built a wood box next to my blast cabinet. I have a blower connected to both. does a pretty good job of sucking out the fumes. of course space it limited.
and when necessary sit the pedestal fan behind me blowing fumes away... 
__________________
Bob Cox 78 930 clone project car. 87 924S resurrect at some point. 84 928S, Ruby Red linen/brown interior - sold  86 944 turbo my new DE/track car - sold
|
||
|
04-28-2020, 05:26 AM
|
|

|
|
Registered
|
Bob, my garage is the way we enter the house 99.9% of the time; you walk up two steps then you're in a mudroom, then the kitchen. While I like to think I still have a great sense of smell, but the fact is I'm somewhat inured to the chemical-type scents of resin and bondo, brake cleaner, lacquer thinners, etc. My wife isn't (thankfully). I'd avoid doing any of this kind of (stinky) work in the winter months, but now I can work with garage doors open, it's less of an issue.
That said, the ventilation ideas you guys have suggested are excellent. If I were ever to get that dream workshop (not complaining about what I have**), heating, A/V and ventilation would all be basic, prime concerns. ** A year or so ago I found this website, retro-rides.org, out of the UK. There are some incredible projects here, and some less so, but often the cars being restored are admirable for being so prosaic. But the point I want to make here is a reminder of how good (most of us) have it here in North America; "over-there" space is so constrained, but you see guys doing serious work in their driveways or tiny little sheds in which we might store our push mowers. https://forum.retro-rides.org/board/12/readers-rides If you're looking for some good education, may I recommend any posts by "grumpnortherner" or "glenanderson". Two examples: https://forum.retro-rides.org/thread/208066/1953-jowett-jupiter-body-restoration https://forum.retro-rides.org/thread/213485/1959-series-rover-rolling-resto I still have a hankering for "Series" Land Rover, preferably an 88" SWB model, although driving one would likely put me in a wheelchair, and I have no interest in building a non-metric set of tools. But was there ever a more honest and capable family of machines? Only the air-cooled VW family comes close in my mind. John |
||
|
04-28-2020, 06:01 AM
|
|
|
Registered
|
Yesterday the resin had cured and I was able to do start preparing the dash for the next step, filler and final shaping.
When you look at some of other folks' efforts (threads, YouTube etc) you see what must be disappointing results, mostly based on the insufficient contouring and final shaping. This generally has two elements: the getting the broad contours correct, then detailing around the openings, such the central speaker cover (which others have deleted), the HVAC controls and vent openings. It is the latter which concerns me more.  BTW, the dark spots are from rain drops, after I stepped outside to blow off the sanding dust with compressed air. Since the resin used with the FG cloth is much harder than the filler I'll be using next**, (obviously) I have to make sure that I've removed as much resin in these key areas as possible, so it's not left to interfere with final shaping. This is easier said than done, and if I were to do this on another dash (not a job for which I'd readily volunteer), I'd mask those openings more thoroughly. In the meantime, I'll need to do much fine sanding and filing, while repeatedly test-fitting the aforementioned pieces to verify progress. As said, not the work of a few minutes: take too much material away and you're back to square one, mixing more resin.  Regarding the filler I'll be using, I've said I'd need to use a flexible filler, as opposed to a "regular" polyester filler, such as Evercoat Rage. But now I'm thinking about it, by glassing those surfaces that'll need reshaping, I've probably removed the flexible concern and am preparing to use Rage filler, then Evercoat Polyflex, a two-part spot putty/fine-build filler.  Yesterday I reached out to SEM to ask a couple of questions about their products, which I plan on using. Their regional rep reached out and was genuinely helpful. - Texture Coating: once the "bodywork" is completed, I'll shoot the whole thing in epoxy primer, let it cure for a few days than add SEM Texture Coating, of which I plan on buying a quart, as opposed to aerosols. This material does not use a catalyst nor is it thinned. I will not be attempting to replicate the faux-leather embossed vinyl look, but rather, a uniform ... textured look.  - Do I used SEM's "Color Coat" or "Classic Coat"? Their website shows both. The SEM rep told me to use [Color Coat, which I can get custom tinted at a local jobber. He said SEM Color Coat is the more durable finish for a rigid or semi-rigid surface (like a dash or trim panel), whereas SEM Classic Coat is designed for more flexible surfaces, especially the thin leather in use in today's cars. Like Texture Coating, Color Coat is not catalyzed or thinned.  _ How do I get the satin/low gloss look I want? I'll need to finish off the repair with SEM Low Luster Clear. All of these products I'll likely shoot thru a detail gun. I have a good jobber (wholesale bodyshop materials supplier) who carries and mixes SEM products close by, and plan on taking a couple of pieces of dash vinyl and a door panel to them for the best possible match. But between now and then, I will have much sanding (and vacuuming/clean-up) to do.  I hope you are all healthy and safe. As always, your feedback is welcomed and encouraged, even if just to say hello. John |
||
|
04-28-2020, 08:13 AM
|
|
|
Custom User Title
Join Date: Jul 2004
Location: WI, US
Posts: 666
|
John, You are setting a very high benchmark for a 924 restoration thread. Just exceptional work! I'm enjoying following along.
|
||
|
04-28-2020, 10:33 AM
|
|
|
Registered
|
I'm sure you considered deleting the vestigial center speaker hole and grate, but looks like you're keeping it there. I think that's a good decision, at least that's what I'd do also.
__________________
1984 944 Zermatt Silver 1987 951 Flamingo Metallic |
||
|
04-28-2020, 01:54 PM
|
|
|
Registered

|
As a new 924S owner I recently came across this thread. Outstanding work sir! Thank you for giving back by documenting your excellent work.
__________________
Thanks, -Roger '87 924S |
||
|
04-28-2020, 02:06 PM
|
|
|
Registered
|
Thanks gents. Well see how this part comes out.
Chris the Second: I figured Id keep the speaker grille; it breaks up the real estate somewhat. Rdonahe: please tell us about your 924S; color, trim, how long youve owned, etc. Cheers, John |
||
|
04-28-2020, 03:52 PM
|
|
|
Registered
|
Greetings Friends,
I've added another 12 or so hours of time to dash sanding since my last installment. I already have some lessons learned that would serve anyone else undertaking something like this, or me if I were to try it again. That, of course, supposes I'll obtain results this time good enough to merit another such repair. In a word, it's masking: I should have masked all the areas I wasn't glassing, i.e., the areas of original vinyl I've retained. That would have saved lots of time and hassle this past week. But I'm trying to be sensible and think ahead. Years ago I was visiting my friend Keith at Alfas Unlimited in (beautiful) Norfolk, Conn., admiring a recently painted Duetto on a lift in the shop. Then Keith brought over one of the rather delicate front quarter bumpers and demonstrated that it would not fit within its aperture in the car's nose, because the body guy hadn't test fit all the body fittings before signing off on his bodywork, so the car had been painted in its Alfa Rosso without confirmation that all the pieces would fit.  Remembering that lesson (who would forget?), tonight, having pretty much completed my detail resin-coat shaping and sanding, I fit the central speaker grill and vents. The side vents both fit well, but the speaker and central vent apertures will need some minor dimensional additions. The filler will be significantly softer than resin, so I needed to make sure the resin coat (and FG cloth within it) isn't too proud, anywhere.  Of course this reminds me earlier attempts at using polyester body fillers; the first was when I was 14, on my Mum's four year old yet already terminally rusty 1976 Fiat 126; it also brings to mind seemingly endless spackle/joint compound shaping and sanding with my wife when we were rehabbing our first fixer-upper home in Paoli, Pennsylvania. Isn't that the essence of filling surfaces, too much on, then too much removed, over and over? Watching professionals is the best way to learn how to avoid too many mistaken approaches or bad strategies, which is why I always find collision centers among the most interesting shops to visit, talk to the guys, etc. On a more basic level with this dash, the main molded fiberboard shell has another substructure, made of the same material and stapled within to add strength and structural features. Mine is loose; I've pulled the old staples and will glue it tomorrow.  Lastly, I had to visit the pharmacy on Wednesday, so donned my facemask and nitrile gloves to dive into Harbor Freight. Some people refuse to buy from HF, and indeed, they do sell certain items that aren't fit for purpose, but also provide some useful tools at reasonable prices; my 1000lb hydraulic lift table comes to mind. I'd seen they carry a speed controller (aka rheostat?) for up-to 15A electric tools, so I grabbed one in order run my Dumore grinder at less hypersonic speeds than usual. It works as described on the box.   I also bought their 2" orbital sander. I'm fortunate to have a kick-a$$ Ingersoll-Rand compressor acquired years ago, which has plenty of mojo for running air tools. This little sander cost $25 and is pleasant to use; it came with a hook-style pad so I've been tracing and cutting 2" circles on Norton Gold Hookit 6" DA sanding discs. Excellent results.  Tomorrow we are due some sunshine, which has been in short supply in these parts, so I must go exercise my SC and exorcise some COVID blues. But I'll probably rush back home to keep working on this dash. Next step will be to fix the dimensions of those two apertures, then start with the next level of filling/shaping, and so forth and so on. Best wishes to all, John Last edited by jjeffries; 05-01-2020 at 08:24 PM.. |
||
|
05-01-2020, 07:36 PM
|
|
|
Registered
|
So this installment will look much the same as the last one. But here I coated all the FG'd areas with 3M 5895, a flexible, sandable epoxy (designed mostly for fixing plastic bumper covers). Cool stuff. You have to mix it in small batches because the work time is only 5 mins. It sands nicely, almost like filler, but seems to retain a significant amount of flexibility. It ain't cheap, but this batch came compliments of my friend Rus, who'd bought it for an Alfa dash restoration, but then got wise and bought a beautiful repro dash for his GTV. A sign of superior intelligence, methinks.
 It looks kinda shiny before you start sanding:  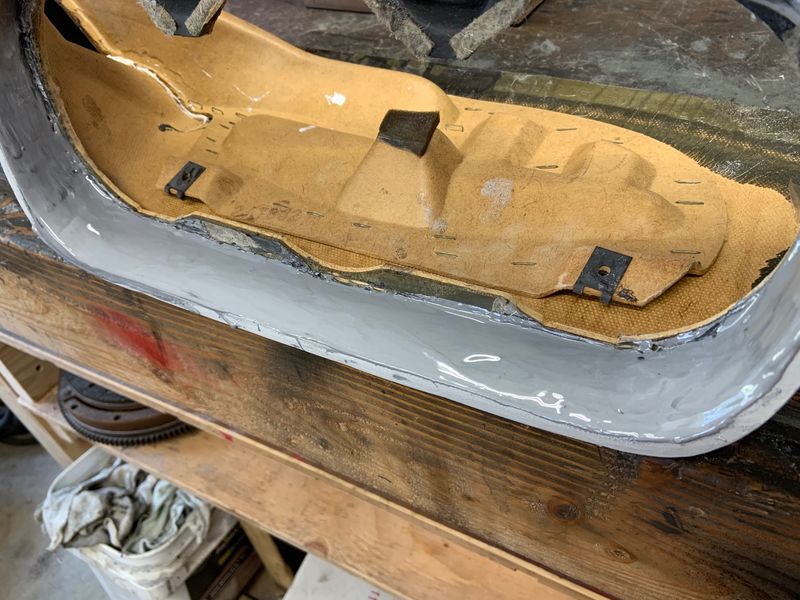 I was knocking back the ridges and shaping with 80 grit, then moved to 120. This stuff doesn't load up the Norton paper I'm using, which is a bonus.  I had at least another ten hours in this between yesterday and today. 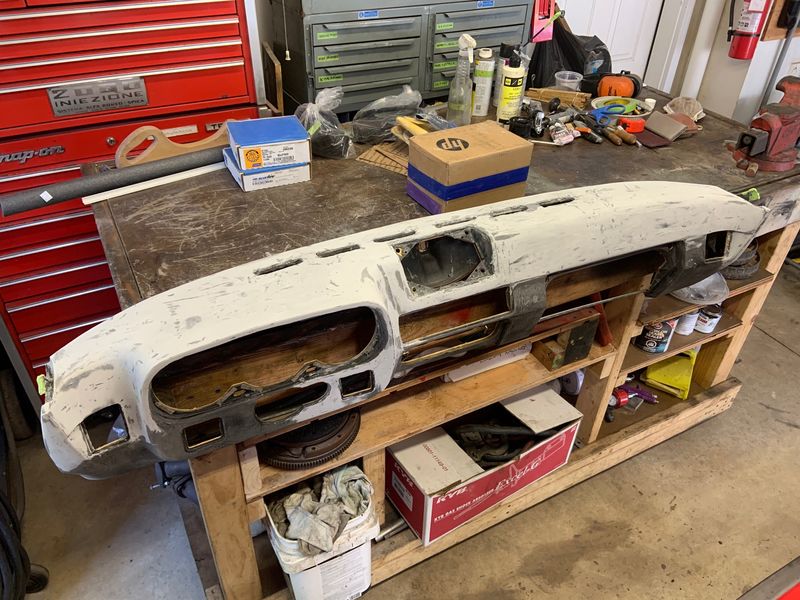 At one point I noticed the light gray 3M filler I'd been sanding was getting dirty from my bench after I'd been moving and turning it around. So I better prepped the worktop: 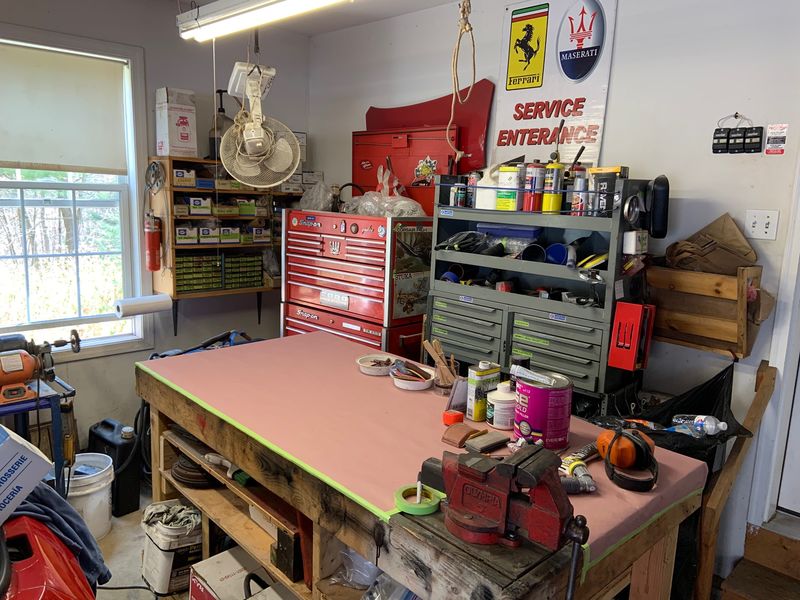 PS: The Ferrari/Maserati sign on my wall: I never worked at that specific dealership, but I did work at another location belonging to the same ownership group. One day the facilities guy rolled up with this sign and asked, "What's wrong with this?" It's pretty obvious. He was about to throw it in the dumpster but I thought it too good to waste. Can you spot the deficiency? Tomorrow's episode: I'll work on what I hope will be a tidy solution for the defroster vents atop the dash, and ... the sanding continues. John |
||
|
05-03-2020, 06:49 PM
|
|
|
Custom User Title
Join Date: Jul 2004
Location: WI, US
Posts: 666
|
I think the person laying out the Ferrari sign wasn't all that good at spelling... Enterance is not a word.
|
||
|
05-03-2020, 07:00 PM
|
|
|
Registered
|
At first I thought it was in Italian, but I guess not...
|
||
|
05-04-2020, 02:15 PM
|
|
|
Registered
|
Keep Sanding
I've been really busy, honest.
By the time you've finished reading tonight's installment(s), we should be at the point where the dash is ready for primer. But first: Those six defrost vents near the leading edge of the dash were going to be a complete pig to shape and sand in a way that didn't look awful. I therefore set forth to find some trim items to help eliminate the need for fine/consistent sculpting, but could find nothing commercially. I could mentally picture what I wanted, so decided to make it. Rather than writing this as a suspense-builder, here's the (nearly) finished result:  And here's how I made them; starting with what turned out to be a prototype, then refining it some and enrolling the help of my son's friend, Kyle, with the metal joinery. The top flange, for lack of a better description...  ... and the wall/tube.  I then turned my big Miller way down low and obtained this result. It fit well, but visually wan't good enough, and required too much grinding post-welding.  The next morning I came to the conclusion that my idea was OK, but that I needed to both cut out the component parts with more accuracy, and find something other than the MIG to tack them together. While my metal cutting tools are relatively limited, I didn't want to be that guy ("a bad workman blames his tools"), and challenged myself to use sufficient care and control to cut a more consistent set of components.  I drilled the pilot holes on my Dunlap (Sears) drill press (left to me by my wife's late grandpa), then punched the larger holes with some Greenlee "stud driven hole punches" I bought a couple of years ago from a older machinist who was retiring to Florida (last fall I bought a set of Fairlawn body hammers from another older machinist retiring to the South, but he was headed to South Carolina; New England loses many senior citizens who head to the warmth and lower taxes of Dixie)  I cut the straight lines with a die grinder; on my prototype I'd used a jig saw but that was really a bit too brutal on the thin sheet metal, even with a fine-tooth blade.  As mentioned earlier, my son and his best bud went in on an inexpensive TiG welder a few years back, and they tacked my parts together with the tiniest of welds.  After this, I cleaned up the top faces with sweet little 2" Norton flap disks on the air grinder, then smeared some JB Weld around the minor gaps and shot the vents with some spray bomb self-etch primer. Next: Rage on, Rage off, rinse and repeat. John |
||
|
05-13-2020, 05:43 PM
|
|
|
Registered
|
While something was drying (likely filler), I addressed the dash center vents, whose foam was decayed and becoming, like the song, dust in the wind.
 The individual pieces of this assembly actually come apart from one another if handled with some care, and I was able to use closed cell weatherstripping to re-foam them. When things were put back together, and the foam compressed somewhat, the result was tidier than these pictures suggest.  When things were put back together, and the foam compressed somewhat, the result was tidier than these pictures suggest.  While it was only five days ago (Saturday; today is Wednesday) when I started the body-filler process, it seems like longer. Lots of sanding ... and then some more.  Great tip from Jim Tweet: gently pre-heat your filler for ease of mixing. It works!  A couple of observations: 1. Today's fillers are so much better than what I remember from the 1980's, mainly in how much easier they sand.  2. That said, back in the 80's when I was trying to become a restorer of fine automobiles (I did try), I was literally having to buy sandpaper by the sheet and never had enough, or the correct range of abrasives/cuts. So now, with a full kit from Norton Aftermarket Division, I'm in hog heaven. and wouldn't wish this job on anyone without the right supplies.  These photos are from this afternoon, and I believe it's at the right stage for me get a couple of good coats of epoxy primer on, after which I'll use a finer, finishing filler to clean-up any details before I move to the SEM Texture Coat and Color steps.  One last note: What's the worst part of doing this kind of bodywork, i.e., using polyester filler? The dust you create ... it is such horrible stuff, as others well know, and awful for one's health (I wear a mask). The best collision shops today know this and use sanding tools connected to a strong source of vacuum and special sandpaper, from Norton or 3M, with holes that allow the sanding waste to be immediately captured, without getting anywhere other than the collection tub: not on the shop floor, in the car's nooks and crannies, in the technician's lungs. Some shops use a centralized vacuum and collection system, but I think a much neater - and economical - solution are these individual work-stations. In Hartford, Connecticut, one such shop is Airport Road Autobody, which is certified by BMW/MINI, Jaguar, Ford (including aluminum for both), VW and LandRover ; it's a large facility and ... the whole facility is absolutely spotless. Each technician has one of these Norton machines** and there is no dust. I've been constantly cleaning my work area throughout this dash job (garage is connected to the house, you enter and are immediately in the kitchen ... ), so I want one, with all the tools designed to work as part of its closed-loop system!  ** You may ask, is this guy a shill for Norton Aftermarket /Abrasives? No, I'm not. I do work in the automotive industry and get to see new products in the Collision and Mechanical repair businesses. There is so much cool new stuff available. I also have a (non-business) friend who works for Norton on their industrial support side, and when I was first working on my 911, obtained a care-package of their sandpapers, grinding disks and polishing materials. It's excellent stuff and has aided me to significantly raise my game; I've hoarded it like bullion. The other superb choice is 3M; these two companies are kind of the Coke and Pepsi of the industry. So if you're doing any work requiring such items, my advice is to buy pro-grade supplies from one of these two companies and to avoid the false-economy of lesser quality items, including those sold at big box stores. Just my two cents. John |
||
|
05-13-2020, 06:59 PM
|
|
|
Registered
|
Another JohnJ thread installment, another tale of sanding, filling, sanding, filling ...
I'm not surprised at the collective yawn. Probably 65+ HRS into this quest, it's now ready for some texture coat then color, which I plan on buying, or at least ordering tomorrow.  Sometime in the past few days (one loses track), having spent ages sanding the Rage filler (multiple applications as I sought the right contours), I then completely re-covered the whole dash with a spot/glazing compound, essentially a fine, softer filler used for filling sanding marks and other minor blemishes. It was a hot day (we haven't had many thus far this spring) with intense light that was uncannily arc-like in its piercing brightness. Having done a major garage de-bondo-dusting (I used my backpack leaf blower in addition to broom and dustpan), I chose to do the next sanding session outdoors. Sheesh! More and more sanding, albeit much softer stuff than the regular body filler, but I'll admit my mojo for this project was on the wane.  I pushed on through and got it ready for a second coat of epoxy primer (not sure if I've already mentioned it, but I'd sealed the Rage with a coat of E.P. before slathering on the finishing compound). I think that was yesterday morning. The E.P. I'm using (Transtar) dries gloss, which is handy when you scuff it, so you can see progress as you're knocking it back bit by bit. Well last evening, in it's glossy grey, I saw some of the waves in the finish I'd been working so hard to avoid. "Eff-it", I said to myself, realizing for the umpteenth time that I was not born to be a finish body-man. "Good enough", I told myself. Then I looked at the exquisite new dashes on werk924.com and felt sorry for myself.  Today, of course, I told myself that good enough, wasn't. I grabbed my long board and hard rubber sanding block, adorned with Norton 320 grit (thank the Car Gods that I have a deep supply of this stuff, manna for my projects) and went back to work. Maybe another four hours later, I've gotten it into the shape (actually, shapes) that are much more pleasing.  You may have read my talking about my interior being a two-tone Linen and a very dark brown. Well ... it ain't. I was cleaning the glove box lid today, (look at the filth that came off), in preparation for the texture and paint, then the two a-pillar trims. This must be a really dark brown ... almost black. Hmmmm. I went down to the basement and pulled the door panels from storage for a better look, at the upper, dark sections. The dark color isn't brown, it's black. Well I never.  How had I gotten this wrong? I think I'm remembering a couple of early 80's Audi 5000's I used to clean for family friends when we lived in SoCal (I called it "detailing" and made absolutely obscene amounts of cash for a 16-18 year old); those cars, at least in my memory, had dashes with a vinyl of similar feel to that used in our cars (built by Audi at Neckarsulm, after all), in a hue I'd describe as "Dark Chocolate". I'd been thinking this car was the same, but I now believe it is black. I've posted this epiphany on the "Interior Color Code" thread, maybe a guru there will look at my car's trunk-mounted spec sticker and shed some light. In the meantime, does anyone else have a similarly-specified 924S and an opinion about this? Best, John |
||
|
05-18-2020, 05:53 PM
|
|
|
Custom User Title
Join Date: Jul 2004
Location: WI, US
Posts: 666
|
John, I have an opinion on the interior color. It's just an opinion and not based on any fact other than a few years of looking at pretty much every 924 for sale that I can find. So, my opinion ain't worth much.
I think the 924, being the lowest priced model of the Porsche lineup, used only two colors for dash and door panel upper parts. It seems only brown and black were used; probably to save cost. I feel that the black parts may fade over time making them appear more chocolate brown than black. My car is a full black interior, but selected parts (upper door parts and dash itself) appear less black and more of that chocolate brown color and probably stems from sun fade since the rest of my car suffered from sun damage. Obviously the carpets, seats and lower door panels came in tan, linen or black along with various fabric choices (Porsche script, pinstripe, etc.). |
||
|
05-19-2020, 06:17 AM
|
|


