|
|
|
|
|
| Author |
|
|
Overseas
Join Date: Mar 2009
Location: Nuremberg, Germany
Posts: 75
|
Location of A/C vacuum reservoir in 924S?
Hi,
What's the location of the A/C vacuum reservoir in 924S, where is this mounted? Maybe it's the same as in early 944, I don't know. I have a 924S from a friend sitting in the garage and the vacuum tank ist just snapped to the battery cabling. I assume it should sit on the two screws facing the battery from the housing of the fresh air blower. Is that so? Does it have a console? I appreciate answers, especially with pictures 
__________________
Tomiki 924S (1986) |
||
 06-03-2013, 11:13 AM
|
|
|
Proprietoristicly Refined
Join Date: Jul 2001
Location: ~Carefree Highway~
Posts: 5,833
|
Picture '87 924S
 J_AZ
__________________
1988 924S, 85,750K ..+ 1987 924S, 154K DD (+15K est. bad odo) |
||
|
06-04-2013, 05:58 AM
|
|
|
Overseas
Join Date: Mar 2009
Location: Nuremberg, Germany
Posts: 75
|
Thanks!!!
__________________
Tomiki 924S (1986) |
||
|
06-04-2013, 12:42 PM
|
|
|
Patrick
|
My 84 944 has the canister in the same place. What does it do exactly? I actually have to work on my AC this weekend, if the weather cooperates.
__________________
1984 944 NA, constant tinkering 1983 "Beastie" - Safari Build |
||
|
06-04-2013, 07:56 PM
|
|
|
Overseas
Join Date: Mar 2009
Location: Nuremberg, Germany
Posts: 75
|
It's basically "holding vacuum" so that the flaps in the heater box in the passenger compartment remain open (held by vacuum) even if you brake or hit the pedal to the metal. There are certain conditions when the vacuum in the engine intake drops that's why there is a vacuum buffer not only for the brakes, but also for the A/C.
What do you plan on doing on your A/C? I have now installed, uninstalled, reinstalled in my 924S, memories are yet vicvid, just this canister I didn't have before at all.
__________________
Tomiki 924S (1986) |
||
|
06-04-2013, 10:35 PM
|
|
|
Patrick
|
Thanks, didn't know that... My system is clogged due to the extremely high gauge readings and I think the cause is a bad expansion valve. Therefore requiring me to partially remove the right side dash. I really am looking for some guidance once the glove box and knee pad is removed. I've been looking everywhere but still haven't found a detailed procedure.
__________________
1984 944 NA, constant tinkering 1983 "Beastie" - Safari Build |
||
|
06-05-2013, 09:46 AM
|
|

|
|
Proprietoristicly Refined
Join Date: Jul 2001
Location: ~Carefree Highway~
Posts: 5,833
|
Quote:
This is the condensed version: Evaporator unit removal on early 944 - Rennlist Discussion Forums I will add a few photos and suggestions. Once the kick panel and glove box is removed----get out your camera and take pictures of the front. Focus on the wires--where they are put. Take more pictures of the AC hard lines. If you do not put the wires back in the same place-especially the lines on top of the blower it will not fit well. You will also get vibration noise later. AC Blower/evaporator housing front  AC Blower/evaporator housing panel removed  AC Blower/evaporator housing removed TOP view  Inside AC Blower/evaporator unit to get to Expansion valve--circled RED  You need a few AC "O" rings and AutoZone sells a small and large kit. You might be able to get by with just the small kit. You also need some AC POE 100 esther oil to pre lube the AC "O" rings. The oil can be used to replace an ounce or so as well because it will mix with either R12 or R134a oils. Or use the AC oil you put in originally. The expansion valve is a simple device and it may just need to be cleaned. If you want to order a new expansion valve, have the old one with you when you go to the store or internet. Make sure they are identical. Different valves were used.  In my 924S: 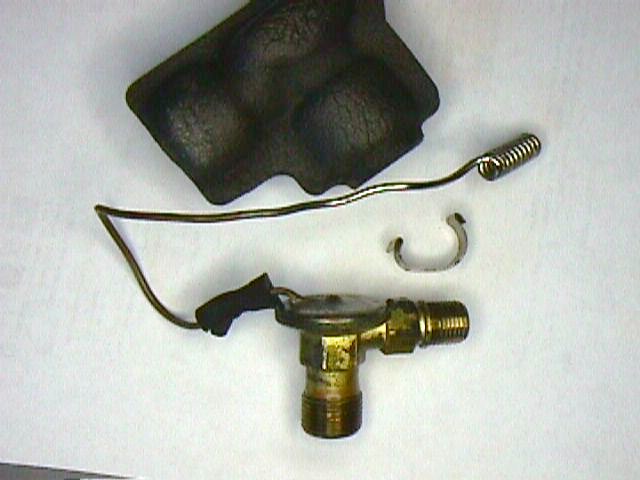 Carefully tighten all connections-very snugly. If you have a leak tester--after you have the unit back in place but before you put on the kick pad---test for leaks. Simple EH! GL J_AZ
__________________
1988 924S, 85,750K ..+ 1987 924S, 154K DD (+15K est. bad odo) |
||
|
06-05-2013, 04:26 PM
|
|
|
Patrick
|
John_AZ,
That's it, you're my new hero!! Thank you very much; this tutorial will be downloaded into my repair library tonight. I'll tackle this during the weekend, weather permitting and post the outcome unless I run into an issue then more questions may fly onto this thread. Patrick
__________________
1984 944 NA, constant tinkering 1983 "Beastie" - Safari Build |
||
|
06-05-2013, 04:44 PM
|
|
|
Proprietoristicly Refined
Join Date: Jul 2001
Location: ~Carefree Highway~
Posts: 5,833
|
Thanks,
The blower/evaporator unit sorta "hangs" by clips underside of the dash. Memorize the feeling and position of the unit when you pull forward slightly and the unit falls to the floor---- If you find the foam seals to the air ducts are rotted---a good time to replace. J_AZ
__________________
1988 924S, 85,750K ..+ 1987 924S, 154K DD (+15K est. bad odo) |
||
|
06-05-2013, 04:49 PM
|
|
|
Patrick
|
Understood. Don't you love how a topic just transforms itself during the course of a few posts? Sorry to the original poster.
__________________
1984 944 NA, constant tinkering 1983 "Beastie" - Safari Build |
||
|
06-05-2013, 06:34 PM
|
|
|
Overseas
Join Date: Mar 2009
Location: Nuremberg, Germany
Posts: 75
|
Hmmm, I just saw that my post from last night didn't appear, oh well
But John has already given the detailed description.
__________________
Tomiki 924S (1986) |
||
|
06-06-2013, 05:35 AM
|
|
|
Patrick
|
Hey Tomiki,
I see that you live in the Mother Country .It's been many years since I was in Germany but I was born in Wiesbaden (army brat). If you ever come to the States, up here in the greater Boston area, let me know. Patrick
__________________
1984 944 NA, constant tinkering 1983 "Beastie" - Safari Build |
||
|
06-06-2013, 10:47 AM
|
|

|
|
Overseas
Join Date: Mar 2009
Location: Nuremberg, Germany
Posts: 75
|
Hey Patrick,
That's a nice coincidence I live for 3 years now in Germany, am originally from Hungary, and gues what where did I live in the first months? In Wiesbaden! Was listening often to the army radio. Thanks for the invite, will keep it in mind, next time we plan a trip to the States is September, but this time rather west coast.Cheers, Miklos
__________________
Tomiki 924S (1986) |
||
|
06-06-2013, 12:16 PM
|
|
|
Overseas
Join Date: Mar 2009
Location: Nuremberg, Germany
Posts: 75
|
If I worked so much with this last night, please allow me to paste it
 Well, I'm not sure if you can remove the A/C inside unit just by taking off the glove compartment and the knee pad. You should still try with that. You will need to unscrew the two pipes - thus first remove the gas from the system! - then you unscrew the relays, remove the cabling and the vacuum tubes and then the inside unit is held by the 3 screws that one can see. Be careful when removing the unit, in the back is the condense water drain pipe connected to it. When you remove the unit, it should slide out nicely. When reinstalling, make sure that you dont forget to connect it, otherwise your drain water will flow on your passengers feet If its not sufficient to remove only the glove box and the knee pad, then you need to remove the whole dashboard. Whenever I uninstalled my A/C inside unit OK, it didnt happen that often, just 3-4 times I had the dash off. The dash removal is a big job. You start with the tape holder, which is the middle arm rest. It is held by 4 screws. Then you remove the ashtray and there are 2 screws underneath. Then remove shift knob, any switches of rear wipers, electric mirrors, hardtop/targa. Then remove radio if installed, then all heating knobs and slides. Then comes the heating panel, it is held by 2 screws from the bottom, which you can access once the radio is gone. Underneath are 2 screws holding the heating slides in place, remove the screws. Then proceed with the gauge + A/C switch panel, it is held by 2 screws on the top. Remove then the loudspeaker grid from middle of the dash by simply pulling it out and remove the nut behind it, holding the dash in place. Then remove the 2 screws holding the middle console to the dashboard (you will see them behind the just removed gauge panel) plus the other 2 that hold it to transaxle housing. When you sit in the car, they are at about your knees. Remove steering wheel and stalks. Remove instruments, which are held by 2 screws accessible from the top of instrument frame in front of the RPM gauge and the multi instrument. Do not try to drill holes between the instruments, the small screw-cover-looking things are no screw covers! Once steering wheel removed, look simply from underneath, you will see the 2 screws. Then remove A-column covers, each are held by 3 screws that are covered. Behind these covers you will see 1 screw on each side, holding the dashboard, remove them. Now your dash is held by 1 screw on each side, on the left it is next to the top fuse board, which you might have to remove, on the right it is below the A/C relays. Once dashboard off, you can easily remove the A/C unit. The expansion valve sits in the piping in one of the corners, thus you will have to completely dismantle the unit. I wonder if Clarks garage has a description, I should have looked first, but now that I already typed it in, I will not delete it
__________________
Tomiki 924S (1986) |
||
|
06-06-2013, 12:17 PM
|
|
|
Patrick
|
Miklos,
Thanks for the description. I'm going to attempt the job this weekend. I hope not to remove the entire dash; I'm going to follow John's tutorial and see where it gets me...
__________________
1984 944 NA, constant tinkering 1983 "Beastie" - Safari Build |
||
|
06-06-2013, 07:00 PM
|
|
|
Patrick
|
So much rain, so little time...
__________________
1984 944 NA, constant tinkering 1983 "Beastie" - Safari Build |
||
|
06-07-2013, 08:24 PM
|
|
|
Patrick
|
John,
I finally ordered the expansion valve today. What an ordeal! It appears that nobody carries them (almost) including, unfortunately, this host. The local Porsche dealer by me wanted almost $180.00 and they stated: "It would have to ship from Germany and may take a few weeks." The early models only have one tube/wire for temp sensing and all the aftermarket units have an additional tube with a threaded connector at the end. What is that for? Anyway, I finally ran across Vertex Auto in Miami, Fla where they actually had a couple valves in stock and charged me a fair $103,00 including shipping. The salesman (Sid) was very friendly and knowledgeable so I should have the unit mid-week. I also purchased a new drier and o-rings for the job as I believe the drier should be replaced every time the system is open (is that correct?). Since I cannot do without AC, I figure on performing the best job possible and replacing the drier is not expensive. Thanks!
__________________
1984 944 NA, constant tinkering 1983 "Beastie" - Safari Build |
||
|
06-14-2013, 07:58 PM
|
|
|
Proprietoristicly Refined
Join Date: Jul 2001
Location: ~Carefree Highway~
Posts: 5,833
|
Yes it is difficult to get the right expansion valve.
The reciever drier should be replaced when the system is open. While you wait for parts, flush the condenser. The bottom of the condenser collects crud/thick oil. Flushing with protect your new expansion valve. Parts stores have a pressurized can of flush to use. . THEN... Add an ounce of POE 100 esther oil to the receiver drier. Add a couple of ounces of POE 100 directly to the inlet of the condenser. Add one ounce of POE 100 oil to the inlet of the evaporator. POE 100 mixes with the original AC oil best. PRO AC tech/shop owner Griffiths explains: Rennlist Discussion Forums - View Single Post - Compressor replacment how to add oil ect! GL J_AZ
__________________
1988 924S, 85,750K ..+ 1987 924S, 154K DD (+15K est. bad odo) |
||
|
06-15-2013, 05:32 AM
|
|
|
Just thinking out loud
Join Date: Nov 2001
Location: Close by
Posts: 6,885
|
Holy shytte!! I hope that expansion valve is made of gold.
POE vs. PAG, pag 46 works just fine. Never had a problem with Denso compressors and PAG46. The additional tube with a threaded connector is an equalizing tube used on externally balanced expansion valves and is often connected to the suction line. Finding the right expansion valve (superheat =4.8, tonnage=1.5 maximum operating pressure=.55+-.035) with the correct threads ought to be something I can figure out. Will look into it.
__________________
83 944 91 FJ80 84 Ram Charger (now gone) Last edited by mattdavis11; 06-15-2013 at 09:07 AM.. |
||
|
06-15-2013, 07:55 AM
|
|
|
Patrick
|
Thanks for the info guys! My hope is to work on the project next weekend. BTW, upon receiving the drier this morning, the package came with a sensor that attaches to the pipe next to the drier. There are two spade connectors on one end and a tube fitting on the other. What is it? The kit even came with a series of o-rings!
__________________
1984 944 NA, constant tinkering 1983 "Beastie" - Safari Build |
||
|
06-15-2013, 12:36 PM
|
|


 1984 Porsche 944 NA
 2015 BMW 328i XDrive
 2019 MB C300 Coupe 4Matic
 The Beastie

