|
|
|
|
|
| Author |
|
|
Registered

|
Winter project -
Like many others I'm working on my list of winter projects while the weather is messy. Just about the time I think my "To Do List" on Miss Purdy and Lady in Red is gradually coming under control one or the other decides they are not getting enough attention. After replacing the tie rods and having their front ends aligned I started on Miss Purdy's HVAC temp control motor. The resistor temp sensing string is reading fine but I found a transistor on the motor driver circuit board has failed. At least it is just a cheap generic Radio Shack 327.
Next up on the list was going to be a front to rear speaker upgrade and naturally I managed to break the speaker grill retaining ring on one of the small 3.5" door speakers. I was thinking of using a couple of Kenwood KFC-1065S Coaxial speakers to replace the 4 inch door speakers. The KFC-1065S are supposed to fit without cutting out any of the metal behind the original ones. For now since the 3.5 inch door tweaters are working fine, I had planned to reuse them once I replace or repair it's broken speaker ring. There was a guy on Rennlist that documented how to repair one of the door speaker rings better than I could ever lay it out. Here is his write up and a photo of my final result - I guess I should have put a little more effort to spread out the leather conditioner better.........  http://rennlist.com/forums/928-forum/595274-save-your-speaker-rings.html Back to my normal routine - Two Steps Forward and One Backwards  Michael
__________________
1984 928S - "Miss Purdy" 1987 911SC - "Frau Helga" 1986 930 - "Well Hung" 1975 911 Targa "Blue" Last edited by JK McDonald; 01-22-2015 at 11:10 AM.. |
||
 01-22-2015, 10:57 AM
|
|
|
Registered User
|
Me...I'm doing mostly things under the hood.
1) WP/TB - done. 2) Vertical grill brackets replacement - done. 3) Repaired radio antenna so it would retract - done. 4) Fuel lines off and coming along nicely. 5) Rear hatch latch apart, just need to order parts. Kind of waiting to see if anything else pops up, getting tired of paying shipping on each little item. 6) Spoiler is still off, but about ready for re-installment. 7) Tune-up coming soon. 8) Tie-rods coming soon. Inside work is to difficult with the temps we have here, every plastic part seems to brittle to work with. Maybe when spring rolls around I can dig into something inside. Brian. |
||
|
01-23-2015, 09:21 AM
|
|
|
Registered
|
Thermistor Connector -
After replacing one of the four transistors mounted inside the temp control motor unit I found that I still had an intermittent problem somewhere in the wiring. It finally turned out to be a poor connector plug to the thermistor in the nose of the left front fender. The final step to straighten the temp control circuit out was to remove the thermistor connector and solder the wires together. An ops check before reinstalling the temp control motor unit showed that the dash HVAC slider was working like a new one. I had already replaced the deteriorated alternator cooling hose with a heavy duty one I found at an RV supply outlet. I later found a similar one for about 1/3 the price in the automotive department at Walmart.
Add an insulation sleeve for the soldered connections, electrical tape, then some zip ties and reinstall the splash panel - she's buttoned up for another 100k miles..... One more project scratched off my winter "To Do List". My squealing blower motor will be next up. Yikes - a new 928 replacement part is advertised @ $600 - $700. I don't suppose anyone has found a $100 alternative like something for an old Ford truck that will fit ? Michael 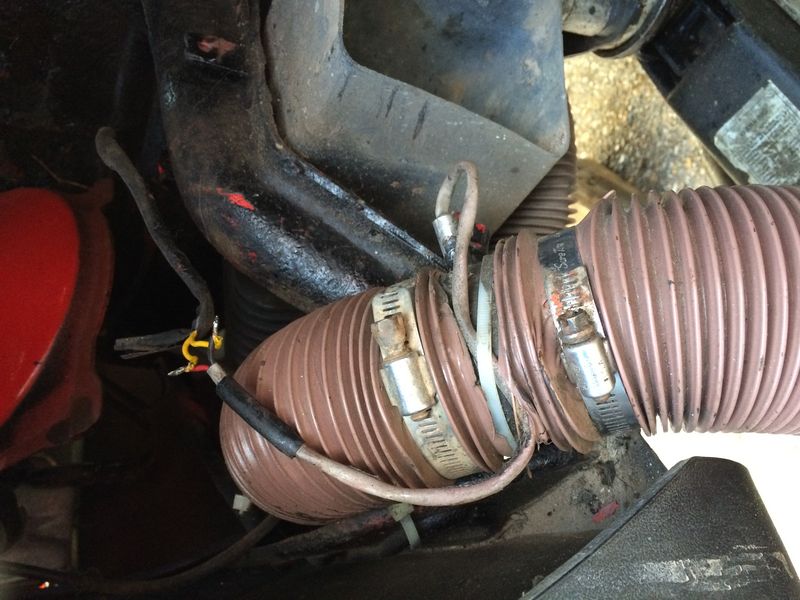
__________________
1984 928S - "Miss Purdy" 1987 911SC - "Frau Helga" 1986 930 - "Well Hung" 1975 911 Targa "Blue" Last edited by JK McDonald; 01-24-2015 at 05:41 PM.. |
||
|
01-24-2015, 05:27 PM
|
|
|
Petie3rd
Join Date: Jul 2000
Location: Philly PA
Posts: 4,528

|
Roger has plug and play new motors for less than 200 its a fun project
__________________
^^^ Stan ^^^ 2019 BMW K1250 GS 2016 HD RK 1988 S4 Auto , Elfenbein Perlglanz, Pearl Gray 1982 5sp Met black and tan sport seats |
||
|
01-24-2015, 06:26 PM
|
|
|
Network Native
Join Date: Jan 2007
Location: SoCal
Posts: 10,349
|
Quote:
|
||
|
01-24-2015, 09:52 PM
|
|
|
Registered
|
Four Modes of Operation -
Thanks for the info Merlin -
Hey Danglerb - "Much More Powerful" reminded me of when my wife and I were shopping for a hot tub and we had a saleslady rattling off all the reasons for buying one particular deluxe model. At the end of her sales pitch she said what really made this unit so exceptional was because the pump motor was much more powerful than the standard hot tub and had four modes of operation - "LOW - MEDIUM - HIGH and WHO NEEDS A MAN". My wife nudged me and said that closed the deal..... Michael
__________________
1984 928S - "Miss Purdy" 1987 911SC - "Frau Helga" 1986 930 - "Well Hung" 1975 911 Targa "Blue" |
||
|
01-25-2015, 01:41 PM
|
|

|
|
Registered
|
Blower Motor -
Once I had the blower motor out and apart, it looks like it must have been replaced by the PO at some point. The armature appears to be a touch rough but I can easily clean it up with a seating stone. I'll also buy a new pair of brushes before reassembly. The bearings/felt looks to be in excellent condition and will be lubricated and tested thoroughly so I (hopefully) wont have to repeat this project again. Please note that I realize the blower motor is on the passenger side of the fire wall - I'm just Getten-Ready-to-Get-Ready.
Michael 
__________________
1984 928S - "Miss Purdy" 1987 911SC - "Frau Helga" 1986 930 - "Well Hung" 1975 911 Targa "Blue" Last edited by JK McDonald; 01-26-2015 at 06:01 PM.. |
||
|
01-26-2015, 05:57 PM
|
|
|
Registered
|
$2,000 in Labor -
I had previously buffed out the blower motor's commutator surface with a length of stiff eraser, carefully cleaned out the mica spacers between the commutator segments with the blunt edge of an Exacto-knife and blew everything out with compressed air. The depth of the mica indicated that there was lots of life left in this motor so I had decided to take the trouble of installing some new brushes and lube the bearings. Since the armature sits vertically I added a little light oil and then a dab of STP to the upper bearing recess and using a thin plastic straw temporarily stuck between the blower fan blades - a little lube was also applied to the felt around the lower bearing. It ran as quiet as a church mouse when powered up prior to re-installation.
After trying to find a couple of new brushes for the blower motor I finally had to make my own. Evidently most alternator/starter rebuild shops do not carry much in the way of parts any more - especially when it comes to individual metric sized stuff. One shop did find a dusty twin lead starter brush that I could make work. Although it was about the correct thickness, it was twice as wide as I needed. Since it had a copper lead attached to the top of each end all I had to do was cut it in half, square it up a bit, contour the commutator contact end and I'd be in business.  I used a fine tooth hack saw blade and miter box as a guide to divide the starter brush down the middle. Then a medium size flat file took off the extra width until I had two correctly sized replacement blower motor brushes. The corner edges and the contoured commutator end of each new brush was closely approximated by comparing the old brushes. Only a few final touches were needed while sliding the new brushes through the brush boxes to make sure there were no binding issues. Since I knew that the copper leads were not quite long enough to reach the original brush terminal posts I had cut the old brushes off at the brush end leaving the majority of their electrical leads in place. With the new brushes installed in their brush boxes, each (new and old pigtail) end of the two copper leads were both joined together in a short uninsulated barrel splice and crimped. I then soldered the leads within the splice for good measure. The photo of the commutator surface didn't come out too clear. 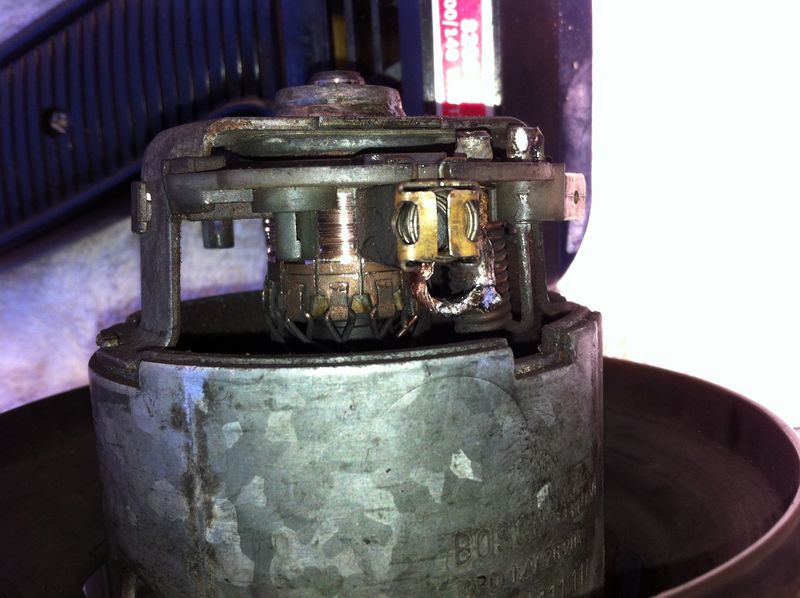 Hopefully my blower motor rebuild effort will last a while. Once everything was buttoned back up and working better than new, I figured that in saving a few dollars in parts, it had only cost me about $2,000 in labor and heart burn...... Michael
__________________
1984 928S - "Miss Purdy" 1987 911SC - "Frau Helga" 1986 930 - "Well Hung" 1975 911 Targa "Blue" |
||
|
01-27-2015, 04:14 PM
|
|
|
Registered
|
Few More Quick Projects -
With the weather staying in the 60's for a few more days I wanted to finish off the week with a couple more quick projects. First is to try once again to find a slow seep in the transmission filler/reservoir area. I've installed a new Fel-Pro Trans Pan Gasket twice and carefully torqued the bolts correctly but still have a slow drip somewhere along the rear of the transmission pan (?).... I'm beginning to suspect a cracked reservoir. It is just enough of a leak for Miss Purdy to mark her territory every time she is parked for any length of time. I keep newspaper under her in the garage to absorb her piddle
Now that the HVAC temp control motor is working as advertised - next is to put the gauges on the A/C system to check out the pressures. I'd replaced the compressor, drier and line seals when I added an external power relay to the clutch circuit and installed Freeze-12 a year or so ago. The previous owner had an A/C bill from the Porsche dealer in the glove box when I bought Miss Purdy that was for more than I paid for my 85 - Lady in Red. Finally I need to replace the odometer gears in Miss Purdy - again. I'm beginning to wonder if this is one of those lost cause projects. There have also been a couple of repeat odometer gear failures in a few of my friends 928's and a BMW. The 928's were possibly the result of a self inflicted skill level miscalculation but the Beemer was a professional garage speed-o-meter swap out. Anyone having a bout with cabin fever ? We're thinking of taking an early spring trip up toward Colorado - Michael
__________________
1984 928S - "Miss Purdy" 1987 911SC - "Frau Helga" 1986 930 - "Well Hung" 1975 911 Targa "Blue" Last edited by JK McDonald; 01-30-2015 at 07:27 AM.. |
||
|
01-29-2015, 05:20 PM
|
|
|
Registered User
|
60 degrees...and you are complaining about cabin fever?
It was 28 degrees here yesterday...and since it was so "nice out"...I thought about starting the tune-up on the car and finishing the fuel lines. After four days of single digits and wind-chills on the negative side of zero...28 seemed almost tropical. Just about broke out the swimsuit and headed for the beach...lol But seriously...nice repair on the blower motor. It's always gratifying to fix something the old fashion way. Instead of just replacing it. Sure enjoy the picture, too. That green stuff in the background looks mighty nice. Brian. |
||
|
02-01-2015, 01:54 AM
|
|
|
Registered
|
Mexican Schnook -
Didn't get everything done because the temps in our area are back down to the high 20's - low 30's again. We just had a Mexican Schnook blow through from the Gulf Coast for a few days. We've had quite a few wet and icy cold spells in North West Texas this year. Believe it or not - We think we are excellent drivers on slippery roads. When things are slick with ice and at their worst, every Texan instinctively believes it is best to drive even faster. All our tow truck drivers are always tickled to see the bad weather - they can charge extra because we're always slid in backwards down in the ditch further than normal......
Michael
__________________
1984 928S - "Miss Purdy" 1987 911SC - "Frau Helga" 1986 930 - "Well Hung" 1975 911 Targa "Blue" Last edited by JK McDonald; 02-01-2015 at 05:55 PM.. |
||
|
02-01-2015, 05:45 PM
|
|
|
Registered
|
Progress - Miss Purdy
With the temps back up into the high 60's again I was able to check the A/C pressures. On the High side 189 psi / Low side 30 Psi. Good enough for government work. Installed a new transmission pan gasket. No leaks so far. Removed both door panels to check for wear in the two window guide post bushings. I installed a zip tie (Thanks Nio) in the upper bushing on the driver's side to take out a small amount of wear. The passenger side was fine. Dissembled/cleaned the window motors and greased the internal gearing. Also lubricated the vertical guide post and horizontal runner for the windows, buttoned it all back up - ops checked good. I found on the driver's side door panel that someone had been in there before and had broken off most of the plastic panel pronged installation grommets. Luckily Auto-Zone has all sorts of generic plastic parts. Also cut to fit a "Dollar Store" shower curtain for a inner water shield for the driver's door panel. (Thanks - Mr Merlin)
The Odometer gear will be on the back burner for a while. I made a rough check of the Toe-In after the alignment and I think they must have lifted the front tires while on the ramps. I'd specifically explained to the technician about the 928 requirement for setting the alignment and that it is important that the weight should not be removed from the front suspension. I guess I'm in for an argument when I take it back in. Especially since they had talked about how new and high tech all their equipment was. So Far, Almost So Good... Michael
__________________
1984 928S - "Miss Purdy" 1987 911SC - "Frau Helga" 1986 930 - "Well Hung" 1975 911 Targa "Blue" Last edited by JK McDonald; 02-07-2015 at 08:08 PM.. |
||
|
02-07-2015, 07:30 PM
|
|
|
Registered
|
In Centi-Meters
After driving Miss Purdy a few times I decided to make another appointment back at the alignment shop and have the toe-in checked again. Although they assured me on the phone that everything had been adjusted properly according to their spec's, she just didn't feel as nimble as it did before the alignment.
Since it is quite a drive into the city I decided to at least try to make a basic toe-in check at home. Has anyone looked at buying one of the "Do It Yourself" Lazar type alignment gizmos ? One manufacturer had a reasonable selling price but wanted an additional $100/month contract for software support to keep their top secret Trapozodial-Hyper-Bolific-Transendental software package current ? I'm sure owning one of these things would be nice but it seems to be over kill for most of my home projects and way too complicated for my needs. When I replace front end components I normally just use some very basic old school methods that will get things close enough to make it to an alignment rack without scrubbing the front tires off. I took a couple of photos to give you a general idea of the toe-in set up. Camber and caster are another animal all together but can also be closely estimated.  My rough toe-in procedure is to first find a flat level cement slab to park the car on and check that all the tire pressures are correct. Center the steering wheel and install the specialty "Nose Cone" centering bolt into the rack and pinion housing. Next, set up 4 heavy jack stands - each one just past the corner of the car and run a tight string front to back down the length of each side. Set the string height across the middle of each rim so that it is evenly spaced out from the front/rear rim center caps exactly 1 inch. This should set each string square to the side of the car. I then carefully measure the distance from the front and rear edge/lip of each front rim to the string. For this measurement I switch to centimeters on my tape measure for a finer hash mark and more precise (for me easier to see) reading. Just as I suspected I found that my toe-in was way off. I placed masking tape with red marks around each tie rod so I could keep track of the direction and how much they were rotated. As I adjust the tie rods 1/2 rotation at a time, I make sure to roll the car forward and back a few times to relax the steering and suspension components. I place a chock behind each rear tire so I can return to the same measuring spot after each final roll back. Now that I have a basic idea of what is needed I set a final .2 cm toe-in at each front tire and snugged the tie rod nuts. It's a little difficult to hold the camera steady vertically so you can see the exact measurement and tape measure in the correct place all at the same time. The close up photos of the rim are only of the drivers side with the front edge of the rim showing 3.4 cm and the rear edge of the rim 3.6 cm. The passenger side rim adjustment would be set to the same relationship.   Once I am satisfied with my final toe-in settings, I then make a side to side measurement under the car between the front two tires using the tread as a marker. I use 4 squared off 4" x 4" blocks (2 per wheel) to standardize the height from the ground to my measuring points. Now again using the centimeter scale I have the wife hold one end of the tape measure against the inner edge of a specific vertical groove on the front side of the right tire while I take a reading at the same tread point on the front side of the left tire. Make sure the tape measure rests across the top of the 4" square block on each side to standardize the measuring height. This measurement is repeated on the rear side of the front tires and the two readings compared. As a cross check - Roll the car forward about 1/2 tire rotation and repeat this measurement. For the side to side measurement across the front of the tires I used the out side large vertical groove. It's showing 159.2 cm. The back side of the front tire using the same grooves for a measurement was 159.4 cm. One point that I should have also mentioned is that when reading across the front and back side of the tires it is at a much lower point (4" from the grd) rather than at the max distance across the middle front and back face of the tires. Since this measurement was 159.2 cm at the front measurement and 159.4 cm at the rear it means that the .2 cm difference indicates a .1 cm toe-in per tire at this location. Still indicating the slight toe-in I'm looking for.  So far I've found that the toe-in was again about the same .2 cm per side using the first method of measurement. After a 10 minute test drive, since the toe-in had not changed I felt that it would be a non-destructive return drive back to the alignment shop. I am sure a trained alignment tech would find a lot of faults with this process and I realize it is not very scientific. At best it does not take into account that my cement slab is not calibrated to be flat to the center of the earth, that the middle position or center of the front and rear wheels may not be square to each other or that my rims may not be perfectly true and/or the tire tread may not have been absolutely centered all the way around the tire. But like I mentioned, all I wanted was a reasonable method to safely get me back to the alignment shop. On a positive note : It turned out that my camber and caster were fine and the toe-in was only off a "Gnats Ass" according to the second alignment tech - I'm not sure how many centimeters are included in a gnats ass ............. Any comments are welcome. Good Luck, Michael
__________________
1984 928S - "Miss Purdy" 1987 911SC - "Frau Helga" 1986 930 - "Well Hung" 1975 911 Targa "Blue" Last edited by JK McDonald; 02-12-2015 at 07:15 AM.. |
||
|
02-11-2015, 05:56 PM
|
|
|
Network Native
Join Date: Jan 2007
Location: SoCal
Posts: 10,349
|
I wouldn't use the edge of the rim, vs first flat area closer to the center of the wheel. Dr Bob on RL has done a few DIY alignment threads, some even using threads.

|
||
|
02-14-2015, 06:44 PM
|
|
|
Registered
|
Hypochondriac -
I thought I was again approaching the end of my "To Do" list when something just jumped up and bit me. I'd had noticed my MPG has been lower than normal for the last tank or two so I decided to temporarily install an Air/Fuel ratio meter as a trouble shooting step. This allows me to monitor what the L-Jectronic computer should be receiving from it's Narrow Band O2 exhaust sensor.
Once this older style O2 sensor is up to operating temp it provides a toggling feed back of either (aprox) a .1 volt signal when it sees a lean exhaust or a .9 volt signal when a rich exhaust mixture is sensed. If everything in the L-Jet system is working properly and it is happy with all it's other inputs - the computer reacts to adjust the fuel injector pulse width by chasing these two O2 sensor voltages. The computer initially fires off the injectors and then waits for the O2 sensor to tell it "What's Happened" in the cylinders. If a .1 volt (lean) signal is received, the computer immediately enriches (lengthens) the next series of injector pulse widths. This generates a slightly richer exhaust moment. Then after receiving the resulting .9 volt (rich) signal from the O2 sensor, the computer now shortens the next series of injector pulse widths to once again lean out the mixture. In theory the average of the toggling lean/rich injector pulse width adjustments are supposed to produce the IDEAL fuel MPG vs emission setting over all. The newer "Wide Band" O2 sensors can produce a vast variety of stair step feedback voltages which gives their computers a lot more information to work with. With today's faster computers, the older designed "Narrow Band" O2 sensor is considered a bit crude when it comes to controlling the engine emissions during a heavy acceleration or hard decelerating event. Although it takes a little longer (compared to the Wide Band Systems) for the older computers to catch up on it's calculations, it will eventually return to producing it's toggling injector command sequence once a steady speed is reached. My MPG problem has turn out to be the result of an unhappy computer commanding a constant rich mixture for some reason and ignoring it's normal toggling lean/rich injector mode of operation. The O2 sensor is generating a constant .9 volt signal as seen on the Air/Fuel mixture meter.  I'm now assuming Miss Purdy is operating in the OPEN LOOP MODE and the problem is not a failed O2 sensor because I just replaced it with no change in the symptoms. The heater supply voltage source is good and the new one tested good using a butane torch before installation. I think it may be now down to a couple of wiring possibilities: 1) The O2 sense signal is not reaching the computer 2) The Temp II Sensor has failed and/or not connected to the computer - the computer may think the engine is always cold ? or 3) One of the Fuel Injectors and/or Cold Start Injector is leaking 4) Fuel Pump pressure too high 5) Miss Purdy is a closet hypochondriac .........It's actually still running pretty good - any additional suggestions would be appreciated. My wife always feels the best way to fix a 928 is unscrew the radiator cap and drive a new car under it. Michael
__________________
1984 928S - "Miss Purdy" 1987 911SC - "Frau Helga" 1986 930 - "Well Hung" 1975 911 Targa "Blue" Last edited by JK McDonald; 02-15-2015 at 05:03 PM.. |
||
|
02-15-2015, 04:39 PM
|
|
|
Registered
|
Running Rich -
When I loosened the brake booster vacuum line at the intake plenum I could visually force the fuel ratio meter/O2 sensor to show a very lean condition, I figured that the L-Jet computer was capable of evaluating the exhaust. My next step was to determine why the engine was running rich and where the extra fuel was coming from since the rail pressure was only 33 psi. The cold start circuitry and the primary injectors were electrically working fine. I then checked for the correct resistance at the temp I (air) and II (water) sensor and traced their wiring back to the computer connector. Finally I started unseating the injectors. The problem turned out to be a fairly steady drip from the cold start injector. While digging around in amongst the engine bay fuel lines I discovered a couple of the larger rubber hoses were rock hard and their outer surface was beginning to show some stress cracks. They all looked good when I bought the car and the owner had said that he'd already had the intake refreshed. But ......to be safe I've decided to go ahead and replace all the high pressure rubber lines and send the injectors out to be cleaned. I guess to the PO "Refreshed Her Top End" may have just meant that Miss Purdy had danced her way into the toilet to powder her nose.
Does anyone know the metric ID of the fuel lines I will need ? There seems to be quite a discussion on whether the Gates 3/8" and 5/8" hoses should be used. Thanks, Michael
__________________
1984 928S - "Miss Purdy" 1987 911SC - "Frau Helga" 1986 930 - "Well Hung" 1975 911 Targa "Blue" Last edited by JK McDonald; 03-01-2015 at 01:20 PM.. |
||
|
02-28-2015, 02:35 PM
|
|
|
Network Native
Join Date: Jan 2007
Location: SoCal
Posts: 10,349
|
Find my old injector thread, full of details. I'm thinking its a metric size like 7.5mm, but I think Roger and someone else sell the right size hose, I bought Gates Calif smog approved, but don't recall the size.
|
||
|
02-28-2015, 05:55 PM
|
|
|
Registered
|
Fuel Lines -
Thanks Danglerb, Good Write-Up With Lots of Information......When It Comes To Buying the Correct Quality and Size To Replace Your Aged Fuel Lines - It's Always Better To Be Safe Than Sorry.
I had to fix a fuel pump leak up under the front of Frauhelga one time that scared the Beejeebers out of me and my wife. We were flying down an old two lane country road out in the middle of no-where when a strong smell of gas suddenly hit. Luckily I was able to immediately turned off the ignition and safely coast down through a grassy ditch and up onto the other side without a streaming trail of fire behind me. Since we had stopped on a hill of sand I put the transmission in 1st gear and pulled the emergency brake. Then chocked the front and back side of the driver's wheels with a couple of large limbs and put a board under the foot of my jack so it wouldn't sink into the ground. Once I had Frauhelga raised enough to lower one side of the fuel pump protective panel I put two cinder blocks liberated from a nearby abandoned trailer house under the passenger's side of the car for (?) safety. (I know-I know but I didn't have much to work with). The spewing leak was just past a crimped high pressure coupler on the output of the fuel pump. Once I cut the collar off the banjo fitting with a hacksaw blade held in a pair of vice-grips, I shortened the line and added a spare hose clamp. An ops check showed that everything was temporarily sealed up again. The black plastic trash bag I used to help keep me out of the dirt did absolutely nothing to deter the fire ants that were doing their best to have me for supper. My wife didn't say much during the repair process but later said that she'd expected to have a pretty tough time explaining this story to the police and coroner if Frauhelga had fallen. One Additional Note: I received an email from a friend asking if we made it home after the fuel line repair - yes, everything did hold together long enough to get us the final 150 miles home. Don't take any chances with your aged fuel lines. Drive Safe, Michael 
__________________
1984 928S - "Miss Purdy" 1987 911SC - "Frau Helga" 1986 930 - "Well Hung" 1975 911 Targa "Blue" Last edited by JK McDonald; 03-02-2015 at 02:28 PM.. |
||
|
03-01-2015, 03:03 PM
|
|
|
Registered
|
The Universe Hates a Vacuum -
Well - I finally sorted out why my MPG had deteriorated on Miss Purdy. The issue turned into more of a project than necessary because I made the mistake of not thoroughly checking the simple things first. Assuming the worst, my troubleshooting process started off by wringing out the L-Jet computer inputs, wiring, plugs, connectors, throttle position signal, air/water temp sensors and all the grounds, etc.... Although I had already found and replaced a seeping cold start injector, it didn't completely solve the problem. I chased a few more rabbits while measuring the pin out resistance of the Air Flow Metering Unit and then disassembled it to examine the internals for wear, contamination or damage. I also adjusted the wiper arm to a new tracking path, cleaned the other contact points and made a couple of updates for reliability.
 During several of my earlier quick fuel pressure tests the regulators/dampener had been eliminated as a potential issue since they were found to be producing about 33 psi with the car at idle and 38 psi when lightly rev-ed. Each of the regulator/dampener spring diaphragms had statically held a good vacuum when individually checked with a small hand held vacuum pump. (Vacuum Gauge Holding Steady)  During the third round of head scratching, I discovered that the fuel pressure became unstable at the slightest sideways movement of the vacuum line plumbing and would cause my fuel pressure to fluctuate or spike up toward 42 psi. It turned out that the origin of my problem was a simple split in one of the 3 legged vacuum fittings attached near the top rear side of the throttle control valve. With the Air Filter Assembly and Air Flow Metering Unit removed, there is just enough access room under the spider to replace the leaking rubber elbow. Note: There are actually two small metal vacuum sources side by side in this location. On Miss Purdy the left one provides a vacuum source to both pressure regulators, the pulse dampener and a small solenoid valve looking gizmo mounted along the middle of the passenger fender well. The right one goes to the distributor advance, a thermal control valve and the charcoal canister control. Once I had narrowed down the source of my problem, it seemed like the more vacuum lines I disassembled, inspected and replaced - the more swollen rubber connections, deteriorated fittings and questionable joints I found. Replaced them all....... Each fuel rail pressure regulator is internally set through a balancing act between an internal spring loaded diaphragm and manifold vacuum. Typically, a high vacuum, low load condition, will see the fuel pressure maintained at a steady (Factory Spec) 36 psi. At idle my regulators appear to hold things a few psi low but I'm also not sure if my test gauge is properly calibrated. This shows the final idle fuel pressure after replacing the vacuum lines and fittings.  If the throttle is suddenly opened wider, the manifold vacuum drops and the regulators will automatically increases the rail pressure. At wide-open-throttle the fuel pressure will temporarily climb toward the 42 psi mark and then taper back down during acceleration. When everything is working properly, the correct quantity of fuel injected at any given instant is the result of a computer calculated pulse width plus an assumed correct fuel rail pressure that is proportionally adjusted according to the engine load. Since I had a loss of manifold vacuum felt to the regulators - my fuel rail pressure was being constantly maxed out in error. When the computer sees the resulting rich exhaust signal being sent back from the Oxygen Sensor, it immediately reduces the injector duty cycle to a minimum - trying to correct the air/fuel mixture. My high fuel consumption was the result of the computer not being able to sufficiently cut back enough on the injector pulse width to cancel out the abnormally high (42 psi) fuel pressure. Each time the injectors were triggered open, excessive fuel was being forced into the cylinders. Looking back I realize that my problem should have been a fairly simple one to figure out if I'd been paying attention to the basics and had remembered the old saying that - "The Universe Hates a Vacuum and Will Eliminate It At Every Opportunity". Drive Safe, Michael
__________________
1984 928S - "Miss Purdy" 1987 911SC - "Frau Helga" 1986 930 - "Well Hung" 1975 911 Targa "Blue" Last edited by JK McDonald; 03-12-2015 at 04:42 PM.. |
||
|
03-11-2015, 08:38 PM
|
|
|
Network Native
Join Date: Jan 2007
Location: SoCal
Posts: 10,349
|
Basic PM eventually pays off, so no worries re lost time etc, you just eliminated a future problem.
|
||
|
03-13-2015, 06:58 PM
|
|


