|
|
|
|
|
| Author |
|
|
Registered
Join Date: Jan 2004
Location: CT
Posts: 11,588
|
2.2L to 2.5L Engine Rebuild Project
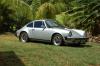
Over the past several years, I have been working on the restoration of a numbers matching 1970 911E that I purchased as a basket case in an estate auction. The details of the now completed project are described in this post on the The Early 911S Registry.
https://www.early911sregistry.org/forums/showthread.php?110928-MY-1970-911E-Restoration-Project I decided to document the details of the engine build here on Pelican as Wayne's book and the articles on this forum have been a great source of inspiration and information for me over the years. It was important to me that the car, including the engine, look as original and correct as possible. However, a little extra pep is always nice to have. Since the original Biral cylinders were too worn to be useable at 84 mm, I decided to have them bored to 86 mm, use a nice 2.4/2.7 crank I had in stock and make a 2.45 L long stroke. Since the car will be a street driver, I used 9.5 CR JE pistons, and a set ModS cams. The heads, throttle bodies and stacks were all opened up to 34 mm intakes and the injection pump recalibrated for the 2.45 application. The idea was to have a nice street driven car with plenty of mid range torque. The engine is now complete, in the car and runs very nicely. The following postings will describe the details of the build project.
__________________
Tom Butler 1973 RSR Clone 1970 911E - Sold but Never Forgotten 914-6 GT Clone |
||
 05-05-2021, 11:32 AM
|
|
|
Registered
Join Date: Jan 2004
Location: CT
Posts: 11,588
|
The case got the standard Magnesium case mods for a street motor. The work was done at Verden Tool in NJ and included the following:
1. Case resized to standard bore 2. Spigot faces re-planed 3. Time certs installed for head studs, gearbox studs, mount console & long 8 mm internal stud 4. Piston squirters 5. Through bolt surfaces spot-faced 6. Oil bypass modification Verden also re-bored the Biral cylinders to 86mm and resurfaced the flywheel.      
__________________
Tom Butler 1973 RSR Clone 1970 911E - Sold but Never Forgotten 914-6 GT Clone |
||
|
05-05-2021, 11:49 AM
|
|
|
Registered
Join Date: Jan 2004
Location: CT
Posts: 11,588
|
I need to store the case while I continued work on the car so I gave it a good soaking with Gibbs and wrapped it in plastic contractor bags.
Once I started on the engine the first step was to check the main bearing clearances and crank rotation. The main bearing clearances were checked as follows: 1. Insert new bearings into the case and torque the case. I used a set of freshly plated fine thread through bolts 2. Zero the dial bore gauge on the crank main journals. All journals were standard diameter. 3. Measure the case main journal bores with the dial bore gauge to determine the difference between the crank journal OD and the main bearing ID. Clearances for all bores measured between 0.002-0.003"  I also decided to check the case bore alignment at this point by installing the crank with the bearings and checking for smooth, low resistance crank rotation. All was good. 
__________________
Tom Butler 1973 RSR Clone 1970 911E - Sold but Never Forgotten 914-6 GT Clone |
||
|
05-05-2021, 12:06 PM
|
|
|
Registered
Join Date: Jan 2004
Location: CT
Posts: 11,588
|
Next up was to install the IMS, layshaft and oil pump and then seal up the case. I used an SC oil pump that I disassembled and inspected for wear. I used steel clinch nuts rather than lock tabs for the oil pump. I also used re-plated steel head studs.
I used the sealant process outlined on Pelican with a few modifications Outer Case Halves: Threebond 1184 Bearing Saddle Surfaces: DRY #8 Bearing (balancer end) O-Ring:Threebond 1211 Case Thru Bolts: Molykote 111 on Green Viton O-Rings Flywheel Seal: DRY Balancer Seal: DRY Intermediate Shaft Cover to Case:Threebond 1211 Oil Breather Cover to Case:Threebond 1211 Cylinders to Case: Curil K-2 orThreebond 1211 Cam Towers to Cylinder Heads: Threebond 1184 Cam Chain Housings to Case: Threebond 1184 Cam Chain Housings to Cam Towers: Threebond 1184 Cam Chain Housing Cover to Cam Chain Housing: Threebond 1184 Gaskets: Thin coat of Loctite 574 I used a set of home made cardboard tools to stand up the rods and chain. Pretty sloppy. On my next build, I will use the correct tools. I was happy with the amount of "squeeze out" and crossed my fingers on no case leaks.    
__________________
Tom Butler 1973 RSR Clone 1970 911E - Sold but Never Forgotten 914-6 GT Clone |
||
|
05-05-2021, 12:20 PM
|
|
|
Registered
Join Date: Jan 2004
Location: CT
Posts: 11,588
|
Next up was the installation of the oil pressure and temperature sensors along with the correct MFI breather cover. I used period correct sensors that I tested using gauges from my stash.
 
__________________
Tom Butler 1973 RSR Clone 1970 911E - Sold but Never Forgotten 914-6 GT Clone |
||
|
05-05-2021, 12:25 PM
|
|
|
Registered
Join Date: Jan 2004
Location: CT
Posts: 11,588
|
Next up was the all important deck height check. I installed the pistons at #1 and #4 using the Stromski pin injector which worked very well once I understood how to use it. I started with a 0.25 mm copper shim under both cylinders and used the crushed solder method. After installing the #1 and #4 heads with their head gaskets and rotating the engine a few times I removed the heads and checked for solder crush at the edges. Since the case had been resized, the cylinders were too close to the engine centerline and thus gave too small a deck height. I ended up using a pair of stacked gaskets with one at 0.25 mm and the second at 0.5 mm to achieve deck hts of 1.15 mm

__________________
Tom Butler 1973 RSR Clone 1970 911E - Sold but Never Forgotten 914-6 GT Clone |
||
|
05-05-2021, 12:37 PM
|
|

|
|
Registered
Join Date: Jan 2004
Location: CT
Posts: 11,588
|
At this point it was time to verify the compression ratio. I had my doubts about the CR as the piston dome hts seemed to be much higher than what I would expect for my 9.5 CR target. The piston supplier assured me I had the right pistons so I set up my burette on the kitchen counter and used the Bruce Anderson description to guide my process.
The combustion chambers all measured as expected in the range of 68-66 cc's. However, the piston dome volumes were all too large. I measured 32 cc's which would put me in the 10.8 CR range. I finally got things squared away with the supplier but had to wait several months for a replacement set of pistons. The correct set of JE pistons finally arrived measured 25.8 cc's and resulted in a calculated 9.6 CR. 
__________________
Tom Butler 1973 RSR Clone 1970 911E - Sold but Never Forgotten 914-6 GT Clone |
||
|
05-05-2021, 12:53 PM
|
|
|
Registered
Join Date: Jan 2004
Location: CT
Posts: 11,588
|
Nest I wanted to verify the piston to cylinder clearances before proceeding. For this I measured the piston skirts with a micrometer and then measured the cylinder bores with a dial gauge calibrated on the same micrometer used to measure the pistons. I check the bore in (4) locations, top and bottom of stroke and at 0 and 90 deg, to confirm roundness and taper are in spec. The inspection results showed good clearances (0.003") with minimal ovality and taper in the bores.

__________________
Tom Butler 1973 RSR Clone 1970 911E - Sold but Never Forgotten 914-6 GT Clone |
||
|
05-05-2021, 01:04 PM
|
|
|
Registered
Join Date: Jan 2004
Location: CT
Posts: 11,588
|
I installed the pistons and cylinders with Threebond 1211 on the inside and outside surfaces of the two shim sandwich. The heads, which were rebuilt ported to 34 mm by Anchor Atlantic, were installed on top of the cylinders with new head gaskets. The cylinder baffles were modified with the cooling improvement cut-outs.
   
__________________
Tom Butler 1973 RSR Clone 1970 911E - Sold but Never Forgotten 914-6 GT Clone |
||
|
05-05-2021, 01:13 PM
|
|
|
Registered
Join Date: Jan 2004
Location: CT
Posts: 11,588
|
Next up was the installation of the cam towers, oil return tubes cams and cam drive hardware. I used a carpenters straight edge clamped to the case front to do the sprocket alignment measurements. I found it very repeatable. I used a set of mechanical tensioners to maintain chain tension while setting the cam timing and I repeated the sprocket alignment measurement after timing the cams. In the spirit of keeping the original look to the engine, I used wide bushed idler arms with late 930 tensioners and safety collars. I checked the piston to valve clearance by screwing in the intake and exhaust valves adjusters to the clearance spec and rotating the engine to ensure no interference.
    
__________________
Tom Butler 1973 RSR Clone 1970 911E - Sold but Never Forgotten 914-6 GT Clone Last edited by tom1394racing; 05-05-2021 at 01:54 PM.. |
||
|
05-05-2021, 01:26 PM
|
|
|
Registered
Join Date: Jan 2004
Location: CT
Posts: 11,588
|
Now it was time to close up the long block. I installed the original Bosch distributor that was rebuilt by Kurt at Parts Klassic. I used a nice set of original Mag upper valve covers that I planed flat. For the lower covers, I used the later model ribbed Aluminum covers that I also planed flat. The oil cooler was cleaned, flushed and pressure checked before installation. The sump cover and screen were also installed as were the chain box covers.
   
__________________
Tom Butler 1973 RSR Clone 1970 911E - Sold but Never Forgotten 914-6 GT Clone |
||
|
05-05-2021, 01:34 PM
|
|
|
Registered
Join Date: Jan 2004
Location: CT
Posts: 11,588
|
It was now time to move to the top of the engine. I started with the original shroud that I restored by cleaning, and clear coating. Then came the injection pump that was rebuilt and calibrated for the 2.5 engine spec by Mark Jung at MFI Werks. I flowed the throttle bodies with a shop vac and Unisyn gauge to set the throttle stops and ensure each throttle flowed the same with the butterflies resting on the idle stops. The butterfly linkage rods were installed with zero tension per the CMA. New injectors were used.
    
__________________
Tom Butler 1973 RSR Clone 1970 911E - Sold but Never Forgotten 914-6 GT Clone |
||
|
05-05-2021, 01:44 PM
|
|
|
Registered
Join Date: Jan 2004
Location: CT
Posts: 11,588
|
Next up were the stacks, crossbar and remaining linkage rods. All were set per the CMA instructions. The restored fan and rebuilt Bosch 55 amp alternator were installed along with the restored engine wiring harness that was checked for correct continuity though the engine relay panel to the main front to back harness.
   
__________________
Tom Butler 1973 RSR Clone 1970 911E - Sold but Never Forgotten 914-6 GT Clone |
||
|
05-05-2021, 01:52 PM
|
|
|
Registered
Join Date: Jan 2004
Location: CT
Posts: 11,588
|
Next up was the engine surround tin and the exhaust system. The original heat exchangers were solid and mostly dent free. The muffler is a new Dansk. Both were ceramic coated and the spayed with the correct VHT color.
       
__________________
Tom Butler 1973 RSR Clone 1970 911E - Sold but Never Forgotten 914-6 GT Clone |
||
|
05-05-2021, 02:01 PM
|
|
|
Registered
Join Date: Jan 2004
Location: CT
Posts: 11,588
|
Since all this was happening during Covid, I was a one man show. I used my Harbor Freight lift table and some jury rigged furniture dollies to align the gearbox with the engine for installation. I used the lift table and a floor jack to install the engine in the car. After some tousling, all went together smoothly.
   
__________________
Tom Butler 1973 RSR Clone 1970 911E - Sold but Never Forgotten 914-6 GT Clone |
||
|
05-05-2021, 02:10 PM
|
|
|
Registered
Join Date: Jan 2004
Location: CT
Posts: 11,588
|
After making all the connections, I verified oil pressure and followed Walt Frick's 1st start and break in process. To my great joy the engine started easily and ran smoothly for 20 minutes at 2000 RPM. No nasty noises or visible leaks. I changed the oil and filter, fired it back up, set the timing and off I drove. The car and engine ran really well. The only issue was the idle which stayed at 2000 RPM after warm up. I went back to the CMA and rechecked all the linkages. I then used the idle air bypass screws to synchronize the airflow to the lowest flowing throttle body at the 2000 RPM idle and brought the idle down to a more manageable 1200 RPM. So far so good!
__________________
Tom Butler 1973 RSR Clone 1970 911E - Sold but Never Forgotten 914-6 GT Clone |
||
|
05-05-2021, 02:19 PM
|
|
|
Registered
Join Date: Jun 2003
Location: Camarillo, Ca.
Posts: 2,418
|
Nice build Tom. And looks the part!
__________________
Aaron.  F.S. 1965 Solex engine w carbs/cleaner F.S. 1965 Solex engine w carbs/cleanerBurnham Performance https://www.instagram.com/burnhamperformance/ |
||
|
05-05-2021, 07:41 PM
|
|
|
JED
|
Professional!
|
||
|
05-06-2021, 06:48 PM
|
|
|
Registered
|
Excellent work, Tom! Thank you for taking the time to document it. I’ll be putting my 71T back together this summer and this thread will be a great help.
Regards, dho |
||
|
05-06-2021, 06:55 PM
|
|
|
I would rather be driving

Join Date: Apr 2000
Location: Austin, TX
Posts: 9,108
|
Tom, Looks great. Happy to see you are back on the road with this car.
__________________
Jamie - I can explain it to you. But I can not understand it for you. 71 911T SWT - Sun and Fun Mobile 72 911T project car. "Minne" - A tangy version of tangerine #projectminne classicautowerks.com - EFI conversion parts and suspension setups. IG Classicautowerks |
||
|
05-07-2021, 11:42 AM
|
|


 1980 PORSCHE 911 SC
 Lorreta
