|
|
|
|
|
| Author |
|
|
Registered

|
Is this basically what we're doing? I feel like I must be missing something, because if this would mean we don't care what the depth gauge values are, just that we find the peak.
I'd like to know what is actually happening, not just the list of directions to do the timing. 
__________________
Lillie - 1979 911 SC Targa, The Original 911 SCWDP Car. Rebuilt and roaring to go! |
||
 10-24-2025, 06:04 AM
|
|
|
It's a 914 ...
Join Date: Jan 2008
Location: Ossining, NY
Posts: 4,802
|
That's basically what's happening. One minor clarification is that when you set cam timing at TDC overlap, the cam is at the "measured lift" spec for your cam (e.g. 1.1-1.4 mm for an SC or 3.2 Carrera), not full lift. I realize you probably already knew this.
If you want to visualize what's happening as you do your cam timing, it can help to have a degree wheel. Even just a printed one taped to your pulley can help visualize. |
||
|
10-24-2025, 06:31 AM
|
|
|
Registered
|
Quote:
__________________
Lillie - 1979 911 SC Targa, The Original 911 SCWDP Car. Rebuilt and roaring to go! |
||
|
10-24-2025, 06:45 AM
|
|
|
It's a 914 ...
Join Date: Jan 2008
Location: Ossining, NY
Posts: 4,802
|
If you are not careful, then yes that could happen. The usual timing procedure has you start with crankshaft at TDC, and camshafts on both sides with the dot or "930" mark pointed vertically (or with the keyway pointed up, in case the other marks are not there). This has you starting in the ballpark, and then you turn one revolution of the crank to get to TDC overlap on #1 do the small correction to get to the measured lift spec. If you follow that procedure, you won't be far enough off to have the issue you mentioned above.
|
||
|
10-24-2025, 06:55 AM
|
|
|
Registered
|
Ah, so you end up doing this?
EDIT: Typos in my image below. 2.d Unlock crankshaft from camshaft, leaving camshaft at measured lift. 2.e Rotate crankshaft back to TDC.  And I need to check Wayne's book or something to get that desired lift value for my engine.
__________________
Lillie - 1979 911 SC Targa, The Original 911 SCWDP Car. Rebuilt and roaring to go! Last edited by OsoMoore; 10-24-2025 at 06:27 PM.. |
||
|
10-24-2025, 07:02 AM
|
|
|
It's a 914 ...
Join Date: Jan 2008
Location: Ossining, NY
Posts: 4,802
|
Edit - realized you have the early style camshafts with the big 46 mm nut.
The basic idea is the same to do the cam timing for the early and late cam timing procedures, but the details are slightly different. With the early style camshaft, you have the option of turning the cam with a wrench. With the later bolt style, this is trickier. The early procedure basically has you turn to TDC like in your 2) c. and then do the correction by unlocking and turning the camshaft. In the later procedure, since you can't turn the camshaft easily, the procedure do 2) c. by turning to the valve measured lift spec and then unlocking and turning the crank to TDC. Your summary seems like it might be mixing the two a little but it looks more like the late procedure. Wayne's book covers both. Have a look and you'll get the idea. Last edited by stownsen914; 10-24-2025 at 08:13 AM.. |
||
|
10-24-2025, 08:01 AM
|
|

|
|
Registered
Join Date: Oct 2008
Location: Nash County, NC.
Posts: 8,557
|
Check the Stomski Racing video on setting cam timing. So much easier than guessing.
Bruce |
||
|
10-24-2025, 05:28 PM
|
|
|
Registered
|
Quote:
__________________
Lillie - 1979 911 SC Targa, The Original 911 SCWDP Car. Rebuilt and roaring to go! |
||
|
10-24-2025, 06:28 PM
|
|
|
PCA Member since 1988
|
Quote:
Yes, you can remove and replace the rockers with the engine in the car. I have done that and it was a major PITA (to install RSR o-rings on the shafts). I strongly advise that you install rebuilt rocker arms now and save yourself that trouble and cussing. Just buy a set from Henry or another vendor on an exchange basis.
__________________
1973.5 911T with RoW 1980 SC CIS stroked to 3.2, 10:1 Mahle Sport p/c's, TBC exhaust ports, M1 cams, SSI's. RSR bushings & adj spring plates, Koni Sports, 21/26mm T-bars, stock swaybars, 16x7 Fuchs w Michelin Pilot Sport A/S 3+, 205/55-16 at all 4 corners. Cars are for driving. If you want art, get something you can hang on the wall! |
||
|
10-24-2025, 11:28 PM
|
|
|
Registered
|
Some good points on doing rockers now, seriously considering sending them out this week while I finish other stuff. I can always put them back in last before I push the engine back in.
Finished cam timing today with the borrowed tools. I'm still using the old slightly damaged locking pin, so I didn't torque one side down. The new pin comes Tuesday. But that doesn't stop me from finishing the timing itself. All the stud stuff is sorted out, just need to oil-bathe my new tensioners and put them in place of the rigged stuff for setting timing, sometime tomorrow. Aren't these things just so beautiful? 
__________________
Lillie - 1979 911 SC Targa, The Original 911 SCWDP Car. Rebuilt and roaring to go! |
||
|
10-25-2025, 01:07 PM
|
|
|
Registered
|
Timing is set! Rockers will be heading off to Supertech this week. A few parts are getting in Tuesday and I should be close to buttoning it all up.

__________________
Lillie - 1979 911 SC Targa, The Original 911 SCWDP Car. Rebuilt and roaring to go! |
||
|
10-27-2025, 05:38 AM
|
|
|
Registered
|
The next step in Wayne's book is to check the piston/valve clearances. Based on my recollections of initial reading last night:
1) Install the Cylinder 1 and 4 Exhaust and Intake valves. 2) Verify at least 1.5mm clearance on intake and 2.0mm clearance on exhaust. The exact way to do that is still a little fuzzy to me. I should be able to track the highest points on the piston travel based on crankshaft position. I'm not sure how best to measure the gap to the valves. I have rebuilt heads, but they are my originals. I have new P+C from Mahle (9.8:1). I have my original crankshaft and crankcase, and rebuild of my original cams in my original cam towers. What is the best way to measure this clearance? Any tricks to it?
__________________
Lillie - 1979 911 SC Targa, The Original 911 SCWDP Car. Rebuilt and roaring to go! |
||
|
10-27-2025, 07:32 AM
|
|
|
Registered
|
One potential approach I found:
1. Set your normal lash to 1mm. 2. Rotate to expected point of closest contact for the cylinder. 3. Zero out your depth gauge on the valve edge. 4. Adjust the valve screw down until you feel it stop against the cylinder head. 5. Read the difference from where you zeroed the gauge. I'm hesitant to try this, as I suspect I'd need a lot of force to turn the screw against the valve springs, which could lead to damaging something when I reach the piston. Is this a real way to do it?
__________________
Lillie - 1979 911 SC Targa, The Original 911 SCWDP Car. Rebuilt and roaring to go! |
||
|
10-27-2025, 12:27 PM
|
|
|
Try not, Do or Do not

|
 It's hard to tell if you're using wide tensioner/idler arms. During the early air-cooled 911 days it was thought that tensioners were failing do to heat and poor design. By the time the factory started using pressure fed tensioners, they had determined that idler arms were binding on the shaft, creating a harmonic that caused the tensioner to fail. They may have introduced the wide arms when they redesigned the 930 tensioner but wide idler arm certainly were installed in all pressure fed tensioner after 1984. The tensioner kits never included new/redesigned arm so most retrofitted tensioner kits were installed using a spacer. A few years back the left side arm became unavailable so we made a bushing to simulate the wider arm configuration. I liked the modification so well that the one-off prototype became a regular in all of our engines. We modify stock idler arms and sell them on an exchange basis. We also upgrade factory wide arms with a propitiatory DP4 bushing for those concerned about wear in their existing arms.  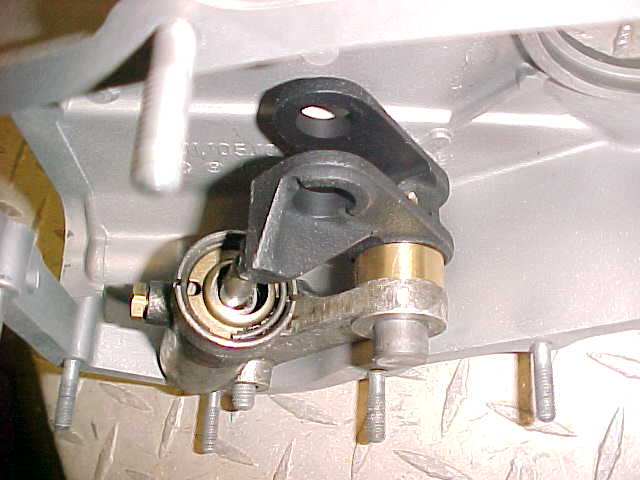 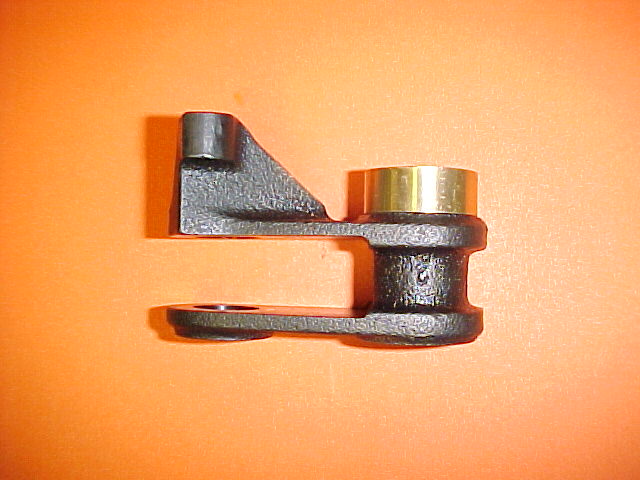 
__________________
Henry Schmidt SUPERTEC PERFORMANCE Ph: 760-728-3062 Email: supertec1@earthlink.net |
||
|
10-27-2025, 01:06 PM
|
|
|
Registered
|
My tensioners were upgraded to oil-fed in 2001, and they have the spacers on them. I didn't buy the car until 2013.
Lee's post about installing them. I feel uniquely blessed to have this much of my car's history recorded on this forum. And it is amazing to read Lee's accounts of him doing the same stuff I'm redoing 25 years later.
__________________
Lillie - 1979 911 SC Targa, The Original 911 SCWDP Car. Rebuilt and roaring to go! |
||
|
10-27-2025, 01:22 PM
|
|
|
Registered
|
Oh my god, seeing John Walker's posts on that old thread. And he's around helping us out again. Good times.
__________________
Lillie - 1979 911 SC Targa, The Original 911 SCWDP Car. Rebuilt and roaring to go! |
||
|
10-27-2025, 01:26 PM
|
|
|
Try not, Do or Do not
|
Quote:
__________________
Henry Schmidt SUPERTEC PERFORMANCE Ph: 760-728-3062 Email: supertec1@earthlink.net |
||
|
10-27-2025, 02:12 PM
|
|
|
It's a 914 ...
Join Date: Jan 2008
Location: Ossining, NY
Posts: 4,802
|
To check your piston to valve clearance - since the engine is assembled already, your best (only?) option is to do the valve adjuster screw method. There's nothing wrong with that method as a sense check to make sure you have proper clearances. I don't recall if you are reassembling with stock parts. If that's the case, you really shouldn't have any issue anyway, but good to check. If cams, pistons, etc. are non-stock, you should definitely check clearances.
Turning the valve adjust screw by hand while the engine is not turning, to make sure you have 1.5 mm, won't damage anything. The resistance turning the screw by hand will be constant unless a valve touches the piston, which you will easily feel. The screws are conveniently 1.0 mm pitch, so just turn 1.5 turns. If you don't feel anything, you're good. I'd think using the Z1 pulley mark or whatever you used for cam timing is fine for knowing where TDC is. If you used non-stock parts, or expect close clearances, some advocate for checking 5, 10, 15, and 20 degrees before and after TDC. With some cam grinds, the valve will open faster than the piston moves away from it near TDC. Some also suggest to just turn the screws in 1.5 turns and turn the engine over by hand. Personally I didn't use that method for my engine. I think you wouldn't have nearly as good a feel for any contact that might happen, and I'd worry about bending a valve. |
||
|
10-27-2025, 02:35 PM
|
|

|
|
Registered
|
Diverging from the valves/timing question. I found this bag of what I believe are valve stem seals in my box of new parts. But I sent my heads to a shop and they came back all redone with springs and all. I'm not sure these are any use to me at this stage.

__________________
Lillie - 1979 911 SC Targa, The Original 911 SCWDP Car. Rebuilt and roaring to go! |
||
|
10-27-2025, 06:09 PM
|
|
|
Registered
|
While I wait for shipping to and from Supertech, I'm working to get the rest of the steps ready to rock. Exciting things like meticulously cleaning all my rocker arm barrels.
I realized I'm going to need a ton of oil for the break-in oil changes. Like 45 or 60 quarts-worth. Any recommendations on how to best get that much 20W-50 dino oil?
__________________
Lillie - 1979 911 SC Targa, The Original 911 SCWDP Car. Rebuilt and roaring to go! |
||
|
10-28-2025, 06:49 PM
|
|


 Lillie


 Porsche
 Retor 911
 Scarab
 Riley
Riley


