|
|
|
|
|
| Author |
|
|
Registered

|
Quote:
I'm looking at sending headers/cam towers/cams/rockers to Craig Garret at G2 for him to clean up the saveable stuff and replace the unlovable parts. Basically get a full clean top end. My only uncertainty is if I wanted to bore out larger (currently 95mm) pistons. I wouldn't want to have to go back if we decide to go to 97 for example. My understanding is the heads would then be bored to match.
__________________
Lillie - 1979 911 SC Targa, The Original 911 SCWDP Car. Currently in open heart surgery. |
||
 07-14-2025, 11:20 AM
|
|
|
Try not, Do or Do not

|
Quote:
First find out what you have. Figure out a budget and proceed with a well thought out plan. That plan must include a sound bottom end.
__________________
Henry Schmidt SUPERTEC PERFORMANCE Ph: 760-728-3062 Email: supertec1@earthlink.net Last edited by Henry Schmidt; 07-14-2025 at 11:36 AM.. |
||
|
07-14-2025, 11:34 AM
|
|
|
Registered
|
In that case, I should find something profitable to do until next week when the expert is back from his races. I held off on cleaning things aggressively because I had read that many places are going to beadblast or use other special cleaning setups, and thus there wasn't much point in me laboring away with a brush and simplegreen on a cam cover.
So... some things I can do in the interim: - Clean the engine bay carefully - Clean the CIS components - Fix some low voltage frayed wires in the ignition system - Repack CV joints (yay!)
__________________
Lillie - 1979 911 SC Targa, The Original 911 SCWDP Car. Currently in open heart surgery. |
||
|
07-14-2025, 02:48 PM
|
|
|
Counterclockwise?
|
and maybe change the details in your sig

__________________
Rod 1986 Carrera 2001 996TT A bunch of stuff with spark plugs |
||
|
07-15-2025, 05:27 AM
|
|
|
Registered
|
Quote:
 Bought a pressure washer this morning, planning to clean up aluminum external case areas, engine bay, and transmission. Water and simple green. Won't touch anything steel until I have a plan to avoid it rusting over later. I don't mind the anodized look, I just want to get all the grim off.
__________________
Lillie - 1979 911 SC Targa, The Original 911 SCWDP Car. Currently in open heart surgery. |
||
|
07-15-2025, 06:14 AM
|
|
|
Counterclockwise?
|
Do you have a parts washer and a couple of cases of brake clean?
__________________
Rod 1986 Carrera 2001 996TT A bunch of stuff with spark plugs |
||
|
07-15-2025, 06:50 AM
|
|

|
|
Registered
|
Quote:
I'll be taking most of the disassembled engine to a local Porsche shop next week to get it measured and analyzed, prior to buying new parts or sending things to be refinished/etc. The shop will likely also have parts cleaners and the like, they do a lot of Porsche engine rebuilds. So I am trying to avoid doing a lot of messy work that could be done more easily by equipment a shop has.
__________________
Lillie - 1979 911 SC Targa, The Original 911 SCWDP Car. Currently in open heart surgery. |
||
|
07-15-2025, 06:57 AM
|
|
|
Registered
|
Quote:
|
||
|
07-15-2025, 09:28 PM
|
|
|
Registered
|
Quote:
I can use the pressure washer and Simplegreen for a first pass, then my bucket and some solvent and brush. In general, what's the rule for how to clean and keep parts safe? My tentative plan based on reading so far: 1) Aluminum parts can be cleaned with detergent and solvents. If not sealed/treated afterwards they may anodize, but that is purely cosmetic. 2) Steel parts can be cleaned as well, although anything that strips the oil will leave them vulnerable to rust. Lightly coat in oil afterwards. Or maybe something else? 3) Be very gentle with surfaces that mate to other surfaces to avoid oil leaks. 4) Be cautious about any brush bristles or grime or other foreign objects getting stuck inside. Some parts are going to be rebuilt, and the costs generally already include the shop cleaning. This includes: 1) Refinishing Heads 2) Refinishing and flushing Cam Towers 3) Flushing and test the oil cooler
__________________
Lillie - 1979 911 SC Targa, The Original 911 SCWDP Car. Currently in open heart surgery. |
||
|
07-16-2025, 04:27 AM
|
|
|
Try not, Do or Do not
|
You might search for a hot tank service. Most hot tanks employ the use of caustic soda (Sodium Hydroxide) which can turn aluminum products black so I would search of a service that offers sodium metasilicate in their hot tank service.
TECHNICHEM offers the best we've found. Have you split you case yet? Did the failure damage the crank as well as the rod? The yellow glob looks like epoxy...did you find anything that was repaired with epoxy?
__________________
Henry Schmidt SUPERTEC PERFORMANCE Ph: 760-728-3062 Email: supertec1@earthlink.net Last edited by Henry Schmidt; 07-16-2025 at 07:29 AM.. |
||
|
07-16-2025, 07:20 AM
|
|
|
Registered
|
Quote:
I split the crankcase and pulled the rod for the the destroyed piston. The rod has a gouge on one end, and is probably going to need replacing. It might be bent, hard to eyeball that for me. There were more piston bits in the crankcase. Other than that, it appeared quite clean.   The crank looked fine to my untrained eye. There is some damage to the worm gear and the large gear that connects to the intermediate shaft. 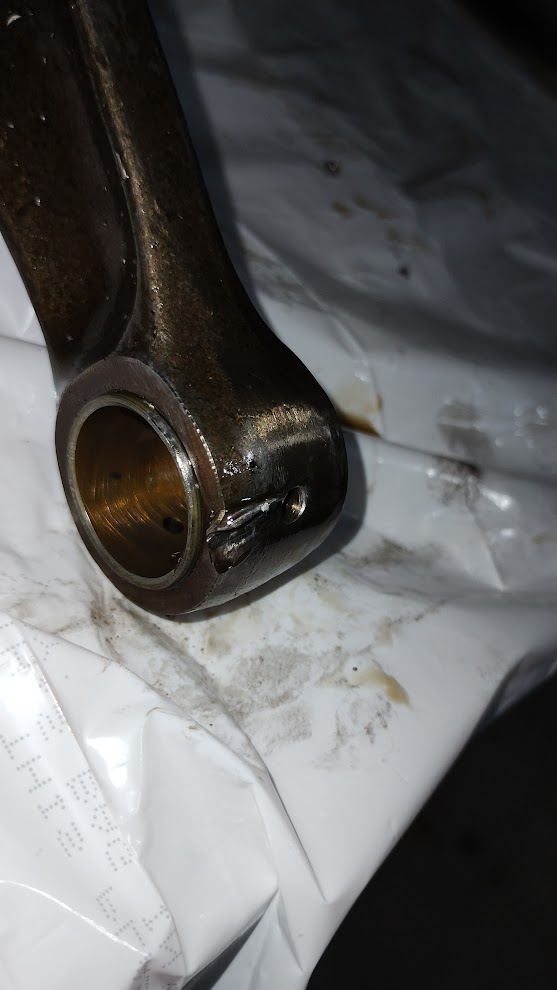   I didn't see any foreign objects in the oil pump, but I'm a little concerned it might have sucked something in. The case and mainshaft seal (not sure about the name) had the epoxy-like stuff on a spot that I suspect was leaking after the initial rebuild, I think the chunk came from there. I will examine them more closely tonight or early tomorrow when I'm home. I'll be taking everything to the area Porsche shop on Monday or Tuesday next week, and have been holding off on ordering anything until I can get expert in-person analysis. So currently I'm collecting info, doing some cleaning, and making lists of questions. The results from that meeting should help inform how much needs to be replaced. Maybe full piston/cylinder set, maybe on option to bore out all existing cylinders, maybe replacing just one? We'll see!
__________________
Lillie - 1979 911 SC Targa, The Original 911 SCWDP Car. Currently in open heart surgery. Last edited by OsoMoore; 07-16-2025 at 07:57 AM.. |
||
|
07-16-2025, 07:41 AM
|
|
|
PCA Member since 1988
|
Quote:
__________________
1973.5 911T with RoW 1980 SC CIS stroked to 3.2, 10:1 Mahle Sport p/c's, TBC exhaust ports, M1 cams, SSI's. RSR bushings & adj spring plates, Koni Sports, 21/26mm T-bars, stock swaybars, 16x7 Fuchs w Michelin Pilot Sport A/S 3+, 205/55-16 at all 4 corners. Cars are for driving. If you want art, get something you can hang on the wall! |
||
|
07-16-2025, 11:59 AM
|
|

|
|
Registered
|
Quote:

__________________
Lillie - 1979 911 SC Targa, The Original 911 SCWDP Car. Currently in open heart surgery. Last edited by OsoMoore; 07-16-2025 at 01:02 PM.. |
||
|
07-16-2025, 12:09 PM
|
|
|
Registered
|
Quote:

__________________
Lillie - 1979 911 SC Targa, The Original 911 SCWDP Car. Currently in open heart surgery. |
||
|
07-17-2025, 06:23 AM
|
|
|
Registered
|
Waiting to take major actions until I talk to the Porsche shop early next week. This morning I set up a new pressure washer and washed the chain covers and housings with high pressure and simple green. Then I put them in a bucket with more simple green to soak. I'll come back and scrub them tomorrow when I have time.
Is it recommended that I clean each nut and bolt and reuse it? Or just buy new ones? I can get them in bulk from McMaster-Carr, or individually here on our host. I presume the nylock nuts must be replaced, but it feels like there are 100 other fasteners too.
__________________
Lillie - 1979 911 SC Targa, The Original 911 SCWDP Car. Currently in open heart surgery. |
||
|
07-17-2025, 06:25 AM
|
|
|
Try not, Do or Do not
|
Quote:
We have a method of repairing this leak that has proven itself over the years. It's still a band-aid but for some, it beats disassembling the entire engine. Number 8 Main Bearing seal kit sup-lrk-001  The repair sleeve is designed to press fit on the outside of the # 8 main bearing so the interference fit should be about .0015- .0020 inches. Clean case and bearing as well as possible. Use a small wire brush (like a tooth bush) and rinse with lacquer thinner or aerosol brake cleaner. Use compressed air to ensure a dry and dust free surface. Heat the repair (small) sleeve to 180 degrees F (+ or 10 degrees). A propane torch or hot water will suffice. Slide the repair/sealing sleeve (smaller of the two) onto the snout of the # 8 bearing (chamfer side towards the case) until it is flush with the front edge of the bearing leaving room for the install the epoxy mixture. If it doesnt quite go as far as flush with the end its ok. The pressing mechanism should still work. Mix between 4 and 5 ml of epoxy in the red container (1) and set it aside. Take the bolt and washer supplied in the kit and install them in the pulley. Lube the bolt end with thread lubricant supplied in the kit (2). Take the installation sleeve and install it on the repair sleeve using the recessed end. Take the syringe supplied in the kit and fill it with you epoxy mixture. Apply it liberally around the bearing as close to the case as possible. If you use too much you can wipe the excess off after the sleeve installation is complete. Using the pulley, bolt and washer assembly, tighten the bolt until the pulley makes contact with the installation sleeve. At this point, use a 19mm socket and wrench to press the sleeve all the way against the case. Let dry for 12hrs. Remove the crank pulley and installation sleeve and reinstall the pulley using your original bolt. Remember to reinstall the locator pin before the final re-torque.
__________________
Henry Schmidt SUPERTEC PERFORMANCE Ph: 760-728-3062 Email: supertec1@earthlink.net |
||
|
07-17-2025, 07:13 AM
|
|
|
Registered
|
Quote:
https://simplegreen.com/industrial/faqs/aluminum/
__________________
Ed 1973.5 T |
||
|
07-17-2025, 12:53 PM
|
|
|
Registered
|
Quote:
Using a plastic brush seems mostly to push around the grime, not remove it. But the power washing blasted it off very well.
__________________
Lillie - 1979 911 SC Targa, The Original 911 SCWDP Car. Currently in open heart surgery. |
||
|
07-17-2025, 01:26 PM
|
|
|
Registered
|
Powerwashed it clean again, looks fine.
I'm putting together a list of general questions for the shop guy next week, in addition to looking at my parts in particular and identifying what needs replacement, what needs rework in a shop, and what I can re-use as is. General questions: 1) Should I reuse bolts and nuts? They are generally grimy but in good shape. Obviously nylock need to be replaced. 2) Should I use carb/brake cleaner for cleaning steel and aluminum external or internal surfaces? Something else? 3) What should I use after cleaning steel or aluminum surfaces to prevent corrosion? 4) What "while you're in there" jobs should I do? Transmission, clutch, and CIS have all been done recently.
__________________
Lillie - 1979 911 SC Targa, The Original 911 SCWDP Car. Currently in open heart surgery. |
||
|
07-18-2025, 10:53 AM
|
|
|
PCA Member since 1988
|
Re "while you're in there": Suspension work. Good time to replace the rear trailing arm bushings and spring plate bushings, if those are still original. If you're thinking about replacing fuel lines, especially those through the tunnel, it's heck of a lot easier without the drivetrain installed.
__________________
1973.5 911T with RoW 1980 SC CIS stroked to 3.2, 10:1 Mahle Sport p/c's, TBC exhaust ports, M1 cams, SSI's. RSR bushings & adj spring plates, Koni Sports, 21/26mm T-bars, stock swaybars, 16x7 Fuchs w Michelin Pilot Sport A/S 3+, 205/55-16 at all 4 corners. Cars are for driving. If you want art, get something you can hang on the wall! |
||
|
07-18-2025, 12:44 PM
|
|


 Lillie


 Porsche
 Retor 911
 Scarab
 Riley
Riley Wicked Witch of the East
 The Other Woman
