|
|
|
|
|
| Author |
|
|
Registered User
|
A post from 2009 warns against using the wrong / hardware store washers. I found and ordered 4 from another supplier. It would be silly to cut corners and risk the whole build.
Time is on my side , but my patience not. Last edited by ErrieKruger; 09-06-2011 at 10:07 PM.. |
||
 09-04-2011, 10:53 AM
|
|
|
Registered
Join Date: Feb 2000
Location: Dallas, TX
Posts: 4,613
|
Quote:
Nice work BTW.
__________________
Neil '73 911S targa |
||
|
09-04-2011, 12:45 PM
|
|
|
Registered User
|
 Neil- Not a quality product , but worked like a charm. I bent the prongs a tad , and that seems to do the trick. Last edited by ErrieKruger; 09-06-2011 at 07:47 PM.. |
||
|
09-04-2011, 01:37 PM
|
|
|
Registered User
|
Alternator and fan
Walnut shell blasting , and then powdercoating , will take care of this. Or maybe clearcoat Krylon as suggested by Henry.

Last edited by ErrieKruger; 09-06-2011 at 09:59 AM.. |
||
|
09-06-2011, 09:37 AM
|
|
|
Registered User
|
My wife out with friends for dinner - I could not make it because I had work to do.
 
|
||
|
09-06-2011, 07:41 PM
|
|
|
Registered User
|
Orgasmic
The shroud had a few nicks that I filled up with fiberglass , sanded it down , cleaned everything starting with hot water and soap. Then after drying , the purple stuff , water , and isopropyl alcohol. Gave everything a sanding down with 600 grit sandpaper , and again alcohol ( at that stage I needed some myself ). Used Krylon high temp primer , and Krylon high temp engine paint.

|
||
|
09-06-2011, 08:18 PM
|
|

|
|
Registered User
|
Walnut needed some glass beads to get through the layers of whatever was sucked in here over the years.

|
||
|
09-06-2011, 09:25 PM
|
|
|
Registered User
|
Next on the list while waiting for parts - and having to spend a few days earning a living.

|
||
|
09-06-2011, 10:05 PM
|
|
|
Registered User
|
   
|
||
|
09-08-2011, 04:42 PM
|
|
|
Registered User
|
I decided to keep to a conservative color on these.
|
||
|
09-08-2011, 04:50 PM
|
|
|
Registered User
|
Clear finish
 
|
||
|
09-08-2011, 07:32 PM
|
|
|
Registered User
|
 Rebuild alternator will arrive in 3 days. |
||
|
09-10-2011, 10:47 PM
|
|
|
Registered User
|
Carrera chain tensioner update will be installed - but the idler arms are still perfect and will be used ( with the needed washers )

|
||
|
09-11-2011, 09:10 PM
|
|
|
Registered User
|
A bit out of fucus
  New head nuts 
|
||
|
09-12-2011, 05:02 PM
|
|
|
Registered User
|
The red spot in the photo above is blood - the sweat and tears only visible under UV light
|
||
|
09-12-2011, 05:04 PM
|
|
|
Registered User
|
 
|
||
|
09-12-2011, 09:05 PM
|
|
|
Registered User
|
Great job and thanks for all the step by step photos.
__________________
Mark Jung Bend, OR MFI Werks.com |
||
|
09-13-2011, 12:52 PM
|
|
|
Registered User
|
Mark - my reason for posting as many photo's as possible is the extra eyes that already saved me once , and also to have a full picture history of the car. It is going to get interesting when I start with the tub in a month or so.
|
||
|
09-13-2011, 02:34 PM
|
|
|
Registered User
|
 
|
||
|
09-13-2011, 11:16 PM
|
|
|
Registered User
|

|
||
|
09-13-2011, 11:21 PM
|
|


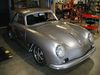 1957 Porsche 356 A Coupe 2.7 Short Stroke
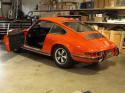 1972 Porsche 72 Coupe
