|
|
|
|
|
| Author |
|
|
Registered
|
Gordo's PMO Carb Tuning
Folks,
I'm finally to the point to where I'm ready to start fine tuning my PMO carbs. Engine Background Link to my engine rebuild Gordo's 3.2L Engine Rebuild - Ready to Reassemble And a photo to catch the interest of those who don't like to read   Rebuilt 3.2L Engine Specs include: Dougherty Racing GT2-102 cams (Dougherty Racing Cams) JE 9.5:1 pistons (measured CR came to 9.3:1) Electromotive XDi Ignition (Initial @ 10º, 3000 RPM @ 24º, Rev limit @ ~ 5700 for break in) B&B exhaust - 1 & 3/4" headers Stock 3.2L heads - reconditioned ARP rod bolts and head studs 46mm PMO Carb Specs (as purchased - used; previously on a 3.0L engine) 38mm venturi F16 emulsion tubes 160 main jets 55 idle jets 190 air correction jets To assist with the carb set up and tuning I installed the Innovate LM-2 Wideband meter (will post graphs as I proceed...). Carb Set Up for First Start / Engine Break In For the initial carb set up to get the car running good enough for the cam break in and break in drive, I simply adjusted the idle mixture screws 2 turns out and I was off and running (rather rich - but good enough for a 20 min RPM yoyo ride).  Based on my research I found most recommend very basic adjustments be made to the carbs when you are working with a newly rebuilt motor. Sync'ing the carbs and getting a better mixture adjustment takes time and can wait until after you have the critical break in done (assuming the car runs good enough to drive without stalling or experincing excessive popping). Post Break In First Adjustments Once the initial break in run was done, I synchronized the carbs (STE syncrometer) and adjusted the idle mixture a bit better. I followed the PMO instructions for carb tuning: PMO Porsche 911 Carburetion - Installation. Another good / similar bit of instruction can be found here: Weber Carbs Technical. And yet another great reference: Tuning Webers One item regarding the instructions was (and is) a bit confusing - do you lean best each throttle/cylinder, or adjust one and then adjust the rest of the idle mixture screws the same # of turns?  I opted to lean best each throttle/cylinder. I opted to lean best each throttle/cylinder.I've made a few short runs since tuning - the engine's a beast, but definitely in need of some additional tuning. Based on my LM-2 feedback, I think I have some more idle mixture adjustments to make before I consider what's happening at higher RPM's and load - my idle is at 11.1 AFR... Based on my initial run's it appears I'm rich at idle and constant mid-range RPM's, and quite lean on hard acceleration - however I will hold off on firm assessments until I'm sure I have the basic settings right. I'm ultimately planning to dyno it with these guys Dyno Tune Virginia Fuel Injection TEC3 Performance (about an hr away) once I think I have the AFM's and ignition settings as good as I can them. Will update as I progress... Gordo
__________________
Don "Gordo" Gordon '83 911SC Targa Last edited by Gordo2; 09-19-2014 at 03:05 PM.. |
||
 07-22-2014, 08:51 PM
|
|
|
Registered
|
I played around with the carbs some more today - nothing like inhaling fumes and exhaust as you lean over a hot engine on a hot day...
This is the second time I've sync'd the carbs, and again I found that I needed to significantly open up the air screws on cylinders #5 and #6 to get them sync'd to #4 and the left carbs/bank. By significant, I mean I had #6 opened about as wide as it could go. Is this unusual? Is it possible I have something clogging my jets causing these two cylinders to draw less air? BTW - the PMO's I'm using were purchased lightly used. Thanks, Gordo
__________________
Don "Gordo" Gordon '83 911SC Targa |
||
|
07-23-2014, 07:58 PM
|
|
|
Registered
|
My 46 Webers tuned to within about a half a turn from one to the other on the air-screw. I think a full turn would be within reason. The beauty of the Weber (PMO) design is that you're tuning a separate carb for each cylinder. Each throat will be tuned specifically to that cylinder and no two cylinders are exactly alike. Also, your engine is going to continuously change as it breaks in. So what you tune today will not be the same as what you tune tomorrow.
__________________
Tell it like it is or don't tell it at all. |
||
|
07-24-2014, 05:49 AM
|
|
|
Registered User
Join Date: Aug 2010
Location: Küsten, Germany
Posts: 175
|
Without having done that combo by myself (while a huge # of 2.2-2.7s) i'd think you'd be better off using idles of some 60-65.
|
||
|
07-24-2014, 09:47 AM
|
|
|
Registered
|
From new, I had same similar issue with the #3 cylinder air, I had to open way out to equalize with 1 and 2. I thought it was running ok so left it.
I ran it that way for a long time. After another issue evolved I cleaned the jets and reset the floats, and now the airs are almost all pulling equal with about the same turns of the screws. The carbs are very smooth with no stuttering, no popping, it is so much better to drive. Check your gaskets and re torque all mounting nuts, etc. when you got them right you will know it.
__________________
78 SC 911 Targa - 3.2SS, PMO 46, M&K 2/2 1 5/8 HEADERS, 123 DIST, PORTERFIELD R4-S PADS, KR75 CAMS, REBEL RACING BUSHINGS, KONI CLASSICS |
||
|
07-24-2014, 01:30 PM
|
|
|
83 911 Production Cab #10
|
Quote:
Using the Jet Nut, were you able to torque all the nuts equally? I was not able to using the 12mm hex head but I did get some 10mm hex head that I'll be installing this winter as 2014 is a "drop the engine Biennial year"  JJ
__________________
Who Will Live... Will See 83 911 Production Cab #10, Slightly Modified: Unslanted, 3.2, PMO EFI, TECgt, CE 911 CAM Sync / Pulley / Wires, SSI, Dansk Sport 2/2, 17" Euromeister, CKO GT3 Seats, Going SOK Super Charger |
||
|
07-24-2014, 05:22 PM
|
|

|
|
Registered
|
Knuts
Quote:
I wasn't able to use my 3/8" torque wrench to tighten the Knuts due to the limited clearance above the socket. Instead I tightened each with a 1/4" drive "spinner handle" (a screwdriver handle that has a 1/4" drive head) attached to a socket u-joint. I think the feel this provided allowed me to tighten each within a reasonably close torque - good & snug ft-lbs... -------------------------------------- Update I'm going to hold off adjusting and tuning the carbs until I can get my fuel pressure corrected. It's too high... PMO Reg Won't Go Lower Than 5 PSI Rather than trying to solve the mystery on where my return fuel line is restricted, I went ahead and ordered the Pierburg low pressure fuel pump. I plan to leave everything else in place (PMO reg and return). Once I have it installed (next 2 weeks), I will resume tuning - starting with the float settings... Thanks for the feedback folks - I'll be back; surely with more questions. Gordo
__________________
Don "Gordo" Gordon '83 911SC Targa |
||
|
07-24-2014, 06:42 PM
|
|
|
Registered
Join Date: Sep 2005
Posts: 950
|
Interesting. Info. Thanks and good luck
|
||
|
07-25-2014, 07:28 AM
|
|
|
Registered
|
subscribe
__________________
Its easier asking dumb questions than fixing dumb mistakes 1974 Porsche 911 Coupe, RSR Project 1976 Porsche 911 Targa, Black 1986 Porsche 911 Carrera, Black 2006 Porsche Cayenne S, Black |
||
|
07-25-2014, 09:50 AM
|
|
|
Registered
|
Problems Swapping the CIS Fuel Pump for Pierburg Universal
Well, the Pierburg Universal fuel pump arrived and I'm still stuck.
 Pierburg Universal Pump Inlet/Outlet Fitting Issues I didn't expect this kind of difficulty when I started a separate thread on the Tech Forum: Fuel Pump Switch - CIS to Pierburg Universal The 5/16" barb fittings (supply/inlet and feed/outlet) on the Pierburg fuel pump are permanently molded to the body of the pump. Meanwhile the supply line/elbow on my fuel tank appears to have a 1/2" barb, while the tunnel feed line seems to be very close to a 5/16" barb. As such I can run a 5/16 ID feed hose from the Pierburg pump to the tunnel line, but I can't seem to find an appropriate adapter / reducer to connect the fuel tank's 1/2" barbed supply line to the Pierburg's 5/16" supply/inlet - no one makes a 1/2" barb to 5/16" barb union reducer. The closest fittings I have found are a 1/2" to 3/8" and a 3/8" to 5/16". I ordered both of these fittings to see if either will suffice. Next Up - Correcting My Throttle Linkage Stopped by Harbor Freight today and picked up a metric tap & die set. I need to shorten the throttle rod that extends from the transmission to the bell crank on the side of the PMO manifold. I'm going to cut the rod about 1" shorter (as per jpnovac's recommendation in this thread PMO install and throttle linkage). Will update with pic's as I dig into this one. Bottom Line - Delay of Game for my PMO Carb Tuning. Gordo
__________________
Don "Gordo" Gordon '83 911SC Targa |
||
|
08-03-2014, 07:41 PM
|
|
|
Registered

Join Date: Jul 2006
Location: Charlotte, NC
Posts: 1,964
|
I thought most recommended shortening the linkage from tunnel to bell crank on tranny?
Todd
__________________
'81 SC |
||
|
08-03-2014, 11:57 PM
|
|
|
Registered
|
Shorten Throttle Linkage Rod
Quote:
From the link provided in the post above - it appears acceptable to shorten either rod. I'm removing an inch as per Steve W's recommendation in one of your previous threads - sorry no definitive answer there, or here... ") Meanwhile, I'm going to take a good look at your recommendation to shorten the tunnel rod. My thoughts: I think the main idea is to adjust the linkage in order to optimize the position of bell cranks (on both the transmission and the PMO intake manifold) in a manner that provides consistent (linear) throttle position movement at the carb - throughout the range of bell crank movement. In my case, I've adjusted (shortened the treaded ball fittings) my throttle linkage rods to the maximum extent possible yet the bell crank on my intake manifold isn't level:  If the bell crank were level at idle, the amount carb opening, throughout the range of pedal travel - would be slightly more consistent (linear). As is, initial pedal travel moves the rod in the pic upward and rearward - whereas if the bell crank started at level, pedal movement would provide more consistent rearward travel (carb opening) throughout the range of pedal travel. Your post made me consider the same for the transmission bell crank (optimized position?) - which may be more optimally positioned as well, by shortening the tunnel rod. Will look into it, Thanks,
__________________
Don "Gordo" Gordon '83 911SC Targa |
||
|
08-04-2014, 05:39 PM
|
|
|
Registered
Join Date: Jul 2006
Location: Charlotte, NC
Posts: 1,964
|
Wow, yeah that is way off. Are you using "tall" manifolds? Should have a second hole in the bell crank on the manifold.
I would suggest, post a few WTB on the classified's. Within a couple if days I was able to get an early tranny bell crank and an early rod from tranny to intake. If you shorten that one, be mindful of the clearance necessary over the CV at the output flange. Todd Ps - I'm still a bit from achieving WOT, and it still gets your attention!! :-)
__________________
'81 SC |
||
|
08-04-2014, 06:38 PM
|
|
|
Registered
|
I messed with the Weber bell crank too. I ended up using the original cassette and it worked great.

__________________
Tell it like it is or don't tell it at all. |
||
|
08-05-2014, 06:36 AM
|
|
|
Registered
|
PMO Carbs are Lean Under Load
OK,
Pierburg fuel pump is installed - I'm at a steady 3.5 PSI. I'm not a fan of the universal pump by the way. Meanwhile I'm going very lean under load (AFR reading of 15-16 and climbing at ~3,000 RPM when I let off). My float bowls appear to be below the 1/2 mark - so I'm going to dig into adjusting the floats next. Any tips or recommendations for adjusting the PMO floats? Thanks, Gordo
__________________
Don "Gordo" Gordon '83 911SC Targa Last edited by Gordo2; 09-08-2014 at 07:02 PM.. |
||
|
09-06-2014, 01:13 PM
|
|
|
Registered
Join Date: Jul 2006
Location: Charlotte, NC
Posts: 1,964
|
Are your air correction jets correct? Thought they were in sizes of "20".
Todd
__________________
'81 SC |
||
|
09-06-2014, 01:34 PM
|
|
|
Registered
|
HI GORDO JJ AND ALL. I AM AT SAME POINT AND HAVING TROUBLE...
just put 50mm pmos on my 3.4 . i had a long talk with knightrace who helped me build this motor and richard: they jetted the carbs properly for it ( 3.4 twin plug, big cams, 10.5:1). using the PMO fuel reg. and a king hell aftermarket racing fuel pump. the idle air inlets are NOT blocked .. It runs nicely. good Autometric A/F meter with new probe in headers and good signal following Parr instructions: 2 turns out on mixture, 1 turn out on airs. STE balanced well side to side. however, upon trying to lean out any of the cylinders by turning the mixture screw in .. there is simply no change in engine rpm. i have done this with each cylinder and the result is same no change at all. no popping or anything else. however...A/F is 13.4 + on idle at 950 or at 1200... then goes to 16 plus on acceleration.. this is quite lean .and alarming i do not know what to do from here. any suugestions? i have already put a thread up asking for advice on a tuner around here.. cheers frank |
||
|
09-06-2014, 03:50 PM
|
|
|
83 911 Production Cab #10
|
Hi Frank,
I'm on the other boat. Mine (EFI) under heavy acceleration it goes rich, very rich as in 10... Hang in there someone will pipe up. JJ
__________________
Who Will Live... Will See 83 911 Production Cab #10, Slightly Modified: Unslanted, 3.2, PMO EFI, TECgt, CE 911 CAM Sync / Pulley / Wires, SSI, Dansk Sport 2/2, 17" Euromeister, CKO GT3 Seats, Going SOK Super Charger |
||
|
09-06-2014, 04:45 PM
|
|
|
Registered
|
Adjustments Then Jets
My general plan is to ensure I have all settings optimized before I start swapping carb parts - hence my plan to adjust the floats to ensure I'm dead nuts on...
Todd, I have 190 air correction jets - this means nothing to me other than I ran the entire config (listed in my first post above) past Richard Parr and he thought it would be fine for a starting point. Frank, Will continue to update this thread with my findings - I'm new to these carbs, so it's a learning experience. I can say however, my air adjustment screws had little effect as well. Best of luck, let me know what you end up doing to get them dialed in. Thanks, Gordo
__________________
Don "Gordo" Gordon '83 911SC Targa |
||
|
09-06-2014, 05:38 PM
|
|
|
Registered
|
PMO Float Level
Found some level ground to take a few photo's of the current float level (while running).
Looks rather low to me: 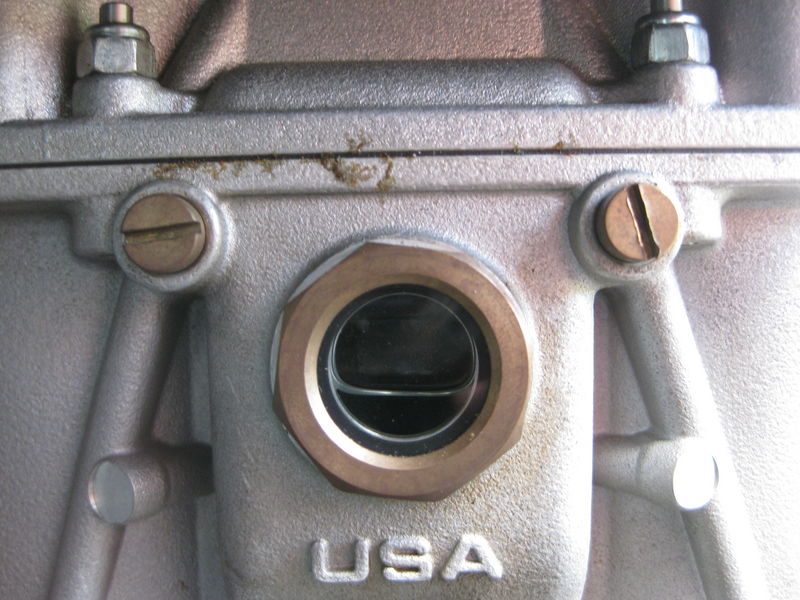 I couldn't get a good photo showing both float windows in the same shot, but in general the levels are inconsistent. From everything I've read - it's important to have the float level set to a point that the fuel is midway up the window (some PMO windows apparently have an etched center dot - mine do not). Will be adjusting to get each float / fuel level to the mid-points. Gordo
__________________
Don "Gordo" Gordon '83 911SC Targa |
||
|
09-07-2014, 08:46 AM
|
|


 Grenade
 Grenade
 Stella
 Das Babe
 Das Babe Metalberiech

