|
|
|
|
|
| Author |
|
|
Call 911
|
911 Valve Lash Adjustment Tool
As a 911 owner now for the past 5 years, I must say that I enjoy working on this air-cooled masterpiece almost as much as driving it. However I quickly learned there were a few jobs that just arent fun; one of these being valve lash adjustments with the engine installed in the car. The combination of tight access to the valve/rocker arm area, the use of thin tin foil feeler gauges that are easily destroyed, and generally cramped quarters in the engine bay, lead to a frustrating and time-consuming experience. After my second lash clearance adjustment, I knew there must be a better way of doing this job.
After some thought, I arrived at what seemed to be a logical alternative. Knowing the rocker arm lash adjuster screw pitch (1.0 mm/rev) and the desired clearance (.1 mm), its straightforward to calculate the amount of turn required to attain the .1 mm clearance from a zero lash baseline. This is the principle upon which this valve lash adjuster tool works, i.e., just like a micrometer. With adjuster screw lock nut loosened, the tool is placed on the rocker arm with driver bit engaging the lash adjuster screw. The knob is rotated clockwise to get a metal-to-metal, zero clearance baseline. At this point, the moveable pointer is then rotated to align with the baseline mark reference. The knob is then rotated counterclockwise to the .1 mm reference line and proper clearance is established. Tighten the lock nut, and clearance is dead-on the money. And should tightening the lock nut cause the adjuster to rotate (as it sometimes does), it is easily seen on the adjuster knob and can be compensated for. After constructing a prototype, I first tried it on my own 88 911, then on two other friends 911s with excellent results. It really cuts down on the time (and more so the frustration) in doing a lash adjustment. I cant claim that the job has now become fun, but it certainly less of a pain when compared to the classical method. A few 911 owners have seen this tool and have encouraged me to go into production with it, and thats what Im planning to do. Im proud to say that this tool is being offered exclusively on our hosts website and here is the link: Porsche 911 & Carrera Cam Towers & Timing Chains - Page 3 A few pictures of the tool follow:  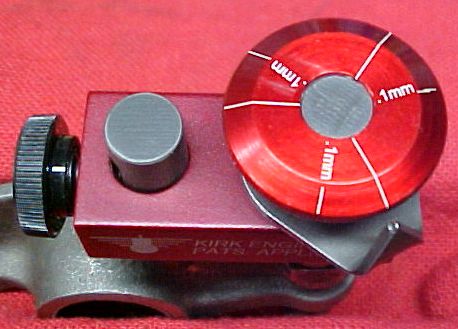  Ive strived to make this a functional, quality tool for a good value and something that would be complimentary to the mechanical beauty of the Porsche 911 engine.
__________________
Dave Kirk My Porsche restoreth my soul. |
||
 01-31-2014, 11:54 AM
|
|
|
Straight shooter

|
Nice work Dave - this will be on my list for spring time.
 Time to retire the ribbon of shame that I had been using as a feeler. Time to retire the ribbon of shame that I had been using as a feeler.
__________________
Of the value traps, the most widespread and pernicious is value rigidity. This is an inability to revalue what one sees because of commitment to previous values. In motorcycle maintenance, you MUST rediscover what you do as you go. Rigid values makes this impossible. ― Robert M. Pirsig, Zen and the Art of Motorcycle Maintenance: An Inquiry Into Values |
||
|
01-31-2014, 12:20 PM
|
|
|
abit off center
|
Nice, Years ago when I suggested using the 1mm pitch screw as a mic to set lash was not received well, pretty damn accurate plus it takes up any wear in the feet and valves stems that a feeler gauge will not. Nice Job!
__________________
______________________ Craig G2Performance Twinplug, head work, case savers, rockers arms, etc. |
||
|
01-31-2014, 02:07 PM
|
|
|
Registered
Join Date: Oct 2008
Location: Nash County, NC.
Posts: 8,556
|
To get the best results you need to go out past the .1mm and close to the .1mm taking the thread play into account. My check is with the dial guage and fixture to the near stud to the rocker.
|
||
|
01-31-2014, 02:21 PM
|
|
|
Registered
Join Date: Oct 2013
Location: Prescott, AZ
Posts: 1,062
|
Looks like a quality tool. My toolbox needs one of these! This method of setting valve lash is tried and true - I once bought a tool using this principle at a garage sale and used it to adjust the valves on a old Chevy six. My old tool wasn't this nicely made, however. I think it was from "Western Auto"!!!
|
||
|
01-31-2014, 07:40 PM
|
|
|
Registered
|
Looks great, one word of caution; do not tighten the tool once the elephant foot contacts the valve, to avoid compressing the valve spring.
__________________
78 SC 911 Targa - 3.2SS, PMO 46, M&K 2/2 1 5/8 HEADERS, 123 DIST, PORTERFIELD R4-S PADS, KR75 CAMS, REBEL RACING BUSHINGS, KONI CLASSICS |
||
|
01-31-2014, 08:16 PM
|
|

|
|
Woodland Hills, CA
Join Date: Dec 2008
Location: Southern, CA
Posts: 634
|
Very impressive. I gotta have one.
|
||
|
01-31-2014, 08:23 PM
|
|
|
Registered
|
Ordered one!
|
||
|
01-31-2014, 09:13 PM
|
|
|
Registered User
|
|||
|
02-10-2014, 10:04 PM
|
|
|
Registered User

|
This is fantastic. It's on my project list for the next Pelican order.
__________________
-- 1974 Porsche 911 Targa w/ 3.2L 1989 Porsche 964 Carrera 4 |
||
|
02-12-2014, 01:32 AM
|
|
|
Registered User
|
Hi Dave,
That looks really sweet! I've been using the "back-side" method and I really like the go/no-go aspect, but even after going through three or four complete cycles, I think I still have a loose one that is making a fuss. I have a question: How do you compensate for the slight change when tightening the set nut? Seems like when I do it I have it just so and as I tighten the nut, it goes loose a tad. I then have to guess a little as to how much affect the nut will have and back it up a little and thus starts the back and forth... And with the back-side, you measure from the top and adjust from the bottom and vise versa. Up and down... Another quick question, the screwdriver slot on the top of the adjuster is huge compared to every screwdriver I have. Does your drive foot compensate for that? Is it a nice snug fit? This looks awesome! Thanks so much for taking the time to work it all out! Oh, do you think this will work on a 356? The adjustment isn't so bad, but it would be nice if it worked on both cars... Franny
__________________
White '86 Carrera Cab "Shamu" |
||
|
02-12-2014, 07:11 AM
|
|
|
Registered

Join Date: Jul 2006
Location: Charlotte, NC
Posts: 1,964
|
I don't think you use a screw driver to adjust, you turn the big red knob.
Todd
__________________
'81 SC |
||
|
02-12-2014, 07:25 AM
|
|
|
Senior Member

Join Date: Nov 2000
Location: Great NorthWest
Posts: 3,950
|
I think Franny has anticipated the natural slop of screwdriver end to screw (the slot is oversize and not a solid fit to the tool end) and is asking about that latitude in adjustment - is it compensated for?
__________________
'78 Targa in Minerva Blue |
||
|
02-12-2014, 08:06 AM
|
|
|
Registered
Join Date: Jul 2006
Location: Charlotte, NC
Posts: 1,964
|
Ah, misread it as "on top if the adjuster" of the tool. Got it now (need more coffee).
Todd
__________________
'81 SC |
||
|
02-12-2014, 08:38 AM
|
|
|
Schleprock
Join Date: Sep 2000
Location: Frankfort IL USA
Posts: 16,640
|
Quote:
The feeler gauge method would be fine if the foot wasn't in such a bad position to bend the feeler gauge. Backside method is close enough for me. But a real nicely executed tool nonetheless. Nice job Kirk.
__________________
Kevin L '86 Carrera "Larry" |
||
|
02-12-2014, 03:33 PM
|
|
|
Moderator

Join Date: Dec 2001
Posts: 9,569
|
I just bought one.
One of my new years resolutions is to do more frequent valve adjustments. I use the z-block and a clock usually, but that is a lot of setup. And the feeler gauge method requires gaging "feel" like a micrometer-- I've checked my feeler gauge job with the z-block/clock method and it's not perfectly repeatable for me. I look forward to trying this out and checking the repeatability. Craig, maybe you are finally getting some respect around here
__________________
'66 911 #304065 Irischgruen 96 993 Carrera 2 Polarsilber '81 R65 Ex-'71 911 PCA C-Stock Club Racer #806 (Sold 5/15/13) Ex-'88 Carrera (Sold 3/29/02) Ex-'91 Carrera 2 Cabriolet (Sold 8/20/04) Ex-'89 944 Turbo S (Sold 8/21/20) |
||
|
02-12-2014, 05:08 PM
|
|
|
Straight shooter
|
Would like to see a video of this in use. Somebody must want to be instructional video/demonstration famous.
__________________
Of the value traps, the most widespread and pernicious is value rigidity. This is an inability to revalue what one sees because of commitment to previous values. In motorcycle maintenance, you MUST rediscover what you do as you go. Rigid values makes this impossible. ― Robert M. Pirsig, Zen and the Art of Motorcycle Maintenance: An Inquiry Into Values |
||
|
02-12-2014, 06:00 PM
|
|
|
Registered
Join Date: Feb 2012
Location: Ventura County, CA
Posts: 874
|
This tool looks awesome and well designed, I'm definitely buying one!
|
||
|
02-12-2014, 08:17 PM
|
|

|
|
Call 911
|
Gentlemen,
Thanks to all for the compliments and suggestions greatly appreciated. Will try to address some of the questions and concerns that have been brought up: 1. Valve spring tension in the 911 engine is high enough that it cannot be overridden by tightening the tool knob with ones fingers impossible. 2. Thread slop compensation is accounted for as the jam nut loads the threads in the same direction as when the zero-lash load is applied to the threads. Hence, when the adjuster is backed off the proper number of degrees from zero clearance and the jam nut is tightened, you are assured of exactly .1mm distance between the elephant foot and the valve stem. You may have to think about this a bit and draw a sketch or two, but its a fact. 3. The driver bit (screwdriver) on this tool is held to a tight width tolerance. The slot in the adjuster screw has a slight taper, and the bit is designed to engage this taper about .75 % of depth, thus there is no angular slop in the fit that could possibly contribute to error. 4. The suggestion of a video is a great idea. Ill do this after the weather warms a bit. Have a friend that needs an adjustment and will use his car as the specimen. I do include a 4-page instruction sheet with every tool which explains proper use in detail, but an instructional video is always the best. I dont necessarily seek YouTube stardom, and fearing that my ugly face may frighten some, Ill try and find a pretty 20 year-old female that can demonstrate the ease by which this tool operates. Thanks again guys.
__________________
Dave Kirk My Porsche restoreth my soul. |
||
|
02-14-2014, 03:35 PM
|
|
|
Registered
|
I think your tool is great for a home mech like me and I would like to buy one, do you a have a distributer in Australia?
|
||
|
02-14-2014, 07:19 PM
|
|


 Little Deutch Coupe

 P911
P911 1969 and 1986 Porsche Targa and Coupe 1720cc and 3
 Stella
 Perle
Perle Eva
Eva
 1978 Porsche 911 SC
