|
|
|
|
|
| Author |
|
|
Registered
|
Quote:
I use centra-shield s-6 wire (0.23) which is ER70S-6. Compared to the rusty unknown stuff that came in my used mig the s6 is magic. I can weld through rust and paint. It scrubs the surface clean and boils the impurities to the edge. Shockingly good. So long as I flow gas while it cools I up with shiny beads (above was with the old nasty wire). I need to weld-thru-metal primer the beads in minutes though or they'll oxidize. |
||
 01-07-2022, 12:21 PM
|
|
|
Registered

Join Date: Oct 2003
Location: Mount Pleasant, South Carolina
Posts: 14,619
|
Update. The 3M panel adhesive was not to be found in town. I did get my Argon CO tank swapped out and a roll of .023 wire, so tomorrow I will start practicing on some 22 gauge sheet metal I bought and go from there.
I also stopped by the auto body supply shop to pick up some supplies and they mixed up a couple cans of the matching paint. Hopefully, I will only be painting around the edges of the wheel arches... |
||
|
01-07-2022, 01:12 PM
|
|
|
Registered
Join Date: Dec 2001
Location: Cambridge, MA
Posts: 44,722
|
good luck!
__________________
Tru6 Restoration & Design |
||
|
01-07-2022, 01:18 PM
|
|
|
Registered
Join Date: Oct 2003
Location: Mount Pleasant, South Carolina
Posts: 14,619
|
Thanks. Im gonna need it!
|
||
|
01-07-2022, 01:28 PM
|
|
|
Registered

Join Date: Jan 2002
Location: Long Beach CA, the sewer by the sea.
Posts: 38,097
|
Quote:
Same thing with hose angle. Don't get all up and weird with your angle. If you have to place the welder behind you to have a relatively straight lead, then do it. The wire doesn't like to go round in circles rubbing the liner, especially if the liner is too large for the gauge you are using. Stay loose my friend. |
||
|
01-07-2022, 01:38 PM
|
|
|
Registered
|
__________________
Guy '87 944 (first porsche/project car) |
||
|
01-07-2022, 01:40 PM
|
|

|
|
Registered
Join Date: Apr 2015
Posts: 74
|
Zeke is spot on about the liner, it can still be used , carefully, but you most definitely need the proper contact tip to match the wire. Good and clean and .023 will get it done.
|
||
|
01-07-2022, 02:09 PM
|
|
|
Registered
Join Date: Dec 2001
Location: Cambridge, MA
Posts: 44,722
|
Quote:
__________________
Tru6 Restoration & Design |
||
|
01-07-2022, 02:10 PM
|
|
|
Registered
Join Date: Oct 2003
Location: Mount Pleasant, South Carolina
Posts: 14,619
|
Great advice, guys. Thanks.
I have a pack of new tips for the .025 wire, so I should be good there. The feed wheel is adjustable has different wheels. Ill have to check the size and tension. Zeke, thanks for the information on the lead. My welder is on a cart, that I can move around as needed. |
||
|
01-07-2022, 04:27 PM
|
|
|
Registered
|
Yay! Now you'll be able to hammer on it if it gets dented.
|
||
|
01-07-2022, 06:41 PM
|
|
|
Registered
Join Date: Jan 2007
Location: Somewhere in North L.A. County
Posts: 2,107
|
Quote:
You will not re-bond it because that would require peeling the panel apart, separating it far enough to get a mixer nozzle in between the two while you squirt adhesive in the middle of the sandwich. The adhesive used is very strong but beating it out with the big hammer can break the bond pretty easily which appears to have happened. The adhesive the factory used was Beta-Mate. You can purchase it through the dealer for an arm and youngest child. Other structural panel adhesive can be used from Lord Fusor or 3m. What are your options? A series of tacks or stitch welds at the hem flange every couple of inches to the wheelhouse would be the easiest way. It will pop and sputter but can be done with minimal work and good welding skills. It wont require a bead or continuous weld, just tacks or stitches linking the two panels. Area has to be clean with any coatings removed. On a race car panel to panel integrity is all you need. Grind and dress the welds and put some primer over it, maybe some urethane under seal and go race it.
__________________
Jeff Hail "All men dream: but not equally. Those who dream by night in the dusty recesses of their minds, wake in the day to find that it is vanity; but the dreamers of the day are dangerous men, for they act their dream with open eyes, to make it possible" Last edited by Jeff Hail; 01-07-2022 at 09:32 PM.. |
||
|
01-07-2022, 09:25 PM
|
|
|
Registered
Join Date: Jun 2000
Location: bottom left corner of the world
Posts: 22,871
|
A good place to research it is on autobody101 in the welding forum https://www.autobody101.com/forums/viewforum.php?f=6
|
||
|
01-07-2022, 10:13 PM
|
|

|
|
Registered
Join Date: Oct 2003
Location: Mount Pleasant, South Carolina
Posts: 14,619
|
Quote:
|
||
|
01-08-2022, 12:15 AM
|
|
|
Registered
Join Date: Oct 2003
Location: Mount Pleasant, South Carolina
Posts: 14,619
|
Quote:
|
||
|
01-08-2022, 12:16 AM
|
|
|
Registered
Join Date: Dec 2001
Location: Cambridge, MA
Posts: 44,722
|
Just as important as wire size and speed and voltage is getting your helmet set correctly, at least for me. You can't weld what you can't see. Adjusting the helmet is key to seeing what you are doing and doing it comfortably.

__________________
Tru6 Restoration & Design |
||
|
01-08-2022, 05:30 AM
|
|
|
I see you
Join Date: Nov 2002
Location: NJ
Posts: 30,046
|
Threads like this humble me...that's the nice way of saying I feel terribly ignorant.
__________________
Si non potes inimicum tuum vincere, habeas eum amicum and ride a big blue trike. "'Bipartisan' usually means that a larger-than-usual deception is being carried out." |
||
|
01-08-2022, 06:47 AM
|
|
|
Registered
Join Date: May 2018
Posts: 4,117
|
If welding doesnt do the trick, how about rivets? Would give you a vintage aircraft look.
|
||
|
01-08-2022, 07:29 AM
|
|
|
Registered
Join Date: Jun 2000
Location: bottom left corner of the world
Posts: 22,871
|
Quote:
Another thing while practicing. Listen for the right sound. Not sharp crackling sound, but rather a smoother (hard to explain) hum. Haha, practice and a bit more practice on bits of test sheet metal then destructive testing in a vice and pliers. |
||
|
01-08-2022, 10:46 AM
|
|
|
Registered
Join Date: Oct 2003
Location: Mount Pleasant, South Carolina
Posts: 14,619
|
Quote:
I tried different wire speed and heat. Some places not enough heat, some places too much heat or too long in one place. I was getting to the point where I could do spot welds in a row half way decent. My practice sheet metal is 22 gauge, and I suspect the car I have thinner material. At least where Ive sanded it down. Heres a few practice welds.  
|
||
|
01-08-2022, 02:15 PM
|
|
|
Registered
Join Date: Oct 2003
Location: Mount Pleasant, South Carolina
Posts: 14,619
|
Follow up: everything is back together. Unfortunately, after going for a drive, Im going to need to push them out another half inch or so, as the tires rubs the fender lips just barely.
Stay tuned for next weekend  
|
||
|
01-09-2022, 05:01 PM
|
|


 1980 Porsche 911 sc
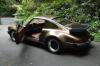 Kids and pets get names...


 1987 Porsche 944
 2009 Ford Mustang


