|
|
|
|
|
| Author |
|
|
Registered User
|
My Electrocooler install
I have decided to document my install of the Classic Retrofit Electrocooler system into my 81 SC. A couple disclaimers.. I am not a mechanic. I'm a guy with 3 kids with a garage and a basic set of tools. I have no idea if my install will be successful, or how long it will take. I may be doing things the wrong way sometimes, so if anyone sees something that doesn't look right then please let me know. I will not be offended.
My SC was a factory AC car. When I bought it, I knew that the AC didn't work. I wasn't sure that I needed it, but after driving late last summer and fall I realized that it would be nice to have AC. I needed a bunch of work over the winter, so I had the independent that I use remove the factory AC components and lines. They also upgraded the alternator to a 90A unit as required. I ended up buying a new fan housing instead of having the stock one machined to fit the new alternator. I considered having the shop do the install, but the labor cost involved would have been very costly. I contacted Jonny in early November to put down a deposit. There were some delays due to a supplier issue for the evaporators, but Jonny was quick to update me whenever I sent him an email. I ended up receiving the parts in March, which was fine for me since it was still winter here. I did have to fill out some customs forms from FedEx when the package arrived and I did have to pay about $75 in customs fees. The boxes looked fine, but when I opened them there was Styrofoam EVERYWHERE. The boxes must have been roughed up a bit but the parts all looked good, just took a good amount of work to free the Styrofoam, especially from the condenser. I read the directions a bunch of times and tried to get an idea of where everything goes, but it became apparent that I was just going to have to dig in and figure it out as I went. Unfortunately, I can only work on the car an hour or two here or there when the kids are in bed or everyone is out of the house. I currently have about 8.5 hours into the install over 3 nights. I have never worked on the car before so I'm sure someone with experience will go much faster. I'm also doing a fair amount of cleaning as I go. See the below posts for the beginning of the work. Car before install:  Parts laid out: 
__________________
1981 911SC Last edited by PushinRice; 04-26-2018 at 09:11 AM.. |
||
 04-21-2018, 05:39 PM
|
|
|
Registered User
|
Session One:
Ok, so first step was to remove the fuel vapor expansion tank and washer bottle tank. The hoses on the fuel vapor tank were crusty, so I ordered new hoses. The washer bottle required removal of the horseshoe bracket which was pretty self explanatory. The headlight also had to be removed which was not difficult. I would recommend emptying the fluid from the washer bottle reservoir. It was heavy even not full. Once those items were out of the way, I was able to do a test fit of the replacement horseshoe bracket and condenser. The filter dryer is also designed to be connected to the new horseshow bracket. Its a tight fit, but the condenser and dryer fit in there. With the condenser loosely in place, I spent some time trying to figure out where to run the hoses. The kit is flexible in this regard. As long as everything is in the right order, it doesn't seem to matter where the hoses are run. I messed around with a few options to see what seemed to work best. I decided that I would run both lines on the top of the wheel well. I removed the thick hose for the washer bottle filler from next to the gas filler to where the tank used to be. This gave plenty of room to rough the hoses in. I also decided to put the filter dryer in the original location, under the gas tank filler. To me it seemed that I could have more adjustment of the condenser without the dryer on the bracket. I also bent the bracket so that the sharp corner would not damage the condenser. Then I removed the condenser to fit the hose connectors. This was not difficult, but I did need to make a decision about which direction to point the connector at the front of the car. I decided to have it point to the outside of the car. I measured approx. length of lines from condenser to filter dryer with a garden hose and used that to cut the line. I connected the hose from the condenser, over the wheel to the filter dryer without the Oetiker clamps. Then I took the remaining length of hose and did a rough routing into the smugglers box. I will be using the brackets from the stock AC to hold the new lines. I was able to get the lines over to under the smugglers box and found an existing hole to bring the hose through. I pulled most of the length through to the frunk, leaving some slack. That was it for the night. Space before washer tank removal:  Washer tank and fuel expansion tank removed:  Horseshoe bracket test fit: 
__________________
1981 911SC Last edited by PushinRice; 04-26-2018 at 09:16 AM.. |
||
|
04-21-2018, 05:40 PM
|
|
|
Registered User
|
Session Two
Next I ran the hose from the front of the condenser, over the wheel and down past the filter dryer, under the car to the smugglers box. It was more difficult to run this line with the first line being in the way. I was able to use the same hole in the smugglers box with a bit of squeezing. I ran the whole length of line up into the frunk leaving some slack. I did a good amount of cleaning. Dirt everywhere. I took the condenser out again, and used the Oetiker clamp tool (which I had to buy beforehand) to do a full connect of the hoses/clamps to the condenser. There were videos online of how to properly do this. I spent some time trying to get the condenser to fit as far in as I could. Once I thought it was as far in as I could get it, I secured the bracket through the headlight. I did not have the bolt for the top, I don't think I misplaced it but its possible. I found another bolt that worked. I'm hoping not to have to remove the condenser again, but it won't be hard if I need to. Routing hoses:  
__________________
1981 911SC Last edited by PushinRice; 04-26-2018 at 09:16 AM.. |
||
|
04-21-2018, 05:40 PM
|
|
|
Registered User
|
Session 3
With the under car hoses where I think I want them, it was time to work in the frunk. The instructions on how to remove the blower box were good, this was not a problem. Once this was out there was a plastic plenum that came out with some effort. I removed some other air hoses as instructed. Instructions note things to do while blower is out that can't be accessed. I ran a sense wire from the rear window defroster. My blend valves did not fully shut so I adjusted those. Then I tried to figure out where all the hoses are supposed to go. I think the instructions are a bit lacking here. A diagram similar to the hose routing would be helpful to visualize IMO. Next is to place a T where the heater hose comes into the car from the drivers footwell. The instructions have pictures. My hose crumbled on touching. Had to pull back the carpet in the drivers footwell to access. I had a really hard time getting the T down to the hole where its supposed to sit. I have small hands but still couldn't get it down there with the blend valve and wire loom in the way. I ended up disconnecting and moving the blend valve to the side (wasted time adjusting these earlier). After moving some wires to the side I was able to get the T down there and connected the new hose from the footwell to the T. This was a pretty frustrating experience and I cut my hands a bunch, not fun. With the lower hose connected to the T, I tried to figure out which should connect to the blend valve and which to another hose. It doesn't appear to be a possible fit without cutting the T, which the instructions state. I decided to call it a night there. Was pretty frustrated and bloody and needed some time away from the project to get my head straight. That is where I stand currently. Hoping to get back into the install again this week. Thanks for reading and if anyone has tips I will consider anything. Blower box out, plenum remaining:  Plenum out. You can see one of the hoses coming out of the smugglers box:  The T down in the hole, tight fit without disconnecting anything.  The T with blend valve disconnected and moved to the side:  New hose in footwell temp connected to T: 
__________________
1981 911SC Last edited by PushinRice; 04-26-2018 at 09:35 AM.. |
||
|
04-21-2018, 05:41 PM
|
|
|
Registered
|
Thank you, this is a great thread for those of us that have been pondering putting this in our cars.
__________________
Rutager West 1977 911S Targa Chocolate Brown |
||
|
04-21-2018, 06:13 PM
|
|
|
Registered User
|
No problem. The forum has been a huge help, glad to give back.
I'm sure I will need encouragement along the way also.
__________________
1981 911SC |
||
|
04-21-2018, 06:23 PM
|
|

|
|
Chain fence eating turbo
Join Date: Dec 2008
Location: Austin, TX
Posts: 9,177
|
TL;DR
We need pics! 
|
||
|
04-21-2018, 06:36 PM
|
|
|
Registered
Join Date: May 2011
Posts: 17
|
Thank appreciate you taking the time for those of us considering this upgrade.
|
||
|
04-21-2018, 06:42 PM
|
|
|
Registered
|
Thanks, i was hoping someone would document this installation. Subscribed.
Good luck with it, and considering the current NE temps, you'll have plenty of time to install it before you need it, so continue to exercise patience. Uploading pics should be straightforward - maybe we can help?
__________________
'79 911SC Targa |
||
|
04-22-2018, 04:20 AM
|
|
|
Uncertifiable!!!
|
Subscribed.
Johan
__________________
🇨🇦 The True North Strong and Free 🇨🇦 Living well is life's best revenge- George Herbert (1593-1633) 2006 C2S, 2024 WRX GT, 911 hot rods on Pelican . Evolution of a Carrera RST, and Sweet Transplant |
||
|
04-23-2018, 04:50 AM
|
|
|
Registered
|
I was too....but with pictures.
__________________
Chris - Insta @chrisjbolton 1975 911s Insta: @911ratrod steel wide body, 3.6 conversion 1989 911 Carrera 25th Anniversary Ed (5th from the last car to ever leave the original Porsche factory assembly line) 2001 996 Turbo - ~54k miles |
||
|
04-24-2018, 10:24 PM
|
|
|
Registered

Join Date: Jul 2013
Location: South East England
Posts: 1,707
|
I am following this too and will be feeding critique back into our install manual.
I think the guys are right though, you should take some time to work out how to post photos. Essentially, you host them somewhere (e.g. Flickr) and paste an image link to them in your posts. Of course, if you have any questions or queries about the installation, please email or message me directly. Here to help!
__________________
www.classicretrofit.com |
||
|
04-25-2018, 12:28 PM
|
|
|
Registered
Join Date: Aug 2006
Location: Edina, MN
Posts: 350
|
Awesome. My '82 is currently sitting as a shell on my octisserie in the garage. I have been trying to figure out which holes I can plug and which to leave open. This is very helpful.
Thank you
__________________
-Dave in Minnesota 96 C4 Cab, 85.5 944 82 SC Targa SCWDP #0023 82 928 67 912 60 T-5 B Cabrio |
||
|
04-25-2018, 02:34 PM
|
|
|
I would rather be driving

Join Date: Apr 2000
Location: Austin, TX
Posts: 9,108
|
PIctures are easy. Click the "go advanced" button. Then click "add photo". Its drag and drop.
__________________
Jamie - I can explain it to you. But I can not understand it for you. 71 911T SWT - Sun and Fun Mobile 72 911T project car. "Minne" - A tangy version of tangerine #projectminne classicautowerks.com - EFI conversion parts and suspension setups. IG Classicautowerks |
||
|
04-25-2018, 02:52 PM
|
|
|
(man/dude)

|
Quote:
__________________
Heavy Metal! Part Deux - The Carbon Copy Project Heavy Metal https://tinyurl.com/57zwayzw (SOLD) 85 Coupe - The Rot Rod! AX beater Quality Carbon Fiber Parts for Classic 911s: instagram.com/jonny_rotten_911 |
||
|
04-25-2018, 03:01 PM
|
|
|
Registered
|
Quote:
__________________
Chris - Insta @chrisjbolton 1975 911s Insta: @911ratrod steel wide body, 3.6 conversion 1989 911 Carrera 25th Anniversary Ed (5th from the last car to ever leave the original Porsche factory assembly line) 2001 996 Turbo - ~54k miles |
||
|
04-26-2018, 06:36 AM
|
|
|
Registered
Join Date: Apr 2002
Location: Omaha, NE
Posts: 3,522
|
as another father with 3 kids I admire your optimism and dedication to this project! good luck I will be following your progress!
__________________
1980 911SC Targa 3.6L |
||
|
04-26-2018, 08:02 AM
|
|
|
Registered User
|
Hey guys, I updated the posts with some pics. Many hosts don't allow direct hosting anymore and the forum is one at a time I believe and not possible in edit mode.
I'm trying to manage expectations here. Like I said, I can't update every day even though I wish I could. Thanks for all the encouragement. I've fiddled with getting the T to fit to the blower and the footwell hose a little. I think I'm going to end up removing the blend valve completely, moving aside the wiring loom, and possibly removing the hood strut to make this work. I think I should be able to spend some time Saturday night on this. It's been good to give it a try and take some time to step back. Maybe I'm doing something wrong that has made it harder than it should be. I've trimmed the T at an angle on one port as instructions state and that has helped. I will post up the final configuration once it all fits.
__________________
1981 911SC Last edited by PushinRice; 04-26-2018 at 09:45 AM.. |
||
|
04-26-2018, 09:31 AM
|
|
|
Registered
Join Date: Jul 2013
Location: South East England
Posts: 1,707
|
Quote:
You're doing great! The 'T' pieces are probably the most awkward part of the install. For the sake of two screws underneath, moving the blend valves saves a lot of pain. Getting all those hoses in a tight space was a real challenge from a design perspective as well as catering for left and right hand drive. Good luck with the rest of the install. Make sure you download the firmware update too. Here's my RHS T piece showing the recirculation and side vent hoses and a slight reconfig of the loom routing:  And before fitting hoses: 
__________________
www.classicretrofit.com Last edited by Jonny H; 04-26-2018 at 01:58 PM.. |
||
|
04-26-2018, 01:47 PM
|
|
|
Registered User
|
Session 4
With the weather getting nicer, I wanted to be able to drive the car. So I decided to finish up everything under the car. I did final connections on both sides of the dryer with Oetiker clamps and did final mounting of the dryer to the original mount. Then I secured lines to the car above the wheelwell, before and after the dryer, under the car, and under the car again before the hoses enter the smugglers box. I replaced the hoses on the vapor tank because mine were very old, then mounted the tank. Put the headlight back on, then the wheel and I was able to drive the car. This was all straightforward. Lines secured to car:  lines and filter dryer secured:  lines going to under car  under car:  under car to smugglers:  wheel back on:  visible tab that can be ground down:  cant see anything above wheel:  cant see much behind wheel: 
__________________
1981 911SC |
||
|
04-28-2018, 07:44 PM
|
|


 1977 Porsche 911S Targa
 1979 Porsche 911SC Targa
 Porschen
 RST
RST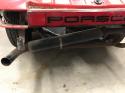 Ugly Duck
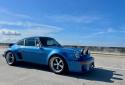 911S Rat Rod
 Anni
Anni BatTurbo

