|
|
|
|
|
| Author |
|
|
Registered
Join Date: Nov 2012
Posts: 172
|
Jonny, have you had many 3.2 folks do this system?
If so, did those people ditch the rear compressor and decklid condenser? Still a ways off from doing anything like this to my own car, but to me if this system allows me to ditch that stuff, that's a real advantage. Also like that it brings a little sanity to the wonky stock AC/fresh air situation. |
||
 08-05-2021, 04:45 PM
|
|
|
Targa_PB_78_SC
|
Thought Id add my what I think is the install plumbing for the front Porsche condenser in series with the Front CR. Also is my guess of the rear 2nd condenser from CR. I searched and could not find a drawing on CR web. Hope CR doesnt mind my use of their drawings.
 Would be nice to know if these are the appropriate install method for a second condenser prior to spending 7k or more. Also, I assume if one wanted a third a combination of these two would be fine? If this intrudes in anyway, Im happy to remove this and start a new thread. Been asking CR about the just ask 6 mm fittings mentioned by Johnny H in Targa80s install thread. No reply from them yet hum received email today 9/1/21, CR says the fittings are not on the website but are in stock If you place an order through the webshop for 2 x Pad fitting E's ( they are the same price ) and just add a note to change them to standard belly pan fittings. Mike back So more money, no problem there!
__________________
BareRearedRookie Last edited by mike sampsel; 09-01-2021 at 04:34 PM.. |
||
|
09-01-2021, 07:11 AM
|
|
|
Heck, Im only 5 not 71!

|
Both drawings work for me, the second drawing is how I added the OEM condenser. I guess you could merge both drawings to create a three condenser system.
__________________
Pat Henry Targa80 1980SC Targa (Mocha Brown) |
||
|
09-01-2021, 07:48 AM
|
|
|
Targa_PB_78_SC
|
Quote:
__________________
BareRearedRookie |
||
|
09-01-2021, 08:55 AM
|
|
|
Targa_PB_78_SC
|
FWIW, Im creating an excel spreadsheet, attempting to document where to find all the good stuff:
E.G., Targa80s fan wiring, the needed lap top driver to communicate, top of blower can be adjusted, Targa80 drain hose fixes boden cable tips Need to find how much extra oil to add, and how much R134 with two condensers to the sheet. Will add sheet to my thread once I start it. Also should add orientation for Freon hose for blower (towards gauges) so lesson interference with brake booster vac connection. Not sure about adding in-line blower found (Turbo), seems it can easily be added and discarded if not liked. Closer to getting the AC as time goes on.
__________________
BareRearedRookie |
||
|
09-01-2021, 09:09 AM
|
|
|
Registered
Join Date: Aug 2018
Location: Maryland
Posts: 2,275
|
2 condensers is 650 grams. It is found in the 964/993 documentation.
EDIT* - It has been said numerous times that the 2nd condensor should follow the CR condenser so it would be #6 line to the rear and then to the drier. Th goof thing I found was that I had my #6 coming out the bottom (front of the car) CR condenser and there was enough length to reach the rear condenser when removing it from the front and sending it to the back.
__________________
83' Coupe - Ex-RaceCar 77' Targa Narrow Body - SC powered Copper Brown Metallic Last edited by Nditiz1; 09-01-2021 at 09:25 AM.. |
||
|
09-01-2021, 09:21 AM
|
|

|
|
Targa_PB_78_SC
|
Quote:
 If you don’t mind, who has said this numerous times? Want to look further. Seems the second rear condenser could be attached to number 8 line to me. All outputs go through the dryer to get to compressor I find the lack of a refrigerant line plumbing documentation, for the “two condenser CR system they sell”, to be conspicuous by its absence.
__________________
BareRearedRookie Last edited by mike sampsel; 09-01-2021 at 12:23 PM.. |
||
|
09-01-2021, 12:12 PM
|
|
|
Registered
Join Date: Aug 2018
Location: Maryland
Posts: 2,275
|
Sorry for the confusion there. You are right it is pad fitting E is #8. I was referring to the size of the line which is #6 - 5/16. That is the smaller line. In your first drawing you have it coming out of fitting D.
__________________
83' Coupe - Ex-RaceCar 77' Targa Narrow Body - SC powered Copper Brown Metallic |
||
|
09-01-2021, 12:20 PM
|
|
|
Targa_PB_78_SC
|
Quote:
I removed my rear condenser drawing which is OBE via the 993 dual condenser drawing mentioned by Johnny.
__________________
BareRearedRookie Last edited by mike sampsel; 09-01-2021 at 04:36 PM.. |
||
|
09-01-2021, 12:51 PM
|
|
|
Registered

Join Date: Jul 2013
Location: South East England
Posts: 1,710
|
^. There is twin condenser diagram in the 964/993 manual.
Primary condenser has #8 D fitting on input and #6 E fitting on output. Second condensers always use the smaller #6 E fitting on both ports. Must get round to adding it to the 911 manual. |
||
|
09-01-2021, 02:21 PM
|
|
|
Targa_PB_78_SC
|
Quote:
And Jonny H, The compressor and evap etc of this system can cope with three condensers, correct?
__________________
BareRearedRookie Last edited by mike sampsel; 09-04-2021 at 04:27 AM.. |
||
|
09-01-2021, 02:31 PM
|
|
|
Registered
|
Thanks Nditiz1 and Pat (Targa80) for all your posts! and thanks Jonny for giving us the help! I got side tracked with several other items (cracked heat exchanger with broken studs, fitting an older front valance instead of cutting my fog light bracket, and trying to figure out how to fit older sport seats that don't have a seat belt receiver attachment point). The last two nights I worked on the ECU/compressor carriage assembly. Should have been easy but since it took me so long to start working on mine I had to create a bracket for the updated relay CR is now shipping as standard. Like others have documented the original ECU plate does not have the correct attachment point so I learned how to use a tap and thread some holes in a new attachment plate. I also got a package of 60mm 90 bends that fit on the T's CR sends out. I'm hoping they help get tighter bends on the ducting I am using. I am trying some CEET duct from Aircraft Spruce so that it will have a smooth lining and maybe cut down on condensation since it is thicker rubber walls. But I learned the radius at the bends were not conducive to the tight space.
I think they might allow me to use the 60mm duct on the drivers side of the blower to supply my driver side vent. I hope this doesn't screw up Jonny's airflow plan. Then I can use the 40mm duct (driver's side) to supply my new eye ball vent that is replacing the bow tie. Hopefully this weekend I can at least have fresh air fan system worked out, and be well on my way with the refrigerant line set up. Car has to be in driving order by Weds so I we can drive it to Luft.  
|
||
|
09-02-2021, 08:04 PM
|
|

|
|
Registered
|
Pat /NDitiz1, did either of you add additional PAG oil for your front condenser? Or just add more R134 (650 grams) for the increased volume of the system with the additional condenser?
|
||
|
09-03-2021, 08:34 AM
|
|
|
Registered
Join Date: Apr 2021
Posts: 90
|
Perhaps someone can clear up my confusion. Seems to me, the front condenser on a front / rear arrangement is best hooked to the drier. That way it can be the last to subcool and make up any losses in the long line from the rear condenser, as well as have a short line to the blower. Is that what we are talking about? Also, the condensers on the CR system appear to be the same size as Porsche’s condensers, albeit with micro channel and maybe other updates. It still seems to me that two should be sufficient for the CR system in most climates. Anybody out there, using more? Thanks.
__________________
Bill (No launch control needed) |
||
|
09-03-2021, 08:51 AM
|
|
|
Registered
|
Bill5900 sorry I can't give you any details, I am mimicking Pat (Targa80) by putting going from the compressor to the CR condenser in the driver front wheel well, then to a condenser in the original Porsche position in the center behind the front bumper then to the drier. I did get a Griffiths "high efficiency" front condenser and fan.
|
||
|
09-03-2021, 12:13 PM
|
|
|
Heck, Im only 5 not 71!
|
Quote:
__________________
Pat Henry Targa80 1980SC Targa (Mocha Brown) |
||
|
09-03-2021, 12:48 PM
|
|
|
Registered
|
While there... I learned I have a intensive windshield washer in my car. Since I do not use the washer that much I am wondering if I can forgo the main washer and just use regular fluid in the "Intensive Washer" to use it as my primary. I think it would just mean that I have to use the button/switch to activate it and would also help to keep from those accidental sprays when I unintentionally hit the windshield washer stalk. Down side I would have a reservoir of water in my frunk.

|
||
|
09-03-2021, 01:52 PM
|
|
|
Registered
|
I had to come in to check on part deliveries so I am taking a break on installation. Here is how the 90 degree bend tubes are helping me out with the limited space on the driver side. I was able to put one of them in the firewall hole that goes to the driver side vent which gave me a sharper turn radius for the 60mm CEET tube. I also attached one to the T coming from the footwell. I think they are perfect on the T since they give you a very clean bend, they are smooth inside, and the lock in to the T and swivel.

|
||
|
09-03-2021, 01:59 PM
|
|
|
Targa_PB_78_SC
|
Quote:
So you might ask him. See post #4 here Removing OEM A/C parts for upgrade?
__________________
BareRearedRookie Last edited by mike sampsel; 09-03-2021 at 02:13 PM.. |
||
|
09-03-2021, 02:11 PM
|
|
|
Registered
|
thanks Mike! Forgot the first rule, search....then ask!
|
||
|
09-03-2021, 02:15 PM
|
|


 67 Datsun stroker 2000
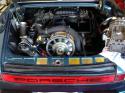 Porsche Targa 1978 SC

 1983 Porsche 911SC (sold)
 1985 Porsche 911
