|
|
|
|
|
| Author |
|
|
Registered
|
First cuts hurt
So one item tonight has been bugging me since the start of the CR build. I really didn't want to cut into my dash to add a blue LED switch. Since I deleted my fog lights I thought I might be able to repurpose that pull switch, but then I saw how that part of the dash is accessed through the front and not from in the cabin and I didn't have the time to figure out how to rewire it. So I did the normal and put the switch in the blank space to the right of the steering wheel. No one has talked through the how, so here is how I did it. I found that a 7/8 inch wood hole drill bit is slightly larger than the switch diameter. In fact it is enough that you can use a M22.23 closed rubber grommet (with the center cut out) to hold the switch in place in the hole. I twisted the 7/8 bit by hand to cut the dash vinyl (it cuts a hole slightly smaller than the raised circle. I did not need to cut any metal. Then I slid the grommet on the switch and then used a dull flat interior pick to set the grommet in place in the hole. It is tight enough that it holds the switch without using the nut supplied by CR. This way if I decide to relocate the switch I can use another of the grommets to fill the hole I left and I believe I will be able to push the switch through the back of the dash without detaching the wires.
  
|
||
 09-04-2021, 07:33 PM
|
|
|
Registered
|
Integrating more aircraft products
The next variance I am trying is to add the eyelet vent in place of the bowtie. I am going to see if the 40mm CEET tube will fit through the old evap blower hole aft of the smugglers box opening and under the blower. I attached it to the eyelet vent in place of the old bowtie and plan to connect the other end to the 40mm outlet on the driver side of the blower. The eyelet will swivel 360 degrees, you can also close it off.

|
||
|
09-04-2021, 07:39 PM
|
|
|
Registered
|
double checking
I think I have all my ducts ready. I ran out of CEET so for now I am going to try to reuse the plastic duct from the blend valves. I also "plugged in" the blower to see if it worked. I held my breath on that one because the original blower did not work when I bought the car and I was hoping that it was due to the motor. Luckily I plugged it in and thanks to drawings posted in either Targa80's or Nditiz1's build thread I had the plug in the correct orientation. All three fan settings worked. I'll take each small victory I can get. Now I am wondering if I want to add the "optional" high load sensor wire from the the wipers or rear defrost. If anyone sees anything wrong with my setup so far speak up. I am sure once I have the blower connected to all the ducts I am not going to want to remove it anytime soon.
Also a note of warning. The lower drain "nipples" are glued on. When I took my blower out of the packaging one was laying at the bottom of the box. Luckily I saw it early so I had time to reattach it with some JBWeld and let it dry. I recommend being careful when you set up the blower to fit it in place or just set it up for any testing. 
|
||
|
09-04-2021, 07:52 PM
|
|
|
Registered
|
Back into setting up A/C
Last season was blower install only this year I must have A/C. So I have connected the two front condensers (CR in front DS wheel well and a new Kuehl condenser in the original front Nose/belly position). I have the #8 and #6 hoses running up through the DS wheel arch and plan to run the #8 up through the steering shaft hole into the frunk and the #6 in through the hole in the bottom of the frunk (believe it is the old hole from original A/C) next to the evaporator drain line hole.
Quick questions for anyone reading this weekend: 1. How much condensation are you getting on the Drier bottle? Any problems noted in installs in the smugglers box for the drier? 2. Any problems routing the hoses through the intended locations? 3. All posts Ive seen recommend running the refridge hoses from the blower aft towards cabin then down through the old hole between the smugglers box and original blower. Any problems found in this configuration? 4. Can you smash down the loops create on the clamps on the CR included hose assemblies? The loop that sticks out after you have tightened the bands on the hose fittings. Id like to minimize any chances of chaffing but I dont want to damage any integrity of the clamps. 5. Any more lessons learned on the location of the high and low charge ports? If I go towards cabin and down for the lines out of the blower into the smuggler box and put the drier in the smugglers box I am committing to the ports going inside the smugglers box. Sounds like a very crowded smugglers box with little access to working on steering linkage and brake lines if needed in the future? |
||
|
05-30-2022, 09:30 AM
|
|
|
Heck, Im only 5 not 71!

|
Both the #6 and #8 hoses from the DS and Nose pan condensers were routed in the wheel well towards the back of the fender and came up through the steering shaft opening one line went to the compressor and the other went to the dryer mounted in the smuggler box. The two line on the evaporator were routed from the connector towards the gauges then u turned back to the smugglers box via a small cut out in the steering collar cover. The u turn provides extra ac line in case you need to remove the evaporator to access behind the gauges. I forget which lines (6 or 8) actually connected to what
Part. In my configuration I had no spare hole from the frunk into the smugglers box to route ac lines. 
__________________
Pat Henry Targa80 1980SC Targa (Mocha Brown) |
||
|
05-30-2022, 01:07 PM
|
|
|
Targa_PB_78_SC
|
My number 8 hose, from air box to compressor was too long at first, so I got a kink in the hose. It likely would have been okay, but I ordered more hose clamps and cut down the hose. Lesson might be to work in the charge port fittings in your hoses before the final cut. I could have done this, but I clamped too soon. Use some PAG oil to get the fittings on and off.
Mine are like this now, and are fine for filling. I have a tie strap to ensure the hose if off the sterring mech, which it likely is without the strap.
__________________
BareRearedRookie |
||
|
05-31-2022, 07:45 AM
|
|

|
|
Targa_PB_78_SC
|
Here is picture

__________________
BareRearedRookie |
||
|
05-31-2022, 07:49 AM
|
|
|
Targa_PB_78_SC
|
I think for me the short straw in moving the compressor up and out of the box, (in case you need to) were my grounding wires. I wish they were a bit longer, but removing them is not too bad, the self lock nut and limited space makes it a bit tedious, which is why, I wish had some extra length on the ground wires.
Only an issue if you want to move the compressor up out of the box, fully connected.
__________________
BareRearedRookie |
||
|
05-31-2022, 07:52 AM
|
|
|
Registered
|
Placement of Drier Bottle
Thanks all,
Still trying to follow up with placement of my drier bottle. Jonny shows the bottle next to the condenser (provides the mounting bracket). Porsche placed it in the aft wheel well in their A/C impact bumper cars. It seems like a lot of guys are installing it in the smugglers box. Why? At first I liked the idea, kept components out of way of thrown debris from the road. Now I am having second thoughts. Keeping the bottle in the Porsche original location would make it easier to change out the bottle, and it would keep the heat from the bottle away from the compressor. What am I missing. At this time I am not planning to put a washer bottle resevoir in the wheel well, my car still has the intensive washer with the small resevoir next to the brake booster assembly in the frunk. |
||
|
05-31-2022, 08:07 AM
|
|
|
Heck, Im only 5 not 71!
|
Quote:
1. Mounted behind condenser in DS front fender to cramped, becomes a magnet for dirt and not easily accessible. 2. Location where factory dryer was mounted in rear DS fender - installed boxer window washer bottle at the top in rear DS fender. This limited space for dryer, also, just another magnet for dirt. 3. Mount inside smuggler box near PS outer wall. Plenty of room for dryer without interfering with compressor. Easily accessible and not a dirt magnet location. I went with option 3.
__________________
Pat Henry Targa80 1980SC Targa (Mocha Brown) |
||
|
05-31-2022, 09:27 AM
|
|
|
Registered
|
Thanks Pat!
|
||
|
05-31-2022, 09:57 AM
|
|


 1983 Porsche 911SC (sold)
 1985 Porsche 911
 67 Datsun stroker 2000
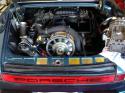 Porsche Targa 1978 SC

