|
|
|
|
|
|
|||||||
 |
|
|
LinkBack | Thread Tools | Rate Thread |
| Author |
|
|
Registered
|
Upper Trailing Arm Bushing Replacement - Elephant Racing Removal Tool While On Car?
Moving to the rear suspension refresh and feel ok with the spring plate bushing and shock replacement but the trailing arm bushings scare the **** out of me. Accessing the bolts that hold the swing arms in place up top looks really tough with the head of the bolt buried deep in the fitting and the nut barely sticking out. Several hoses in the way as well. If I do go forward, thinking of trying the Elephant tool which is shown in the video as allowing the bushings to be driven out while the arms are in the car, no removal of the drive shafts and brakes/wheels. Anybody do this as in the video?
https://www.youtube.com/watch?v=4bilewM7Zsw
__________________
Jeff  Byron Center Michigan |
||
 12-15-2024, 08:33 PM
|
|
|
Registered

Join Date: Feb 2007
Location: Northeast
Posts: 464
|
Just not a fun job, sorry. Have tried the tool with only a modicum of success.
__________________
Mark www.exotechpower.com 1981 Targa-messed with. 91 C2 supercharged track rat Radical Prosport-irritates the GT3 guys 40 years of rebuilding services |
||
|
12-16-2024, 06:57 AM
|
|
|
Registered
|
Were you able to change the bushings while the trailing arms were attached to the car? How did you access the bolts that hold the arms in place? Thanks for the reply.
__________________
Jeff Byron Center Michigan |
||
|
12-16-2024, 07:06 AM
|
|
|
Registered
Join Date: Oct 2016
Location: WA
Posts: 375
|
What trans? It's tougher with the G50 transmission, but still doable (allegedly). There are apparently some low profile sockets that will allow the work to be done with trans still up. I haven't tried this yet. I've removed my arms twice, both times with the trans out of the way.
Get a torch for the rubber bushings in the arms. |
||
|
12-16-2024, 07:12 AM
|
|
|
Registered
|
All set with a torch, just not seeing how to get a wrench on the bolt. The fact that every cable, hose, wire etc runs across the area doesnt help.
|
||
|
12-16-2024, 04:18 PM
|
|
|
Registered

Join Date: Mar 2001
Location: Marysville Wa.
Posts: 22,517
|
Most of those bushings are just fine. Lots of hassle for very little, if any return. JMO.
__________________
https://www.instagram.com/johnwalker8704 8009 103rd pl ne Marysville Wa 98270 206 637 4071 |
||
|
12-16-2024, 07:26 PM
|
|

|
|
Registered
Join Date: Oct 2016
Location: WA
Posts: 375
|
Would these work? I'm not certain these are the specific set that others have had success with.
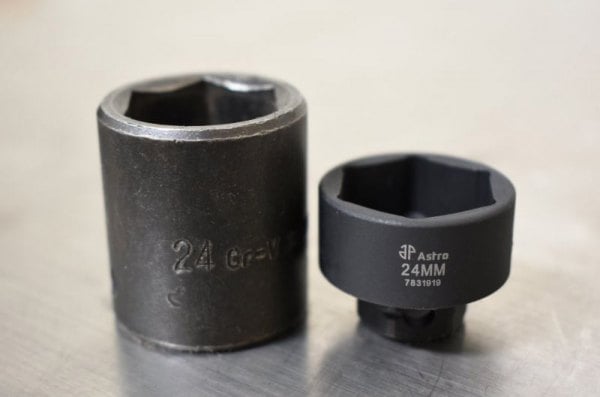 Edit, I believe they're called Astro Nano impact sockets. |
||
|
12-17-2024, 11:55 AM
|
|
|
Registered
Join Date: Oct 2019
Location: Denver, CO
Posts: 188
|
I did this job on my car and can confirm the Elephant Racing tool is the only way to do it without a press. The torch is important. Use it to heat the aluminum for around 4-5 minutes if your garage is cold. That way, prying is as easy as the video shows.
The only thing that makes this job really hard is if your brackets are narrow. If they are so narrow that the new bushings don't want to fit into the same hole, use the tool to compress the bushings until they fit in the slot. Then, once you've got the bushing started, or just wedged in the slot, remove the tool and push it the rest of the way. I wrestled with mine for a day or two. Give yourself some kind of low bench or pile of wood to set the trailing arms on so that you can rest your arms. Good luck! |
||
|
12-17-2024, 05:05 PM
|
|
|
Registered
|
What did you use to remove the pivot bolts? Were you able to get past all the cables and wires? I assume you left the arm attached to the wheel and unbolted the top pivot and shock?
|
||
|
12-18-2024, 04:55 PM
|
|
|
Registered
Join Date: Oct 2019
Location: Denver, CO
Posts: 188
|
I had the wheel, the shock, and the spring plate detached. When you detach from the spring plate, you will lose alignment.
I just used some big sockets and long breaker bars with extensions to remove the bolts. Might have even had a friend help me brace myself to twist them off, I think. Before you put all that torque on the car, be sure you're happy with the jack points; grab a fender and push the car back and forth a bit checking for movement. |
||
|
12-18-2024, 05:02 PM
|
|
|
Registered
Join Date: Oct 2019
Location: Denver, CO
Posts: 188
|
Oh, now I see your post about those nano sockets. I think it might be more important to get sockets that have 12 possible "settings." That plus breaker bars should be enough I would think.
|
||
|
12-18-2024, 05:03 PM
|
|
|
Registered
Join Date: Dec 2024
Location: New York City
Posts: 7
|
Quote:
|
||
|
12-21-2024, 05:37 PM
|
|


