|
|
|
|
|
| Author |
|
|
It'll be legen-waitforit

Join Date: Jan 2002
Location: Calgary, Canada
Posts: 7,046
|
Looking good Dennis, what lift did you finally get?
Bob |
||
 03-22-2013, 05:16 PM
|
|
|
Registered
Join Date: Jan 2012
Location: Erehwon
Posts: 3,369
|
Bob,
I ended up with an AC Hydraulic (out of Denmark) mid-rise lift. I like it a lot, but it has a few drawbacks. The Carrera project car is on a wheeled stand though... Dennis |
||
|
03-22-2013, 07:03 PM
|
|
|
Registered
Join Date: Jan 2012
Location: Erehwon
Posts: 3,369
|
Well, just handed in my notice and have no intention of working (for pay that is) for at least the next 6 months or so, just had it with Corporate Canada and the BS that passes for ethics these days.
Upside is that I should be able to spend lots of time on the car, intention is to have the chassis ready for paint by end of this calendar year, lots of stuff to do, especially since the wife wants me to take a vacation outside of the home for a month or two! Yippee! I'm free, I'm free, I'm free at last!! Dennis |
||
|
04-12-2013, 06:05 AM
|
|
|
Registered
Join Date: Jan 2012
Location: Erehwon
Posts: 3,369
|
Well, just handed in my notice and have no intention of working (for pay that is) for at least the next 6 months or so, just had it with Corporate Canada and the BS that passes for ethics these days.
Upside is that I should be able to spend lots of time on the car, intention is to have the chassis ready for paint by end of this calendar year, lots of stuff to do, especially since the wife wants me to take a vacation outside of the home for a month or two! Yippee! I'm free, I'm free, I'm free at last!! Dennis |
||
|
04-12-2013, 06:06 AM
|
|
|
Registered
Join Date: Jan 2012
Location: Erehwon
Posts: 3,369
|
Some progress to report on, all with that front bumper....
Here it is on initial mockup, first step after getting it more or less straight was to extend the bumper by about 2 cm, this to allow clearance for all sorts of things not the least of which is the A/C.  Here it is on the work bench, wanted to fix all that was wrong with it....and my, there was a lot wrong with it, plus wanted to fair in the fog lights with perhaps a little slot for additional air flow into the oil cooler and A/C condenser. I finally got my gas welding under control and have done mainly gas welding as it allows the hammer and dolly to do its thing much more easily  Here is is with just the bumper mocked, plenty of adjustment when I do the final fitting to get all the edges in the right spot. Found out that the foglight supports actually interfere with the bumper mounting brackets, so some creative engineering required..  Here is the full mockup (not aligned for sure) and it is beginning to come together.  And a photo a little further back to give an idea of the whole look, it is starting to get there,  Starting to get there, lots of work on the front yet, mainly building the brackets that support the end of the bumper and valance, some internal bracing on the bumper plus all the refinishing of the various little holes and crap on the bumper itself. Dennis Last edited by Iciclehead; 04-27-2013 at 12:38 PM.. |
||
|
04-27-2013, 12:36 PM
|
|
|
Registered
Join Date: Jan 2012
Location: Erehwon
Posts: 3,369
|
OK, been a while since I posted, but I have been doing a lot of work on the front end...seemed like it would never get there.
Anyway, it took a long time to figure out how to support the bumper ends, particularly on the drivers side where the new air conditioning condenser now lives. On the passenger side all was well....except the early signal lights unfortunately want to occupy the same space as the support bracket...so, needed to make something exotic so I hammerformed the S shaped piece and it seems to work and clear fine.  Drivers side was harder, but ultimately simpler as I gave up trying to make the equivalent of the passenger side and simply put a small bracket at the end of the fender to tie the two together. Issue is that there needs to be a gap as there a rubber molding that fits between the bumper and the fender....so you really can't bolt the two together unless you do some kluge spacer thing. I also found out that the rubber sealing strip fits "backwards" from the intuitive way it looks like it goes on.  Needed to fabricate the mounting point on the fender...did both sides as I am a little anal, but it was a relatively simple piece to make up.  The bumper still needs a lot of finishing work, it definitely was a crappy part....probably should have bought a new or at least better one, there were rust holes that needed filling, bent parts, wrinkles...you name it, but the 3 inch lead will take care of the final look. I have welded in the inner supports an mounts, again, need some final grinding and prettifying before I coat it with anything....  Final appearance is what I wanted, it will look better with the fogs in it, plus the lip spoiler (still need to that final bit of fettling).  Next project after doing all the little details and finishing on the front is to do the bum of the thing....need to convert bumperettes to RS shape, plus fit the earlier rear finishing panel and such. Nothing too hard there from what I can tell, so I think I am still on track to get the car in primer by year end. Dennis |
||
|
08-05-2013, 01:43 PM
|
|

|
|
Registered
Join Date: Jan 2012
Location: Erehwon
Posts: 3,369
|
Well, I guess I am just an idiot. Got to the bum of the car, did the easy part first, namely taking the little trim panel off.
Here it is before....  Took out a few spot welds, cut the braces underneath, ground away the MIG welding at the edges and voila....early behind.  I thought, oh, this will be fun and easy compared to the front....here are the parts, including a new repro centre panel, used rear bumpers etc...I knew I had to "RS" the bumpers, but how hard could that be?  Well, lets just say that the world and I are not friends right now. First of all, the bumpers were not in the finest shape and so there is crappy welding and BRAZING for crying out loud....from a previous repair. No worries, just fit and make it work. I am not going to fit them in original style, but rather fabricate a bracket to use the short hood bumper mounts. Got the idea from another guy doing a similar thing.... No matter what I did though, I could not get the blessed bumpers to fit. A miserable afternoon of fiddling and then it dawned on me...the bumpers I have are from a short wheelbase car, and therefore the side portion of the bumpers are longer. Crap, besides RS'ing them, I now have to section them as well (or buy them all ready to go). Did the price check...$1100 per side, so much for that idea. Cut the bumpers in two...cut slots to allow the RS bend...here it is in mid progress....  All gas welding as I want to be able to hammer out any imperfections....or at least get close enough for the lead to do its thing... A lot of fiddly gas welding, filling the slots and gaps....then cut the section down and refit. Needless to say there is not a parallel line in the whole blessed bumper, so there is a bit more hammerforming in my future....but here is the product as it stands today.  Pretty happy with my gas welding job, very little filler rod except where the gaps were over a 1/16.... Took a while to get the penetration and pooling correct, but I got enough practice today, brings back memories of my dad coaching me through welding....takes a while to get the touch back. Glad this is a high crown piece as on the RS part there was a fair amount of heat put into the part. Where it is seamed the HAZ isn't too bad, so pretty happy about that. Thats all for now folks! Dennis |
||
|
08-14-2013, 05:21 PM
|
|
|
Uncertifiable!!!
|
Just came across this thread. One cool build!! I am admiring your great workmanship. Do keep the pics rolling. Seems that you have the same idea as I have about keeping the comforts of A/C in a backdate. I'll be following this thread. Cheers...
__________________
🇨🇦 The True North Strong and Free 🇨🇦 Living well is life's best revenge- George Herbert (1593-1633) 2006 C2S, 2024 WRX GT, 911 hot rods on Pelican . Evolution of a Carrera RST, and Sweet Transplant |
||
|
10-31-2013, 04:13 AM
|
|
|
Registered User
|
Love the thread. You are building the car I have been envisaging for my own build.
__________________
Childhood dream car: Porsche 959 |
||
|
02-16-2014, 05:42 PM
|
|
|
Registered
Join Date: Jan 2012
Location: Erehwon
Posts: 3,369
|
Hellfire and damnation....another problem, or shall we say opportunity.
Finally got the rear of the car done, all the bumpers and such....haven't posted that stuff as there are lots of backdate threads going on... Anyway, on to the meat of the matter. I thought it prudent to mock up the transmission/engine assembly complete with the torsion tube welded in, check them modifications to the shift linkage, check the starter and clutch actuation now that I have made the pilot bearing mount a little thinner. Well, some parts of the work went well, here is the welded up crossmember, still need to rust proof the inside, but it is all welded up, looks like it will hold...  Also installed the Wevo antiroll bar mounts so they are in place. Nice product, strong like bull.... Anyway got to mocking up the transmission/engine on the bench, assembled it all and noticed right away that I was having trouble getting the transmission flange to mate up fully to the engine flange. Little worried. Put the transmission in gear, moved the clutch actuator to disengage the clutch, expecting that it would in fact disengage. Well, it didn't. Spent the last few hours trying to diagnose what is wrong and, lo and behold. I want to punch the folks at Getrag right in the nose. Turns out that the splines on the input shaft do not run all the way to the throw-out bearing....they taper slightly as per the picture below:  Not sure if you can see it all that well, but there is about 7 mm where the splines end/taper right near the throwout bearing guide tube. The clutch disc has nice chamfered edges, but no where near the taper shape.  So the net effect is as below....when I slide the clutch disc onto the input shaft, it stops about 7 mm or so short of the guide tube, which isn't the end of the world, but most critically, it now jams the clutch disc against the flywheel....it has no room to go back and disengage.  I did a bunch of measuring and looking at shortened 5 speed pictures on the web which gave me insight into a few things. First of all, the 5 speed G50's input shaft tapers right after the splines, so on disengagement, it is no big deal if the clutch disc splines hang out a little, plus they are complete splines. I also think the guide tube on the 5 speed is a little shorter, I'd love to get the measurement, but in any event, I figure I'd have about 1 mm clearance, no biggie to trim it down by a few millimetres if it needs to be done. As per the picture below...you can see the different shaft shape and the splines. Explains a lot.  The G50 6 speed is actually similar in weight to the 5 speed, in part as the shafts are tubular, which means the splines were cut "into" the shaft as it is a little bigger in diameter to compensate for it being tubular. So, what to do. The "perfect" answer is to disassemble the transmission, take the input shaft to a machinist, have him extend the splines by 10 mm or so. I checked withe local guy, they say they can do it and do not believe the shaft needs to be rehardened or treated in any way. Not so sure about that, but then again, we are not talking about taking much off here. I also am not sure how much clearance I will need. My measurements show that I need about 7 mm as a "neutral" measurement where the disc would just brush the flywheel (pressure plate is not an issue as it will move back when actuated. Anyone have any insight on either the spline machining/hardening question or how much clearance the disc actually needs? Don't think it is much....but 1 or 2 mm enough? Trouble is, I am not confident on disassembling/reassembling the transmission and the local Porsche guy figures it will be around $1500 round trip to disassemble/reassemble...plus $200 for machining and it gets perilously close to $2k - major hole in my budget, coupled with a little uncertainty that this will do the job. Expedient answer is to just shorten the clutch disc splines. Easy to do as I will just take the metal cutting grinder to it, make it tidy and should be good. The G50 clutch disc splines are about 27 mm deep, taking 8 mm off, leaves 19 mm of engagement of the splines onto the input shaft. I read on the web (yes that great purveyor of truth) that involute splines shafts need about 1 to 1.5x the shaft diameter for proper engagement. The input shaft major diameter is 25mm (gee...the Sachs guys read the same stuff I do!), so this would put it a fair bit below minimum. Risk is, I suppose, that with the mighty 3.4 twisting it would destroy the splines and strand me somewhere....but then again, how much overkill is there in automotive engineering? Anyway, I know this thread only gets updated intermittently, but here is hoping others can shine some light on this dilemma. Thoughts greatly appreciated... Dennis Last edited by Iciclehead; 03-08-2014 at 01:47 PM.. |
||
|
03-08-2014, 12:26 PM
|
|
|
Registered
|
I ran in to a similar problem with my G50/50 conversion, best to get the input shaft machined. I wouldn't do it any other way. Patrick Motorsport or TurboKraft can get it done for you, not a big job
__________________
Lincoln Phillip 87 930 Motec EFI M600 G50/50 TurboKrafted Hell Hound. Jeep, Chrysler, Dodge, Ram, SRT & AEV Dealer pm me for your Mopar needs. "the 930 is THE CAR that started my PORSCHE love affair..." Magnus Walker |
||
|
03-08-2014, 02:27 PM
|
|
|
Registered
Join Date: Jan 2012
Location: Erehwon
Posts: 3,369
|
Quote:
Any idea how far back you had to cut the splines? I am thinking about 12 mm, just to give me plenty of room, don't see any downside for a millimetre or two longer, but lots of downside if I don't take enough out. Dennis |
||
|
03-08-2014, 03:54 PM
|
|

|
|
Is very busy
|
Does a G50 even come as a 6-speed? I thought they were only 5-speed.
__________________
Jason 1987 930 Slantnose Cabriolet, 545 hp, Guards Red- Weekend cruiser 1986 944 Turbo (951), 350+hp, Guards Red- Track car 2005 Toyota Tundra SR5 Double Cab 4x4, stock 282 hp, Silver- Daily driver |
||
|
03-08-2014, 03:56 PM
|
|
|
Registered
Join Date: Jan 2012
Location: Erehwon
Posts: 3,369
|
Yes, the transmission was always designed to be a 6 speed from the 964 forward....mine is out of a 993. There is a lot of stuff earlier in the thread that helps explain it I suppose..
Dennis |
||
|
03-08-2014, 04:40 PM
|
|
|
Is very busy
|
Quote:
__________________
Jason 1987 930 Slantnose Cabriolet, 545 hp, Guards Red- Weekend cruiser 1986 944 Turbo (951), 350+hp, Guards Red- Track car 2005 Toyota Tundra SR5 Double Cab 4x4, stock 282 hp, Silver- Daily driver |
||
|
03-08-2014, 08:15 PM
|
|
|
Registered
Join Date: Jan 2012
Location: Erehwon
Posts: 3,369
|
Ok, finally another update....at long last.
If you have read this thread..and it is getting old, you'd remember that I ran into the problem of the splines on the transmission input shaft not being long enough to allow the clutch disc to move far enough away from the flywheel to disengage. So, I had the transmission disassembled, brought the input shaft to the machine shop where they cursed and swore as the nice hard German steel broke their spline cutter. To their credit, they offered to buy a harder cutter (carbide I think) if I was prepared to wait...no problem, so here is the input shaft with the longer splines in it. You can see where they extended them...  So, then back to the independent Porsche dealer that was assembling the transmission for me, I told them I was in no rush so it took 6 months for the round trip. In any event, they found that one bearing was buggered and that needed to be replaced, then the pinion needed to be reshimmed....curious as Porsche did the first dis/re-assembly and I would have hoped they did it well, I guess not. So after a lot more money than I expected, finally got it all back this week, put the whole assembly together. Here it is...  Can't get over how long this whole thing is. Anyway, hooked up a battery, everything spun as required Then did the clutch disengagement with a bolt/plate arrangement and &^$&^$&^%#$%^&$ NO 'effin DISENGAGEMENT. Crap, a million times over CRAP! Well, calmed down, and did a step by step re-assembly. No problem with input shaft to pilot bearing clearance, appears to be about 1.5 mm Put the clutch disc back on sans pressure plate and voila! Found the problem.....Clutch disc interferes with the throwout bearing guide tube.  Easy fix....take it all apart, take out the guide tube which thankfully is just retained by two screws and grind it down about 1.5 mm. I actually estimated the clearance required by spacing the transmission away from the engine case until there was clearance and then just used that measurement plus a RCH to guide the grinding. |
||
|
10-10-2014, 01:21 PM
|
|
|
Registered
Join Date: Jan 2012
Location: Erehwon
Posts: 3,369
|
OK, last update for today. Did the grinding, reassembled the whole thing and it works.
So I can say, with certainty, that you can indeed fit a G50 6 speed transmission into a '89 Carrera, without coil overs, without crazy slicing of the torsion tube. I have to get the rear engine mount back from the powder coaters before I put this in the car to validate that the shifter rod/coupler is all OK, but that is not much of a worry, compared to all this other stuff, it is pretty darn simple. I will post more when I mock it up and do the final check on shifting and clearances and such. I also need to make the transmission crossmember the way I want, which I intend to cast an aluminium mount to fit between the transmission and the 915 transmission crossmember. Never cast anything before, so this ought to be a fun experience. Dennis |
||
|
10-10-2014, 01:25 PM
|
|
|
Moderator

|
It's too late but which guide tube did you use?
On 993 there are 2, a short one is used w/ DMF flywheel/clutch package A longer one is used w/ the RS/CS single mass flywheel/clutch package
__________________
Bill Verburg '76 Carrera 3.6RS(nee C3/hotrod), '95 993RS/CS(clone) | Pelican Home |Rennlist Wheels |Rennlist Brakes | |
||
|
10-10-2014, 01:59 PM
|
|
|
Registered
Join Date: Jan 2012
Location: Erehwon
Posts: 3,369
|
Quote:
It was the stock one with transmission, and while I don't have all the details on the donor car, from what I do know it was an unmodified 993 so I suspect it was the shorter one.... Dennis |
||
|
10-10-2014, 06:27 PM
|
|
|
Moderator
|
Quote:
The RS/CS and Cup cars used a single mass flywheel which needs to have the longer guide tube stock one for dual mass flywheel is 950.116.813.06 the one for single mass(old style) is 950.116.813.30
__________________
Bill Verburg '76 Carrera 3.6RS(nee C3/hotrod), '95 993RS/CS(clone) | Pelican Home |Rennlist Wheels |Rennlist Brakes | |
||
|
10-11-2014, 04:15 AM
|
|


 Porschen
 RST
RST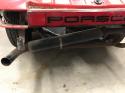 Ugly Duck
 1987 Porsche 930 Slantnose Cabriolet
 1986 Porsche 944 Turbo (951)
 2009 Porsche Cayenne GTS
 1976 Porsche Carrera 3.0
 1995 Porsche 993 Carrera Coupe
