|
|
|
|
|
| Author |
|
|
Member 911 Anonymous
|
Quote:
1. The 2.2MM per foot draws 0.51 mAmps. (that is miliamps) 2. a. Here is a pic of the radial bend it can take, you can wrap it around a pencil: The pis is copy right so I can not cut and paste it http://www.coolight.com/category-s/53.htm 2. b. I purchased the 2.2MM mounts:  At www.thatscoolwire.com they said placing a fuse before the inverter will not hurt but they reassured me that the inverter can take +/-8% fluctuations ( I am not a EE so I do not know what the hell that means )
__________________
'85 Carrera Targa Factory Marble Grey/Black * Turbo Tail * 930 Steering Wheel* Sport Seats * 17" Fuchs (r) * 3.4 * 964 Cams * 915 * LSD * Factory SS * Turbo Tie Rods * Bilsteins * Euro Pre-Muff * SW Chip on 4K DME * NGK * Sienes GSK * Targa Body Brace PCA/POC Last edited by DRACO A5OG; 04-03-2009 at 12:41 PM.. |
||
 04-03-2009, 12:38 PM
|
|
|
Member 911 Anonymous
|
Quote:
__________________
'85 Carrera Targa Factory Marble Grey/Black * Turbo Tail * 930 Steering Wheel* Sport Seats * 17" Fuchs (r) * 3.4 * 964 Cams * 915 * LSD * Factory SS * Turbo Tie Rods * Bilsteins * Euro Pre-Muff * SW Chip on 4K DME * NGK * Sienes GSK * Targa Body Brace PCA/POC |
||
|
04-03-2009, 12:48 PM
|
|
|
Registered
Join Date: Apr 2008
Location: Houston TX
Posts: 8,737
|
Quote:
 But I won't...
__________________
Mike Bradshaw 1980 911SC sunroof coupe, silver/black Putting the sick back into sycophant! |
||
|
04-03-2009, 12:52 PM
|
|
|
Member 911 Anonymous
|
No worries, I will get it on Wednesday next week. you still Cool though :P
__________________
'85 Carrera Targa Factory Marble Grey/Black * Turbo Tail * 930 Steering Wheel* Sport Seats * 17" Fuchs (r) * 3.4 * 964 Cams * 915 * LSD * Factory SS * Turbo Tie Rods * Bilsteins * Euro Pre-Muff * SW Chip on 4K DME * NGK * Sienes GSK * Targa Body Brace PCA/POC |
||
|
04-03-2009, 12:55 PM
|
|
|
Registered
Join Date: Apr 2008
Location: Houston TX
Posts: 8,737
|
It would be interesting to see what the 2.2mm produces as far as light, and whether the 0.9mm might be better, at full current. Also, the 0.9mm is small enough that you could run two loops, of different colors. White for normal driving, and red/green/blue/orange/whatever for car shows, etc.
__________________
Mike Bradshaw 1980 911SC sunroof coupe, silver/black Putting the sick back into sycophant! |
||
|
04-03-2009, 12:59 PM
|
|
|
R&D guy
Join Date: Sep 2007
Location: the border between the states of inebriation & confusion
Posts: 2,034
|
Quote:
 0.51mA/ft !!!! The inverter probably looses more than the total current the lighting elements themselves draw, just due to parasitic and efficiency losses. Standard led's draw 10 - 20mA (or more) each, depending on the specific type & brightness of the led's. Hmmm... Maybe I will put in more than one color so I can adjust it to my liking, similar to the option on new Mustangs. |
||
|
04-03-2009, 02:46 PM
|
|

|
|
Registered
Join Date: May 2002
Location: St Louis
Posts: 4,211
|
Quote:
Where did you get that number? Did they have capacitance per foot also?
__________________
Rick 88 Cab |
||
|
04-03-2009, 04:11 PM
|
|
|
Member 911 Anonymous
|
Quote:
 From their FAQ: Quote:
__________________
'85 Carrera Targa Factory Marble Grey/Black * Turbo Tail * 930 Steering Wheel* Sport Seats * 17" Fuchs (r) * 3.4 * 964 Cams * 915 * LSD * Factory SS * Turbo Tie Rods * Bilsteins * Euro Pre-Muff * SW Chip on 4K DME * NGK * Sienes GSK * Targa Body Brace PCA/POC Last edited by DRACO A5OG; 04-03-2009 at 06:21 PM.. |
||
|
04-03-2009, 06:15 PM
|
|
|
Member 911 Anonymous
|
In all my excitement, I have a Question?
Which Guage would you guys tap off of for 12v source? I was thinking one of the light bulb (Black/Blue) wire off of the Speedo and tap the (Brown) Ground Wire. What say you guys? I read the specs in the Bentley page 970-77 & 78 it shows two (Red/Black) power leads.
__________________
'85 Carrera Targa Factory Marble Grey/Black * Turbo Tail * 930 Steering Wheel* Sport Seats * 17" Fuchs (r) * 3.4 * 964 Cams * 915 * LSD * Factory SS * Turbo Tie Rods * Bilsteins * Euro Pre-Muff * SW Chip on 4K DME * NGK * Sienes GSK * Targa Body Brace PCA/POC Last edited by DRACO A5OG; 04-03-2009 at 06:37 PM.. |
||
|
04-03-2009, 06:33 PM
|
|
|
Go Speedracer, go!

Join Date: Aug 2002
Location: Indianapolis
Posts: 1,951
|
Update: I have now installed the wire in all 5 gauges. It was quite a bit of work but well worth it. I used exactly 5' of wire for all of them. I soldered connectors for each gauge and passed the wire through the existing light socket. I did retain the original sockets with LEDs in the speedometer to retain the lighting of the odometer. On all others I ditched the original light sockets all together. I did not cut any factory wiring so I can go back to stock if I want to.
I used double sided foam tape to line the inside of each gauge. I did not use the tape to stick the wire though. I only used it to prevent the wire from falling into the gauge. The wire will stick against the gauge with a little tension bent into the it. The inner bezel holds the wire nicely against the foam tape, and it is not visible once put back together. I had to split the right 3 gauges to install the wire. The left two you can access from the back without splitting. To hook up in the car, I used 2 inverters with splitters. I pulled power off of the main feed for all of the gauges. I simply used a jumper and spliced right into the wire where it comes out of the harness. I used the ground on the back of the gas/oil gauge. I put the inverters way up in the trunk so I don't hear them. Sorry I cannot put up more pictures, but I have to pack for a work trip early AM. All I can say is WOW!!! I haven't finished with the install in the car yet. I will be out of the country all week, so it's going to have to wait until next weekend. Here are a few pictures of the progress:    
__________________
1981 SC ROW Coupe |
||
|
04-05-2009, 04:16 PM
|
|
|
Almost Banned Once
Join Date: Feb 2009
Location: Adelaide South Australia
Posts: 38,600

|
They look great!
__________________
- Peter |
||
|
04-05-2009, 04:46 PM
|
|
|
Slumlord
Join Date: May 2001
Location: Canada
Posts: 4,983
|
Quote:
__________________
84 Cab - sold! 89 Cab - not quite done 90C4 - winter beater |
||
|
04-05-2009, 07:35 PM
|
|

|
|
Registered
|
Yep, you are definitely heading down the right path here.
__________________
88' Carrera, Black/Black/Black, "Murdered Out" OEM. 06' BMW 'M' Roadster (Wife's car and WAY faster than mine) |
||
|
04-05-2009, 09:14 PM
|
|
|
Member 911 Anonymous
|
That is awsome Speed.
I can't wait to set up my guages. WIIT, I'm going to touch up all the red/orange with some model paint. Questions: Is there a reason why you did not allow the EL-Wire to eluminate within the body of the Guage? I notice you place heat shrink before the bend. Quote:
Quote:
Quote:
Quote:
Sorry Speed for all the questions. Great Job Brother!
__________________
'85 Carrera Targa Factory Marble Grey/Black * Turbo Tail * 930 Steering Wheel* Sport Seats * 17" Fuchs (r) * 3.4 * 964 Cams * 915 * LSD * Factory SS * Turbo Tie Rods * Bilsteins * Euro Pre-Muff * SW Chip on 4K DME * NGK * Sienes GSK * Targa Body Brace PCA/POC Last edited by DRACO A5OG; 04-06-2009 at 12:05 AM.. |
||||
|
04-05-2009, 11:50 PM
|
|
|
Almost Banned Once
Join Date: Feb 2009
Location: Adelaide South Australia
Posts: 38,600
|
Also... Can we have a rough wiring diagram showing the 2 inverters with splitters showing all five gauges...
Thanks advance.
__________________
- Peter |
||
|
04-06-2009, 12:08 AM
|
|
|
Member 911 Anonymous
|
If Speed doesn't get back in time I will post all pics of my set up and maybe diagram ( that's a good idea to keep everything organised, good call )
__________________
'85 Carrera Targa Factory Marble Grey/Black * Turbo Tail * 930 Steering Wheel* Sport Seats * 17" Fuchs (r) * 3.4 * 964 Cams * 915 * LSD * Factory SS * Turbo Tie Rods * Bilsteins * Euro Pre-Muff * SW Chip on 4K DME * NGK * Sienes GSK * Targa Body Brace PCA/POC |
||
|
04-06-2009, 12:11 AM
|
|
|
Go Speedracer, go!
Join Date: Aug 2002
Location: Indianapolis
Posts: 1,951
|
Quote:
I tucked the wire under the bezel so that it would shine down on the numbers. If I put it in the body, I don't think there would be enough light to shine up and onto the numbers. Also, that heat shrink is my soldered connection to the female EL wire connector. I pulled the connector into each gauge and fastened it to the body of the gauges so that it would not get pulled out while tugging on the gauges during install. Quote:
Quote:
Quote:
.Quote:
Quote:
__________________
1981 SC ROW Coupe |
||||||
|
04-06-2009, 07:03 AM
|
|
|
Member 911 Anonymous
|
Thanks Speed, Safe Journey and Hurry Back!
Here is diagram of my EL-Wire plan: 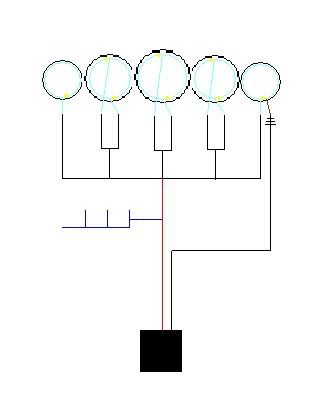 With generous report from Speed about entering both sockets on the three center gauges, I decided to split the center EL-Wires so the wires can act like OEM bulbs emitting light thru the sockets and gauge assembly's body. I will test and post. Each wire would cover half of each radius and end capped. The gauges are set up looking from the trunk. Clock on the Left, Fuel/Oil Level to the right where the Ground will be connected to the extra Male Spade Ground.  Where the hell are my EL-Wires? Where the hell are my EL-Wires?
__________________
'85 Carrera Targa Factory Marble Grey/Black * Turbo Tail * 930 Steering Wheel* Sport Seats * 17" Fuchs (r) * 3.4 * 964 Cams * 915 * LSD * Factory SS * Turbo Tie Rods * Bilsteins * Euro Pre-Muff * SW Chip on 4K DME * NGK * Sienes GSK * Targa Body Brace PCA/POC Last edited by DRACO A5OG; 04-07-2009 at 12:29 AM.. |
||
|
04-06-2009, 08:32 AM
|
|
|
Registered
Join Date: May 2002
Location: St Louis
Posts: 4,211
|
http://www.micrel.com/_PDF/mic4830.pdf
You could apply 12 volts directly to the inductor but now you have to come up with some way to dim them (perhaps a pot on Rel).
__________________
Rick 88 Cab |
||
|
04-07-2009, 10:52 AM
|
|
|
Member 911 Anonymous
|
That is an alternative but the idea would be to use the existing wiring harness that is hooked up to the OEM dimmer light switch, the blue diagram to the left middle of my crappy non-EE diagram.
Hey that micrel product looks great.
__________________
'85 Carrera Targa Factory Marble Grey/Black * Turbo Tail * 930 Steering Wheel* Sport Seats * 17" Fuchs (r) * 3.4 * 964 Cams * 915 * LSD * Factory SS * Turbo Tie Rods * Bilsteins * Euro Pre-Muff * SW Chip on 4K DME * NGK * Sienes GSK * Targa Body Brace PCA/POC |
||
|
04-07-2009, 11:29 AM
|
|


 Marble Grey


 1988 Porsche 911 Carrera
 2006 BMW 'M Roadster'
