|
|
|
|
|
| Author |
|
|
Registered
Join Date: Jun 2009
Location: ohio
Posts: 4,306
|
it seems like everyone else has done it, so why not me... (interior)
finally had some free time to start this project so here we go.....
found a used scissor lift a few weeks back on cl and snatched it up quick. the brand is benwil (never heard of it) and it is a 48" 6klb lift. this thing is massively heavy and made of very thick steel, much thicker than pics of some other brands i have seen online. it works very nicely, and it is 110v, which is a godsend since i can't get a 220v line in the garage. bought some 2x10 boards, doubled em up and screwed em together. took an old pair of steel ramps that were useless due to their angle and chopped off the back and gave em a few coats of rustoleum. screwed these into the 2x10s and i have a nice cheap set of ramps to drive up. they were still a little too high for the 2x10 boards but i set it up so that as soon as i "drop down" i am in the perfect position on the boards. 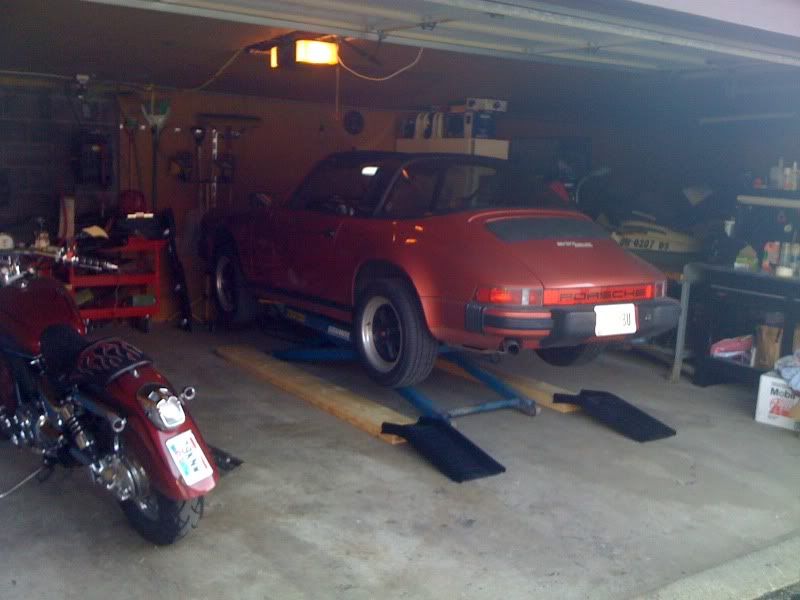 went to the grocery store and bought a box of ziploc sandwich bags and used them to hold all the screws for each piece i removed. hopefully reassembly will be much easier now. removed the seats and everything else that i needed to, then took the carpet out. took out my handy dandy multi-purpose scraper and my heatgun and went to town. the old asphalt came up surprising easy and the whole job took about 3-3.5 hours to ge to this point. 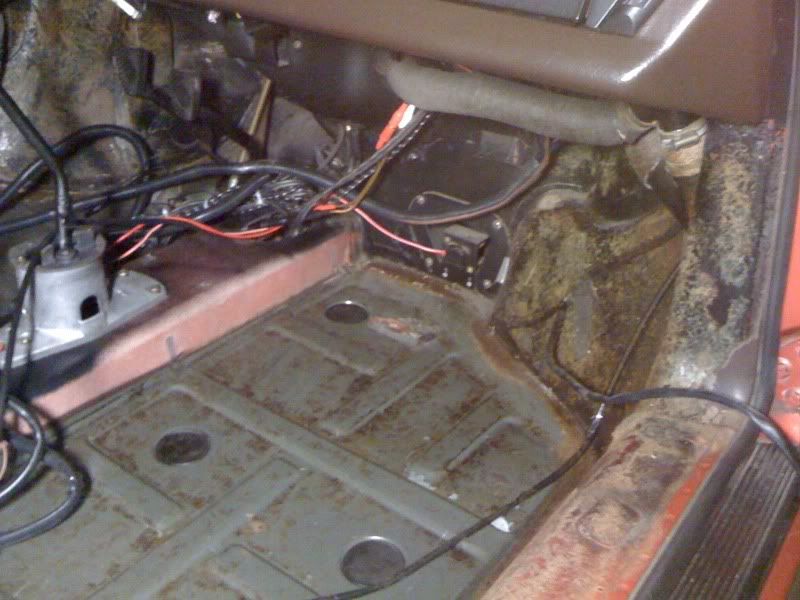 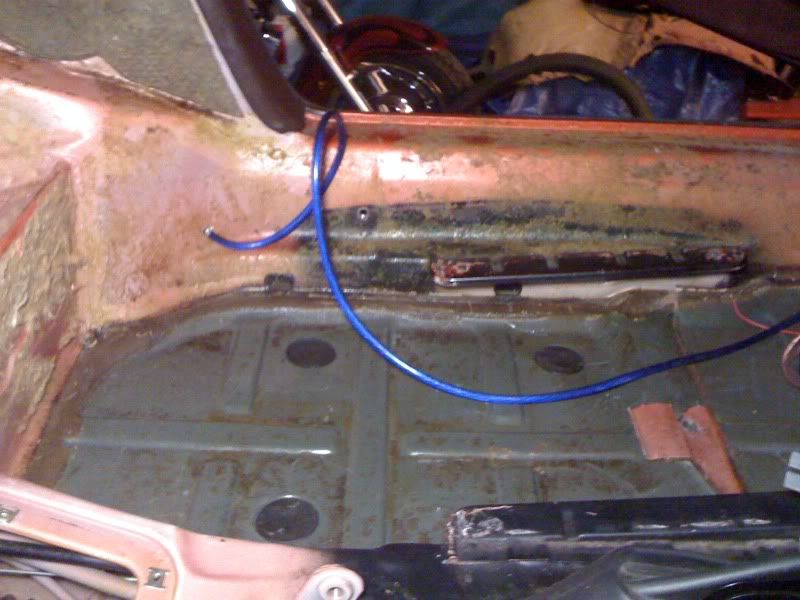  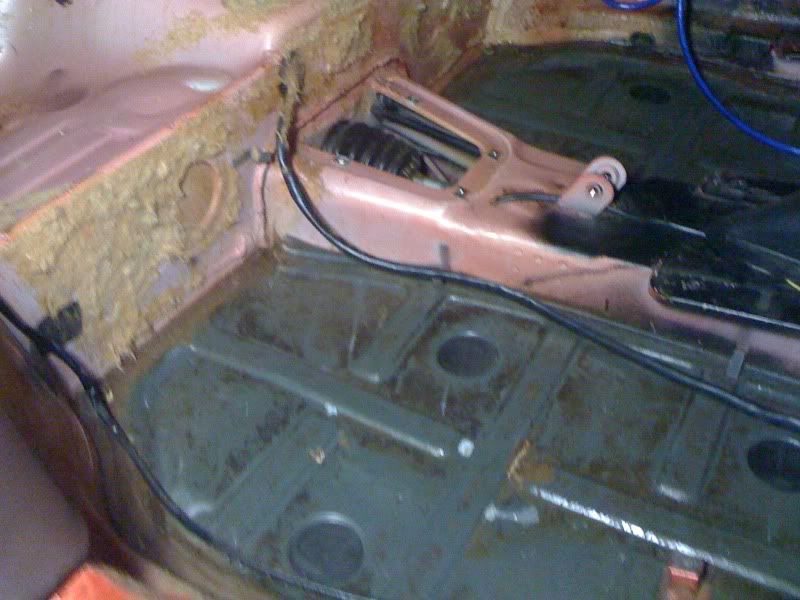 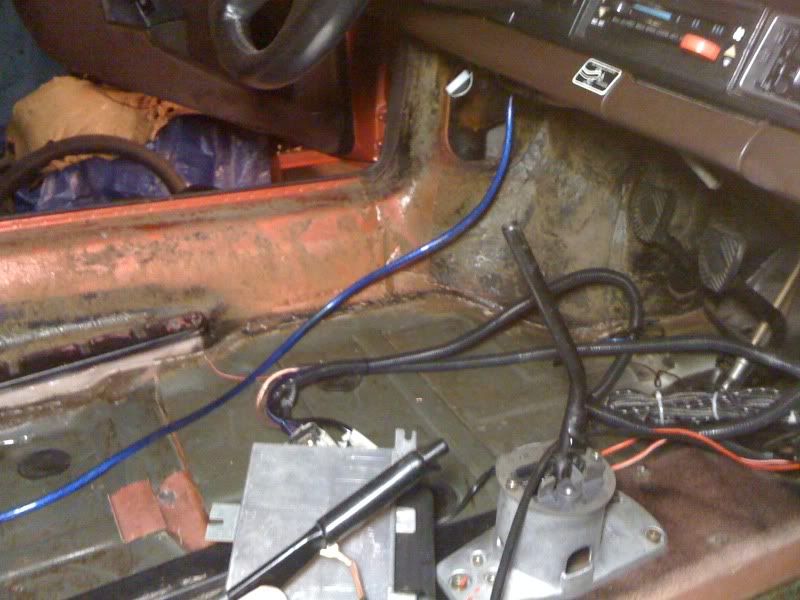 i am very happy to report that there was not a spec of rust anywhere to be found. i was also able to save about 90% of the padding on the back of the seat sound pad by slowly working it off with a gloved hand. this is all that was left on the floor.  i noticed a few things while doing this job. at some point a window was broken because i found a lot of little glass pieces on the floor. looks like it was on the driver's side of the car. the factory asphalt, while one solid looking piece, had different sections. most of it was a solid sheet but some of it was cut into small hexagon patterns which made it break up into tons of little pieces. it is a good idea to keep track of where you lay your heatgun down. my right ring finger has a nasty burn on the side of the tip as i wasn't paying attention and touched the heatgun tip with it. ouch does not even begin to express the pain. i do have 2 questions and hopefully someone can shed some light on them for me. do i need to remove the rubber seal/weather stripping to get to the rest of the vinyl that was attached to the carpet here? 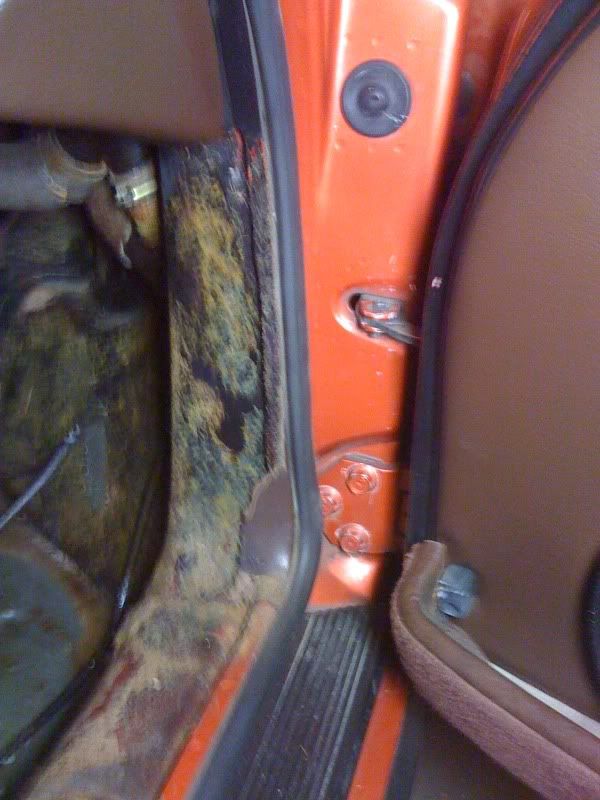 if so, how does it come off? i am assuming it just pulls off like a modern car but before i removed anything i wanted to ask. i looked over the length of it but i did not see a break anywhere to start pulling it off from. similarly, how do i remove the trim piece on the back side of the door frame? i got the top trim piece and the rear side trim piece but that part that is on the door frame is on solid and i cannot see any screws holding it on. the green arrow is pointing at the piece i am talking about. 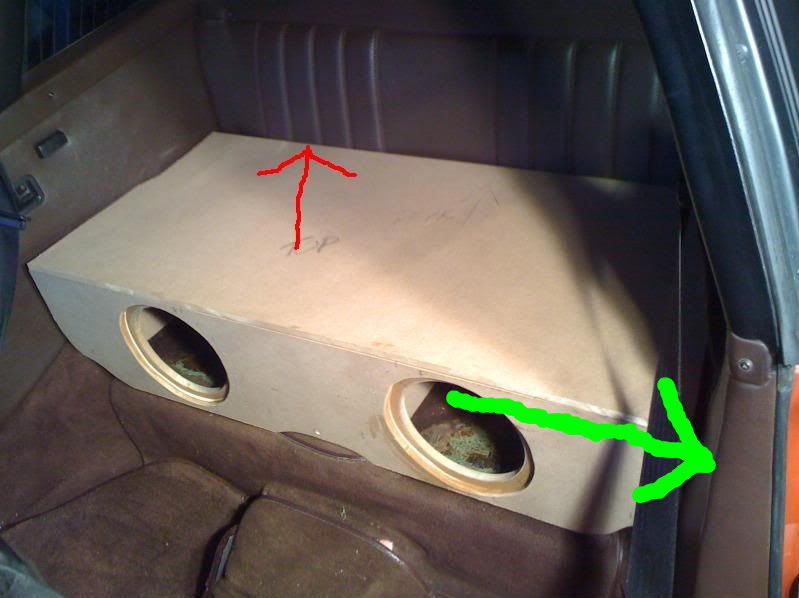
__________________
- He gave his father "the talk" - Once while sailing around the world he found a shortcut - He taught a german shepard how to bark in spanish He is.... nineball. I don't always drive sports cars, but when I do I drive a 1983 911SC Targa. Stay fast my friends. |
||
 05-19-2010, 08:12 PM
|
|
|
Registered
Join Date: Jun 2009
Location: ohio
Posts: 4,306
|
one other thing.... goo gone is freakin amazing for removing glue/ashpalt/crap from your hands that happens while doing this project. smells good too.
__________________
- He gave his father "the talk" - Once while sailing around the world he found a shortcut - He taught a german shepard how to bark in spanish He is.... nineball. I don't always drive sports cars, but when I do I drive a 1983 911SC Targa. Stay fast my friends. |
||
|
05-19-2010, 08:20 PM
|
|
|
Registered

Join Date: May 2006
Posts: 1,191
|
The weatherstripping just pulls out. Its glued in but it shouldn't give you much trouble. The vinyl edge of the carpet is wrapped and glued to the metal edge behind the rubber.
..and if you want any decent sound coming from your sub enclosure, you are going to want to seal the bottom of the box, making sure the entire enclosure is air tight. |
||
|
05-19-2010, 08:23 PM
|
|
|
Registered

|
looking forward to your progress. I really need to make some time to do my interior. Have most of the stuff ready in boxes, but "time keeps on slippin"...
nice score on the lift. Never thought to look for one of those on CL. I have something new to search for on Craiglook. Wife will be pleased... ")
__________________
Shane - 1984 928S |
||
|
05-19-2010, 08:28 PM
|
|
|
be here now
Join Date: Jul 2009
Location: somewhere. not here.
Posts: 2,544
|
Nineball...... Best of luck with the project. I know it will turn out perfect. You were a great source of help when I did my interior!
__________________
Rob.... '66 911, '74 911, '85.5 944, '69 914-6, '65 356C, '01 986, '04 955S, '97 993 C2S, '55 356 OUTLAW, '98 993 Cab, '55 356 Speedster, '06 955S, '58 356A, '96 993 C4S, '87 BD 911, '95 993, '06 997S, '11 997.2S, '74 914 2.7, '15 981S |
||
|
05-19-2010, 08:37 PM
|
|
|
Registered
Join Date: Jun 2009
Location: ohio
Posts: 4,306
|
Quote:
thanks, i thought it was just glued in place but wanted to be sure. no need to worry about the audio end of things, i have that covered. new audio install Quote:
thanks mate, i appreciate it. the only thing that will be holding me back will be free time. anyone have any info on the rear doorjam trim piece?
__________________
- He gave his father "the talk" - Once while sailing around the world he found a shortcut - He taught a german shepard how to bark in spanish He is.... nineball. I don't always drive sports cars, but when I do I drive a 1983 911SC Targa. Stay fast my friends. Last edited by nineball; 05-19-2010 at 09:21 PM.. |
||
|
05-19-2010, 09:07 PM
|
|

|
|
Registered
|
so, on CL, where exactly did you find the lift? EB auto parts, garage sale, ??? find the screw and extract. you will have a much better finished product with the trim (as much as possible) taken off. it all (door rubber & other trim) goes on in a heartbeat. it it tough stuff.
Last edited by WRGREENER; 05-19-2010 at 09:13 PM.. |
||
|
05-19-2010, 09:10 PM
|
|
|
Registered
Join Date: Jun 2009
Location: ohio
Posts: 4,306
|
over the past 7 months or so i have been searching for the term "lift" on my local cl as well as the neighboring ones. you get a lot of results you don't want (lifted trucks, lift kits, wheelchair lifts, scooter lifts, etc) but when checking everyday it goes pretty fast after the first time or two.
fwiw 2/4 post lifts around here go for $1500-4000 depending on condition and capacity. i have only seen two scissor lifts like mine and the first one sold for close to $1000. i found mine about 35 mins away listed for $500 and i was out there the same day to look at it. paid the guy on the spot and gave him an extra $50 to deliver it using his flatbed trailer that had a winch on it. best money i have spent do far.
__________________
- He gave his father "the talk" - Once while sailing around the world he found a shortcut - He taught a german shepard how to bark in spanish He is.... nineball. I don't always drive sports cars, but when I do I drive a 1983 911SC Targa. Stay fast my friends. |
||
|
05-19-2010, 09:21 PM
|
|
|
Registered
Join Date: Jun 2009
Location: ohio
Posts: 4,306
|
had the day off so it was right back into the garage for more.
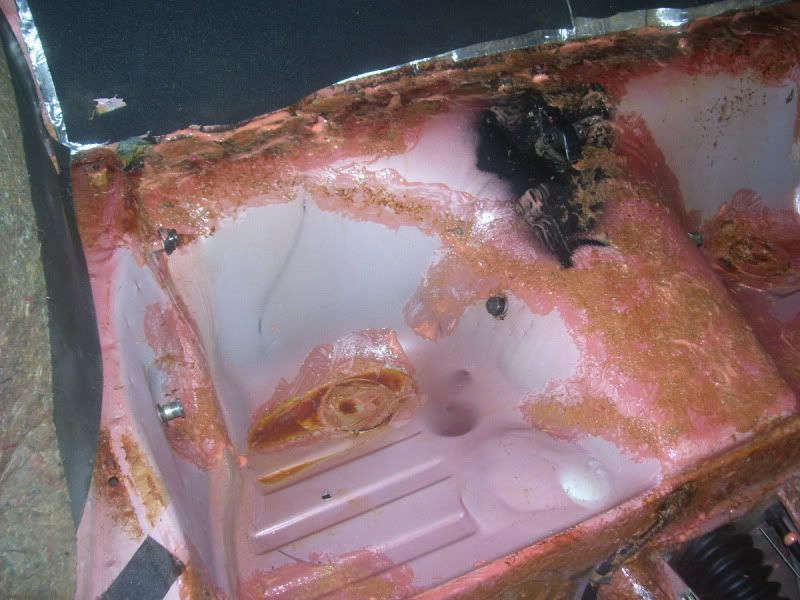
somehow i missed the asphalt sheet on the kick panel so i had to remove those first. this stuff was the third version of this material in my car. it was much harder to get off than anything else i had before. before after  from another threads suggestions i went to home depot and picked up a bottle of this:  worked pretty damn good and smelled like an orange creamsicle! i left it on for about an hour but for future use longer would do better. poured some out into a cup and used a 2" brush to dap it on.  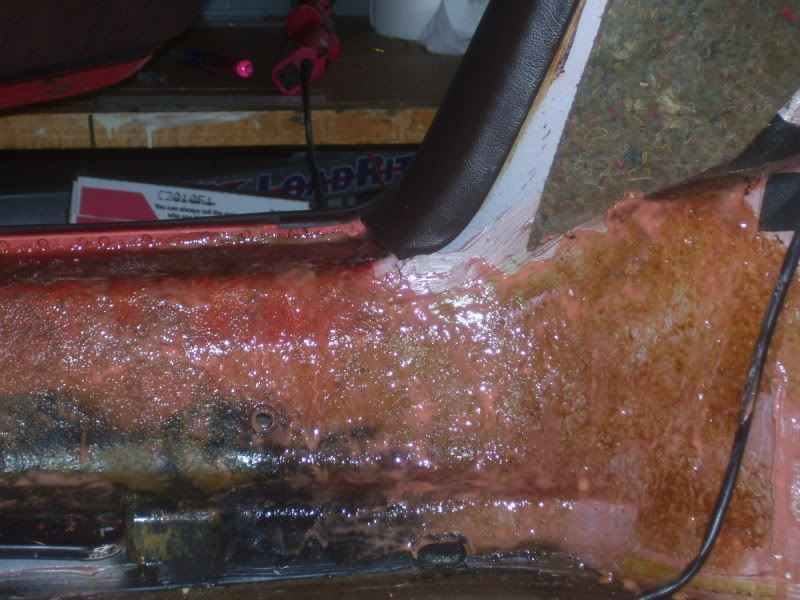 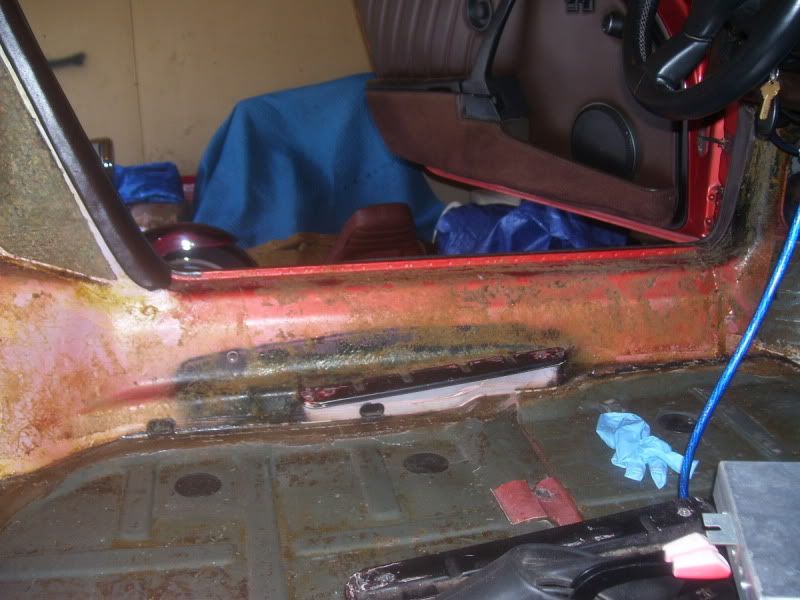 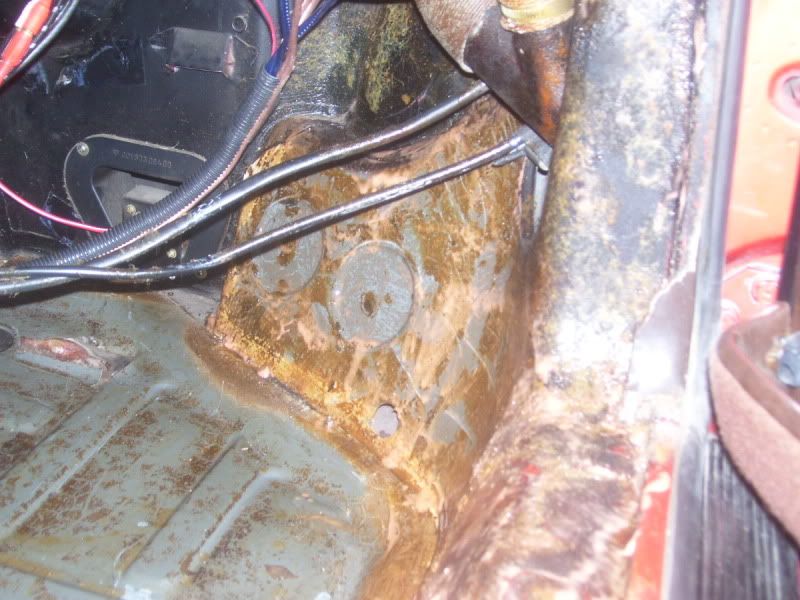 after an hour or so (remember leave it on longer if you use this in the future) i was able to wipe about 60-70% of everything off with just paper towels. after that i cut a plastic scraper down to about 2" wide and started scraping the remaining bit keeping my shop vac right next to it to suck up everything i was scraping up. the results:  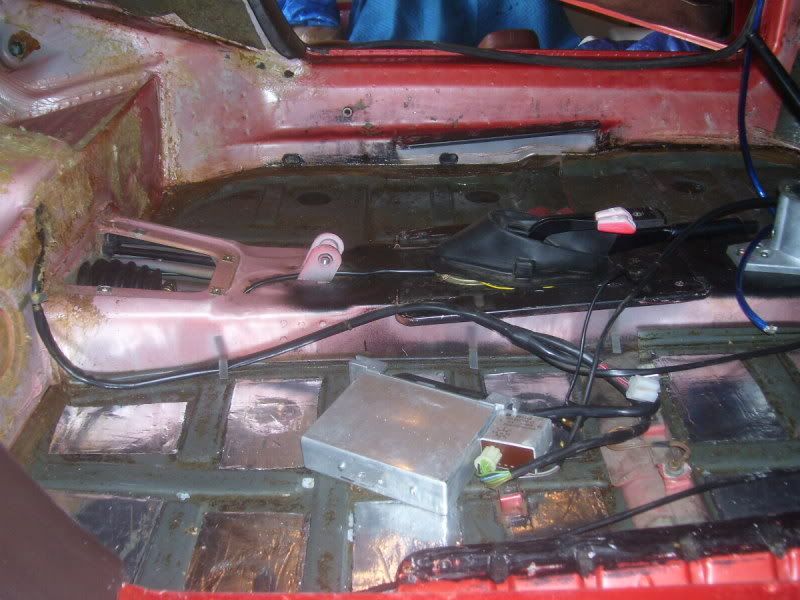 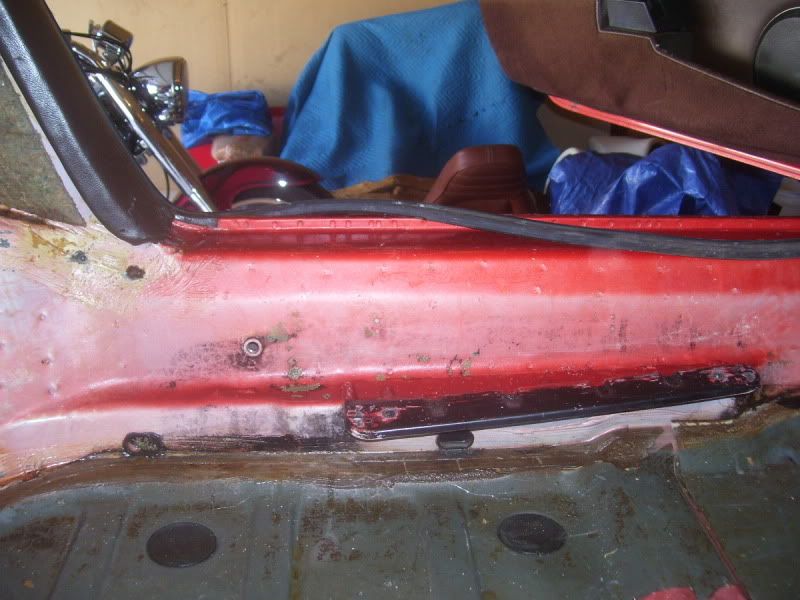
__________________
- He gave his father "the talk" - Once while sailing around the world he found a shortcut - He taught a german shepard how to bark in spanish He is.... nineball. I don't always drive sports cars, but when I do I drive a 1983 911SC Targa. Stay fast my friends. |
||
|
05-25-2010, 03:04 PM
|
|
|
Registered
Join Date: Jun 2009
Location: ohio
Posts: 4,306
|
did the same thing to the left over jute on the rear seats. it took a little more to saturate everything but it worked just as good.
  once that was removed i had to go back and wash down everywhere the remover was. it wasn't toxic or anything but it did leave a residue that would have prevented the next step from working. bucket of water and a rag, the shopvac to hose up the water and some elbow grease and everything was done. next up was to lay down the damplifier pro. i had a bulk pack (36sqft) leftover from previous installs so in it went. i probably went a little overboard but what you see below used 7.25 sheets (12.2 sq ft or about 7.26lbs total).  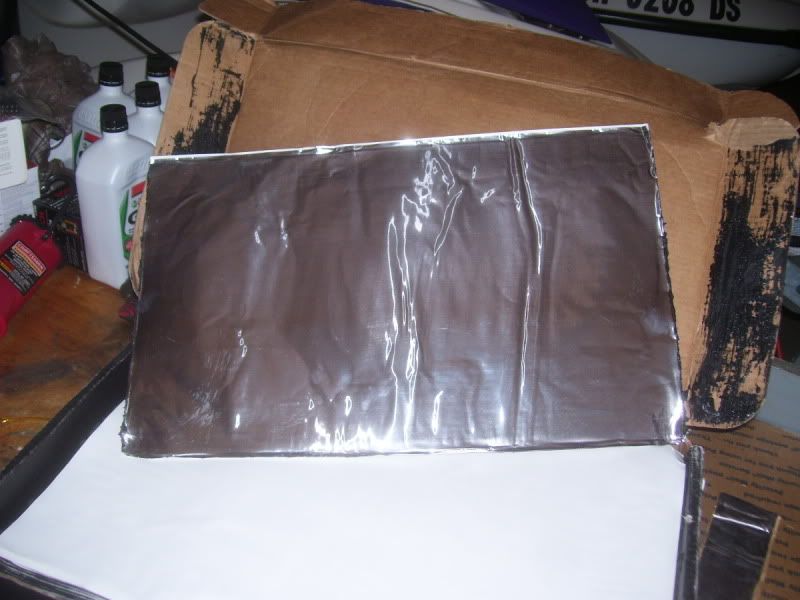 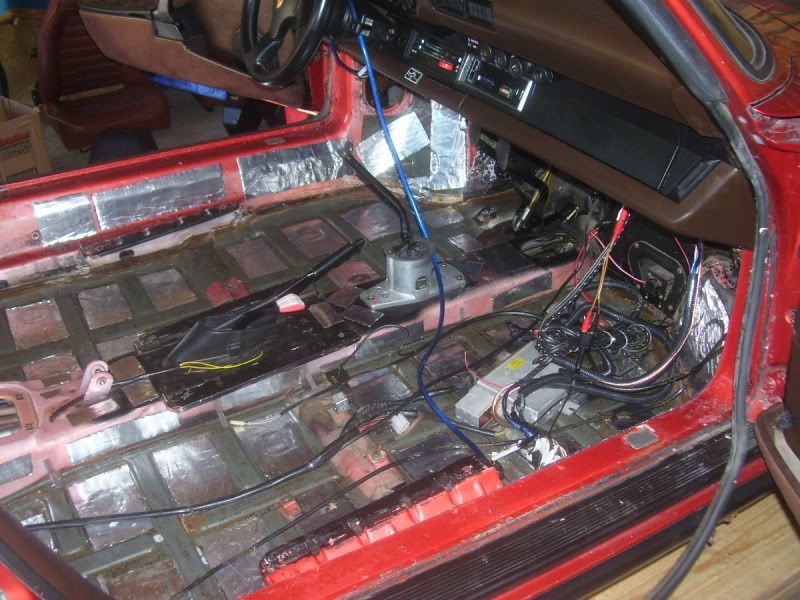 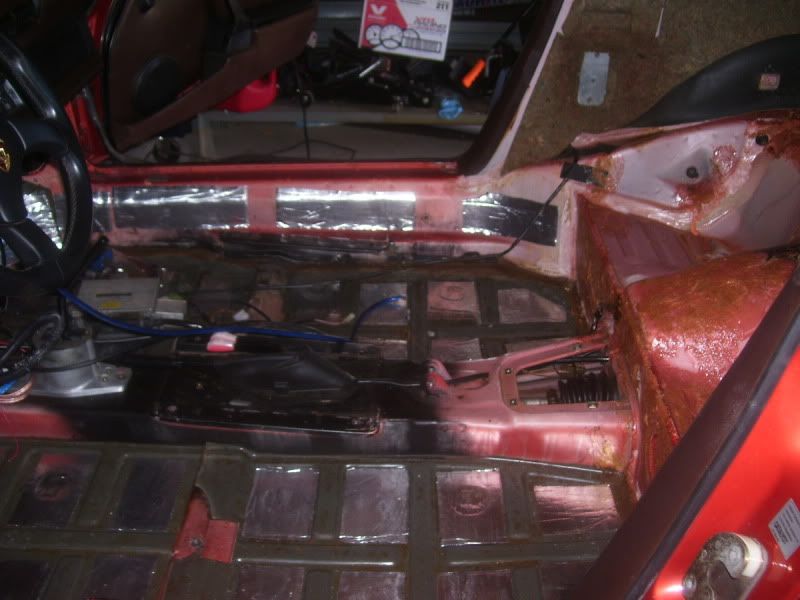  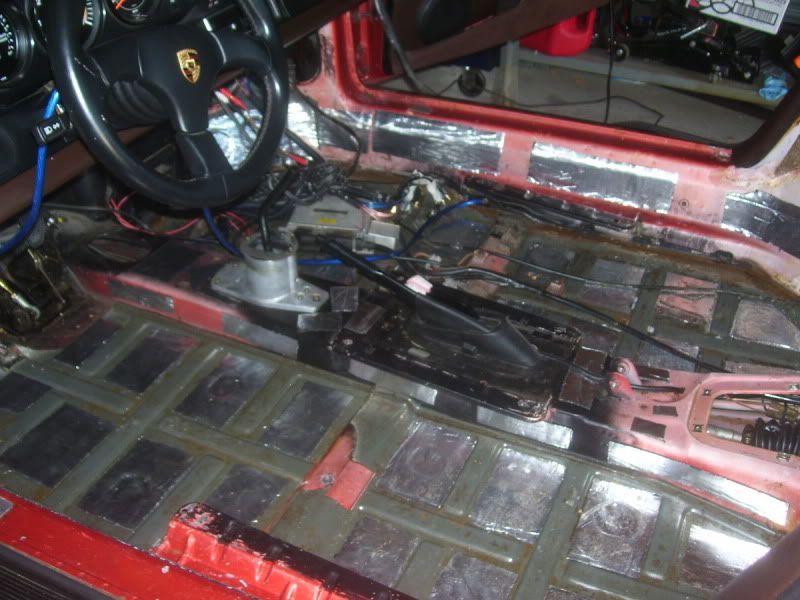  taking a break for a little bit now to shower and get some food. i'll be spending the night out there putting in the padding and possibly getting a start on the carpet but that may be a bit more than i want to do in the same day.
__________________
- He gave his father "the talk" - Once while sailing around the world he found a shortcut - He taught a german shepard how to bark in spanish He is.... nineball. I don't always drive sports cars, but when I do I drive a 1983 911SC Targa. Stay fast my friends. |
||
|
05-25-2010, 03:13 PM
|
|
|
Registered
Join Date: Jan 2004
Location: Docking Bay 94
Posts: 7,092
|
If I recall, you already did the doors and rear shelf (I followed your work closely). What were you going to lay over the Damplifier? - Maybe you mentioned it and I missed it... I did the rear shelf with Damp Pro and Luxury Liner Pro and wasn't impressed. I'll be rooting for you to quiet these beasts down.
I'm still intending to do my floors and was looking at the Super Soundproof CC foam from Aircraft Spruce. They have the thickness I'm looking for.
__________________
Kurt |
||
|
05-25-2010, 04:13 PM
|
|
|
Registered knucklehead
|
Nineball
About the "trim piece" at the rear of the door jamb, I remember seeing on a post here somewhere that it does not remove as it is actually a piece of metal welded to the body that is just covered with vinyl.. so if the covering is in good condition I would not mess with it. I can not find the post right now but will do a little more searching and if I find it will post a link to what I am talking about..was interested because I have to replace that piece on my cab.. Good luck with the renew Gregg S.
__________________
1983 911 SC Cabriolet, 1989 944 S2 1969 Chevelle SS396 w/427 Vette motor, 1970 Buick GS455 2000 BMW 528i Touring, 2005 GMC Sierra |
||
|
05-25-2010, 04:42 PM
|
|
|
Registered
Join Date: Jun 2009
Location: ohio
Posts: 4,306
|
Quote:
Quote:
thanks greg i figured that one out already. only took me about 30 mins of looking around to figure it out too  on to the last part of today. got some 1/4" high density vinyl/rubber commercial carpet padding to put between the damp pro and the carpet. used about 100 sheets of paper so far making templates for the first step. since all the pics would look the same here is an example: 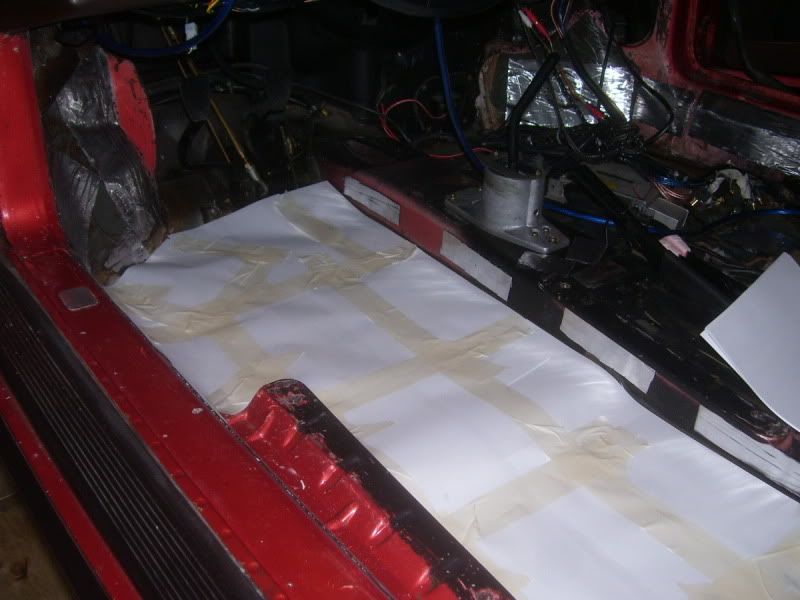 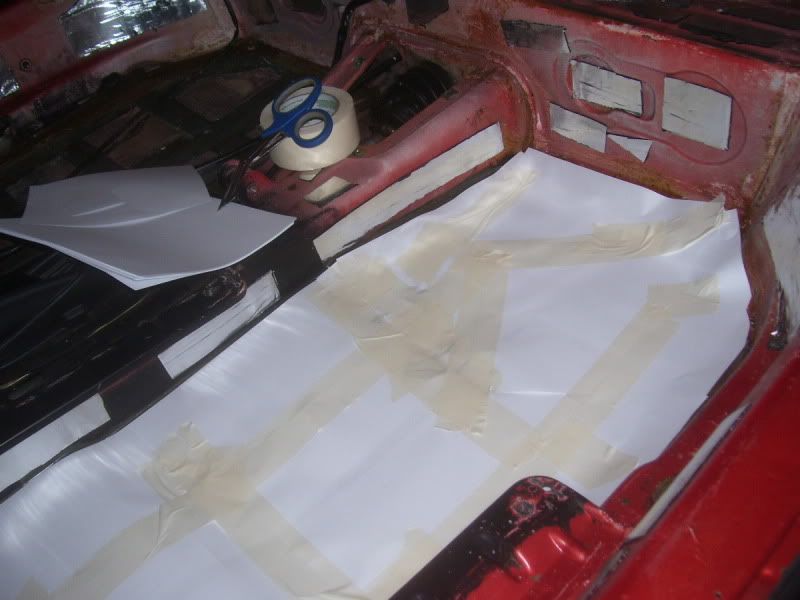 once i had a template made i took it to the padding and then cut it out. i can't stress how nice it is to have a fresh razor blade, and since i grabbed a 10 pack of refills from HF i can swap them as soon as i like. i got about 80% of it done when i ran out of glue. btw, 3m 74 glue is excellent stuff. it comes in clear (like i bought) and orange.   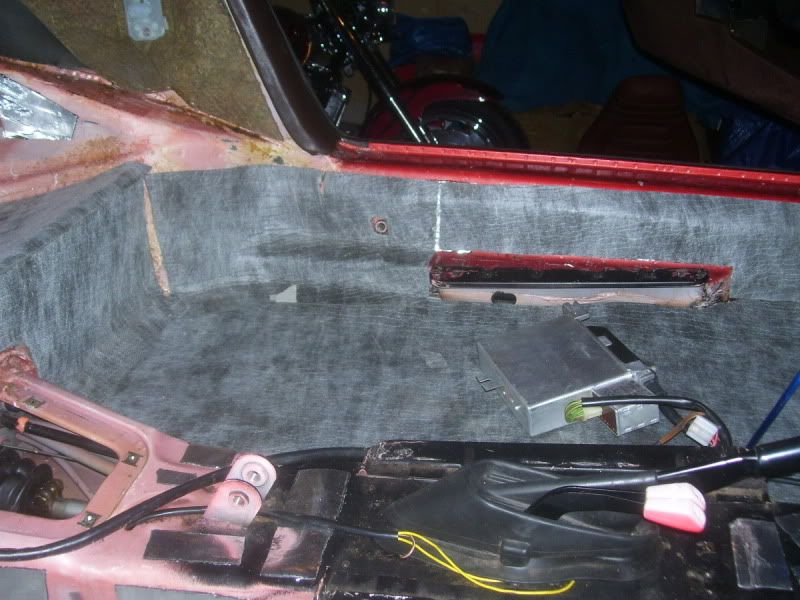 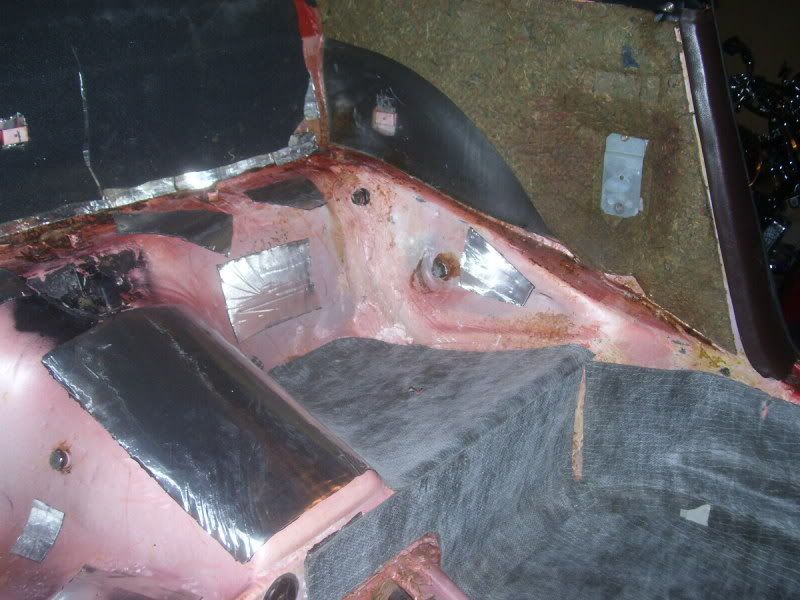 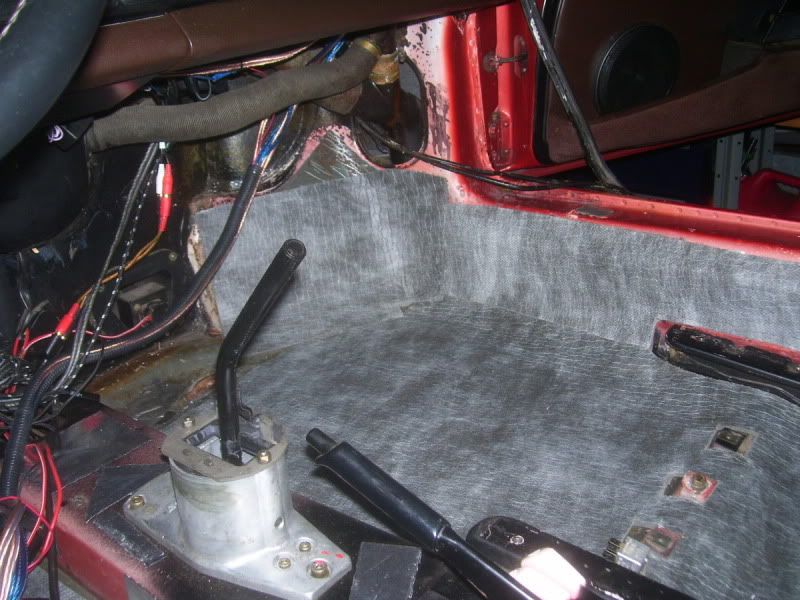 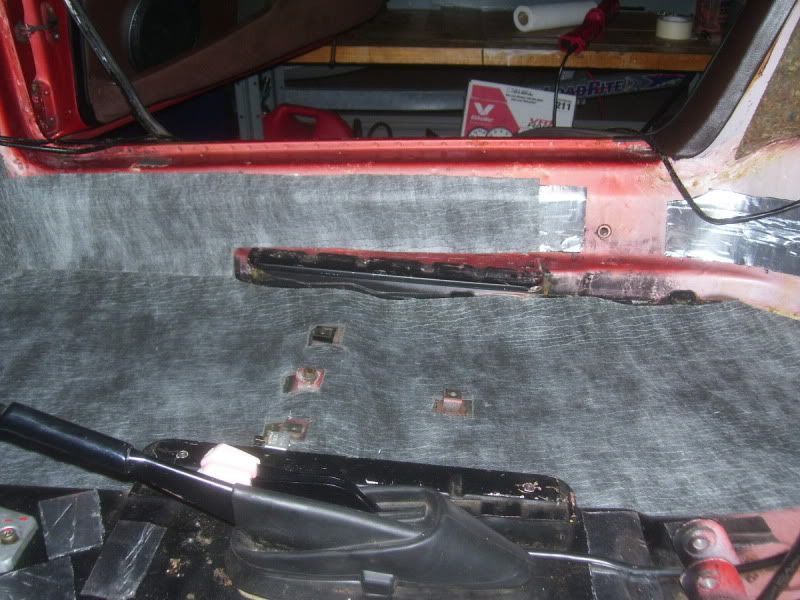 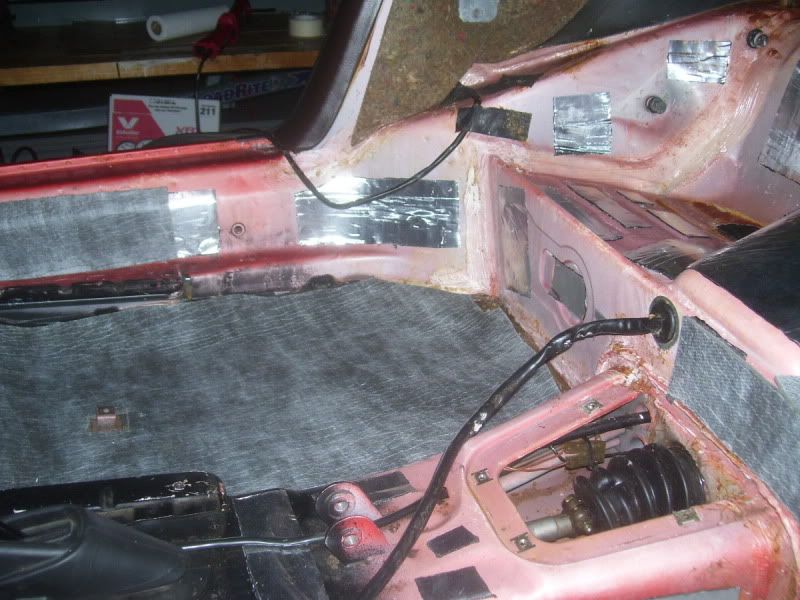 i probably won't have any time to work on this tomorrow but hopefully after thursday and friday i should be done with the carpet. all that will be left (hehe all.. like it will be simple) will be to dye the new-to-me 993 seats and install them.
__________________
- He gave his father "the talk" - Once while sailing around the world he found a shortcut - He taught a german shepard how to bark in spanish He is.... nineball. I don't always drive sports cars, but when I do I drive a 1983 911SC Targa. Stay fast my friends. |
||
|
05-25-2010, 06:24 PM
|
|
|
Registered
|
nice work. i need to do mine...
__________________
83 SC Targa -- 3.2SS, GT2-108 Dougherty Cams, 9.5:1 JE Pistons, Supertec Studs, PMO ITB's, MS2 EFI, SSI's, Recurved Dizzy, MSD, Backdated Dansk Sport Stainless 2 in 1 out, Elephant Polybronze, Turbo Tie Rods, Bilstein HD's, Hollow 21-27 TBs, Optima Redtop 34R, Griffiths-ZIMS AC, Seine Shifter, Elephant Racing Oil Cooling. |
||
|
05-25-2010, 06:49 PM
|
|
|
Registered
Join Date: Jan 2004
Location: Docking Bay 94
Posts: 7,092
|
Please give us your driving impressions when you're all done.
__________________
Kurt |
||
|
05-25-2010, 07:02 PM
|
|
|
Registered

|
NineBall,
I'm sure you going to replace the door seals, but if you're not I would strongly recommend that you do. The old door seals get stiff and I found that when I replaced mine that it cut down a lot of wind noise. The door seals were $37.00/eac. from our host. I only glued mine back in at a couple of critical places, they have stayed seated just fine. One reason I didn't glue them in all around was that I'm still thinking about replacing my headliner. After the carpet job I had all the fun I needed for awhile...
__________________
Mitch Leland "03" 996 C2S-LS3 V8-480 HP "84" 911 Turbo Look-Sold w/ found memories |
||
|
05-25-2010, 09:32 PM
|
|
|
Registered
Join Date: Jun 2009
Location: ohio
Posts: 4,306
|
ya i already have new door seals but mine were in surprisingly good condition, almost excellent. there were no stiff points at all in either, and if i had not already had the replacements in my hands i would have reused them.
wind noise from the doors? in a targa with the top off 99% of the time there is nothing but wind noise.... from everywhere.
__________________
- He gave his father "the talk" - Once while sailing around the world he found a shortcut - He taught a german shepard how to bark in spanish He is.... nineball. I don't always drive sports cars, but when I do I drive a 1983 911SC Targa. Stay fast my friends. |
||
|
05-26-2010, 01:01 PM
|
|
|
Registered
Join Date: Jun 2008
Location: Yo momma's house
Posts: 612
|
check the glue label.
I do upholstery and some glue is what we call soft bond or foam glue never fully hardens. That means as soon as it gets warm it releases. We use it for bonding poly or foam when we need a non permanant bond. So just check the label to make sure it hardens. Usually permanant can glue will say high heat or heat resistant. Good luck!
|
||
|
05-26-2010, 08:34 PM
|
|
|
Registered
Join Date: Jun 2009
Location: ohio
Posts: 4,306
|
well i am by no means an expert rather using what others have reported success with. i have used super77 countless times with great results, but 90% of that would be bonding ozite to speaker cabinets and mixing consoles. i looked on the 3m site and this was all i could find for a description:
3M™ FoamFast 74 Spray Adhesive A fast tack adhesive available in an orange and clear formula. Its high content of adhesive solids provides high coverage. It quickly bonds many soft foams and fabrics. The non-dimpling glue line provides an ideal bond line for many upholstery applications. Its variable valve provides a precise spray pattern width of 1" to 4". Common Uses:
i called 3m directly and asked about doing work of this nature since the only choices i had locally were super77, super90, and general trim adhesive (requires 3 coats on each surface to be bonded!!). the rep told me the 74 was the best suited to my needs. as of now i have only glued down the pad but my next can of 74 is arriving tomorrow. can you, as a professional, see anything wrong with using this glue?
__________________
- He gave his father "the talk" - Once while sailing around the world he found a shortcut - He taught a german shepard how to bark in spanish He is.... nineball. I don't always drive sports cars, but when I do I drive a 1983 911SC Targa. Stay fast my friends. |
||
|
05-26-2010, 08:49 PM
|
|
|
Registered
Join Date: Jun 2008
Location: Yo momma's house
Posts: 612
|
only
usually any contact adhesive that only requires you to coat one surface or that stays very sticky hours after you spray it doesn't make a good permanent bond. I have seen people use foam glue on things such as a headliner. It sticks great until it gets hot. then it get sticky again and lets go. On anything that I want to stay stuck I always use are contact glue that you coat both surfaces let dry for a few minutes and then stick together. It is what's called a semi contact because unlike full contact (wood laminate) it can be repositioned if needed, but after it fully cures aprox. 24 hours it's a done deal. I have used 3M heat resistant glue before it says it works on headiners and carpets. The product you have might work fine but I would test it first.
|
||
|
05-26-2010, 10:43 PM
|
|


 BIG RED
 porsche
 2003 Porsche 996 C4S
 Interior
 996 C4S - LS3 V8
 006 C4S - LS3 V8
 LS3/480 HP
