|
|
|
|
|
| Author |
|
|
Registered
Join Date: Mar 2008
Location: Pittsburgh, PA
Posts: 2,587
|
Looks good Glenn.
If you don't mind me asking, where did you get your fuel lines? OEM or custom? It's a project I'd like to tackle sooner than later. |
||
 07-25-2012, 05:00 AM
|
|
|
MBruns for President
|
Hey Glenn - what are you using for a welder? Looks good!
__________________
Current Whip: - 2003 996 Twin Turbo - 39K miles - Lapis Blue/Grey Past: 1974 IROC (3.6) , 1987 Cabriolet (3.4) , 1990 C2 Targa, 1989 S2 |
||
|
07-25-2012, 05:17 AM
|
|
|
Tired Member

|
I got OEM fuel lines from our host and my welder is a Millermatic 140 and I use an 80/20 CO2/Argon mix as a shielding gas.
__________________
Glenn Daily Driver - '78 911SC RoW Endurance Racer - '85.1 944 Street/Track Project - '86 951 Race Project - 944 Spec |
||
|
07-25-2012, 07:31 AM
|
|
|
Tired Member
|
Another milestone reached today. I finished priming the body. Bolt-on panels are next.

__________________
Glenn Daily Driver - '78 911SC RoW Endurance Racer - '85.1 944 Street/Track Project - '86 951 Race Project - 944 Spec |
||
|
08-26-2012, 04:33 PM
|
|
|
Registered
Join Date: Aug 2008
Location: Clemson, SC
Posts: 500
|
Exciting, Glenn. It's looking good. Nice work.
Mike
__________________
Michael Caterino Clemson, SC 1970 tangerine (=Tiger Orange) 'T' targa restoration: mk911.blogspot.com |
||
|
08-26-2012, 07:38 PM
|
|
|
Registered
Join Date: Mar 2008
Location: Pittsburgh, PA
Posts: 2,587
|
That's a huge milestone Glenn. Congratulations.
|
||
|
08-27-2012, 03:54 AM
|
|

|
|
MBruns for President
|
Yea Glenn!
|
||
|
08-27-2012, 03:57 AM
|
|
|
Tired Member
|
It has now been two years since I started the fiasco, I mean project. I guess I've made some progress. This weekend, I am starting to strip and prime the bolt on parts. So far I've got the doors, engine lid and hood down to the zinc. Tomorrow I will strip the fenders, weld up a little crack in one door and get some primer on the doors.... I hope.
") To see what I've been dealing with, here is a photo progression of stripping the hood. First coat of paint remover and covered with plastic.  After letting it sit for an hour, I pulled the plastic and took a razor blade to it. This is what it looked like when I was done. The most recent respray was 99% off. What you see left is the original color and the first respray. the paint was softened but not enough to scrape off.  After another application of paint remover under plastic it looked much better. Ready to scrape.  What was left would easily come off with the wire wheel.  The same multi-step process was required on both doors and the engine lid. Sigh...
__________________
Glenn Daily Driver - '78 911SC RoW Endurance Racer - '85.1 944 Street/Track Project - '86 951 Race Project - 944 Spec |
||
|
09-02-2012, 04:53 PM
|
|
|
Exotic Vehicles are here
|
Great Job Glenn !!!
__________________
"Y" <- My favorite question... + '68 911 + Helping your business to get more business: http://myWWWapp.com |
||
|
09-03-2012, 04:35 AM
|
|
|
Tired Member
|
Done with the bondo on the tub... here are a few shots.
   Next for the tub is more primer, then color. 
__________________
Glenn Daily Driver - '78 911SC RoW Endurance Racer - '85.1 944 Street/Track Project - '86 951 Race Project - 944 Spec |
||
|
09-20-2012, 01:06 PM
|
|
|
Senior Member
Join Date: Jun 2000
Location: N. Phoenix AZ USA
Posts: 28,967
|
Very nice work! You doing the painting as well?
__________________
2021 Subaru Legacy, 2002 Dodge Ram 2500 Cummins (the workhorse), 1992 Jaguar XJ S-3 V-12 VDP (one of only 100 examples made), 1969 Jaguar XJ (been in the family since new), 1985 911 Targa backdated to 1973 RS specs with a 3.6 shoehorned in the back, 1959 Austin Healey Sprite (former SCCA H-Prod), 1995 BMW R1100RSL, 1971 & '72 BMW R75/5 "Toaster," Ural Tourist w/sidecar, 1949 Aeronca Sedan / QB |
||
|
09-20-2012, 03:12 PM
|
|
|
Tired Member
|
Quote:
__________________
Glenn Daily Driver - '78 911SC RoW Endurance Racer - '85.1 944 Street/Track Project - '86 951 Race Project - 944 Spec |
||
|
09-20-2012, 05:42 PM
|
|

|
|
Registered
Join Date: Aug 2008
Location: Clemson, SC
Posts: 500
|
Glenn,
Funny as it may sound from someone who's driving their car, those pics make me nostalgic. I really enjoyed the body work. Everything looks pretty good, but I have to say, your door gap in the corner looks like it tightens up a little. A little more primer and paint and it could be too close. Can you round that out a little more? I know I had to do a lot of 'shaping' in the corners. Could just be the angle of the photo too. Mike
__________________
Michael Caterino Clemson, SC 1970 tangerine (=Tiger Orange) 'T' targa restoration: mk911.blogspot.com |
||
|
09-20-2012, 06:43 PM
|
|
|
Registered User
Join Date: May 2011
Location: San Diego
Posts: 383
|
Just FYI,
The valance you are looking at above may cause you some issues where there are any "dips" i.e., driveways, intersections. |
||
|
09-20-2012, 07:00 PM
|
|
|
Tired Member
|
Quote:
Regarding the gap... it may be the angle. I'll take a closer look when the sun comes up. Any recommendations on how big the gap should be pre-primer/paint?
__________________
Glenn Daily Driver - '78 911SC RoW Endurance Racer - '85.1 944 Street/Track Project - '86 951 Race Project - 944 Spec |
||
|
09-21-2012, 03:07 AM
|
|
|
Tired Member
|
Quote:
__________________
Glenn Daily Driver - '78 911SC RoW Endurance Racer - '85.1 944 Street/Track Project - '86 951 Race Project - 944 Spec |
||
|
09-21-2012, 03:08 AM
|
|
|
Tired Member
|
Gaps are pretty consistent all around the doors. So I shouldn't have an issue.
Took the doors off, cleaned it up, tape & paper and shot some more primer this weekend. Next is to sand with 220. 
__________________
Glenn Daily Driver - '78 911SC RoW Endurance Racer - '85.1 944 Street/Track Project - '86 951 Race Project - 944 Spec |
||
|
09-23-2012, 02:00 PM
|
|
|
Registered
Join Date: Jul 2006
Posts: 356
|
Looking good! Don't forget to remove the tailight housings prior to shooting the top coats.
For the door gap, I would fashion a go/no-go gauge out of wood and size it for the gap as it is on the straight portion of the door's trailing edge. Keep the gauge narrow, and they you can use it to check the gap all the way around the curve. Looking at the picture I had the same first impression... it looks too tight around the curve. If that really is the case, then the effort to perfect it now will be well worth it, as this is the kind of thing that can grow to bug you later. |
||
|
09-24-2012, 09:27 AM
|
|
|
Tired Member
|
Wow, its been a while since I updated this thread.
I didn't get color on the tub before the weather got too cold. It will have to wait for spring. So I've been working a a bunch of different tasks. Cleaning the glue off the interior... work in progress  Lowering and moving back the passenger side seat mount... also in progress (no pictures yet) But hey I learned something... in searching for high quality drill bits I learned that if you don't use your drill at full speed but rather let it turn slowly, the bits work better and don't overheat and lose their edge. When I think of the money I spent replacing drill bits 'cause I didn't know to go slow...  and the other day, I started another task... back in my comfort zone.  As you can see, I have oil leakage on the right side. I can't tell for sure where it came from but I suspect a couple places. I have ordered gaskets etc to reseal the cam chain cover, the oil pressure sender and to temp sender. It also looks like I have a leaky #8 bearing seal (behind the pulley). So that will be replaced, too. When I first dropped the engine about 7-8 years ago, I gave it a good cleaning and fixed all the leaks in the triangle of death. I couldn't get to the bottom of the engine since I didn't have a stand at that time. I do now so I am tackling the bottom while I wait for my next Pelican shipment. Lots of gunk here.  I've got about half done in the picture. Not going for perfection. Just want to be able to see if I spring any new leaks. I'll try to document my oil leak repairs.... maybe here or perhaps another thread. Oh, and I got another car. Picked up a 2000 BMW 740iL Sport in great shape. Wheeee 
__________________
Glenn Daily Driver - '78 911SC RoW Endurance Racer - '85.1 944 Street/Track Project - '86 951 Race Project - 944 Spec |
||
|
01-17-2013, 05:38 PM
|
|
|
Tired Member
|
I got the bottom of the engine cleaned and replaced the sump plate gaskets with new silicon gaskets. No surprises peeking up inside the crankcase.
 Then I turned my attention to the mess on the front. Got the oil lines removed and cleaned up the outside. I think my oil leak was at the block that the oil pressure sender screws into. I seemed way too loose. But I will proceed with my plan to address all suspect areas. All clean.  Then off with the cam chain cover. Everything looks good on the inside.  The cam chain cover gasket was dry, no signs of oil seeping by anywhere.
__________________
Glenn Daily Driver - '78 911SC RoW Endurance Racer - '85.1 944 Street/Track Project - '86 951 Race Project - 944 Spec |
||
|
01-19-2013, 03:49 PM
|
|


 Gone to California
 Turbo
Turbo "The Porsche"
 Endurance Racer
 944 Spec "The green car"
 Scalded Cheetah?
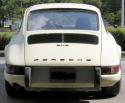 Porsche 911 - then
 Porsche 911 - now


