|
|
|
|
|
| Author |
|
|
Member 911 Anonymous
|
Credit does not go to me, but an Old School Newbie, Mr. Larry Hughes, if you check his profile, he's no newbie to Porsche's, I wonder why he's been hiding from us. Please forgive the errors/omissions and typos
 Larry Hughes' Original Post: Quote:
Was refreshingly simple and took about an hour even with pics. Symptoms: Erratic Oil Level readings at Gauge, after properly warmed (1st mark in Oil Temp Gauge or 185-190 degrees) i.e. pegged up, harsh crazy bouncing (5-6X's) when coming to stop off freeway, in red zone when dip stick shows desired middle level. I had an extra issue where my dip stick was jamming into the Oil Level Sending Unit (OLSU). I can only deduce POS/iWrench jammed the OLSU in or out. The retaining tabs appears to have been tampered. It was scored and severely scuffed at the shiny part of the float arm assembly:  I know it is blurry but trust me it is there and can only be produced by the end of the dip stick. Parts needed: GASKET from our Gracious Host $5.75 http://www.pelicanparts.com/cgi-bin/smart/imgdsply.cgi?pn=91420189100-M82 Tools needed: 8MM socket/wrench Needle Nose Pin Tool Metal, 2" puddy knife Heat Gun Heat Shrink Weather Strip Sealant ( optional ) Mineral Oil, Brush and Bucket RAG Digital Volt Meter (DVM) Prep: (Safety 1st, normally I would disconnect the battery whenever I work on electrical but in this case I needed to test the Circuit, Terminals, OLSU and the Fix) 1. Wheel Blocks in front 2. Raise rear end, placed jack stand 3. Removed Right Rear Wheel 4. Thoroughly cleaned the OLSU exterior and immediate surrounding of debris that may enter by accident into the sump. 5. REMOVE DIP STICK The Fix Test Gauge to insure it is not the culprit, pull ground at OLSU ( should be a female spade ), turn ignition to on position, and it should peg up. If it does not Gauge is potential failed component. or Get your DVM, connect Red lead to center connection on OLSU and Black lead to ground attached to one of the side bolts, these are readings I obtained: 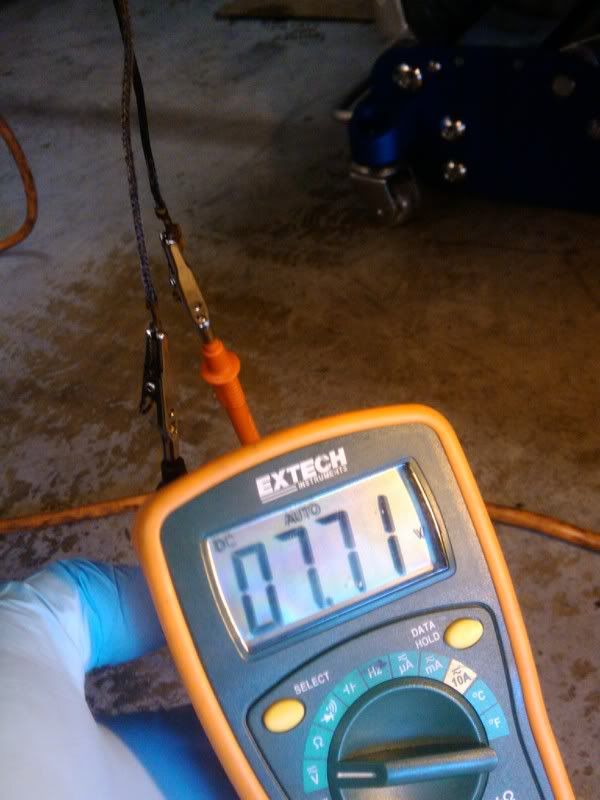 Car Off 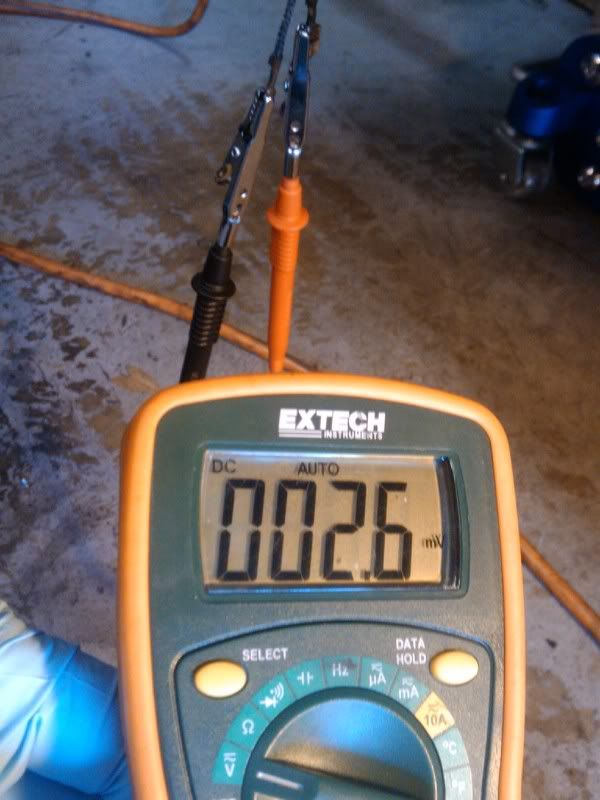 Car in On Position Removal of OLSU: 1. Pull both wires, the ground will be the bare female spade attached to what is the male spade under one of the 8MM nuts closest to you, the signal wire is also a female spade covered by a rubber boot at center of OLSU. (if you are lucky, mine was missing, it appeared it was worked on before by POS/iWrench that never bothered replacing it, just cut it off. Both were filthy and exposed to the elements) 2. Remove 8MM nuts and washers (3 of mine were so loose they were removed by my fingers  , I don't think that is snug, I did observe some oil sweat spots prior to prep). TAKE CARE NOT TO LOSE THE MALE SPADE under that one nut/washer, you will need it! , I don't think that is snug, I did observe some oil sweat spots prior to prep). TAKE CARE NOT TO LOSE THE MALE SPADE under that one nut/washer, you will need it!3. I found the OLSU even with loose nuts did not budge, I even tried to gently tap on it, no go. I did not want to pry at it since I am planning on reusing it (if found to be good). I resorted to using a HEAT GUN to warm it up but not too close or the plastic center could melt. At about 140 degrees, it just peeled off and the gasket intact  4. Now the fun begins, After looking a pics of a new OLSU, I determined that the main body needed to be out first by pivoting the plate inwards to towards the engine then rotate and carefully fish out the arm and float in a down /up motion. Lucky guess, it came out smoothly with out snagging. Set Aside 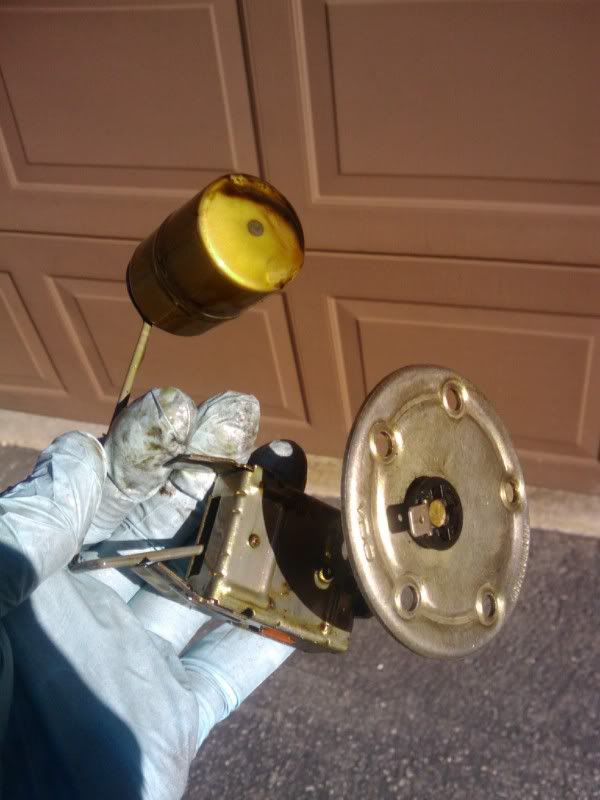 VIDEO later of how I re-inserted it 5. Stuff a CLEAN rag into the hole at the sump, not too deep or you will touch the oil and soak your rag with valuable oil. 6. Using a puddy knife, peel the old cork gasket and use brush with solvent to clean the mating surface. Dismantle the OLSU: Before you go forward, check to see if the coil copper wires are not broken/severed, if so stop, your OLSU is toast and you need a new one. Skip to Install. If good, proceed to next step. ( I guess in a pinch, your could solder it and reposition the limiter ) Inspect the path of the contact end of the float arm assembly on the coil. You want to see if it glides within the coil cluster not too far or too short. Once open you can better see where it glides. Mine was not traveling the entire path and one end was going too far off the coil giving me a PEGGED READING. Also the arm was very sloppy due to the arm tension spring being weakened over the years, I could see it literally skip off the coil. 7. Using a needle nose, pry up the 4 small tabs holding the half plate of the OLSU. Make sure you are over a table, there is a Spring surprise waiting for you. 8. Separate the plate and the arm and float assembly will drop out with the tension spring.  Notice old gasket, the reason we need to plug the hole to sump. 9. Place in the bucket, use a brush and cleaner, I opted to use Mineral Oil. Brushed and soaked thoroughly, wiped excess down and let it dry off before adjustments. continued..............
__________________
'85 Carrera Targa Factory Marble Grey/Black * Turbo Tail * 930 Steering Wheel* Sport Seats * 17" Fuchs (r) * 3.4 * 964 Cams * 915 * LSD * Factory SS * Turbo Tie Rods * Bilsteins * Euro Pre-Muff * SW Chip on 4K DME * NGK * Sienes GSK * Targa Body Brace PCA/POC Last edited by DRACO A5OG; 03-01-2011 at 10:18 AM.. |
||
 02-27-2011, 05:16 PM
|
|
|
Member 911 Anonymous
|
Break Adjustments 10. Copper Arm of Float Arm Assembly, I bent mine about 3/8" to give more tension to the contact on the coils, take care that the bend does not cause the copper arm itself to rub against the coil, you only want the rounded tip to glide on the coil. I also removed any sharp edges from years of grinding against the coils and polished with Dremel. Someone posted a pic of how the OLSU cut thru the coil because of the round edge wearing thru and the stub cut the coil causing a failure. 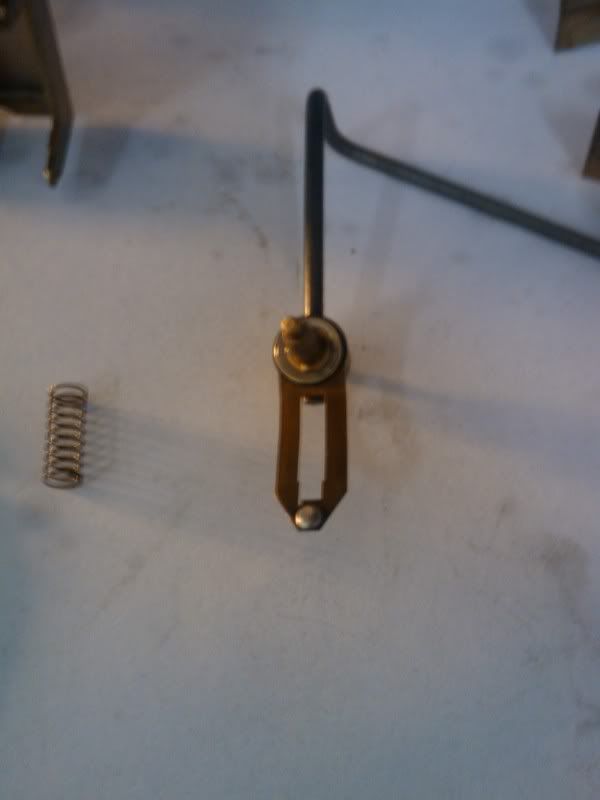  Copper arm must be parallel to the coil. It is the thin copper thing next to the reddish colored block in pic. 11. Spring, I decided to stretch the spring a bit to give more stability to the pivot point. It did take out some slop but probably due to the bend above. 12. Limit Adjustments, there are two large 45 degree +/- side tabs off of the plate, those are the limiters. Temporarily re-assemble the plates not to forget about the spring and hold by one hand then move the arm to see how much the limiters need to be bent in or out. Take Care to insure the center of the round contact is always in contact with the coil or you will be doing all this for nothing. 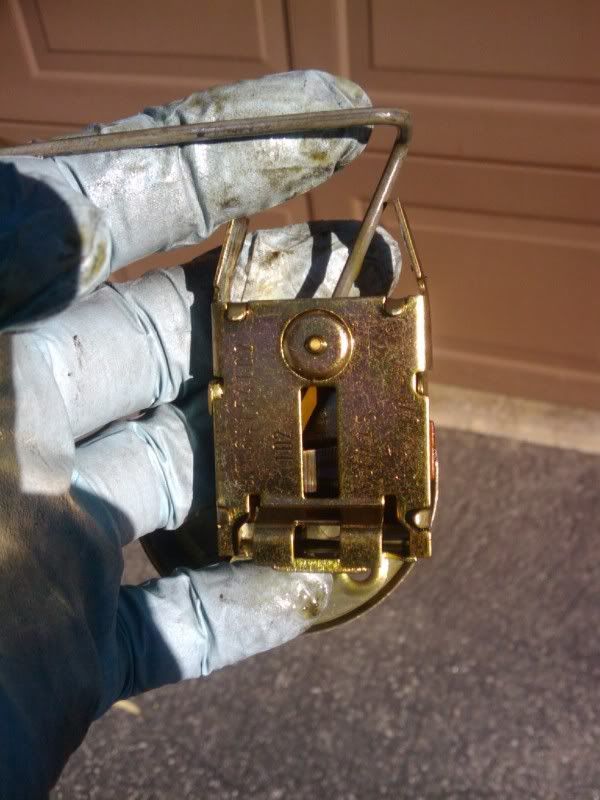 Two large tabs at top 13. Once you are satisfied with the limits, test on car, connect the spades then, turn ignition to on position and move the float, your gauge should correspond, max, middle & low. Success !!! 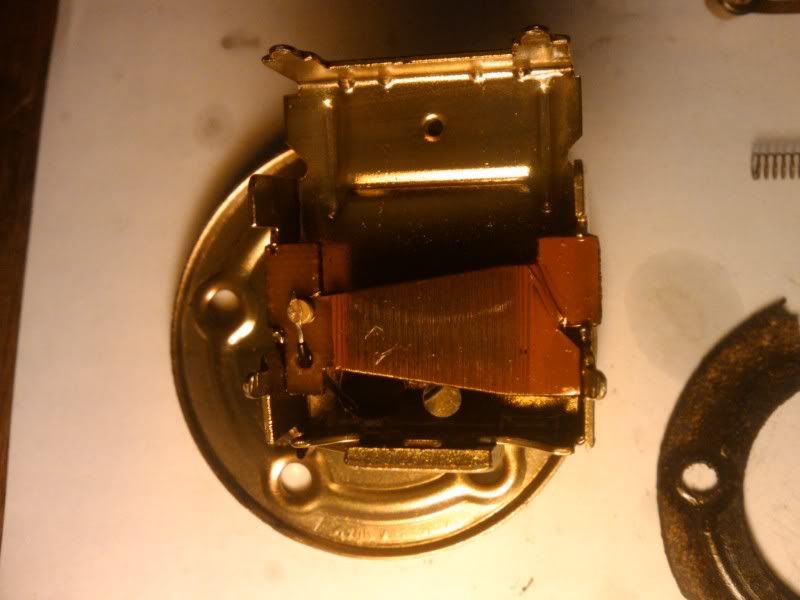 You can see the path, the left shows the drop off and the right shows where it stops short of full path. 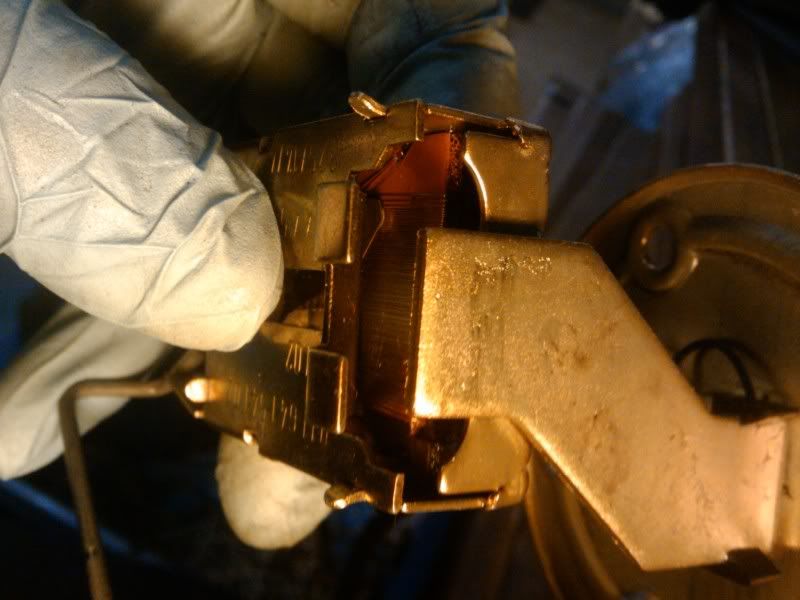 With halves held by hand to look at the path limit 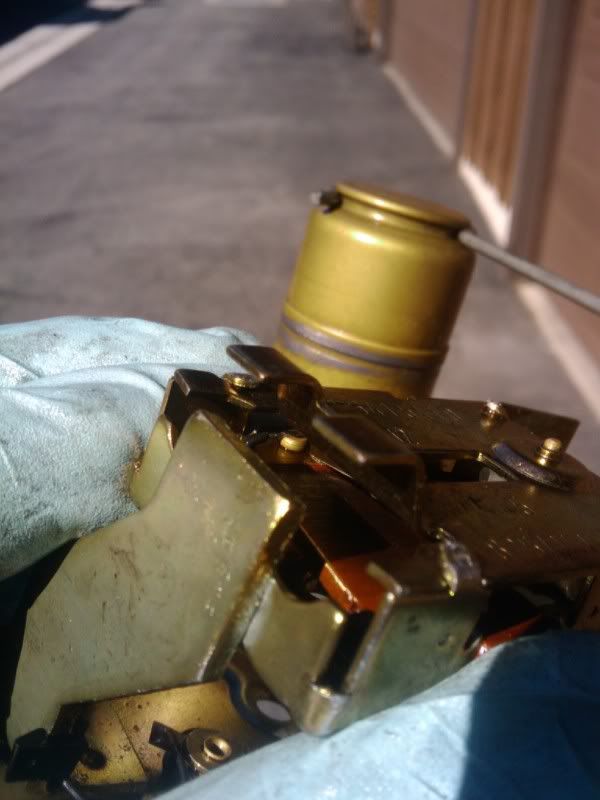 and the other extreme 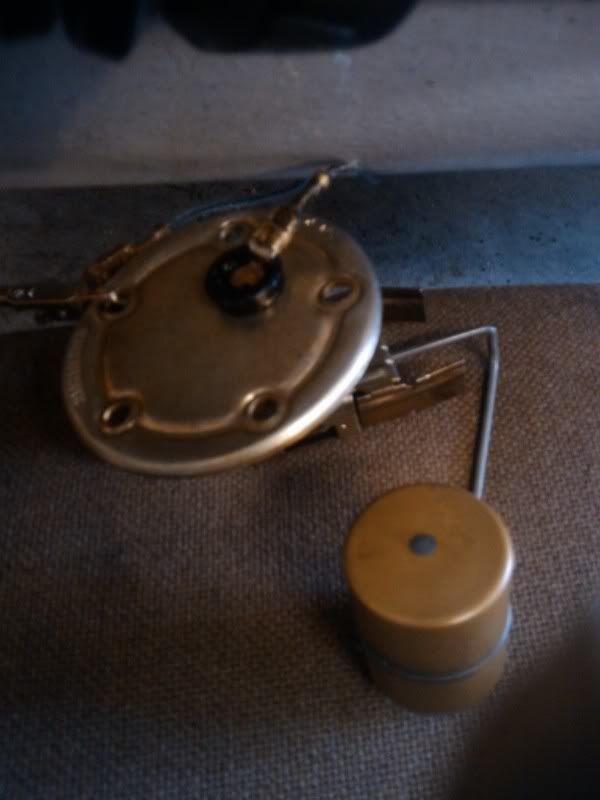  As tested prior to re-install, middle postion 14. Disconnect from wires and bend down the 4 small tabs to secure the OLSU assembly together. Install: 15. Slip on the New Cork Gasket, find the proper alignment, there is only one way and loosely place a zip tie to set as a reference, others recommended goo to hold in place, I did not want to compromise the gasket. 16. The part number on the OLSU is embossed on the rim, that is the top end orientation. 17. Insert the float, then the arm, dropping it down into the sump, turn OLSU outer plate inwards toward engine then slide main body into hole, flip it back in and place gasket and plate on two bolts loosely, cut off the zip tie and place the washer and bolts. Note the stub closes to you will be the ground attachment for that male spade, put it on first then the washer and nut. 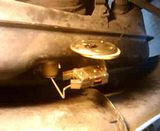 Here is a video, hope it came out clear enough, Click Pic to Play Video (BTW, I am right handed) 18. 8MM Torque Spec??? Here is where I went by gut, Bentley states the Fuel Tank Gasket calls for 18 inches/ lb What the DUCK???. OK my micro only goes to 50 inch/lb. (4.6 ft/lb). Anyways, I used a star pattern and incrementally torqued it by feel. "BABY SNUG", heck it was removed by hand earlier. I eye balled the nuts to insure there were even except the ground nut because of the spade fitting. 19. Placed heat shrink on both female spades, if you have the cover, you are lucky. I would still heat shrink it because that is really a harsh environment. (I placed some gasket sealant at the center plastic assembly to cover up the exposed copper rivet) 20. Connected the Both Spades, of course all of these contacts were polished. 21. Checked my work: Turned key to on position, the needle gently rose to top of red zone. I had to adjust my gauge needle up a bit to compensate for the damage of the float arm by POS/iWrench. I simply removed the gauge and held the base end not the skinny needle to adjust up about 1/4", if you need to do this, first install the OLSU then adjust the needle to the dip stick reading after fully warm. Be very carefull how you handle the gauge it is very fragile 23. Drove off to bring her to 190 degrees, full operating temps. SUCCESS !!! My humble contribution, and once again sincere thanks to Larry Hughes  Jim
__________________
'85 Carrera Targa Factory Marble Grey/Black * Turbo Tail * 930 Steering Wheel* Sport Seats * 17" Fuchs (r) * 3.4 * 964 Cams * 915 * LSD * Factory SS * Turbo Tie Rods * Bilsteins * Euro Pre-Muff * SW Chip on 4K DME * NGK * Sienes GSK * Targa Body Brace PCA/POC Last edited by DRACO A5OG; 03-01-2011 at 04:15 PM.. |
||
|
02-27-2011, 05:17 PM
|
|
|
Member 911 Anonymous
|
Here are the results:
 Gauge Oil Level at 3 o'clock, Oil temp at 190 Degrees ( verified by infrared thermometer )  Dip Stick at middle mark ( fresh oil change, it is the yellowish part to the middle, sorry for bad pic )No worries JB, here is my Volt Meter , two would have been too much ( inside joke )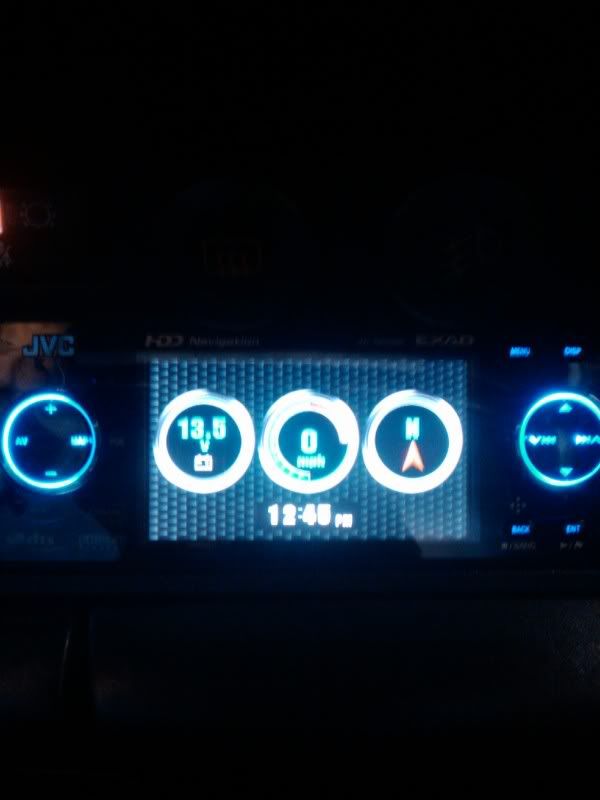 OSLU not leaking after an hours drive: 
__________________
'85 Carrera Targa Factory Marble Grey/Black * Turbo Tail * 930 Steering Wheel* Sport Seats * 17" Fuchs (r) * 3.4 * 964 Cams * 915 * LSD * Factory SS * Turbo Tie Rods * Bilsteins * Euro Pre-Muff * SW Chip on 4K DME * NGK * Sienes GSK * Targa Body Brace PCA/POC Last edited by DRACO A5OG; 02-27-2011 at 10:05 PM.. |
||
|
02-27-2011, 05:25 PM
|
|
|
Registered
|
Excellent write up. Much thanks fort taking time to document and share!
|
||
|
02-27-2011, 05:29 PM
|
|
|
Registered
Join Date: Nov 2007
Location: Greater PDX, OR
Posts: 90
|
Thanks for the excellent write up. My gauge has always read very low, so it looks like this task is in my near future. A real good fix prior to spring.
__________________
Jeff '82SC Pacific Blue '02 C4S Silver (Gone but fondly remembered) '11 GTS Amethyst |
||
|
02-27-2011, 05:39 PM
|
|
|
Member 911 Anonymous
|
My pleasure fellas, I hope it wasn't too in-coherent??? I did not realize I took so many pics.
__________________
'85 Carrera Targa Factory Marble Grey/Black * Turbo Tail * 930 Steering Wheel* Sport Seats * 17" Fuchs (r) * 3.4 * 964 Cams * 915 * LSD * Factory SS * Turbo Tie Rods * Bilsteins * Euro Pre-Muff * SW Chip on 4K DME * NGK * Sienes GSK * Targa Body Brace PCA/POC |
||
|
02-27-2011, 06:26 PM
|
|

|
|
Registered
|
Very nicely described. I've got to do this too at some point, as my gauge does not give any reading at all.
-C
__________________
Bone stock 1974 911S Targa. 1972 914/4 Race Car |
||
|
02-28-2011, 07:20 AM
|
|
|
Registered

Join Date: May 2005
Location: Austin, TX
Posts: 909
|
Thanks for the write up. I need to fix mine as it is pegged at the top of the gauge.
This is going to be a big help. Jay
__________________
2002 Boxster Speed Yellow |
||
|
02-28-2011, 07:23 AM
|
|
|
Registered
Join Date: Jan 2006
Location: Santa Barbara, CA
Posts: 2,307
|
Returning this thing to the tank can be a pain, given the bolt pattern and the shape of the sender itself. It helps to cut a tank-size hole in a piece of cardboard and practice inserting the unit into the cardboard on the bench before trying it on the tank.
__________________
jhtaylor santa barbara 74 911 coupe. 2.7 motor by Schneider Auto Santa Barbara. Case blueprinted, shuffle-pinned, boat-tailed by Competition Engineering. Elgin mod-S cams. J&E 9.5's. PMO's. 73 Targa (gone but not forgotten) |
||
|
02-28-2011, 08:18 AM
|
|
|
Member 911 Anonymous
|
Quote:
Please note, I was using my left and holding a light plus camera in my right hand when I video taped it. It took no longer than a 60 seconds to plop the OSLU in the sump.
__________________
'85 Carrera Targa Factory Marble Grey/Black * Turbo Tail * 930 Steering Wheel* Sport Seats * 17" Fuchs (r) * 3.4 * 964 Cams * 915 * LSD * Factory SS * Turbo Tie Rods * Bilsteins * Euro Pre-Muff * SW Chip on 4K DME * NGK * Sienes GSK * Targa Body Brace PCA/POC Last edited by DRACO A5OG; 03-01-2011 at 10:14 AM.. |
||
|
02-28-2011, 10:19 AM
|
|
|
Mo money = mo parts
|
Great thread.
__________________
Greg 86 Coupe (stock - pretty much like Butzi designed it) 65 Ducati Monza 250 & 66 Monza Junior (project) "if you are lucky enough to own a Porsche, you are lucky enough" |
||
|
03-01-2011, 09:08 AM
|
|
|
80 911 SC, Orem, Ut
Join Date: May 2009
Location: Orem, Utah
Posts: 222
|
I pulled my sender a week or so ago to try and fix it so that it would register higher than empty.
When I got the sender out and cleaned it up, I found that the winding (little wires) that the scrapper runs on were broken. Is there a repair for this, or is it a total replacement? Thanks for the help.
__________________
Rob 1980 911 SC |
||
|
06-12-2011, 06:57 PM
|
|
|
Member 911 Anonymous
|
Sorry to say it is toast.
However, I never give up, you could solder them and see if it will register on the gauge smoothly, a helper would be useful. Test it off the car use the connections. Since the loom has broken try to re-position the arm so it will glide on a new path. Jim
__________________
'85 Carrera Targa Factory Marble Grey/Black * Turbo Tail * 930 Steering Wheel* Sport Seats * 17" Fuchs (r) * 3.4 * 964 Cams * 915 * LSD * Factory SS * Turbo Tie Rods * Bilsteins * Euro Pre-Muff * SW Chip on 4K DME * NGK * Sienes GSK * Targa Body Brace PCA/POC Last edited by DRACO A5OG; 06-12-2011 at 10:14 PM.. |
||
|
06-12-2011, 10:12 PM
|
|
|
80 911 SC, Orem, Ut
Join Date: May 2009
Location: Orem, Utah
Posts: 222
|
Jeez at my age I am lucky to see the wires, let alone solder them. I think I'll buy a new unit.
Thanks for the info.
__________________
Rob 1980 911 SC |
||
|
06-13-2011, 01:36 AM
|
|
|
Registered
|
Great post! It's ironic but I was going to ask about the gauge bouncing around but as a newbie, I felt dumb asking because everyone says the gauge isn't accurate and to just check the level with the dipstick. Mine was working ok last summer, but this year it only got to the middle when braking. When driving or accelerating it was always in the red zone. Maybe (hopefully) this is my answer!
__________________
Dave Black 1985 911 Carrera M491 |
||
|
06-13-2011, 03:04 AM
|
|
|
Member 911 Anonymous
|
Well Join the Club OLD Rob, I needed my glasses and day light to see what the heck I was doing.
Dave, NEVER IS A QUESTION DUMN , before you start tearing it apart, here is the thing about the oil gauge, engine must be HOT, 1/8" above the first has mark or 194 degree then the gauge will operate as designed, until then it will sit in the red zone as designed. PAG Assumes you check your oil on a regular basis after a good run of 20-30+ minutes.At 194 degrees, on level ground with the engine on at idle, let sit for several minutes then check to see if the dip stick corresponds to the gauge. If not do the following: Gauge Check: disconnect the ground wire at OLSU in the wheel well, the gauge should peg all the way up. If it does then the gauge is fine, if not you just may have found the culprit, a failing gauge or it may just need the solders re-flowed or the needle repositioned. If Gauge pegs when ungrounded, then it may be the OLSU. Also make certiant he dipstick does not bind when it is close to the end of insertion. Jim P.S. While Driving, it is very normal per Tony Callas, Callas Rennsport for the oil level gauge go down when driving and come up when at a stop. The oil is pumping oil from the oil tank into the engine when accelerating, simple as that ergo the gauge is telling you that. When hot check out the gauge on the Freeway and Highway, it will be on red but as soon as you take your foot off the gas pedal, it will rise about 1/4 inch.
__________________
'85 Carrera Targa Factory Marble Grey/Black * Turbo Tail * 930 Steering Wheel* Sport Seats * 17" Fuchs (r) * 3.4 * 964 Cams * 915 * LSD * Factory SS * Turbo Tie Rods * Bilsteins * Euro Pre-Muff * SW Chip on 4K DME * NGK * Sienes GSK * Targa Body Brace PCA/POC |
||
|
06-13-2011, 08:49 AM
|
|
|
Registered
|
Jim,
Thanks for the extra info (I think you've helped me before on other posts, too). I've definitely had the car hot enough, but for some reason, it just seems to be acting very differently this year as opposed to last. I'll have to check both the sending unit and the gauge. Having a problem with the oil pressure gauge as well. Oil pressure stuck at 4, not pegged at 5 (searched) Don't have alligator clips for my cheap voltmeter, so I've got to get some to tackle both jobs. Will keep you posted. My electrical knowledge is somewhat lacking. Thanks again!
__________________
Dave Black 1985 911 Carrera M491 |
||
|
06-13-2011, 05:48 PM
|
|
|
Member 911 Anonymous
|
LOL, blind leading the blind.
Use electrical tape in a pinch, the OEM aligator clip ;-), just need contact. Try to "find the faults first" before spending money, as a Wise Pelican said to me. I hat efor you to tear into the OLSU only to find a faulty gauge,
__________________
'85 Carrera Targa Factory Marble Grey/Black * Turbo Tail * 930 Steering Wheel* Sport Seats * 17" Fuchs (r) * 3.4 * 964 Cams * 915 * LSD * Factory SS * Turbo Tie Rods * Bilsteins * Euro Pre-Muff * SW Chip on 4K DME * NGK * Sienes GSK * Targa Body Brace PCA/POC |
||
|
06-13-2011, 06:39 PM
|
|
|
Registered User
|
Drain the oil prior to install?
This is a great instructional post and the pictures are a huge help. I am a complete newbie to doing work on my recently purchased '83 911 SC. I am planning to change out the sender unit. Do I have to drain the oil prior to installation of the unit or can the procedure be done with a full tank?
Thanks for your help BN |
||
|
07-09-2011, 12:11 PM
|
|
|
Member 911 Anonymous
|
No need to drain it, if cold.
If hot, which would be kinda of crazy but doable, if the level is higher than the middle mark on the dip stick it could leak out the OSLU hole. Side note, once you have the nuts on, drive her around and bring her up to 194 degress and check the seal for sweating. I found I had to tighten a bit more then OEM spec. Make sure they are evenly torqued, if doing it visually, the nut with ground will show less exposed thread compared to the rest, hint hint Jim
__________________
'85 Carrera Targa Factory Marble Grey/Black * Turbo Tail * 930 Steering Wheel* Sport Seats * 17" Fuchs (r) * 3.4 * 964 Cams * 915 * LSD * Factory SS * Turbo Tie Rods * Bilsteins * Euro Pre-Muff * SW Chip on 4K DME * NGK * Sienes GSK * Targa Body Brace PCA/POC Last edited by DRACO A5OG; 07-09-2011 at 12:19 PM.. |
||
|
07-09-2011, 12:16 PM
|
|


 Marble Grey

 1974 Porsche 911S Targa
 1986 Porsche 911
 1985 Porsche 911
 1990 Nissan 300ZX
 2011 Audi A4
