|
|
|
|
|
| Author |
|
|
Registered
|
Electric Side Mirror Help
I'm all out of ideas to get my electric side mirrors to go left right. 1988 911
Both sides electric mirrors go up/down but not left/right. I first checked the fuse and the fuse wiring, cleaning the contacts. I checked and cleaned the ground wire in the front trunk. I opened up the side mirrors, cleaned the wiring contacts, fixed the white plastic ball socket that had popped out. I got a used mirror assembly and still the same problem. So I am confident that the motors are good. I tried a new switch that attaches under the mirror control joystick and cleaned those contacts. Lastly I bought a used left right toggle switch under the dash. Still no go. I have consulted the Bentley manual and diagrams. I have a multi meter but am very novice with it. I was getting 14 volts at the joystick switch on two of the six contact points but I'm not sure where else to be checking. Anything else I am missing? |
||
 06-04-2017, 06:21 AM
|
|
|
Registered
Join Date: Jun 2000
Posts: 3,445
|
Check the wiring itself, both in the door close to the mirror footing, and near the door hinges. Most body shops will simply cut the wire bundle instead of removing the single plugs in the connector to remove the mirror to repaint the door, and the constant folding by the door hinges will fatigue the wiring that can crack. If you find the bundle in the car, you can check for continuity as well.
|
||
|
06-04-2017, 07:01 AM
|
|
|
Registered
|
I think that could be a likely cause.
I can only see a small part of the wiring in the door or in the door/fender gap with the door open. Is taking the door off going to be required? Not sure I am up for that for this issue. Or do I need to remove the mirror base from the body of the car?   
Last edited by DWeg1998; 06-04-2017 at 07:58 AM.. |
||
|
06-04-2017, 07:54 AM
|
|
|
Registered
Join Date: Jun 2000
Posts: 3,445
|
I'd start be removing the Mirror from the door. One 5mm allen key on the mirror foot. Don't unscrew too far! That will allow you to inspect the upper wiring for signs of damage/repairs.
By the door hinge is more of a chore.... |
||
|
06-04-2017, 08:13 AM
|
|
|
ROW '78 911 Targa
|
Check to see if each pin in the white round connector lines up and is fully mated with the correct wire color on each side.
Use ohms on your meter to make sure there is no resistance from one side of the connection pins to the other. Do this at the mirrors as well.
__________________
Dennis Euro 1978 SC Targa, SSI's, Dansk 2/1, PMO ITBs, Electric A/C Need a New Wiring Harness? PM or e-mail me. Search for "harnesses" in the classifieds. Last edited by timmy2; 06-04-2017 at 08:40 AM.. |
||
|
06-04-2017, 08:36 AM
|
|
|
Registered
|
Quote:
I tried this but the wires are in an insulation wrap that I can't see how to move. |
||
|
06-04-2017, 11:24 AM
|
|

|
|
Registered
|
Quote:
|
||
|
06-04-2017, 11:41 AM
|
|
|
Registered
Join Date: Jan 2009
Location: Marietta, Ga (Atlanta)
Posts: 2,970
|
Quote:
__________________
'80SC Widebody 3.6 transplant Anthracite "The Rocket" Long gone but still miss them all: '77 911 Targa, '72 BMW 3.0CS Coupe(finest car I ever had!) '71 911T Coupe White, '70 911T Coupe Blue '68 911 Coupe Orange, '68 911L Soft Window Targa |
||
|
06-04-2017, 12:16 PM
|
|
|
Registered
|
Hi Dw...to remove the plug you can make your self tool from a pen.Like this one.The best is metallic ..nowadays they are all plastic,unfortunately......This works well..
Ivan 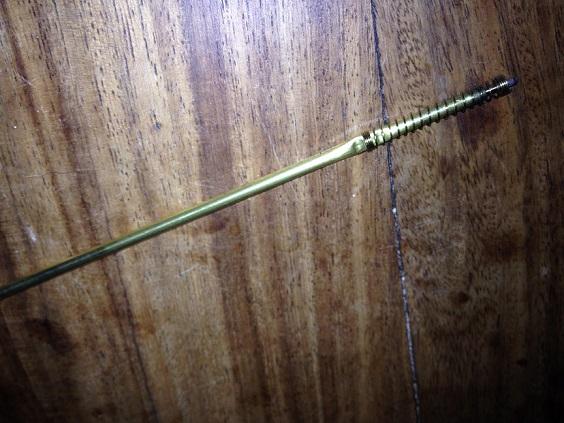
|
||
|
06-04-2017, 12:29 PM
|
|
|
ROW '78 911 Targa
|
Just use a pair of jeweler's screwdrivers (or similar) and push the pins together inside the connectors more, so they make better contact. (Power off) !!!
The intermittent is likely in there.
__________________
Dennis Euro 1978 SC Targa, SSI's, Dansk 2/1, PMO ITBs, Electric A/C Need a New Wiring Harness? PM or e-mail me. Search for "harnesses" in the classifieds. Last edited by timmy2; 06-04-2017 at 03:56 PM.. |
||
|
06-04-2017, 03:54 PM
|
|
|
Registered
Join Date: May 2004
Location: Boulder, Colorado
Posts: 7,275
|
You can, with the white round connector pulled into its two halves, spray contact cleaner up into both sides. You could do this with any other connectors you can access. It leaves no nasty residue, but when it is wet, connecting and disconnecting things several times may break through any corrosion. Contacts which measure zero ohms (as opposed to no ohms) you can probably leave alone.
|
||
|
06-04-2017, 06:50 PM
|
|
|
Registered
|
To demonstrate how to use the pen insert is like this..So you do not brake the connector inside the el.plug..
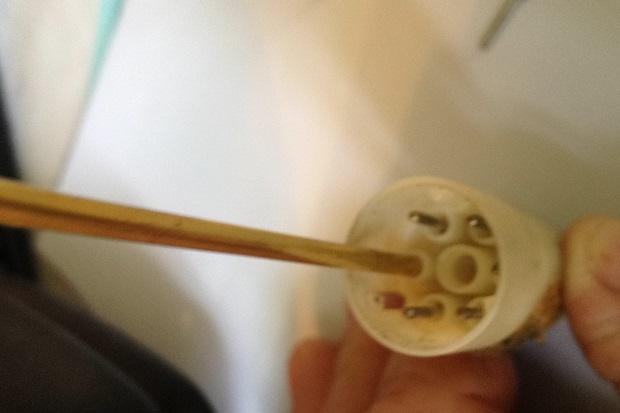 looks like this inside the plug...the tool has to slide over those little clips... 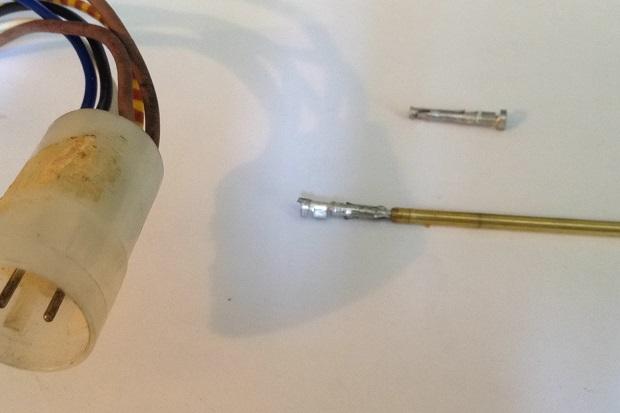 Ivan |
||
|
06-04-2017, 11:48 PM
|
|

|
|
Registered
|
Quote:
I got this Lisle tool, tried the pen insert but plastic wasn't getting it done and the poster is right about pens not having metal cartridges anymore. I also didn't see that my pen insert would fit the female side of the connector which is my problem side I believe.  I ordered new plug socket housings on here- part #803-971-979-OEM. When they arrive I will clean up each wire terminal and have new plug contacts. Thanks to all! Last edited by DWeg1998; 06-06-2017 at 03:42 PM.. |
||
|
06-06-2017, 03:27 PM
|
|


 1988 Porsche 911
 Heinz
Heinz


