|
|
|
|
|
| Author |
|
|
Registered
Join Date: Sep 2002
Posts: 3,580
|
993 Howto: 60K CV joint servicing
Hi,
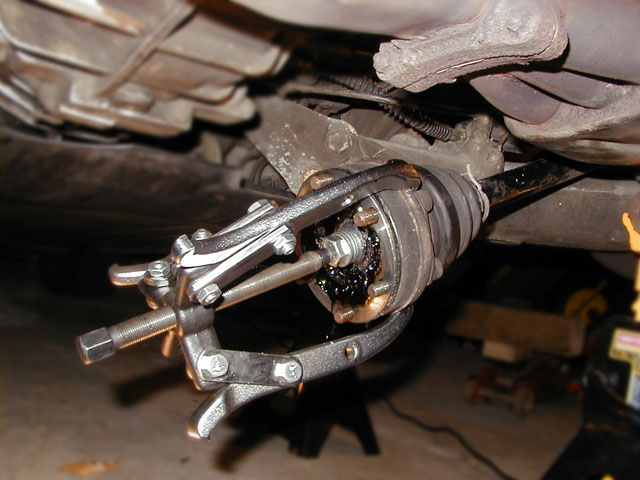
I recently bought a 993, and I've owned 911s for the past 10 years or so. This is one project I didn't see written up on the excellent p-car.com site, so I thought I'd post my CV servicing experience. Here goes: CV Joint servicing on the 993. (This model is an early '95) 0) Buy 4 CV joint servicing kits, part # F-332-924-02.  1) Jack up the car and support it on jackstands. Remove the rear wheels. Chock the front wheels. Set the parking brake. 2) Remove the 32mm nut from the center of the wheel hub. This nut holds the stib axle in the hub. It's a good idea to do this first, because if you can't get this far, the project comes to a halt. If you don't have air tools, you're in for some pain here. And even if you do have an impact gun, it may or may not be strong enough. It's a good idea to soak these nuts with PB Blaster or similar for a couple nights before you try to break them loose. I was lucky and got them off with my C-H air impact gun. After the nuts are off, spray some more PB Blaster on the stub axle splines where they are mated to the splines on the wheel hub. You will be sliding this assembly out of the wheel hub later on.  3) Release the parking brake and make sure you can spin each wheel hub by hand. 4) Underneath the car, near the right-hand axle there is a metal oil line about 1 inch in diameter. Unscrew the 10mm bolt that holds the oil line bracket to the bottom center of the engine case. This will give you a bit of play in the line, which helps later when you're removing the right axle.  5) Also on the right, loosen the clamps that connect the orange silicone couplers to the large steel air duct pipe. Just back them off enough to allow the pipe to move free of the couplers. Then undo the two brackets holding the duct. This requires a 4mm hex key for the bottom and a 10mm wrench on top. Pull the duct down (as shown in the picture) or completely off the car to open up space under the axle.   6) Using the same method as in #5, remove the duct on the left side. 7) Now you're ready to pull the axles. Remove the 6 inboard M10 screws from each axle. These require an 8mm hex socket and lots of extensions. The parking brake may not be strong enough to hold the wheel hub when you are removing these bolts, and it's also a pain to repeatedly release and set the brake as you maneuver to reach each bolt. An easier way to hold the hub still is to slip a jack handle or wooden rod between the lugnut studs and brace it against the floor. The bolts are divided into three pairs, and each pair has a metal bracket straddling it so that the bolt's force is spread out over the CV joint. You don't have to pull the bolts out at this point. You can just back them completely out of the transmission flange and leave them in the CV. The axle will separate from the transmission easily because there is no sealer or gasket. There's a metal cap over the CV you are pulling off, so don't worry about grease falling out, or contaminating the CV with other dirt and grit.  8) Move back to the wheel hub and tap the stub axle (the part that the big nut was attached to from step 1) with a plastic hammer or similar. Be careful not to mar the stub. You can place a block of wood or a drift over the stub to help with this. If you doubt you can avoid damaging the stub, go ahead and spin the big nut back on to the point jsut before the stub protrudes from the nut, and whack the nut instead. You can replace the nut much more cheaply than the stub axle! I had to hammer surprisingly hard to separate these pieces. One the stub axle starts backing out of the hub, watch the other side of the axle carefully to make sure it doesn't hit anything. 9) Removing the axle from the car requires some maneuvering of the trailing arm. After you have pulled the inboard side of the axle down as far under the transmission as you can, place a jack under the suspension arm and gently raise it. Checking the axle carefully to make sure it's not hanging up on anything, raise the suspension a-arm until it's roughly parallel with the ground. At this point, there is barely enough clearance to slide the axle out under the center of the car. Take the whole axle to the workbench.   (Continued in next message).
__________________
993 Last edited by cowtown; 09-06-2004 at 06:46 PM.. |
||
 09-06-2004, 06:34 PM
|
|
|
Registered
Join Date: Sep 2002
Posts: 3,580
|
--Rebuilding the axle is exactly the same as on other (G50 and later) 911s. You can stop reading here if you already know how to work on the torsion-bar cars.--
10) Remove the four clamps that secure the rubber CV boots. Depending on the clamp style, you may need a jeweler's screwdriver to pry up the little metal flap that holds the clamp. Discard the old clamps. 11) Slide each boot a couple inches toward the center of the axle, so that they slip off the tin flange that is pressed on to each CV.  12) Pop off the large metal cap that covers the outside of the inboard CV. I found it easy to use a small punch and hammer. This exposes all the grease. Using the same method, pop off the other two metal covers, one from the inside of that same outboard CV and one from the outboard CV. Take care not to tilt the CVs too far in any direction, because this can release the ball bearing from their cage. If one or two do pop out, try to return them to their old positions. 13) Now you have the boots and all the metal covers off the CVs, and you are almost ready to disassemble the axle. But there is one last thing: On the inboard CV, hiding under the grease on top of the end of the axle, there is a circlip (AKA lock ring), and the axle won't come apart from the CV until you release this circlip. Pull it off using a circlip pliers.  14) Separating the inboard CV: You may get lucky here, and be able to slide the CV right off. I wasn't. I ended up putting the axle loosely in a soft-jawed vice, so that the inner piece of the CV was resting on to top of the vice jaws. Then I sat a socket on the axle in the center of the CV and hit it repeatedly with a large hammer. The axle will finally separate, and you have to catch it before it hits the ground. 15) Now that the inboard CV is off the axle, pull off both old boots and the metal covers that the boots were clamped to. Clean up and keep these covers, because you will reuse them. 16) Clean and repack the detached CV using the grease that came in your CV kit. There is a debate about whether it's a good idea to use solvent (Brake Kleen, etc) on these CVs. I always did in the past on my '75 and '88 911s with no ill effects, but decided just to clean these ones up with paper towels as well as I could, and repack them. 17) Separating the outboard CV: This is what separates the men from the boys, and it turned out I am a boy. Starting with the 3.2 Carrera axles, the outboard CV is pressed on to the axle, and there is no easy way to remove it without a real shop press. If you're just replacing boots, this is not a big deal, but if you're replacing grease as a maintenance item, getting all the old grease out of the inboard CV is tough when it's still attached to the axle. You can take the axles to a shop to have them separated, or do the best you can with the CV attached. You have to pick your method and live with it here, and I decided not to worry about separating this joint, but to get as much old grease as I could out of the CV, then repack, reboot, and reassemble the axle.  18) After considering the options presented in #17, clean and repack the outboard CV. 19) Slide the metal cover for the outboard CV over the axle and tap it on to the CV. It's a good Idea to temporarily slip a couple bolts through the CV bolt hole and the metal cover when you are doing this to ensure that the cover is lined up correctly with the CV. 20) Slide two new CV boots over the axle. Attach the new outboard boot to the metal cover using a new large clamp, then use a small clamp to secure the small end of the boot to the axle. The small end of the boot should ride in the shallow depression in the axle - you will know this when you see it. The clamps are provided with the rebuild kit. 21) Put the second metal cover over the axle and maneuver the new inboard boot onto the cover. Clamp the large and small ends of the new boot. 22) Tap the inboard CV back on to the axle, taking care not to cock it on the axle splines. The axle needs to protrude from the CV by about 1/8", enough to expose the groove that the new circlip will ride in. A large socket on top of the CV, straddling the end of the axle, helps here. Place the bolt-end of the socket on the CV so that the axle end can rise up nto the socket as it comes out of the CV, then hammer on the socket. 23) Replace the circlip with the new one from your rebuild kit. 24) Tap the new metal cover over the outer end of the inboard CV. Again, temporarily putting a couple CV bolts in the holes helps you to line up the cover correctly.  25) Insert the 6 CV bolts through the inboard CV. Don't forget the three brackets that act as washers under the bolts. It's OK to reuse the old bolts as long as the heads are in good shape (not marred or stripped) and they have not been over-torqued. Wipe as much grease off the protruding threads as possible - torque on these bolts is supposed to be measured dry. 26) You're now ready to reinstall the axle on the car. As the Haynes manual says, "installation is the reverse of removal." Maneuver the axle back on, rasing and lowering the suspension a-arm as necessary to clear the transmission and shock absorber. It's a tight fit. Torque the 6 CV bolts to 60 ft-lbs, tightening them in a star-pattern as you would with wheel lugnuts. Set the parking brake. Then tighten the 32mm nut to 360 ft-lbs. This is beyond the scale of any torque wrench I own, so I set my air impact wrench (rated at 350lbs) to maximum and had at it. Finally, reinstall the air duct and oil line brackets.
__________________
993 Last edited by cowtown; 09-06-2004 at 06:58 PM.. |
||
|
09-06-2004, 06:35 PM
|
|
|
Registered

|
WOW !
Good stuff Colin. Having new 'hands-on' 993 owners such as yourself is something to look forward to on this board! max
__________________
max |
||
|
09-06-2004, 07:36 PM
|
|
|
Senior Member

Join Date: Jan 2000
Location: Reno, NV
Posts: 3,694
|
Excellent writeup my friend!
I can't wait to get back to work so I can use our color printer!
__________________
-- Chief Architect and Mastermind, SCWDP |
||
|
09-06-2004, 08:52 PM
|
|
|
Registered
Join Date: Sep 2002
Posts: 3,580
|
Leland, congratulations on the new car! I thought you were looking for a 930 but I haven't seen your posts in a while.
I'm loving this 993 so far (though I've only had it a week). I just couldn't resist tearing it apart as soon as it followed me home.
__________________
993 |
||
|
09-07-2004, 08:15 AM
|
|
|
Registered
Join Date: Mar 2001
Posts: 1,031
|
Great write-up! Thanks for doing this!
Chris Walrod |
||
|
09-08-2004, 08:57 AM
|
|

|
|
Registered
Join Date: Aug 2002
Location: STX
Posts: 247
|
Quote:
|
||
|
01-15-2006, 08:32 PM
|
|
|
Registered
Join Date: Sep 2002
Posts: 3,580
|
Yeah, that hammer method is not the greatest. I bought a press shortly after doing this job, so I've retired my hammers. The puller looks like good advice too.
__________________
993 |
||
|
01-16-2006, 09:07 AM
|
|
|
Moderator

|
Excellent write up. I've recommended for the Wiki. Perhaps you would like to pass it to Mike at http://www.pcarworkshop.com
__________________
Don Plumley M235i memories: 87 911, 96 993, 13 Cayenne |
||
|
08-30-2008, 09:46 AM
|
|
|
Registered
Join Date: Aug 2001
Location: Brighton UK since 11/2012
Posts: 3,170
|
Excellent, funny how Porsche AG can't do anything like that in their factory information.
Maybe digital cameras are out in Germany yet...
__________________
From November 2012; Precision Porsche Specialist Sussex UK, +44 (0)1825-721-205 2001-2012 Gerber Motorsport Inc. 206-352-6911 07.15.06 1996 Ducati 900SP. Suprisingly enough, it's red 08.16.09 1999 Kawasaki ZRX1100. Green. |
||
|
08-30-2008, 11:04 AM
|
|
|
Registered
|
Just did this job a few hours ago. I'd done it before, but never without an experienced helper and several years ago. Anyway, it was a total cinch. I took the ball bearings out and really cleaned everything up. I am fascinated by the design of the CV's, inner cage and ball bearings. Really amazing to have come up with that.
__________________
2022 BMW 530i 2021 MB GLA250 2020 BMW R1250GS |
||
|
12-20-2009, 05:06 PM
|
|
|
Registered
|
One of my CV boots on the driver side is torn. I have all the four CV boot kits ready and have been procrastinating for the last four weeks. I have an IR impact wrench but my air compressor went kaput, so I may just do the inboard torn boot close to the transaxle so I don't have to pull the whole axle.
Great write up!
__________________
1993 964 C2 still makes me smile Retired and work as needed as a pain in the **s. |
||
|
12-20-2009, 06:42 PM
|
|

|
|
Registered
|
Can't imagine doing this without pulling the whole half-shaft out. Why? So much more difficult to do it on your back than on a workbench. It was really one of the easier jobs I've done, certainly not in the same league with pulling my tranny out a few weeks ago, alone, on jackstands, with the engine left in.
__________________
2022 BMW 530i 2021 MB GLA250 2020 BMW R1250GS |
||
|
12-20-2009, 06:47 PM
|
|
|
Registered
|
This would be impossible while still attached to the car.
   
__________________
2022 BMW 530i 2021 MB GLA250 2020 BMW R1250GS |
||
|
12-20-2009, 06:54 PM
|
|
|
Registered
|
Quote:
__________________
1993 964 C2 still makes me smile Retired and work as needed as a pain in the **s. |
||
|
12-21-2009, 06:31 AM
|
|
|
Registered
|
I suppose you can punish yourself and do it that way. Gonna be a huge PITA when you drop those ball bearings on the garage floor from 7' up and wiggle that boot on, tighten the band clamps, repack with grease. Such a nightmare. I will never do this anywhere but on my workbench.
__________________
2022 BMW 530i 2021 MB GLA250 2020 BMW R1250GS |
||
|
12-21-2009, 06:40 AM
|
|
|
Registered
|
Quote:
I will just replace the CV boot on the driver side inboard CV and repack with grease and that's it. I will do the rest when I have a new air compressor. Thanks.
__________________
1993 964 C2 still makes me smile Retired and work as needed as a pain in the **s. |
||
|
12-21-2009, 07:35 AM
|
|
|
Registered
Join Date: Apr 2006
Location: Ellicott City, MD
Posts: 448
|
Mr. Cow,
Excellent write-up. Andreas
__________________
1995 993 Coupe, Polar Silver / Black 2014 Audi A4, Monsoon Gray / Black 2002 Toyota 4Runner, Dorado Gold 2001 Toyota 4Runner, Dorado Gold, 604,XXX 1-owner miles 1998 Toyota 4Runner, Oxidized, 5-speed |
||
|
01-02-2010, 07:53 AM
|
|
|
Registered
|
I took a day off today and tackled the CV boot replacement on both axles.
To break the axle nut loose, I just went to the nearest truck tire place and asked them to break it loose and torque it back up to 100 ft-lbs so I can drive it home. When completed, I took it back to the same tire place to tighten the axle nut. Removing the axle is the way to go. It is just too tight under there. What is the torque value on the CV allen cap screws? Is 40 ft-lbs enough? Edit: Found the answer on step # 26, torque on M10 allen cap screws is 60 ft-lbs. Lifted the car and torque CV to correct value.
__________________
1993 964 C2 still makes me smile Retired and work as needed as a pain in the **s. Last edited by bazar01; 02-10-2010 at 04:03 PM.. |
||
|
02-10-2010, 12:39 PM
|
|
|
Registered
Join Date: Jul 2010
Posts: 328
|
Is replacing the center 32mm nut advisable? Also, should I consider using any type of thread lock on the inboard bolts or the center nut? Is so, what type?
Thank you. |
||
|
04-26-2011, 05:33 AM
|
|


 1980 /1997 Porsche 911 SC/ 993s 3.0 / 3.6
 1987 Porsche Carrera 3.2
  Only Porsche
 Only bike
 911
911

