|
|
|
|
|
| Author |
|
|
Ambitious Outsider

|
End of week update...
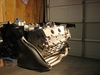
Cam's are timed, new tensioners are in, chain housing covers are on, intake & exhaust covers are on, distributor is in, engine mount & cross bar installed, heat exchangers installed, and finally to rap up today's work the new exhaust was bolted on. Man I'm tired!!
         
__________________
1988 3.2 Cab 2005 997.1 C2S |
||
 10-05-2008, 07:22 PM
|
|
|
*****

Join Date: Apr 2006
Location: Charleston, SC
Posts: 2,359
|
Hey, we are running the exact same exhuast! Nice!
Great to see the progress. I am curious to see if your muffler comes in contact with the underside of your bumper. Mine is touching ever so sligthly - going to have it bent down a tad by a local blacksmith. Make sure that you get air through the SSIs. Initially I left my old fan plates on - both sides were blocked off b/c I used to have headers. No air was being sent through the SSIs (all air was being pushed over the top of the engine cylinders) and my engine temps were nearly 30 degrees higher than they should have been. After finishing my heater backdate, temps dropped significantly. Some may argue that what I say is not true. But getting air over the exhaust side is terribly important - otherwise the SSIs act as a heat sink. And since the bottom of the engine is hotter anyway, you really want air moving through this area.
__________________
82 911SC Coupe Chiffon / Chocolate 9.5 JEs, 964 Cams, SSIs, Dansk Exhaust, CIS (SOLD) |
||
|
10-06-2008, 06:29 AM
|
|
|
Ambitious Outsider
|
"After finishing my heater backdate, temps dropped significantly".
Do I need to back date my heater system as well? I just purchased and installed new flapper boxes for my current configuration... 
__________________
1988 3.2 Cab 2005 997.1 C2S |
||
|
10-06-2008, 11:27 AM
|
|
|
Registered
|
NICE WORK!!
Looks great! |
||
|
10-06-2008, 11:31 AM
|
|
|
*****
Join Date: Apr 2006
Location: Charleston, SC
Posts: 2,359
|
Quote:
To backdate, you install two fan outlets on the sides of your engine fan - one for the left and one for the right. Hoses are connected to the outlets and to the open side of the SSIs at the back of the car (the hoses run from the outlets through the engine tin to the SSIs). The backdate eliminates the heater fan blower - it really cleans up the engine and gives you more real estate to work on the engine. You DO NOT have to backdate. Either way you do it you will still be sending air from your engine fan through the SSIs and up towards your heater boxes. Even if your heater boxes are closed, air is still moving through the SSIs which helps cool the bottom side of the engine.
__________________
82 911SC Coupe Chiffon / Chocolate 9.5 JEs, 964 Cams, SSIs, Dansk Exhaust, CIS (SOLD) |
||
|
10-06-2008, 01:30 PM
|
|
|
Ambitious Outsider
|
Quote:

__________________
1988 3.2 Cab 2005 997.1 C2S |
||
|
10-06-2008, 02:38 PM
|
|

|
|
Ambitious Outsider
|
Quote:
Thanks!
__________________
1988 3.2 Cab 2005 997.1 C2S |
||
|
10-06-2008, 02:42 PM
|
|
|
Registered

Join Date: Feb 2004
Location: Long Island, N.Y.
Posts: 1,798
|
sabeo,
Make sure you check the tolerance between your fan and housing. By powder coating them you add material on the inside of the housing and on the tips of the fan blades; powder is thick. Cheers, jp Ps. there's nothing better looking than a fresh rebuild!! Very nice.. |
||
|
10-06-2008, 07:29 PM
|
|
|
Ambitious Outsider
|
Quote:
__________________
1988 3.2 Cab 2005 997.1 C2S |
||
|
10-07-2008, 10:04 AM
|
|
|
*****
Join Date: Apr 2006
Location: Charleston, SC
Posts: 2,359
|
Sabeo,
Are you using the thin flange SSIs or the thick flange? I think I had a revelation regarding my muffler and bumper clearance. Remember how I said that my muffler touches my bumper? Well, I have the thin flange SSIs. If I was using the thick flange SSIs, the muffler would certainly clear the bumper. The thicker flanges would give greater distance between the SSIs and the heads ... which, in turn, would push the muffer down ever so slightly since the muffler is connected to the SSIs. To my knowledge, nobody had mentioned this. It seems to be a matter of preference as to whether or not you use thin or thick flange SSIs. Most people buy the SSIs based on the length of the exhuast studs - if yours are short, you get the thin flange ... if long, you get the thick flange. In my case, the exhuast studs were a mix and match - the PO had headers on there and a Bursch exhaust. I installed all new exhaust studs (shorter ones) b/c I had already purchased the thin flange SSIs. If I could do it all over again, I would absolutely have gone with the thick flange. Anyhow, hope this helps ... and I hope you have thick flanges!
__________________
82 911SC Coupe Chiffon / Chocolate 9.5 JEs, 964 Cams, SSIs, Dansk Exhaust, CIS (SOLD) |
||
|
10-08-2008, 06:29 AM
|
|
|
Ambitious Outsider
|
Craig, in that regard I made the right choice. The exhaust bolts that I have are long; the flanges on the SSI's are thick. I started to tackle the CIS last night. I didn't get far because I had to sand the inside of the fan housing to remove some of the powder coating. The fan blade had difficulty spinning freely. I didn’t realize how thick the layer was, JP was right. Powder coating looks great, but it's not worth the trouble.
__________________
1988 3.2 Cab 2005 997.1 C2S |
||
|
10-09-2008, 06:20 AM
|
|
|
Registered
Join Date: Apr 2008
Posts: 9
|
Looks great, and is inspiring! Can't wait to see it back in the Targa!
|
||
|
10-16-2008, 12:24 AM
|
|
|
Ambitious Outsider
|
Quote:

__________________
1988 3.2 Cab 2005 997.1 C2S |
||
|
10-16-2008, 04:26 AM
|
|
|
Ambitious Outsider
|
New Alternator
I'm not sure about the wiring on this new Valeo alternator. Does this look right? My old S.E.V Marchal alternator had to large cracks in the housing! It was perfectly fine when I took it out 7 months ago
   
__________________
1988 3.2 Cab 2005 997.1 C2S |
||
|
10-16-2008, 04:37 AM
|
|
|
Throw it on the ground!
Join Date: Aug 2006
Location: Atlanta, GA
Posts: 2,562
|
Here is the wiring orientation on my 1987 (Valeo)

__________________
Mark 1987 911 Coupe Granite Green Metallic My Cousin's Wife's Sister's Husband is a Lawyer. |
||
|
10-16-2008, 05:11 AM
|
|
|
Ambitious Outsider
|
Mark thanks for pic. I'm Following the diagram right out of the Bentley manual. It seems to help but I'm still not sure. I know that the Valeo has the VR built in as opposed to the old Marchal, and that I have to remove the external VR from the engine bay…
__________________
1988 3.2 Cab 2005 997.1 C2S |
||
|
10-16-2008, 06:16 AM
|
|
|
*****
Join Date: Apr 2006
Location: Charleston, SC
Posts: 2,359
|
Quote:
Also, I have my alternator turned upside down - voltage regulator towards the case. I think it is less stressful on the wires this way b/c that blue wire is more flexible and seems to have greater reach whereas the others are more stiff and brittle making them harder to manipulate. When you put the air guide on the back of the fan housing you will see what I mean b/c the wires have to run through the hole in the air guide. Regarding your SSIs ... you may find that you have to cut them near the clutch assembly. The big arm (looks like a "C" and can't remember the name) may interfere with the SSIs. It is funny b/c I noticed a picture in the 101 projects book (I think it is the clutch adjustment section) where the SSIs had been cut too.
__________________
82 911SC Coupe Chiffon / Chocolate 9.5 JEs, 964 Cams, SSIs, Dansk Exhaust, CIS (SOLD) |
||
|
10-16-2008, 09:05 AM
|
|
|
Ambitious Outsider
|
Craig, I got the correct wiring set up from the 911 technical BB. The black wire was throwing me off, and had attached the brown wire in the wrong spot. Well I hope I don't have to do any modifications to the SSI's. I'll take a look in the 101 project book when I get home…
__________________
1988 3.2 Cab 2005 997.1 C2S |
||
|
10-16-2008, 12:02 PM
|
|

|
|
Ambitious Outsider
|
Finally!
Well it's finally finished! I was done installing the fuel injectors and the CIS around 3am. I also attached the hoses even though I'll probably have to remove a couple to get the engine in the bay. Over all I'm very happy with the end result. I had a few hang up's here and there but I guess that's expected the first time doing something like this. I still have to attach the clutch & transmission, then into the engine bay it goes. A big thank you for every ones help and support. I have acquired a little more knowledge and understanding of how this modern marvel works, it has been and continues to be a great learning experience and hopefully in turn this thread provides useful information and insight to the next novice re-builder...
         
__________________
1988 3.2 Cab 2005 997.1 C2S |
||
|
10-20-2008, 05:56 PM
|
|
|
*****
Join Date: Apr 2006
Location: Charleston, SC
Posts: 2,359
|
Awesome! Well done!
Looks fantastic ... are you going to crank it up this weekend?
__________________
82 911SC Coupe Chiffon / Chocolate 9.5 JEs, 964 Cams, SSIs, Dansk Exhaust, CIS (SOLD) |
||
|
10-20-2008, 06:02 PM
|
|
 |
| Thread Tools | |
| Rate This Thread | |
|
|


 Porsche 911SC 3.0 Targa

 Black bastard


