|
|
|
|
|
| Author |
|
|
Caveman Hammer Mechanic

|
The car is bare, little metal work(prep), weld a proper threaded bung/block on both sides(L&R). The problem is the bolt is in tension vs shear. I would have a big problem with that fastener unless the threads were perfect. Its never gonna get easier access than you have now. Angle grinder, die grinder and MIG welding would fix both sides in less than 3 hours for an experienced fabricator. Little more for a home shop guy/gal. this is a 2 banana fix.
__________________
1984 Carrera El Chupacabra 1974 Toyota FJ40 Turbo Diesel "Easy, easy, this car is just the right amount of chitty" "America is all about speed. Hot,nasty, bad ass speed." Eleanor Roosevelt, 1936 |
||
 09-21-2020, 09:57 AM
|
|
|
Registered
|
Could you drill it straight thru and use a threaded rivet?
__________________
89 930 Cab Black 11 Cayenne |
||
|
09-21-2020, 10:07 AM
|
|
|
Caveman Hammer Mechanic
|
Quote:
__________________
1984 Carrera El Chupacabra 1974 Toyota FJ40 Turbo Diesel "Easy, easy, this car is just the right amount of chitty" "America is all about speed. Hot,nasty, bad ass speed." Eleanor Roosevelt, 1936 |
||
|
09-21-2020, 10:17 AM
|
|
|
Registered
|
Quote:
I like this idea, however I would definitely need to see some pictures of another '72 fully assembled to make sure that where I put the brackets will not get in the way of anything. You don't happen to have any? Something like this will take only minutes to do. Thanks, Rodney
__________________
Rodney Nelson - '72 911T (Undergoing Full Resto), '82 SC (Grand Prix White) Gone for 20 yrs and now back, '86 951 (Guards Red) Caught Fire, '71 911T (Tangerine) Sold, '72 911E (Grand Prix White) Sold, '86 951 (Black) Sold, '79 SC (Grand Prix White) Sold, '71 911T (Irish Green) Sold |
||
|
09-21-2020, 10:38 AM
|
|
|
Registered
|
Just to clarify, I also used the exact same kit as Jeff H. Bought drill bit separately. Has performed well. Was also thinking of welding in a stud, think this would work well.
|
||
|
09-21-2020, 12:28 PM
|
|
|
Registered
|
There's probably not enough homogenous meat to drill & tap for a helicoil and less likely for a keensert. You could drill an oversized hole and weld in a short section of rod that’s been drilled and tapped for the appropriate fastener or you could grind out the weld and some parent material and weld in an nut.
__________________
Bill 1987 Marine Blue 911 Carrera Coupe RIP 01/2011 1987 Black 930 RUF Coupe Resurrected, 2488 lbs, EFI Technology, UMS Tuned - Mild & Wild, Current in pieces at paint |
||
|
09-21-2020, 02:12 PM
|
|

|
|
Caveman Hammer Mechanic
|
Quote:
Been a fabricator for 30 years, this is how I would do it.
__________________
1984 Carrera El Chupacabra 1974 Toyota FJ40 Turbo Diesel "Easy, easy, this car is just the right amount of chitty" "America is all about speed. Hot,nasty, bad ass speed." Eleanor Roosevelt, 1936 |
||
|
09-21-2020, 08:25 PM
|
|
|
Registered
|
Drill it out grind a nut round ,stick a bolt in it with nickel anti seize, line it up with the mount tack and weld it. If it seems too flimsy drill the bulges on the backside and weld there too.
Just make sure any weld beads dont stick to the threads or its a do over. |
||
|
09-21-2020, 08:56 PM
|
|
|
Registered

Join Date: Jul 2004
Location: Austin, TX
Posts: 1,695
|
Regarding the torsion tube bracing, I believe the factory started welding in the gussets with the G-Series chassis (my '73 does not have them, the '77 does). See these posts/threads for more info:
http://forums.pelicanparts.com/7376534-post470.html http://forums.pelicanparts.com/porsche-911-technical-forum/641654-torsion-tube-failure-repair-project.html If you need photos of the gussets on the '77 let me know - I may have photos that show them.
__________________
'73 911T RoW (Project) '77 911S 2.7RS '76 914 2.0 Early911SReg #2945 Last edited by frankc; 09-21-2020 at 09:37 PM.. |
||
|
09-21-2020, 09:35 PM
|
|
|
Registered
|
Ok good news and bad news...
I'll start with the good news. It seemed that a majority of people suggested Time-Serts, which can be expensive for the kit. Well I decided to ask a newer friend of mine who has a nice home shop if he had a kit. Well he didn't but he has a mechanic friend who does and he lent me the kit with ask of paying $5 for the insert.... well that is a deal.    So this morning I got up and decided to see if I could install the Time-Sert instead of working out. All excited until the bad news came... Check out these pictures... This is drivers side, see how tight the bolt sits into the hole?... 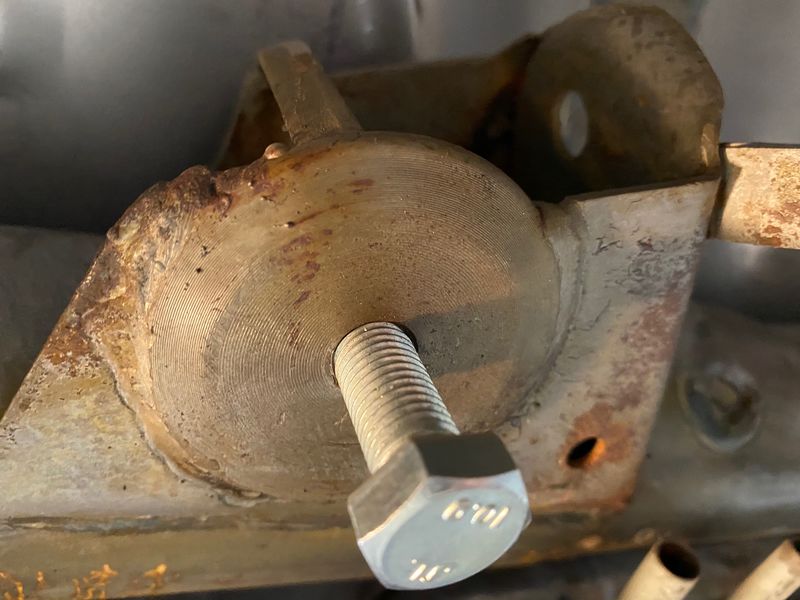 Here is the passenger side, the bolt is super loose... 
__________________
Rodney Nelson - '72 911T (Undergoing Full Resto), '82 SC (Grand Prix White) Gone for 20 yrs and now back, '86 951 (Guards Red) Caught Fire, '71 911T (Tangerine) Sold, '72 911E (Grand Prix White) Sold, '86 951 (Black) Sold, '79 SC (Grand Prix White) Sold, '71 911T (Irish Green) Sold |
||
|
09-23-2020, 08:14 PM
|
|
|
Registered
|
So, the problem... The time-sert drill bit just goes right in the hole, doesn't even hit the sides.
Under further investigation it seem that this has been repaired before. Maybe a helicoil or drilled out for a larger bolt. You can see from this picture it was definitely drilled out and tapped. 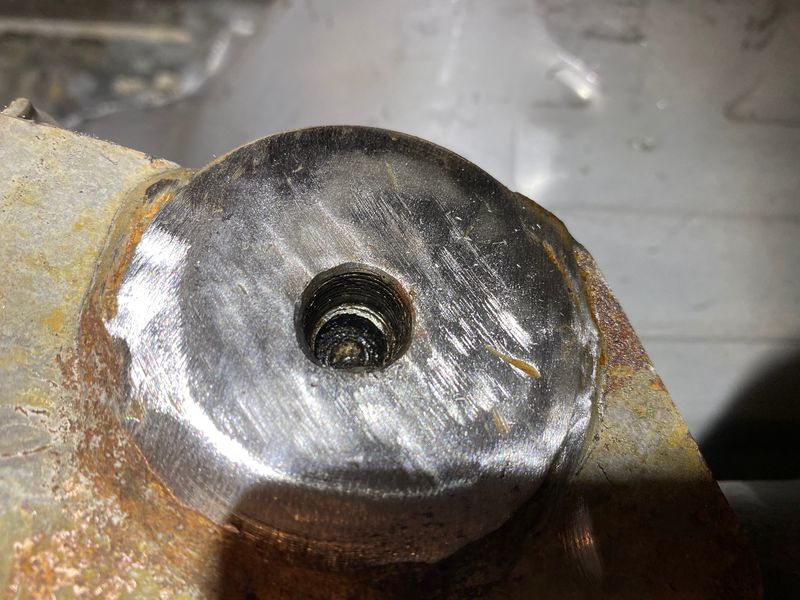 So, I am left with really only one type of fix. The old remove the back of the bracket and weld on a nut fix. Here is a pic of the back of the bracket. I will have to remove the dome section that the bolt currently screws into. The red shows what I'm going to cut out. The green shows where I will weld a bolt onto the bracket. Then I will weld back in the red removed section. 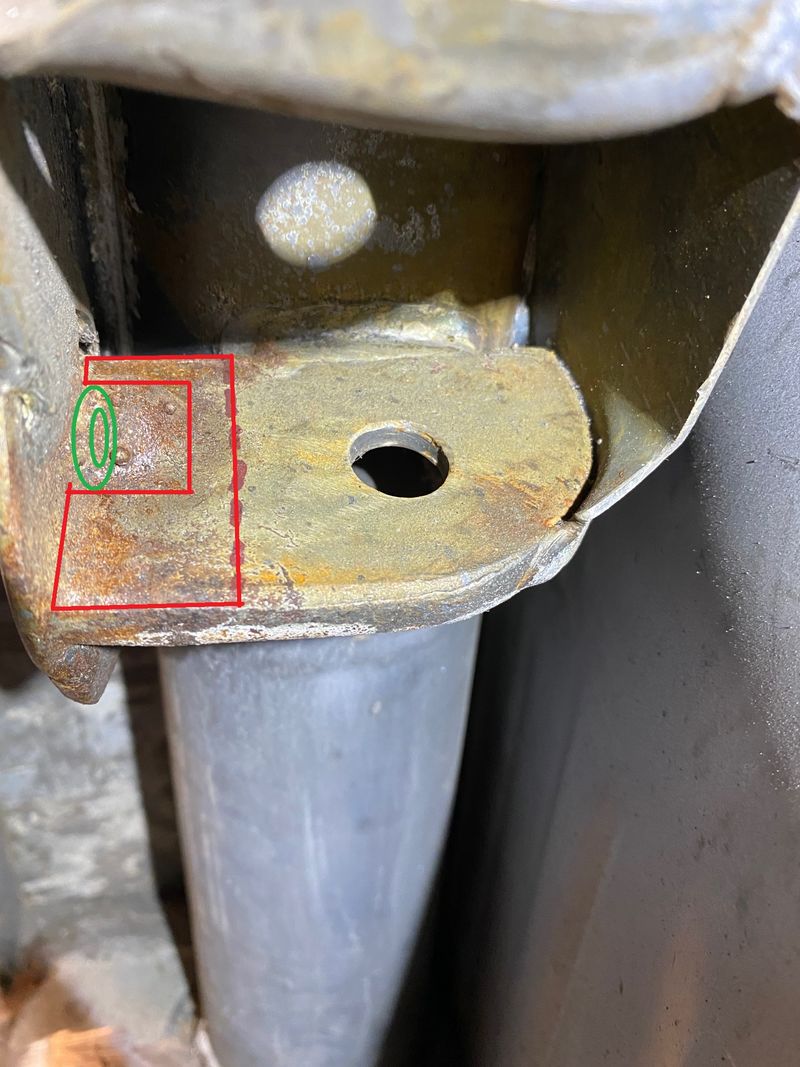 If possible when I remove everything I may fill the hole in the bracket with weld. Then line up the transmission mount and drill a new 12mm hole so I can perfectly line up the nut that will be welded on. Stay tuned, I just ordered the nuts, bolts, and washers from Bellmetric and new motor and transmission mounts, Motor Mount Large Washer, Motor Mount Bolts from Pelican Parts. So, I may not be able to actually do welding/drilling for another week. I may cut out he bracket section this weekend... Thanks for everyone's help, Rodney
__________________
Rodney Nelson - '72 911T (Undergoing Full Resto), '82 SC (Grand Prix White) Gone for 20 yrs and now back, '86 951 (Guards Red) Caught Fire, '71 911T (Tangerine) Sold, '72 911E (Grand Prix White) Sold, '86 951 (Black) Sold, '79 SC (Grand Prix White) Sold, '71 911T (Irish Green) Sold Last edited by Rodney Nelson; 09-23-2020 at 08:41 PM.. |
||
|
09-23-2020, 08:33 PM
|
|
|
Registered
|
Hold off on cutting the bracket. drill the offending hole to a size that you like and center it , then get a pice of solid bar or thick wall tubing , Chuck it in a lathe or drill press vice, drill a pilot hole ,thread the part to 12x1.5, trim the bar to a snug size for the hole , .001" interference , round off the top of the insert to match the bottom of the original hole. Drill some rosette holes to anchor the new part, a beveled edge at the open end for welding, heat the repair hole and insert he repair part , weld .
Just a thought Ian
__________________
Kermit, 73 RS clone, Just Part of the Team Chris Leydon ,Louis Baldwin ,Peter Brock ,Riche Clark Jerry Sherman ,Rob McGlade ,Donnie Deal Hank Clarkson ,Craig Waldner ,Don Kean ,Leroy Axel Gains |
||
|
09-24-2020, 04:26 AM
|
|

|
|
Registered
Join Date: Oct 2001
Location: San Carlos, CA US
Posts: 5,558
|
Quote:
1. You can use two Timeserts, one of the right size and one larger to fit into the hole. the problem with this method is the larger hole may now weaken the wall of the hole so it may not hold. 2. Cut out the back of the bracket, weld in the nut, and refill the bracket as much as possible. Smooth it out and paint.
__________________
Porsche 2005 GT3, 2006 997S with bore-scoring Exotic: Ferrari F360F1 TDF, Ferrari 328 GTS Disposable Car: BMW 530xiT, 2008 Mini Cooper S Two-wheel art: Ducati 907IE, Ducati 851 |
||
|
09-24-2020, 07:24 AM
|
|
|
Registered
|
I would check to see if Timesert's Big-Sert will fit into the hole.
|
||
|
09-24-2020, 07:36 AM
|
|
|
Registered
Join Date: Oct 2005
Location: Northern California
Posts: 3,759
|
My application is racing, and I my car had a fabbed up solid mount set-up in that location when I bought it. Basically this set up was 3/16 inch thick alu flat plate bolted to the tranny mount, and spacers to get the tranny nose height in the proper location.
At some point early on, I re-installed the engine/tranny and damaged the threads on one side. I started drilling for a thread repair product (if I recall correctly it was a Helicoil), but allowed the bit to go too fast and hardened the material. At that point I could have just gone one step larger with thread repair, but I decided on a different approach. I did not want to buy another expensive drill bit or thread repair kit. And I do not have welding skills or equipment. I bought two pieces of cylindrical steel bar about an inch in height and 2 inches in diameter. I drilled through one of them with a hole big enough for the mounting bolt. I drilled and tapped the other one. Thread pattern for the mounting bolt. Let's call these "spacers." The material cost about $2 and I already had the necessary drill bits and taps. Then I drilled three holes in the threaded spacer for M8 socket head bolts. Then I centered it up and drilled corresponding three holes in the control arm. So now I have the spacer on that one side attached to the control arm with three M8's. It's center contains the "new threads" for the tranny mount bolt. On the other side is a spacer with equal height. This was an easy and inexpensive approach for my application, which did not need any type of rubber in that mounting location.
__________________
Mike PCA Golden Gate Region Porsche Racing Club #4 BMWCCA NASA |
||
|
09-24-2020, 09:01 AM
|
|
|
I would rather be driving

Join Date: Apr 2000
Location: Austin, TX
Posts: 9,108
|
What about drilling through to 21mm and then inserting an M12x1.5 stand off spacer. I am going to guess that the 21mm drill will cut through the outside walls of the bracket. Then you can easily lay a weld bead across the "punch through" securing the standoff spacer on both sides. Rosette weld the perimeter of the spacer on the mounting face and grind flush. This would be strong and relatively easy to install.
https://www.mcmaster.com/metric-standoffs/thread-size~m12/pitch~1-5-mm/ https://www.belmetric.com/fine-thread-couplers-c-563_578_1299_1809/nlong12x15x30ss-fine-standoff-hex-nut-stainless-p-13852.html?zenid=58eefr4u0hh2i7usj34823vjf7
__________________
Jamie - I can explain it to you. But I can not understand it for you. 71 911T SWT - Sun and Fun Mobile 72 911T project car. "Minne" - A tangy version of tangerine #projectminne classicautowerks.com - EFI conversion parts and suspension setups. IG Classicautowerks |
||
|
09-24-2020, 09:16 AM
|
|
|
Registered
Join Date: Dec 2014
Posts: 14,040
|
Fill the hole preferably with tig grind flush then drill and tap, done. Cutting bracket out and welding back Not necessary.
|
||
|
09-24-2020, 09:22 AM
|
|
|
Get off my lawn!
|
Quote:
You certainly know now is the time to do it right, and make a forever fix, not a patch or bodge.
__________________
Glen 49 Year member of the Porsche Club of America 1985 911 Carrera; 2017 Macan 1986 El Camino with Fuel Injected 350 Crate Engine My Motto: I will never be too old to have a happy childhood! |
||
|
09-24-2020, 11:26 AM
|
|
|
Registered
|
Quote:
I could cut off the bracket. Then fill the hole in the plate portion, and then fill the hole in the bracket portion, then re-attach everything. Right now I'm sitting back weighing everyone's inputs! I have the mounts and some bolts on order and tomorrow morning I will step into the garage and do some more assessing.
__________________
Rodney Nelson - '72 911T (Undergoing Full Resto), '82 SC (Grand Prix White) Gone for 20 yrs and now back, '86 951 (Guards Red) Caught Fire, '71 911T (Tangerine) Sold, '72 911E (Grand Prix White) Sold, '86 951 (Black) Sold, '79 SC (Grand Prix White) Sold, '71 911T (Irish Green) Sold |
||
|
09-24-2020, 12:16 PM
|
|
|
Registered
Join Date: Aug 2018
Location: San Diego, CA
Posts: 1,298
|
Quote:
The rosette welds are key to the final strength.
__________________
1978 SC Targa |
||
|
09-24-2020, 12:22 PM
|
|


 PC
PC 911
911 American Ironhorse
 1987 Porsche 930
 1988 Porsche 930
 1989 Harley Davidson FLH
 My Latest
 American Muscle

 1972 Porsche 911T
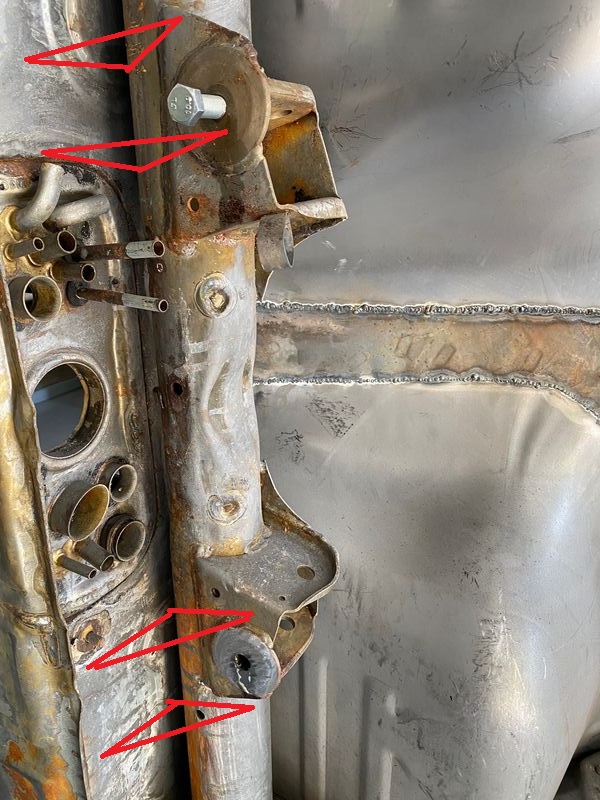
 Carrera
