|
|
|
|
|
| Author |
|
|
Registered
|
Syltech combination sensor that provides oil temperature and pressure to two different terminals on the ECM. 4 wires -- the two just mentioned, 5V from the ECM, and a sensor ground wire.
 I discovered this sensor by watching Tom on his YouTube channel - Ah Garage Time and his recent EFI build. The hard part was finding a M18 bushing with 1/8" female NPT threads, lol. A Subie specialist was able to obtain one from Killer B. Apparently Killer B is a Subie specialist shop as well based in Virginia. That took about 4 weeks to get this darn piece on the brown truck.
__________________
912E-3.2ss |
||
 10-31-2024, 03:23 PM
|
|
|
Registered
|
And final update for the day while I scan through some recent photos... Since my fuel pump had no relay wired in until now, I went with a Resto Design 30 amp round red relay that they've recently introduced to the market. It's a modern small relay under the red anodized cover that somewhat mimics the original plastic cover (but better!). I've ready too many stories about bad round relays so I think i have a nice solution to eliminating a possible issue down the road.

__________________
912E-3.2ss |
||
|
10-31-2024, 03:59 PM
|
|
|
Registered
|
Weekend Update: After a few weeks of work-related travel, I had a free afternoon to insert drivetrain into square hole.
First, heres a behind the scene look at the back of the engine with 4mm plastic vacuum piping, and a few short harnesses laying around. Vacuum piping includes one line off the intake manifold to ECMs own MAP vacuum port and its teed off to fuel pressure regulator as well. Other vacuum line from manifold has the white check valve and feeds vacuum to resonance valve/ flap and vacuum reservoir near firewall.  Line it all up and drop the car down slowly.   Hmm. I thought I had a problem with the rear cross bar after loosely bolting in the transmission crossmember. Both sides here are about ¾ back of the rear mount bolt. Texted a pro, and he assured me that theres nothing wrong and the crossbar has some flexibility. He was right! Worry session quickly went away!   Filter assembly fits. I used an Amazon 3.25 x 3.5 reducing silicone elbow with constant torque clamps and a plump Green Filter.com from the Commonwealth of PA. Seems like a nice piece. And the fit was perfect - no trimming & filter just touches firewall insulation to the top.  Fuel Lines. I selected Red Horse Performance 6AN fittings and black coated st/st PTFE hose to plumb this thing up. I am HOPEFUL that my first time hose building will prove successful. I purchased some pressure test fittings to fill with air and dunk in a bucket of water. Several fittings needed a bit more tightening and one hose assembly was a complete failure with bad assembly. Luckily, I bought additional hose length and assortment of fittings so I could overcome this issue that I sorta expected from the beginning. You get a feel for building these and can sense when your hose assembly is right. When you do one that goes wrong, you can tell. Air bubbles in bucket confirm you suspicions!   This one is coming off the backside of RH fuel rail and pressure gauge to Adapt Motorsport adjustable fuel pressure regulator using a 60 degree and a straight fitting.  
__________________
912E-3.2ss |
||
|
11-17-2024, 06:10 AM
|
|
|
Registered
|
Been working on this EFI project since
., oh about a year now! That includes when I started ordering conversion parts/ pieces and cleaning up the 964 alum intake halves.
Things are really coming together now. Ive scaled back work travel for the Holidays and can spend late afternoons and evenings in the shop which is a big plus. Heres what has been happening in southern Wake County: Upon learning that my LH rear floor mat would not fit due to ECM bolted thru the floor (but on raised platform, if you will). That was an unforced error but nothing that a good blood orange IPA in my left hand couldnt resolve! So, I removed the 2 offending small diameter bolts, utilized some S metal (HVAC galvanized metal strip for two adjoining sheet metal panels) by bending into a Z so it can attach to the rear of my aftermarket seat bracket. Now the whole contraption is off the floor and floor mat can be slid into place. Bracket consists of alum street sign (not stolen) and cutting board.    Heres a shot of finished wiring to DBW pedal and wiring to Fuel pump relay. Cool thing is that the wrapped wiring just sits under front floor mat. Didnt have to pull up any new carpet and not disturb the industrial strength glue that Sonderwerks used with its installation. Fuel pump trigger wire (switched ground) continues under the dash and exits into the frunk at far passenger side as I could use a somewhat hidden rubber grommet for easy peasy access.  At the firewall, I needed to weatherproof my rear, lower LH opening. I stuffed some closed cell insulation pieces around my two wires as the finished interior piece has some open area within itself. I then cut two pieces of alum trim (think aluminum window trim for houses) with RTV sealant around the perimeter. Should be fine until the car sits in 3 of water as these cabins are not water proof at transmission!  Early Fall, I decided to proceed with rebuilding my CV axles. With this 76 having a 1982 drivetrain, I ordered 2 new CV joints (think larger 108mm version) to replace two original that showed slight galling in one or two spots. Well, that didnt work as my car is still utilizing the smaller 100mm CV joints left over from the 912E days. Lol. I guess the NY shop that did this swap 20 years ago decided to just swap the smaller flanges over to the 915 transaxle. Anyhoo, I just cleaned mine up really well and repacked the 4 CV joints with their original ball bearings. My original boots are in great shape and got a good soaking of 303 Protectant. I swapped LH and RH axles around to put the forces onto the lesser used side of the CV joints. All new Bel Metric hardware and Schnorr washers. Pro Tip: Replacement 8mm Allen head bolts need to be no more than 50mm length! Ask me how 55mm length bolts did going into wheel hub ---- Not too good! When fully torqued, the rear wheel would not roll at all. 2nd set of hardware ordered quickly thereafter. Also, axles were date stamped something like 4/76. I have since learned all about 911 CV axles!   Working with Sports Purpose Garage in Raleigh area on tuning the EFI and assistance with setting up the ECU Master Black, I discovered that I needed to move my oil temp wire to the Coolant Temp input on the ECM. Luckily for me, those pin locations were in the same harness plug and only 2 pins apart. De-pinned and reinserted.  And as I get ready for the initial START UP, I installed Dansk muffler and rear valance. This was also a good time to torque down new CV bolts at rear hubs.   Next chapter here we will talk about Initial START UP !! This just occurred, and boy.., is there some more self-inflicted drama to talk about. Im still soaking in all the highs and lows from this event.
__________________
912E-3.2ss |
||
|
12-20-2024, 08:21 AM
|
|
|
Registered
Join Date: Nov 2004
Location: Raleigh, NC
Posts: 3,902
|
Awesome work !!
Thanks for the updates !
__________________
John D. 82 911 SC Targa-Rosewood 2012 Golf TDI |
||
|
12-20-2024, 09:40 AM
|
|
|
Registered
|
Quick update --
Single DBW Throttle Body - EFI project reached a fresh milestone today. Erik of Sports Purpose Garage spent the better part of the day installing a tune into my ECU Master Black while also getting the DBW pedal and Bosch 74mm throttle body synched up & calibrated. The black magic that I still cannot wrap my head around is the synching up of the hall-type cam & crank sensors. His adjustable Snap On timing light verified what he needed to see and lock in the ECM. Good stuff for sure! Car cranked up pretty quickly once the above were dialed in.   He did show up in his client’s 930 Safari build that’s been underway for the past 8 or 9 months. Not sure these photos capture the color – but Moonstone is just wicked and perfect for such a unique car. I don’t know the specs, but you can definitely hear it coming and going as the turbo whistles loudly like a modified F350 Super Duty at a stop light.   Late this afternoon, I decided to hit the street and cruised some wide-open country roads around me in the ’76 coupe. I set the laptop / Black ECM on for AutoTune and started a data log file. After 15 minutes or so, I made it back successfully to the shop. Let me tell you, this car sounds and feels great right now!! I definitely have a lot to learn and tweak going forward, but no stumbling, nothing odd happening that I’m aware of. It may be running rich. And if I was successful turning on (and subsequently saving) the autotune and log file, then I have something to review and play around with. My clutch cable needs adjusting – as I now have it too close to the pedal board. And the DBW pedal needs adjusting so it’s less linier and mimics the analog pedal I’m used to. I did toss on these 993 brake cooling scoops that I purchased from our host about 3 or 4 years ago and had never installed. I remember reading about them here on the forum. They simply tuck in nicely against the caliper and rotor backing plate. We shall see … I’ve never run out of brakes on my mountain weekend rallies in the past, and I’d guess the more fresh cool air the better.    Good times – Hope to slap more miles on this on-going project in 1H2025! 
__________________
912E-3.2ss |
||
|
12-22-2024, 05:32 PM
|
|
|
Registered
Join Date: Nov 2004
Location: Raleigh, NC
Posts: 3,902
|
Woo Hoo !
Glad you got it back on the road !! Erik is a Master with that ECU stuff !
__________________
John D. 82 911 SC Targa-Rosewood 2012 Golf TDI |
||
|
12-22-2024, 06:28 PM
|
|
|
Registered
|
Beautifully documented build Patrick!
Been thinking about a 964 intake conversion and seeing the steps required really helps understand what all is involved. Slowly realizing that for me focusing on the CIS is the better short term plan. One day I hope to have patience and skill that you are exhibiting. Hope you enjoy the updated fuel delivery system. Fantastic work! |
||
|
01-14-2025, 09:08 PM
|
|
|
Registered
|
Missed this update. This is coming along nicely!! So much fun to take on these style projects!
__________________
'81 911 SC '03 BMW M3 (Sold) '64 VW Beetle, 2332, 48 IDA (Sold) Instagram: @j_smallwood |
||
|
01-15-2025, 05:36 AM
|
|
|
Registered
|
Well
, Decisions were made in Feb 2025. Ever since we got it running in late December, Ive been suffering from excessive blue smoke out of the tailpipe. I also had a few new leaks under the engine, but I could address those. I was hopeful that I had a ring, perhaps, that needed to be unstuck so I did some aggressive driving, several times, after warm up with hard acceleration and hard de-acceleration just wishing that my blue smoke situation would magically disappear. Did. Not. Happen. Unfortunately.
I took as much outside recommendations & consultations as possible. Some were long distance Pelicans most were local air-cooled Raleigh-area folks. One of those that I visited with the smoking car is a local celeb in my eyes. He knows air-cooled engines, has decades of experience, and has a knowledge base rooted in practical experience with these motors. He said I have a certain case of burned-up valve guides. Made me sad that I knew I would need to remove the engine. But it also brought out some relief that I now knew we could make a plan to split the case, inspect the bearings, and start from scratch to build a solid motor to take me to my final sunset, lol! He advised against just a top-end as I have no real knowledge of whats been done to this 3.0L. I only had verbal confirmation that this motor had a top-end done 15-18 years ago but no receipts for solid proof. So, my local engine builder (who will remain nameless unless he suggests its okay to share his name here) requested that I pull the motor, take it down to a long block, and get ready to drop it off at his shop in the next few weeks! Im quite excited to have him do the work and get the party started sooner than later. It looks like Ill miss out on some upcoming mtn rallies in late Spring/ early Summer maybe. But, I dont want to rush him for the wrong reasons. So there is that.  Dressed down and rolling on furniture dollies  Using the above steel I-beam and two chain hoists, I can yank off the transmission.  Located a Flyin Miata crankshaft holder tool to secure my flywheel and remove the nine 12mm triple square bolts and three pilot bearing bolts.  She is now ready to be loaded in the back of the pickup for an hour journey to engine builder. As soon as he says the word GO, Im ready! 
__________________
912E-3.2ss |
||
|
02-27-2025, 02:16 PM
|
|
|
Registered
Join Date: Jul 2013
Location: Brisbane, Australia.
Posts: 2,700
|
Quote:
Curious to learn more about the autotune function ; i have it in my car (same ecu) but after all this time not sure I'm using it right! I've been pulling over and then opening the autotune function and then making adjustments. But I have a feeling there is a way to set it so that the autotune makes changes on the fly... ie while you're driving.. is that right? looking forward to more updates on your engine build.
__________________
Always learning. www.aircooledporsches.com.au |
||
|
06-17-2025, 05:03 AM
|
|
|
Registered
|
Quote:
Honestly, I have to learn more about tuning my engine. Just rebuilt - but not first start as of yet. I’ve watched Erik turn on autotune and let it run for 30 min or so. Save it, perhaps? And then respond to a pop up or similar that asks do you want to apply 100% or 50% of the corrections. Joe Smallwood in southern Indiana and Erik Lind of Sports Purpose Garage in Wake Forest NC both know how to get the most out of autotune features with the ECU Master Black. You may have talked or communicated with Erik in the past. I’m hopeful that I can lean on these two for technique and helpful tips. Thank you for reading thru some of this...! Patrick
__________________
912E-3.2ss Last edited by ToySnakePMC; 06-17-2025 at 08:01 PM.. |
||
|
06-17-2025, 07:56 PM
|
|

|
|
Registered
Join Date: Aug 2021
Location: Barrington, IL
Posts: 20
|
Nice build! I’m currently running MegaSquirt on mine and looking to upgrade. Any chance you can provide the part list you used from Adapt Motorsports? Looks like they have a full kit now with manifolds, but it appears you got a used 964 manifold in your build.
Last edited by Wizoftk; 10-07-2025 at 06:52 PM.. |
||
|
10-07-2025, 06:47 PM
|
|
|
Registered
|
Thanks for the compliment. Yes, I sorta went all in 2 yrs ago with Adapt on all that they offered for my desire to build a single throttle body EFI/ common plenum DBW system. Could not put my hands on the receipt, but looked at their current website to jog my memory.
Items from Adapt Motorsport in Switzerland: * Mini Blade Fuse Panels front & rear * Cam & Crank Sensor Kit for 3.0 * 964 E Throttle DBW Center Section Kit with 1.15 Bar T-Map Sensor & Bosch 74mm throttle body * G model DBW Pedal Assy * Classic 911 Fuel Rail Kit for 964 intake * 911 3.0 2-bolt Adapter Kit to 964 intake * Classic 911 Fuel Pressure Regulator with JIC Fittings & their Mounting Bracket * Bosch COP direct fit coils (can go elsewhere and save $) It appears that prices have definitely changed in 2 yrs. I was able to utilize a Black Friday 10% discount they offered around Thanksgiving - I do remember that. Have not had any issues. I do think I would look closer at the Clewett cam & crank sensors if I was to do it all over again after learning from experienced shop owner that drilling into the cam for the Clewett sensor is not too difficult. Best of luck on your future upgrades. And, yes, finding aluminum 964 intake halves is the first thing I purchased here on the Forum. Some folks like plastic version for weight savings. I think you lose some aesthetic appeal - just personal opinion for what I wanted to achieve. Patrick
__________________
912E-3.2ss Last edited by ToySnakePMC; 10-11-2025 at 12:33 PM.. |
||
|
10-11-2025, 06:36 AM
|
|
|
Registered
|
Big Project
Coffee talk, anyone? Let’s get this build thread more up-to-date as 2026 has been off and on busy with this project that actually extended out longer and costlier than what it could have been. M.C.D. - Mission Creep disease is a real thing. There is no cure for the affected, I hate to admit.
So what happened? Well - as indicated in a Feb ’25 post just above, a decision was made to open up the case and go from there. My engine assembly genius is Mr. Bruce Abbott who you may or may not know. He is Flat6pac here on the Pelican and is a seasoned air-cooled engine builder. Bruce got introduced to early 911’s in the early 1980’s and has consulted with and built engines for many folks here on the east coast. I have had the pleasure to get to know him, ask questions, listen to his answers, and understand that his knowledge base is built on realistic results and real-world experiences – not so much trying to sell me something that I don’t need or may be deemed as overkill. Did I listen to Bruce? Absolutely. Did I stray from what he thought I needed to get it back in shape? For sure! We did go his route with full rebuild, check all bearings, clean things up, polish stuff we can reuse, send out other items for machine work, and use fresh gaskets, sealant, return tubes, etc to freshen up this 3.0L. Where I did go off the deep end due to the devil sitting on my shoulder (and compelling influence from close friends who wanted me to open my wallet even wider) was to take this to a 3.2 short stroke with higher compression and twin plugs. Okay. That cannot be but a small upgrade – LOL… So, the long block 3.0 was taken to Bruce one Saturday in early March and he got it down to two large separate pieces.  Here's Bruce giving Tad240 some one-on-one schooling as we disassemble. No broken head bolts. But interestingly enough - I had all Dilivar studs - not 12, but 24. Odd right?    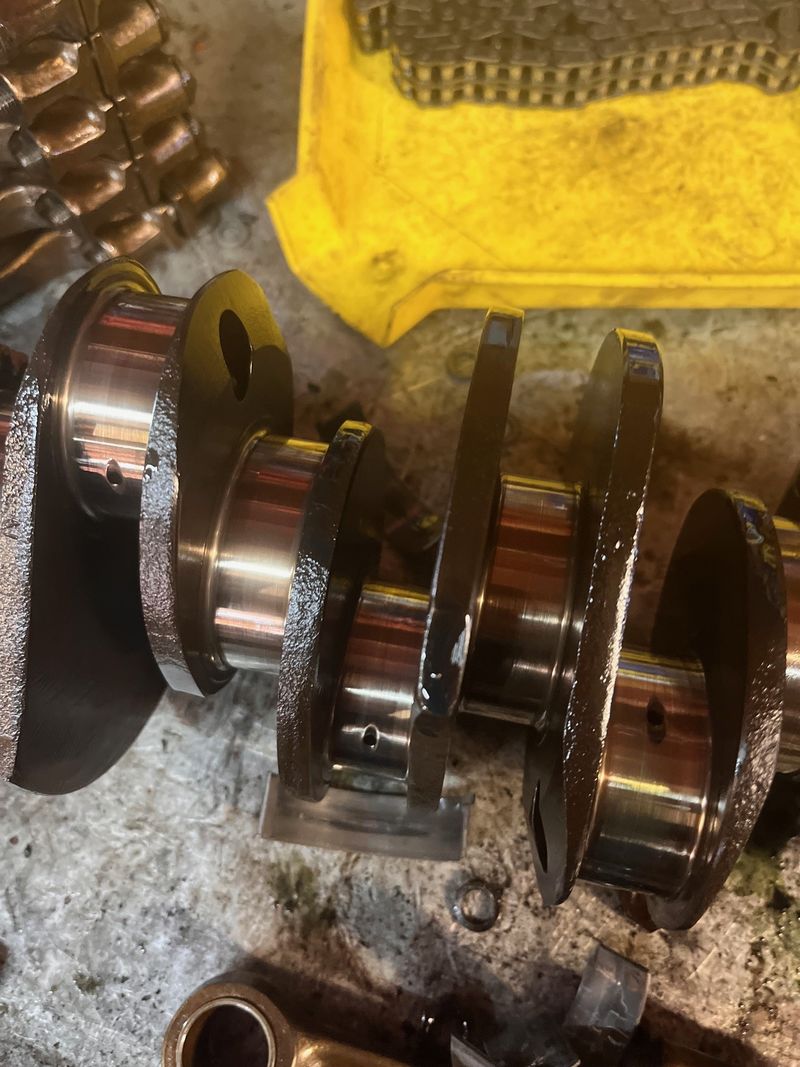
__________________
912E-3.2ss Last edited by ToySnakePMC; 10-11-2025 at 09:40 AM.. |
||
|
10-11-2025, 08:11 AM
|
|
|
Registered
|
Plan was put together for needed parts list and began to figure out where to obtain certain high-performance parts and trusted machine work. In the meantime, Bruce took care of some early steps on his end such as cleaning, more cleaning, and getting his top secret, local machine shop do their magic. For whatever reason, they do work for general public and other shops, but the only air-cooled work they will do is for Bruce. I think its an older gentleman, hes worked for Bruce for decades, and he doesnt need to chat with/ educate the less experienced like me!
  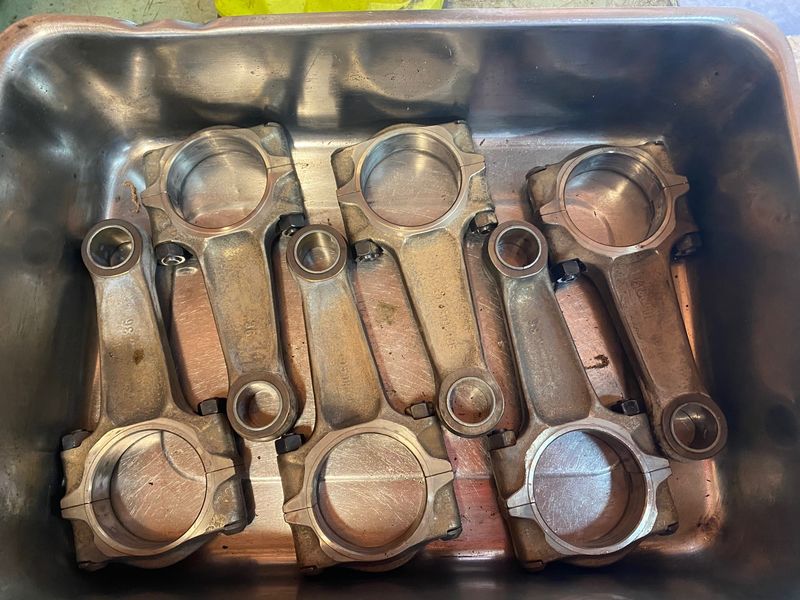 While that was happening, I ordered and received eye candy over a period of time. Supertec head stud kit.  Mahle Motorsports Pistons & Cylinders PS98-014 with 10.2:1 and 98mm.  Gasket kits, rocker shaft seals, timing chain rails, consumables, etc  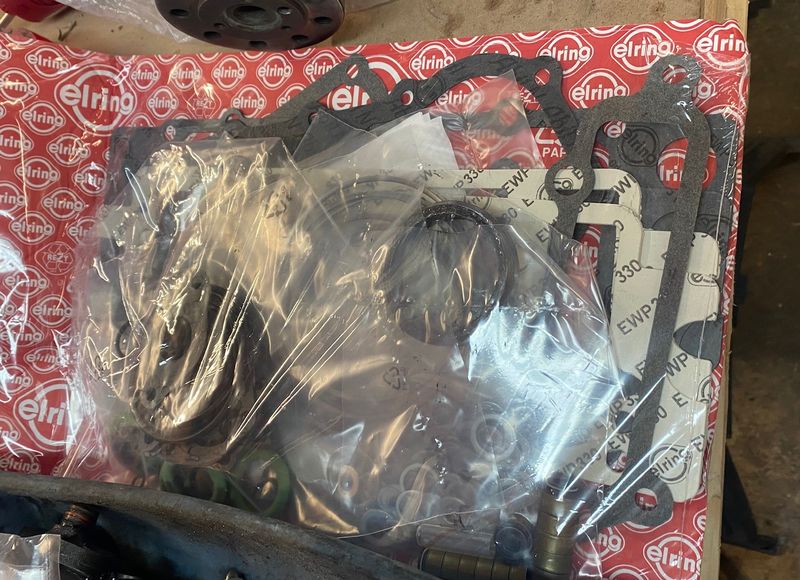 Some other key items that I may not have photos of... ARP rod bolts EBS Racing for main bearing set and Calico-coated Clevite rod bearings GT3 oil pump and short shaft
__________________
912E-3.2ss |
||
|
10-11-2025, 08:32 AM
|
|
|
Registered
|
Moving on to the heads. Im starting out with 1982 SC drivetrain so I have the small port heads. Based on what you see from above, stock may not cut it. So I wanted to find a Pelican-friendly machine shop who knows our engines and can give me top shelf results with their guidance on what my particular heads need to function with the new P&Cs.
First of all, I failed to get a response to my emails from a reputable shop in upper Midwest. Disappointed as I know he does very good work around here. So, I read great reviews and spoke with a local Raleigh fella who had just finished a job with Anchor Atlantic in Pitman, NJ. Bob at Anchor was great to work with! He listened to what I wanted to build, has the expertise, and definitely has the talent and technique. I had a meeting on the MD eastern shore the following week, so I hauled my heads with me, and snuck out for the 1.5 hr drive to his shop at pre rush-hour traffic one Wednesday morning. Perfect day. What I received 3 or 4 weeks later were glass bead blasted heads, fly cut sealing surface and top surface, valve springs, valve guides, seals, intake & exhaust valves, twin plug machining for 14mm lower plugs to match uppers, intake ported to 37mm, my Adapt intake stacks also ported to 37mm, (12) exhaust stud time serts, and machining lower turbo valve covers for twin plugs.     While that was happening, one of the nicest people in this industry, Mr. John Dougherty recommended and produced a pair of 993-SS camshafts that he said would complement my common plenum intake and serve me well for mountain rallies and general fun runabout. Unless I form a new addiction, I don't usually like to live at redline - so I'm not building this one for 7K+. 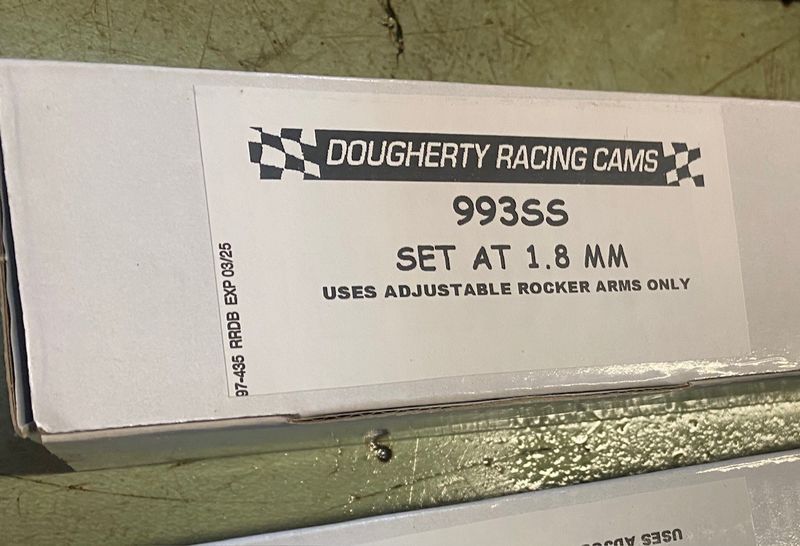
__________________
912E-3.2ss |
||
|
10-11-2025, 08:57 AM
|
|
|
Registered
|
Assembly by Bruce Abbott.
These photos were sent to me from the Man. I regret not having more photos of the case halves with crank, oil pump, and other related components sitting in place but I know whats in there so I do have some peace of mind. Once we had the heads and cams, Bruce had this long block back together in a week or so.       About the same time, I decided to update the clutch items since I had been staring at the transmission on my shop floor for several weeks! Check out this clutch fork. Looks like double or triple pass with the welding torch as a previous technician put a lot of metal and a lot of heat in this thing. In this photo, it looks a bit tweaked to me.  New components ordered and installed.  New Sachs clutch kit with aluminum pressure plate  And finally, a new stock flywheel. I had my original one machined, freshened up by a local machine shop for nominal fee. But, when I originally put this entire drivetrain back in COMPLETELY, my attempt to adjust the clutch cable failed! I was perplexed. I knew I had all new components with the exception of the machined flywheel. Perhaps it was now out of spec and too thin? I dunno. Some folks told me no way it should work, but something was off and the small clutch lever arm would not get into correct position / spacing from Omega spring larger lever arm. Ordered new flywheel from Germany. Dropped engine / trans broke them apart. Install new flywheel, clutch, etc. Re-install engine / transmission. Clutch works. Needs more adjustment as of Oct 11, but it works. 
__________________
912E-3.2ss |
||
|
10-11-2025, 09:34 AM
|
|

|
|
Registered
|
Additional Wiring. Why you ask? I just built a Bussmann 10 fuse & five relay box late last year. Unfortunately, I didnt build in easy expansion for twin plug and providing lower coils with their own switched 12v+ power. It really didnt turn out to be that difficult once I unbolted the Bussmann panel and could flip it around to the backside for pinning new fused circuits and moving some existing circuits and pinning a few new fused relay circuits.
Started with:  Moved some wiring around  Ended up with   And edited a new page in my handy dandy written notes on all things wiring so if this car ends up in the hands of someone else someday, there should be no mysteries on wasted hours trying to figure out how this EFI swap was wired up.  So, this Bussmann panel is as follows: Fuse F1 20A fuse Coils upper with 12 ga power wire from Relay F2 5A fuse 964 Resonance Flap F3 10A fuse Fuel Injectors with 16 ga power wire from Relay F4 10A fuse ECM F5 20A fuse Coil lower with 12 ga power wire on Relay F6 empty F7 5A fuse ECM switched key-on with 16 ga power wire from Relay F8 empty F9 5A fuse O2 sensor heater And Crank & Cam Sensors with 14 ga power wire from Relay F10 empty Now, time for reassembly of intake, exhaust, fan assy, engine tins and whatnot. This was easy and went quickly as I just repeated the same steps from winter 24.   Notice the M&K style used headers with 1-1/2 primaries that I picked up from eBay. Came from Kalifornia. Sure didnt notice how far forward they wrapped around up under the transmission. Yea me  Precision Matters. Best name for a small Porsche parts specialty manufacturer. Nice deep, recessed sump cover to accommodate the GT-3 oil pump strainer. Pretty piece & well made for sure. 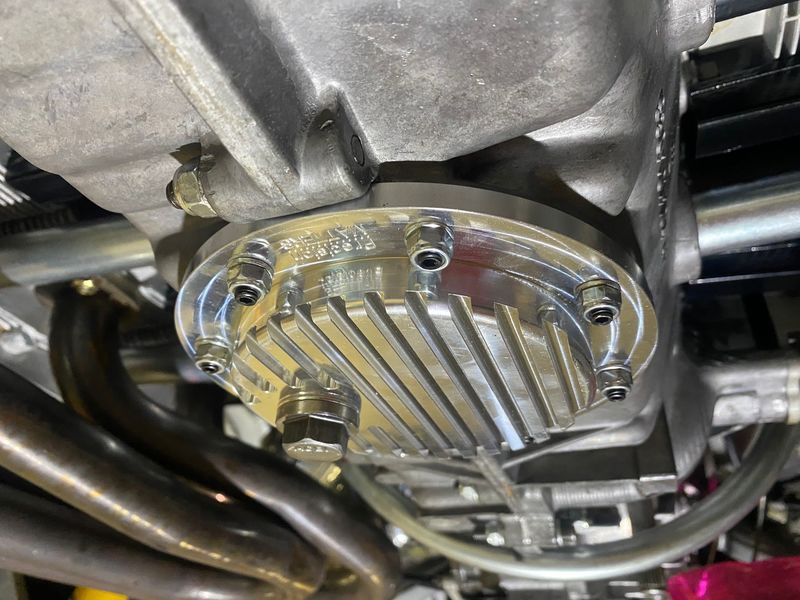
__________________
912E-3.2ss |
||
|
10-11-2025, 02:38 PM
|
|
|
Registered
|
Lower Plug Wiring.
Purchased 6 more AUDI COPs from a Audi/ VW on-line retailer in Washington State. Way… Much... Cheaper than the first 6 I bought in that Adapt Motorsports bundle of goodies. Had to source the harness connector kit (enough for 8 coils) on eBay so I now have a few extra pieces on hand so that’s a small plus. Needed 12 NGK plugs as well. I think someone on the ECU Master Black community forum recommended this plug number as a suitable shorter length plug with a heat range sufficient for this air-cooled motor. We shall see. NGK BKR7E-4644. They are a tad shorter and now my COP’s in top valve covers fit more flush so I love that!  Time to wire up the lower Coils. So, first thing first – locate an appropriate spot to splice into the 6 existing sequential ECM coil trigger wires. Others had confirmed that the ECU Master Black could handle both upper and lower coils on the same wire. Worked for me – proceeded with little caution, lol ! Splices are down lower at the backside of firewall. Everything was carefully crimped, tested, heat-shrinked, wrapped, etc to prevent issues. Power wires and a fresh ground wire on RH and LH side of transmission/ engine bolts provided good grounds thru the Deutsch DT single LH and RH connectors.  I have developed a passion for building harnesses. Making good crimps is satisfying to the soul. Cannot explain as I’ve just developed this skill in past 12 months. I love it.    3:1 Heat shrink does a nice job as you can bend it into desired shape as you run your heat gun back and forth. 
__________________
912E-3.2ss Last edited by ToySnakePMC; 12-01-2025 at 04:52 PM.. |
||
|
10-11-2025, 03:04 PM
|
|


 P912E 3.0
 Gelb Elfer
 Jacky
Jacky

