|
|
|
|
|
| Author |
|
|
Registered
|
  I am going to paint with a gun but does anyone know a color for the frosted parts? I tried mixing up a couple different ones and sprayed the center of the wheel, where the tire goes but the color has not looked right. One more thing does the polished lip stay raw or does it get a gloss clear coat over it? Because I would think the satin clear going over the rest of the wheel would not look good. I am practicing with these wheels and they will be for sale when I am done. They are original Fuch 16x7's and Japanese replica 16x9's Thanks for any input Dave |
||
 03-22-2013, 06:08 PM
|
|
|
Porsche Nut
|
Quote:
|
||
|
11-24-2013, 02:15 PM
|
|
|
Registered User
|
The rsr finish does look really good. Did you consider anodizing the wheel after bead blasting and polishing but before painting to give the wheels some protection?
__________________
Rohrer Wheels & Restortation Code:
Fuchs Restoration 911M491@comcast.net |
||
|
11-26-2013, 06:14 AM
|
|
|
Registered
Join Date: Jul 2002
Location: Atlanta
Posts: 7,125
|
How much does it cost to anodize a wheel?
__________________
erik.lombard@gmail.com 1994 Lotus Esprit S4 - interesting! 84 lime green back date (LWB 911R) SOLD  RSR look hot rod, based on 75' SOLD 73 911t 3.0SC Hot rod Gulf Blue - Sold. |
||
|
11-26-2013, 06:54 AM
|
|
|
Registered User
|
The cost to anodize depends on the shop. Some shops will charge by the batch.$100 a bath is reasonable. Some shops can dip all four wheels in one shot.
I believe the factory originally did a two step anodizing process to get the rsr finish you are after.
__________________
Rohrer Wheels & Restortation Code:
Fuchs Restoration 911M491@comcast.net |
||
|
11-27-2013, 06:12 AM
|
|
|
Porsche Nut
|
The anodize shop I am working with said they could get the RSR style finish two ways, light acid bath or media blast. They thought the acid bath would give a better result but we have not gotten to it yet. They would follow with light polish of the lip and finally anodization. I am sure it is much more complicated than this. Such as the untold hours I have spent working imperfections out of 30 year old wheels by hand. And they are still far from perfect, but will work for a DD. Even with air tools the time it takes is crazy. No doubt that the service Harvey provides is well worth the money he charges.
|
||
|
11-27-2013, 07:19 AM
|
|

|
|
Registered User
|
Finnish
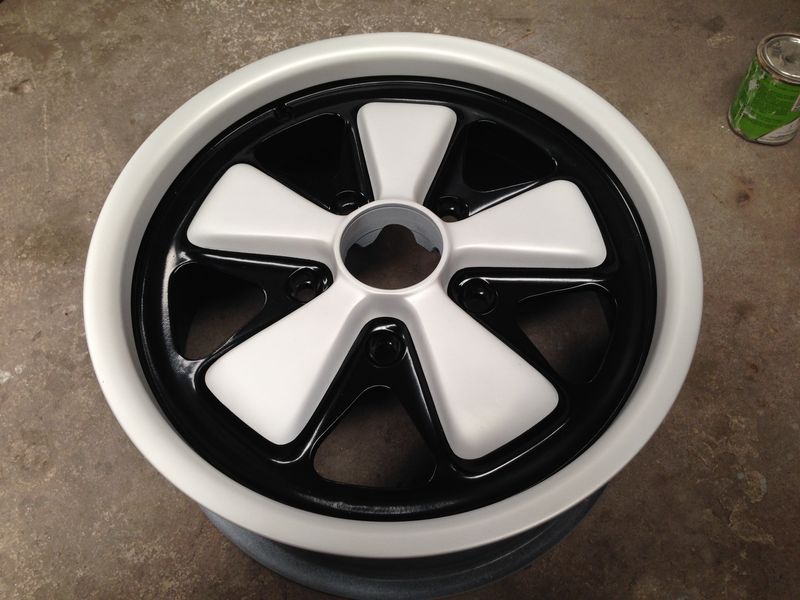
After I sandblasted my fuchs, I painted them with a pearl white mixed with a drop of black and then clear-coated it using a full mat coat so to protect the paint and end up with an easy-cleaning wheels.
|
||
|
11-27-2013, 07:20 AM
|
|
|
Registered User
|
An anodizing shop can do a two step process to get the RSR finish. Many are reluctant to do it though. Each shop will have their own solutions and application specific details. It's best to provide an actual example and photos at the very least. After you or a stripping shop strips, preps and polishes the wheel, the anodizer can apply a clear process to the entire wheel for a base protective layer. Many DIY will do all the polishing but not do the anodizing leaving their wheels unprotected. Not good.
This first dip is the final look of the outer rim edges. It is not mirror or chrome looking and should not be. It will be slightly duller than the polished bare wheel. Next tape off this outer-edge to the first radius to keep the clear polished look to the outside edge. Then re-dip (second step) in a more diluted acid solution from the first dip with higher current. This will affect all un-taped/un-masked arears of the wheel to get the frosted or duller or satin look to the inner rim. The petals and centers can now be painted. A satin black is my preference and gives you a Fuchs factory look.
__________________
Rohrer Wheels & Restortation Code:
Fuchs Restoration 911M491@comcast.net |
||
|
11-28-2013, 08:50 AM
|
|
|
Porsche Nut
|
Rohrer, thanks for the great information. So to clarify.
1. Strip wheel and polish the outer lip. 2. First dip to set the outer lip finish. 3. Tape off outer lip to protect finish. 4. Second dip in more diluted acid solution. (Thus is confusing, seems like u would use more acid than first dip to cause dull a dull finish) Sure the anodizer will understand this. 5. Tape off petals and paint satin black background. |
||
|
11-28-2013, 09:59 AM
|
|
|
Registered
Join Date: Feb 2004
Location: UK
Posts: 2,230
|
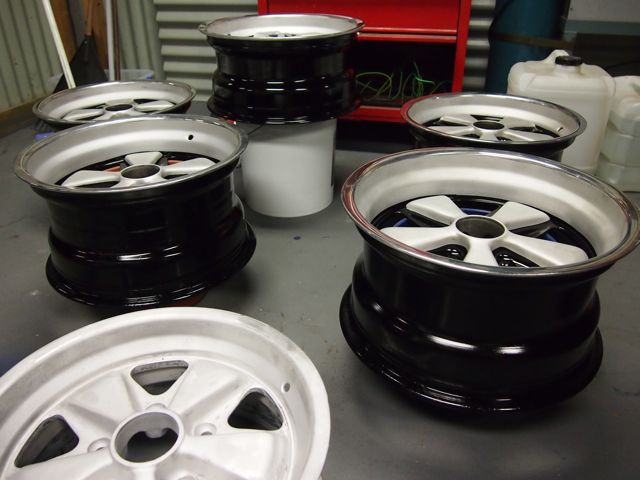
 Bead Blasted and painted as they have been converted to 17" by welding and trying to anodise them revealed the welds. |
||
|
11-28-2013, 10:30 AM
|
|
|
Porsche Nut
|
Chris those look great. I have also seen repair spots on wheels that looked different from the surrounding metal after anodization. I guess once the metal structure changes it won't anodize all the same.
|
||
|
11-28-2013, 10:44 AM
|
|
|
Registered
Join Date: Jul 2000
Location: So. Calif.
Posts: 19,910
|
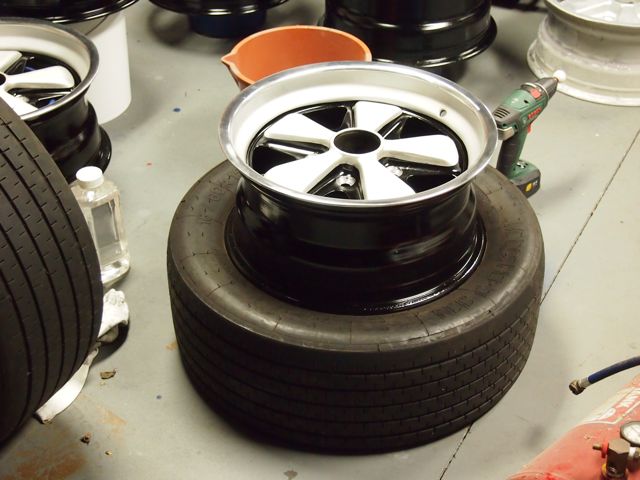
These are 17" Fuchs modified by Lindsey Racing.
Before. Some prefer the fully polished look:  After refinishing by Al Reed Polishing to RSR-look:  The bead blast pressure will vary the end result. Lower pressure (approx. 30 psi) produces a smoother, lighter tone finish. These were shot at approx. 40-50 psi. Glass bead size/shape unknown. Their process, at least for these wheels: 1. Polish 2. Anodize the complete wheel 3. Mask selected area, then bead blast. The outer edge remained polished - hard to see in the above photo 4. Mask and Paint background Notice the sequential steps they employ. They explained that in their experience, anodizing bead-blasted surfaces (reverse steps 2 and 3) can leave a blotchy appearance, probably a greater chance with custom-welded wheels. Not sure if any of the thin anodizing surface remains in these blast-treated areas. Just to be sure (or anal), I'm now looking at protecting all surfaces with a clear, low-gloss, ceramic coating which is impervious to acids, solvents, brake fluid, etc. (product-dependent). In the meantime, the wheels receive a thin coat of petroleum jelly (Vaseline). Al Reed also recommends more frequent scheduled maintenance with bead blasted wheels to reduce brake dust from attaching itself to the finish. Sherwood |
||
|
11-28-2013, 11:59 AM
|
|

|
|
Registered User
|
Hi Mark
The steps you are reviewing below are correct. See my notes. And yes your anodizer or their tech should know about the step 4 process. You want a greater build up or growth of oxidation from the electolytic solution and higher voltage for a thicker coating for the stain finish. Aluminum anodizing is done in an acid solution which slowly disovles aluminum oxide The acid action with the oxidation rate will help form the coating. Let me know if you discover something to the contrary. 1. Strip wheel and polish the outer lip. Polish only where you want the shiney finish. 2. First dip to set the outer lip finish. First dip is a Clear anodized finish. 3. Tape off outer lip to protect finish. 4. Second dip in more diluted acid solution. (Thus is confusing, seems like u would use more acid than first dip to cause dull a dull finish) Sure the anodizer will understand this. See my notes. 5. Tape off petals and paint satin black background.
__________________
Rohrer Wheels & Restortation Code:
Fuchs Restoration 911M491@comcast.net |
||
|
11-28-2013, 12:15 PM
|
|
|
Tony
Join Date: Sep 2007
Location: Cincinnati, OH
Posts: 1,149
|
Can anyone provide a good method/template/measurements for taping off the wheel to create the junctions between the silver and black on the petals? To me this seems the hardest part - to get it straight and uniform. I thought the beauty of the "flood with paint in each pedal" method was not having to worry about this. But I guess that only works with 15x6s according to some on this board. Thanks.
__________________
Tony 22 GT4 04 E46 M3 87 Carrera (sold - craving aircooled again) 12 991 Carrera (sold) |
||
|
04-25-2014, 09:26 AM
|
|
|
Tony
Join Date: Sep 2007
Location: Cincinnati, OH
Posts: 1,149
|
Also what is the color difference between the silver wheels in the picture below and the RSR finish talked about in this thread? They seem close but ... not sure if the picture below is stock for that year ~1974.

__________________
Tony 22 GT4 04 E46 M3 87 Carrera (sold - craving aircooled again) 12 991 Carrera (sold) |
||
|
04-25-2014, 09:41 AM
|
|
|
Rescuer of old cars
|
I've never seen any documentation for the trim paint. Not surprising for the 16" wheels, as they were never offered in other than painted centers.
I just ad-libbed it on mine. Really not that difficult as long as you use a flexible tape to mask off the petals. Many here have used black vinyl electrical tape, but I found that the electrical tape can tend to leave a bit of adhesive on the wheel, as well as being a bit harder to get smooth curves due to the width of the tape. I used 3M Automotive Trimline masking tape, a dark blue vinyl tape designed for sharp edged masking. I found the ⅜" width easier to work with than the electrical tape, and comes off cleaner. Using it I found it relatively easy to get nice straight lines. I used normal blue and/or green masking tape on the larger areas of the wheels. If you want to bring your wheels to Oregon, I'd be happy to assist.   Quote:
I had mine done in clear. 
__________________
2018 718 Cayman 2.0 Priors - '72 911T coupe, '84 911 Carrera coupe, '84 944, '73 914 2.0 Last edited by Arne2; 04-25-2014 at 07:09 PM.. |
||
|
04-25-2014, 09:51 AM
|
|
|
Registered
Join Date: Mar 2008
Location: Pittsburgh, PA
Posts: 2,587
|
Quote:
Restore Fuchs Wheels DIY | Featured Cars | The Motoring Journal Shoot, just saw that you already noted the pouring method. I don't see why it wouldn't work on any other wheel. With the 7" and wider wheels, I'd think it would be a little easier because you have a very defined line to pour the paint to. Just pour really, really slow so you don't go past your line. Also, the gentlemen/designer from Bugatti used soap water to mark his line. That way if he messed up, he just washed it off. He marked his line with the soap and then taped them. Last edited by will hung; 04-25-2014 at 10:53 AM.. |
||
|
04-25-2014, 10:51 AM
|
|
|
Registered
Join Date: Mar 2008
Location: Pittsburgh, PA
Posts: 2,587
|
|||
|
04-25-2014, 10:54 AM
|
|
|
Rescuer of old cars
|
The problem with the pour method for 16" wheels is that the spoke petals sit much higher than the paint line for the lip. If you pour paint to the normal paint line, the paint doesn't extend far enough up the sides of the petals. If you pour enough to make the petals look right, you are covering a lot more of the lip than is normal. In fact, on the 16x6 wheels the paint line is recessed below the spoke recesses, the entire flat part of the lip would be painted. Would make for a huge black border.
__________________
2018 718 Cayman 2.0 Priors - '72 911T coupe, '84 911 Carrera coupe, '84 944, '73 914 2.0 Last edited by Arne2; 04-25-2014 at 12:13 PM.. |
||
|
04-25-2014, 12:11 PM
|
|
|
Registered
Join Date: Mar 2008
Location: Pittsburgh, PA
Posts: 2,587
|
That stinks. The factory method was to dip them, so me, they line around the recess of the rim should line up with the line on the pedals. I wasn't aware that they didn't line up on a 16" wheel.
All the more reason to use the soup water method to get a nice even line to tape your line. |
||
|
04-25-2014, 02:12 PM
|
|


 2006 Ducati 999
 1981 Porsche SC
 1997 BMW M3
 1975 Porsche 911
 912
912 FJ45LV
 SL
SL 911S
911S


 1988 Porsche Carrera Cabriolet
 1971 PORSCHE 911T Super Sleeper RSR 3.8 50mm PMOs
 1973 911 T RSR 3.8 VRAM
 1980 Porsche SC 3.8 ITB-EFI 415HP, IROC MONSTER
 '84 Carrera Coupe (Sold)
 The Yellow One (Sold)
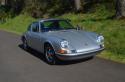 The one I wanted for decades (Sold)
 Cayman
