|
|
|
|
|
| Author |
|
|
Registered User
Join Date: Jul 2013
Posts: 63
|
Fantastic thread!!! Thanks for posting your journey. Looking forward to future looks at the saga!
 
__________________
Jake 1973 Tangerine 911S 1967 Corvette Roadster - Triple Black |
||
 08-09-2013, 08:33 PM
|
|
|
Registered
|
Glamour Pics
Just realised, all anybody had seen of the car is the grubby underneath so here are some glamour shots on location
   
|
||
|
08-10-2013, 05:50 AM
|
|
|
Banned but not out, yet..
|
Great write-up and quite an entertaining read. Very well done.
|
||
|
08-10-2013, 08:40 AM
|
|
|
Registered
|
Quote:
Quote:
I'm glad your enjoying my journey too, its the least I could do as i've gained so much knowledge and entertainment from this (International) community in the last year or so. I hope by sharing my experiences they may be useful to somebody tackling a similar job or even like i was a few months ago, waiting, looking, learning and I suppose deciding what 911 was right for me. Cheers Last edited by Caledonian; 08-10-2013 at 02:24 PM.. |
||
|
08-10-2013, 02:14 PM
|
|
|
Registered User
|
Fantastic thread, and nearly identical story. I turn 50 next week, and early this year finally had the resources to realize my 911 dream. My wife, like yours, was very supportive and encouraging. A few months back I found a Guards Red '79 SC with 88,000 km (RoW spec, sun-roof delete) that had been driven very little over the past three years. I knew it had issues when I bought it and trailered it home, and was expecting to find several more due to the lack of use. The synchro's absolutely needed to be replaced which is why I didn't get the pleasure of driving it home; and like you, turns out the PO wasn't exactly honest or forthright. With that said though he also didn't know what he had, and while the car came with a few obvious modifications like Recaro seats, Momo steering wheel, roll bar, Cup wheels (although I could do without those), the not so obvious were 993 brakes all around, SSI headers, and Carrera chain tensioners. After having the transmission rebuilt I've been able to enjoy the car intermittently. First the coil failed, then the alternator almost a month later.
I enjoyed reading through this thread since I either am currently, or soon will, experience some of the same issues; like replacing the engine and trans mounts since I have to get at an oil leak on the top/back of the engine... and the mounts are toast. But I think I've enjoyed reading this more so because our stories are nearly identical (as well as several others looking at some of the responses). It almost instantly took away some of the stress/edge, and buyers remorse I've been feeling knowing there others who are in the same boat I am, and they're all working through it. Keep it coming! Keith |
||
|
08-10-2013, 03:45 PM
|
|
|
Registered
|
G'Day Keith and thank you for your comments.
I wanted a red one so I'm a wee bit jealous  in saying that I get many comments on how good it looks in white..... probably the best colour for the Queensland climate too. in saying that I get many comments on how good it looks in white..... probably the best colour for the Queensland climate too.Hope to hear and see your story one day. Cheers |
||
|
08-11-2013, 05:10 AM
|
|

|
|
Registered
|
shift improvements - update
Theres a lesson to be learned here, when you see somthing that needs fixed, fix it
 While out for a drive at the weekend, something in the gear lever went click and the lever went all floppy  gear selection was still possible but scary has you were never quite sure what gear you were going into. gear selection was still possible but scary has you were never quite sure what gear you were going into.I suspected the shifter block (i think thats it name ) had broken fully, i was kicking myself as i knew i should have fixed it when i first noticed it.... On removing the gear lever my suspicions were correct:   I found the broken bit and the shims (well just washers really ) in the bottom of the tunnel. This part is apparently no longer available so i'll have to repair this one or make a new one.   Looks like fatigue possibly caused the failure, maybe not shimmed correctly and too much vibration? I'd like to hear if anybody else has had the same problem.   To be continued..... |
||
|
08-13-2013, 11:35 PM
|
|
|
Registered
|
LED Dash Light upgrade
After welding the shifter block up (very neatly but forgot to take pics) i took my time cleaning,adjusting and greasing all the contact parts so it was tight but not giving any resistance. The PO told me this was a Short Shift kit which it appears to be but i'm not sure if its factory or aftermarket. It was quite simple to take apart and put back together, and once i put the assembly back in the car was time for a test drive. While i had driven other 911's in the past it was only for a short run and a long time ago, more recently i test drove 3 of the ones i looked at before buying this one. So it fair to say i'm no expert on how a 915 gearbox should feel, but i think my perseverance to try and improve my "Shifting Experience" indicates i knew mine could be better. Well it certainly was, no wobble in the gear lever at all, and the annoying rattle from the stick in 4th was gone, I reckon this was certainly due to the broken shifter block.
Out on the road the improvement was immediately noticeable, while it had not become as super slick as a modern car it felt like what you would expect from a sports car. There is a little balky feeling going into 1st and 2nd, while 3rd occasionally and a very slight.... not sure what to call it? Hmm.. if a crunch on the scale of 10 was a 10 then this would be a 1 and only sometimes . I've read a lot about the the various techniques on how to shift a 915 gearbox and have tried most of them, i would have to say it does make a difference when you slightly pause in neutral from 1st to 2nd and 3rd to 4th. Also slightly lifting off and back on the clutch pedal in the neutral zone make for a smooth shift too. I think thats what they call "Double declutching". I did mean to re-check and adjust the shifter coupling now that everything related has been replaced or adjusted correctly. I now see how critical it is that all the related gear shift components are in good order and correctly adjusted. Very happy with the end result and very satisfying So after all that work it was time to treat myself to an interior lighting improvement. Although this was one of the things on the to do list it was pretty far down as i wanted to spend my limited money and time making the car reliable and enjoyable to drive. The 1/2 candle power dash lights had been annoying me since i got the car, not that i drive at night a lot but when i do it would be nice to see the speedo. I'm not going to go into too much detail here as pretty all there is to say about this subject has been said I reckon. So a few comments and some pics and hopefully you can make an informed decision. Oh I should mention I got my LED's from a chap on here called Etarga huge thread (see below) on the subject including the LED's he sells and mostly positive! http://forums.pelicanparts.com/porsche-911-technical-forum/644374-ultimate-led-ba7s-bulbs-gauges-ala-etarga-pic-vid.html#post6424675 So this is the 1/2 candle power original bulbs (or Globes for our US friends).  Removing the steering wheel makes access really easy:  Once you get one gauge out the rest are easy to get out:  Fuel/oil guage with new LED next to Tacho with the candle and then Tacho with new LED next to Speedo with candle:   This one is with everything back together and the camera at the distance your head would be when sitting in the car, only side light (park Lights) on, at night with the garage lights out.  There are 10 LED's in the packet, 8 white, 1 blue for high beam indicator on the tacho and 1 green for the side/park light indicator on the speedo. These were not cheap compared to others you see around the web although they did seem to have mixed reviews, i suppose some of that depends on what their expectations were. Took about 30 min to fit but be prepared for a gauge or two that is a little stuck and don't force them. In short i'm happy with them, not as bright as i expected but I suppose only time will tell if they are really value for money. To be continued..... Last edited by Caledonian; 12-25-2013 at 01:22 AM.. |
||
|
08-22-2013, 04:01 AM
|
|
|
What the ?

|
Great write up, nice car too.
__________________
SCWDP 73 1980 SC Harley Davidson Road King 9/11/01 FDNY/343 Never Forget! |
||
|
08-22-2013, 10:47 AM
|
|
|
Registered
|
Rear Lamp Seal Replacment
Thanks gLewis80sc, and good to hear.
When the car was dismantled and waiting for some parts I tackled one of the jobs I was going to leave until later, mainly because I wanted to do all bodywork and related tasks at one time. Also, I have a body repair background, so i know it's always going to worse than what it looks! The taillamp seals are a common job that is required on the 911, actually it probably would be on any car of this age. I had noticed when when i first washed the car the seals were shot so I added them to my first parts order.While the parts from our host are generally competitively priced the postage cost to the other side of the world impacts that initial saving. So when doing an order to our host I try to maximise it by including a few parts from further down the "To Do" list, while it can hurt the budget at the time It should balance out in the long term. I started with the RHR one, mainly because i was standing next to it when i decided to do the job. Also one of the lens retaining screws was missing as the threads has been stripped on the lamp body, I found these thread repair inserts at the local independent auto parts store, should have taken a pic of it before i put it in but i forgot. It's bit tricky drilling out the old hole as there was no room for error and alloy can catch when drilling it. Anyway all went well and it did a great job. Thread insert fitted:  The seal was cracked and rock hard and generally useless:  The screws that hold the lamp body to the car were seized solid even though i'd been soaking them with WD for a while, experience told me to drill the heads off if i was going to save the captive nut spire clips:  There was a lot of crud in there and obviously the lamp had not been removed lately:  Removing the lamp rear cover to remove the wiring was not as easy as it should have been, WD and some gentle heat eventually persuaded the screws to move. The cover still had the original caulking as a moisture seal, this was now dried out and useless and as it was Sunday i was not getting any new stuff today.  After quite a bit of cleaning the lamp came up quite nicely and was in very good condition.   The new seal fitted well but you do need to take your time and glue it on.  I came up with the idea of using some windscreen washer hose to make a seal for the rear lamp cover. By slitting it down its length it kind of clipped on to the lamp body and stayed on fine, a bit of jiggling is required to get the cover to sit just right bit i was quite happy with the result.  
Last edited by Caledonian; 08-24-2013 at 03:54 PM.. |
||
|
08-24-2013, 05:00 AM
|
|
|
Registered
|
 Some new screws were required and it all went together nicely, and while it was quite a simple job it did take a fair bit of time to do the job and more than half the time was cleaning. URL=http://s259.photobucket.com/user/mikechev/media/Porsche%20911%20SC/Tail%20Lamp%20Seal/file-11.jpg.html] 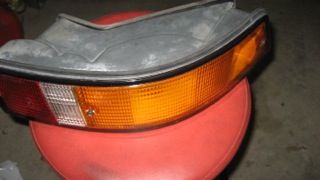 [/URL] [/URL]I've still got the LH one to do but that will be easier now I've done one. To be continued...... Last edited by Caledonian; 08-24-2013 at 03:55 PM.. |
||
|
08-24-2013, 05:01 AM
|
|
|
Registered
|
Handbrake Cables and Brake lines
Well its been a wee while between drinks as they say
A new job has impacted both fettling and forum time quite a bit, hence no recent updates. I have actually been driving and enjoying the car, and i'm still smiling Finished off replacing the handbrake cables (from our host) a bit fiddly to fit and adjust correctly, but at least the handbrake lever is now not pointing to the roof when applied. Also took the time to sand an paint the very scruffy handbrake lever while it was out, the little things like that do smarten up the car.  While i'd had the car up on stands my new "Hel" Braided Brake Lines arrived, not a big job and going by the condition of one of the rear brake lines it was a good job i didn't leave it too long .     While I'd have to say I did not think there was anything wrong before, the difference was well worth it. The pedal is far more stiffer and has a better feel. To be continued... |
||
|
11-06-2013, 01:50 AM
|
|

|
|
Registered
|
Auto Heat more questions than answers!
As its coming into summer here in Queensland I thought I take a look at why my Auto Heat stopped working. Bit of a back story first, when driving the car back to Brisbane after the purchase it was getting a bit cold so i yanked on the red lever next to the park brake hoping for some warmth... something went snap and the lever would not stay up? DOH! just realised what I did was probably not good @#$$#^%^%$.
Anyway as this was not high on the "Things to fix list" i left it and got on with all the other stuff. Now before i tackled the problem I got on here and... well theres a lot of posts on this subject and it was all a bit too high level for my skill set. So I started with the basics. 1. Did the rear engine blower work? - yes but it seemed to be on or off and full blast was on. 2. Could i hear the motor in the Auto heat unit when i turned the control knob - Yes! 3. When i took the inspection cover off was the rod disconnected - Yes. This is simple I though, just pop the rod back on and Roberts your fathers brother as the say.... well the rod was not going back on via the inspection hole in the side so i undid the 4 screws that hold the AutoHeat console/unit to the car, popped the rod back on, turned the knob to test and.........well that was the last time it showed any life? the motor went to fully closed or open (can't remember now) the fan would not work (unless I connected the 2 yellow wires together) strange i thought... must have blown a fuse..... nope fuses ok and power coming to the unit? It was at this point my electrical knowledge ran out, so as many other before me have probably done, i put it back together and added it to the bottom of the "Things to Fix List". There are quite a few things well before this but as I had to take the unit off to access the handbrake cables, i thought I would have a wee look see....nothing miraculous had happened and my elecrical knowledge has not increased, so i didi the next best thing... took it apart and took loads of pic to post here and somebody will just give me the answer Seriously, I did notice something on the circuit board that maybe a clue to the fault. one of the little transistor thingys (if it's not a transistor it ok to tell me) looked a bit frazzled? Could the be the problem? please have a look and any suggestions or offers to fly to Australia (or drive to Brisbane if you are already here) and fix it for me would be welcomed Here is the pics:    This what i think it should look like?      Honestly, any suggestions welcome... To be continued.... Last edited by Caledonian; 11-10-2013 at 01:50 AM.. |
||
|
11-10-2013, 01:43 AM
|
|
|
Registered
|
I'd say whatever that thing is.....it's definitely cooked.
My cure for my auto heat was to leave the rod off and manually raise the red lever. If I want the fan to run I turn the knob to any position ( servo motor goes full open) and the blower comes on. I'm sure someone here can tell you what that part is.
__________________
Pete 79 911SC RoW "Tornadoes come out of frikkin nowhere. One minute everything is all sunshine and puppies the next thing you know you've got flying cows".- Stomachmonkey |
||
|
11-10-2013, 04:36 AM
|
|
|
Registered
|
G'day Pete, I would be happy with your situation but I can't even get the fan to work from the control knob.
|
||
|
11-10-2013, 05:08 AM
|
|
|
non-whiner

Join Date: Aug 2012
Location: Slightly right of center
Posts: 5,235
|
That is a capacitor and it is cooked. Should be easy to find at a local electronic supply shop. Take the board with you so they can see the good one. Looks like 100 micro-farad electrolytic. Don't worry if the new one looks different (solid silver case).
__________________
"Too much is just enough." |
||
|
11-10-2013, 06:18 AM
|
|
|
Registered
|
Thank you mreid, any ideas what could have caused it to get cooked?
|
||
|
11-10-2013, 11:32 PM
|
|
|
Registered User
Join Date: Nov 2013
Location: North of France
Posts: 76
|
Hi Caledonian !
First of all sorry to no have read all the post but just the first message took me a quarter of an hour to be understood I read your second post too and after I just watched pictures  Such a good trip of 1000km I suppose you had ! Buy a Porsche is something but bring it for a long trip is an other thing wich is unforgettable, I hope one day will be me Well in fact this isn't my favorite 911 but combo white war, black interior and black wheels is very pretty. Apparently you have some work on it but you are good and the job down seems to be "Deutsch Qualität" ahah Continue like that and I'll try to understand as well as I xan the other post
__________________
I'm French and here to share around a passion but to learn English too so excuse my faults and never hesitate to correct me ! |
||
|
11-11-2013, 01:52 AM
|
|
|
Registered User
|
Not mreid, but capacitors, especially old ones in a dodgy location in our cars just fail. My LG flat screen (not even 7 years old) has had several fail and after my initial, omg. Pulled it apart got correct capacitors. (Generally under $5 for a whole bunch of sizes) and removed old ones. Re soldered the new ones. Was unnerved until I realized I couldn't break it worse than it was!
|
||
|
11-11-2013, 06:12 AM
|
|
|
Registered
|
Thank you for the responses, i now have the confidence to go out and find the correct capacitor and solder it in. I'll post the results, good, bad or indifferent.
And for aymeric59 Merci pour les réponses, j'ai maintenant la confiance nécessaire pour aller chercher le condensateur et le souder po je posterai les résultats, bons, mauvais ou indifférent correct. Caledonian is somebody from Écosse To be continued .... |
||
|
11-13-2013, 01:35 AM
|
|


 1978 Porsche 911 SC
 Igor
Igor Estrous Express
 The Green Piggy
 1979 Porsche 911
 1979 Porsche 911SC
 Delilah
