|
|
|
|
|
| Author |
|
|
Registered
|
WEVO Joins the Luftgekühlt Rally Car Build #LUFTAUTO
WEVO is well known within the Porsche enthusiast world for their quality in design and final product. In fact, Windrush has over 100 products, all designed and developed at their California headquarters. We're proud to introduce WEVO as a partner in this special project.
As we've set the Rally car theme, it's important to utilize componentry that can stand the rigors of virtually any condition. The Rally car will most likely get pushed to the limit - maybe even get some air time - so WEVO engine and transmission mounts immediately come to mind as a must. We'll start with the trans mounts, which many of you know mount to the trans beam which is out of the car making it easier to see. For the Rally car, we chose WEVO's Semi-Solid Engine and Transmission mounts with black pillows. Note that you can swap black to blue pillows or even mix in any combination. Here's an exploded view of the components: And a unit fully assembled (not shown are the serrated and larger washers included with each mount): The team at E-Motion Engineering put their attention towards the old tired mounts and off they came: Installation is very straight forward, mounting from the underside of the beam: We torqued each of the four M8 bolts to 18 ft.lbs. Although not quite ready to mount the assembly now, the two M12 through bolts will be torqued to 40 ft.lbs. We have plenty of WEVO parts to cover coming-up! Engine mounts, Precision Shift Joint and Classic Shifter with a nice Rally-inspired design touch to the knob. You can find further WEVO transmission mount information in our catalog HERE. Are you attending Luft? We hope to see you there and discuss any aspects of the Rally car among the ultimate air-cooled atmosphere at Modernica. 
|
||
 03-30-2016, 03:28 PM
|
|
|
Constitutional Liberal
Join Date: Apr 2004
Location: Seasonal locations
Posts: 14,787
|
Watching with interest.
__________________
Jim Rhetoric is no substitute for reality. ― Thomas Sowell |
||
|
03-31-2016, 10:40 AM
|
|
|
Registered
|
Super cool build
__________________
Current Project - http://forums.pelicanparts.com/paint-bodywork-discussion-forum/860107-mid-year-humane-society-76-re-fresh-4.html PCA Member, Early S Reg member, 356 Reg member. Instagram Jason Morski Current Rides: 76 911s 3.4 white/lobster hot rod, 2000 Boxster S Lapis Blue, 2005 Carrera S Riviera blue/pccb's, 13 Cayenne S, 2018 GT3 Lava Orange |
||
|
03-31-2016, 12:00 PM
|
|
|
Registered
|
Fantastic, thanks for sharing. Francisco
|
||
|
04-01-2016, 12:14 AM
|
|
|
Pelican Parts Vendor

|
So proud to be part of this awesome build. Can't wait to meet everyone involved this weekend

__________________
Paul Eddleston BRAID Wheels USA Team Illuminata Motorsport |
||
|
04-05-2016, 04:16 PM
|
|
|
Registered
|
WEVO Engine Mounts - Installation
As a follow-up to the installation of WEVO's transmission mounts (black pillows), the old and tired engine mounts had served their purpose. In their place we'll install a set of WEVO's Semi-Solid Engine Mounts, again with black pillows.
Out with the old and hardware:    And in with the attractive SS Engine Mounts:    The SS Mounts are perfect for this application as the black elastomeric pillows will firmly locate the engine without the annoying vibration of a metal to metal mount. They'll be able to easily handle repeated hard driving but also be pleasant on city streets. With the engine installed and with new hardware:  Again, it's important to note that the two smaller M8 bolts (per mount) are tightened to 18 ft/lbs while the single M12 bolt is tightened to 40 ft/lbs. In the image below, also note the location of the serrated washer under the M12 bolt head:  All buttoned-up and ready to rock!  The #LUFTAUTO is full of awesome detail work - much more to come! 
|
||
|
04-05-2016, 06:57 PM
|
|

|
|
Pelican Parts Vendor
|
I just love brand new rally tires
__________________
Paul Eddleston BRAID Wheels USA Team Illuminata Motorsport |
||
|
04-06-2016, 03:03 PM
|
|
|
Registered
|
It's all in the details - PMB restores #Luftauto's calipers
For this first-ever Luft build, emphasis was placed on keeping the car streetable vs. building an all-out gravel racer. So, with the suggestion by Pelican, the E-Motion team made the decision to forego a big brake application and stick with the dependable, tried and true stock calipers. Although this '85 was in great shape to begin with, the calipers were in need of a complete restoration so let's follow PMB Performance as they performed their magic on this set of calipers.
Here's a shot of the calipers as delivered to PMB - tagged and ready to be disassembled:  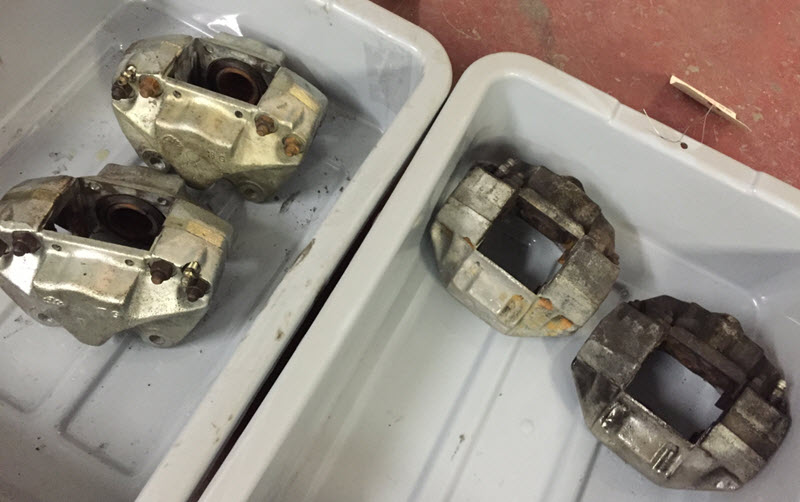 With a dental pick, the wire clips were carefully pried out and dust boots removed, bound for the trash can - not to be re-used of course. The pistons on the calipers moved freely to begin with so compressed air was used to gradually move the inboard piston out first while a C-clamp held the outboard piston in place. Compressed air was also used to free the outboard piston while padding the cavity.   PMB emphasizes that using the proper Ribe bits for the caliper fasteners is very important, especially for disassembly, as a Torx bit may damage the fastener. PMB removes the fasteners by hand not air, and always torquing the nut, not the Ribe fastener itself. For A-Calipers, an R6 bit is used on an M9 fastener. Now that the calipers are split, the bore seals are carefully removed, again with a dental pick and the entire body is carefully cleaned and inspected before plating. The caliper halves are finished with yellow zinc which is a clear zinc with a short yellow dichromate bath - short bath being 20-25 seconds in the yellow dichromate while the fasteners receive black zinc. The result is stunning and with the zinc finish, the caliper halves now have a new layer of protection!   Meanwhile, the pistons are cleaned using a vibratory polisher and a mild cleanser. But what about the bores? Should they be honed? The answer is, no, they should not as you want a nice coating of zinc on the bores to prevent build-up of rust. PMB uses original ATE Classic parts for re-assembly - just as they came from the factory originally.  The seals are replaced and with the bores lubricated, the pistons are properly set, then installed:  After the new dust boot clips are installed, it's time for the halves to be reassembled. The EPDM O-rings are set into their special grooves and the two halves can be fastened. There's a sequence for torquing (always at the nut) and two torque operations with the second being 29ft-lbs.  The pictures above are the actual set of calipers now re-installed on the rally car as you can see below:  So if you ever wondered what happens behind the scenes at PMB Performance, hopefully this gives you a good idea of the emphasis on the details! Although the rally car is up and running at this point, the calipers have been put to the test and are performing flawlessly. Pelican offers this outstanding restoration service by PMB for A, M, S and Turbo calipers here. More to come as we continue to highlight interesting build details of the Luftauto! |
||
|
04-13-2016, 09:04 AM
|
|
|
AirBorne!
Join Date: Sep 2004
Location: NE Ohio
Posts: 1,195
|
Congrats on a wicked build. Looking forward to more updates.
__________________
2008 997 C4S Silver, Kitty Cat, 1989 3.4 911 Silver Carrera, Erica, 1989 944S2 NASA GTS2, Iris, 1988 944 DE Car, Backdate 1975S to 1970s w 3.0 PMO - Roxanne, 1967 911 normal w 2.2s engine w S goodies, 89 VW Cabriolet - 2.0 conversion - sold and missed |
||
|
04-13-2016, 10:38 AM
|
|
|
Registered
|
Thanks JackMan! More to come....

|
||
|
04-18-2016, 11:54 AM
|
|
|
Registered
|
Making shift linkage action more precise
One of the areas that sees wear over time is the shift linkage coupler but you may not really notice the degradation in feel as you unconsciously adjust your gear shifting for the increase in slop. Most 911 owners who do this replacement are amazed at what they've been missing - the enjoyment of rowing through the gears with ease and exactness.
Remember, the Luft rally car is an '85 and although it is in great shape, the opportunity arose to focus attention on the coupler. Want to check your coupler for excessive wear? Simply access the inspection plate on top of the tunnel just behind the front seats. Typically, there are four Phillips head screws you'll need to remove , then simply remove the plate. Now gently move the shift lever forward and back by just a small amount and watch the coupler. The bushings are worn if you see movement at the center section of the coupler without the shift tube moving. The area you'll notice the excessive movement will be from the area highlighted by the red arrow:  The E-Motion team chose the stock Precision Shift Joint by WEVO for the Luft car. The PSJ is a gorgeous direct bolt-in replacement, feels solid as a rock and is built to endure any challenge. Here's a great shot of the PSJ (with billet clamp) next to the stock coupler and clamp:  The PSJ features the same OE style knurling on the stump end and can be used with the stock clamp or WEVO's stout billet clamp. The tired coupler was removed by unfastening the M8 conical set screw on the transmission side, then by unfastening the 13mm hardware on the shift lever side. The shift lever is then positioned in the second gear spot freeing the coupler and clamp.   Here's a great shot of the PSJ with the rubber boot removed showing the pre-lubed joint:  Installation is the same as removal but reversed. The billet clamp slides over the tube first, then the PSJ is fitted to each end, knurled end goes into the tube. Place the shift lever back to the first gear position and fasten the conical screw and clamp hardware.  You may need to slightly adjust after a test drive but once dialed-in, the unit is set for life. No need to remove the clamp end again. For example, if removing the transmission at some point, remove the conical set screw and not the billet clamp. This way, the positioning will be saved and no need to adjust again. You'll find WEVO's Precision Shift Joint in our catalog here and the billet clamp here. |
||
|
04-18-2016, 01:01 PM
|
|
|
Registered User
Join Date: Nov 2013
Location: Main Line, PA
Posts: 1,226
|
I'm loving this build!
__________________
1985 911 3.2 Carrera Coupe - Constant Project - 2550lbs 2005 E46 M3- Daily Beater - 3350lbs |
||
|
04-18-2016, 01:41 PM
|
|
|
Registered
|
Great build. Did you consider the racing psj?
David |
||
|
04-18-2016, 04:57 PM
|
|
|
Registered
|
The Racing Precision Shift Joint is a fine piece and the fact that it virtually eliminates any unintended adjustment is attractive but for this project we felt WEVO's billet clamp would do the job nicely.
|
||
|
04-22-2016, 01:53 PM
|
|
|
Registered
|
Love this shot showing the front suspension including the ERP adjustable arms and custom KWs.
 And spring plate pickup point:  Speaking of the rear, way back in the fabrication period, the rear bumper guard was test-fitted and as you can see, this isn't a simple bumper surface guard. The structure extends all the way back to the floor and eventually a skid plate was fastened. 
|
||
|
04-26-2016, 02:23 PM
|
|
|
Registered
|
8mm silicone Clewett plug wires for the #Luftauto
As we continue to take a closer look at some of the details that went into Luft's first-ever build project, focus turned to finishing up the engine and it was decided to forego the stock ignition wires for a set of performance wires by Clewett Engineering.
  The set for this 3.2 features 8mm wires with an abrasion, cut and fire resistant protective sleeve. The proprietary spec also includes a spiral core cable for longevity, noise suppression and reliability. So there's no worries of an ignition wire failure when the Luftauto is tearing through the remote back country. The Clewett set for the Luftauto was installed while the engine was out of the car and you can get a good idea of the protective sleeves for each wire in this shot: 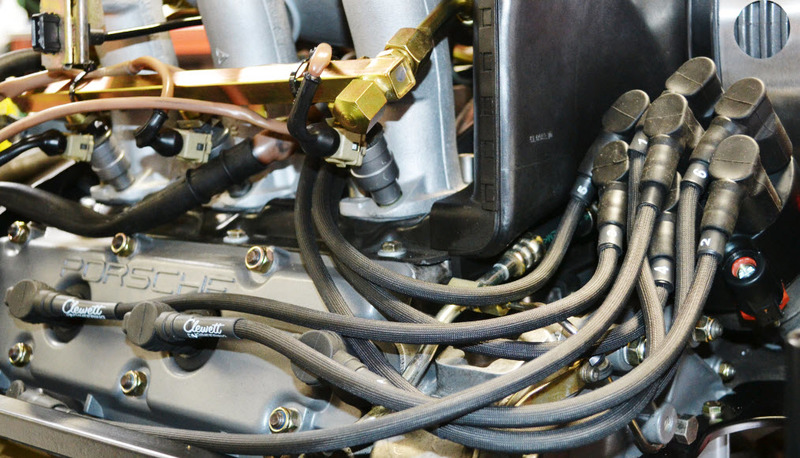 We did an install on an SC engine recently and there are a few features that make the process a breeze. The wires are numbered according to each cylinder so it makes it nearly impossible to mix them up. If you are just starting to DIY and do not know what the cylinder numbers are, begin by replacing one wire at a time starting with the longest wire first.  You can trace each wire individually from the distributor to the plug, freeing thew wire from connectors or mounts along the way. Hold the end of the connector (red arrow) and twist slightly to break the connection between the connector and spark plug, pulling carefully until the connector comes loose. Never pull on the wire to remove the connector or use pliers or any other tool to remove them.  The same holds true for removing them from the distributor cap; always grab the connector by the base and never pull by the wire or use some tool to try and remove them.  When installing the connector it is important that you feel and hear the click as the connector has fully engaged the spark plug. Due to the design of the 911 motor the plugs are recessed behind the valve covers and some can be difficult to get the connector on the end of the plug; Im talking to you number 6 cylinder! If this is the first time replacing the wires just take your time and you will get the feel for it. Once the connector is securely on the plug, slide the air seal down the connector (red arrow) to seal the wire to the valve cover surface.  Congratulations! You've just installed a high-quality, heavy duty spark plug wire set on your Porsche's engine. The Luft 3.2 turned out well!  The Luftauto may be jumping creek beds by now, but we're not done! Plenty to come so stay tuned. For more information on Clewett Plug Wires and applications, click below: '65-'73 911 '74-'89 911 incl Turbo 964 & 993 |
||
|
04-26-2016, 04:16 PM
|
|
|
Registered
|
VIDEO: Behind the Scenes of the Build
Here's a great short video of some of the behind the scenes action at E-Motion Engineering during the build period.
Stay tuned as we take a look at WEVO's Classic Shifter and the unique shift knob made just for the Luftauto. |
||
|
05-03-2016, 12:21 PM
|
|
|
Registered
|
#Luftauto is auctioned for a great cause
If you were present at Luft3, for the live auction of Luft's first-ever project build, it quickly became apparent that the gavel would fall on a very serious number and best of all, those proceeds would go to the Autumn Leaves Project in support of pancreatic cancer research.
We've taken different looks at the behind the scenes highlights along the way and will continue to do so but let's pause for a moment and look back at this incredible moment during the event. More to come! |
||
|
05-03-2016, 02:11 PM
|
|
|
Registered
|
WEVO's 915 Shifter - Classic Style for Luftauto
Over time, shift action in air-cooled 911s can become somewhat vague and sloppy. Although the Luftauto was in fantastic shape before the project build even started, its shift action was due for a tune-up. Knowing that this particular 911 would be driven hard over varying terrain, it was decided to utilize a precision shifter kit and the decision was made to go with the class leader, the Classic Shifter by WEVO for the 915 box.
 The kit sub-assembly includes a tubular lever assembly, OE ball socket, top plate assembly, K-nuts and shift tube bushing. We've included the shift knob crush sleeve in this photo (but not included in the kit) as you'll need a replacement sleeve in order to re-install your shift knob or utilize another OE-style knob. As you can see by the picture below, the finished install turned out really well highlighted by the custom shift knob manufactured as a one-off piece by Luft3 location host, Modernica. You'll also notice that the OE shifter base was painted while the OE boot was omitted to better match the overall theme and other hard surfaces such as the floor Rennline boards.  Most of the components will be replaced but the WEVO shifter does use the original housing, thread pin, cap bolt, roll pin and washer. The top plate sub-assembly comes complete with two K-nuts (red arrow). They come from WEVO attached to the top plate. The tensioning springs come preassembled (yellow arrows) and need no adjustment. The reverse lockout mechanism (blue arrow) is adjustable but you will not need to worry about this until later.  The pivot box, rod and ball socket bushing all come preassembled and lubricated and do not need any adjustments.  The key to removing the original stock shifter housing is to place the shift lever in 3rd gear before getting started. With the two 10mm bolts/washers and three 13mm bolts/washers (red arrows) removed, the shifter housing was removed from the tunnel.  With the shifter housing on the bench, disassembly begins. Can you believe the length of those springs? Pretty good amount of force there; we were careful when releasing the plate after removing the 10mm nuts. 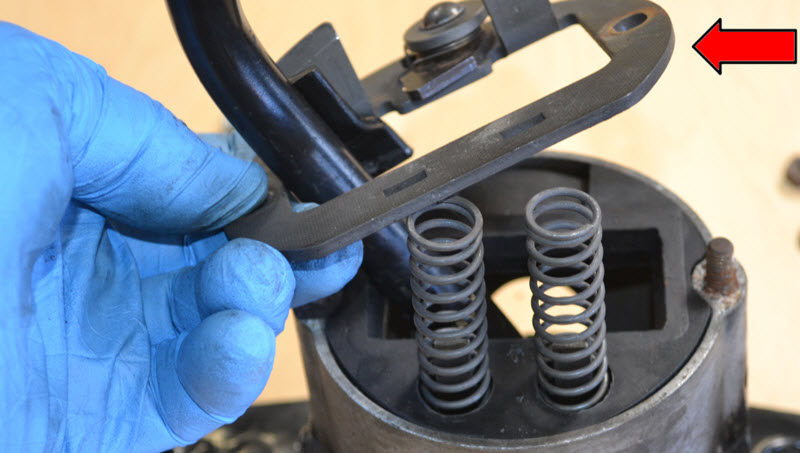 Further disassembly yields four items retained for reassembly:
 With WEVO's lever and top plate assemblies installed, the housing is complete.  Before the housing was installed into the tunnel, the L-shaped bracket that supports the shift tube needed to be removed in order to replace its bushing (included in the WEVO kit). With the bracket removed, you can see a comparison between the old bushing and new.  With the shifter base painted and Modernica one-off knob installed, the presentation was a real hit with Luft3 attendees. The Luftauto now shifts with crisp confidence-inspiring throws perfect for daily cruising or more aggressive canyon carving.  We'll have a DIY technical article published shortly that will detail each step for proper installation of the WEVO 915 Classic Shifter so stay tuned! You'll find the Classic Shifter as well as other popular WEVO shifter kits within our catalog here. |
||
|
05-10-2016, 03:26 PM
|
|
|
Registered

Join Date: Jan 2016
Posts: 185
|
Did you enjoy following along as we built this project car with our friends at Luftgekuhlt? If so, please help us support both Patrick Long and Luftgekuhlt by voting them one of the Best Car Shows in the US: Vote - Luftgekuhlt - Best Car Show Nominee: 2016 10Best Readers' Choice Travel Awards
Thanks for your help!  |
||
|
06-30-2016, 02:05 PM
|
|


 911.360.0601
 The 85

 1976 Porsche 911s White/Lobster
 2005 Porsche 997 Carrera S
 914-6
914-6 1991 Porsche 964 Carrera 4 Cabrio
 URQ
URQ A3
A3 RALIVAN
 Jeep
Jeep OBRS
OBRS
