|
|
|
|
|
| Author |
|
|
Registered
|
Quote:
John |
||
 06-14-2020, 07:50 AM
|
|
|
Registered
|
Hi All,
Have been mostly radio silent over the past week having annoyingly flared my gimpy back baling a friend out of a car accident problem. No good deed goes unpunished. Therefore I took a brief break from the garage and worked instead in the basement. A local friend has access to a surplus stock of LED bulbs used to refit fluorescent fixtures and donated a few more to my cause. These work with the standard "tombstone" connector, of which I had four remaining. Using absolutely the scrappiest of scrap plywood (from a crate I made 30 years ago to schlep a seized Alfa motor on at least four successive house moves) and zip ties (see my homage to zip ties in Discseven's Fuel Filter Console thread) I knocked-together two fixtures.  I then added an outlet onto the end of an existing lamp circuit in my basement ...  ... the purpose of which was to illuminate the work are for my newly acquired Singer 241-3 (1940 production) industrial sewing machine, to explore the next frontier: 924S seat upholstery.  The light these lamps yield is impressive. My means of holding them together may strike some as appallingly crapulent, but they're strong (enough), safe and were free. I enjoy fixing old things or assembling found/surplus items to create something of utility ... could happily play like that all day. John |
||
|
06-14-2020, 08:22 AM
|
|
|
Registered
|
You may recall that I've been working with Len Cummings on a set of fuel lines; they're now all installed. The hoses in the rear of the car have been set for a few weeks now but we've been working together for the right length of the engine compartment supply and return hoses. Yes, these are available quite reasonably from Rennbay, but Len will put anything together and make it look factory, so I was able to single source the system's needs through him.
 Next time Len will probably make these ca. 6" longer; these I've installed are neat and in a well-protected spot but might be a PIA with the motor in. Len supplied the correct/necessary metric compression fittings and I used a small K-D tube cutter to do the hose-ectomy.  Here's what was removed:  Speaking of -ectomies, in the rear of car I'd removed the tattered remnants of the fuel sock from the die-cast (German Purolator) tank outlet fitting; knowledgeable techs said that with a freshly overhauled tank and all new pump, filter and hoses, the sock would (should?) be superfluous. So ... I snipped it off. That said, the fitting snugs up to the tank outlet with an o-ring, and the original told me it had had enough, so a new one came from the dealer. 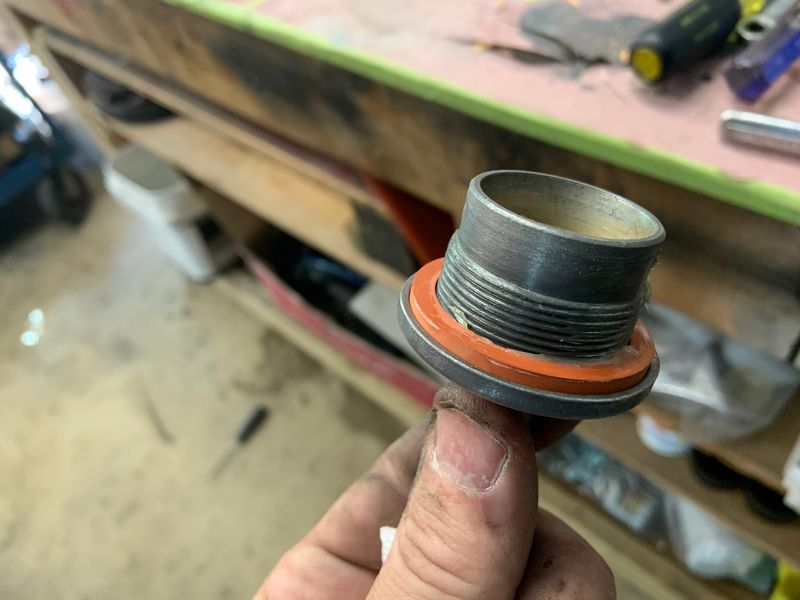  Here's the p/n if you need one yourself. Less than $8; I didn't want to gamble with something more generic.  Here's a wider view of the business end. Gas tank repaired by International Auto of West Hartford, Conn; fuel hoses by Les Cummings, fuel pump and rubber anti-vibration mounts from URO, while the fuel filter is a Hengst.  In other words, it takes a (global) village to keep a 33 year old German sports car alive and kicking ... not that I'm there yet, but that's the plan. Next: build-up the replacement engine, and/or (when the weather is oppressive) head into the coolness of the basement to work on learning to use that Singer (a complex bit of kit!) and start on my path towards recreating the upholstery. John |
||
|
06-14-2020, 09:09 AM
|
|
|
Patrick
|
Looks great! Replacing the entire fuel line system is on my to do list. Len supplied me with the pump to filter hose a few yrs ago.
__________________
1984 944 NA, constant tinkering 1983 "Beastie" - Safari Build |
||
|
06-14-2020, 12:00 PM
|
|
|
Tired Member

|
I'll be doing a similar "hose-ectomy" shortly. But since my motor is in now, I'll cut the lines a little further back, just before the turn up into the engine compartment. And since it is a track car, they will be stainless steel with heat sleeves.
__________________
Glenn Daily Driver - '78 911SC RoW Endurance Racer - '85.1 944 Street/Track Project - '86 951 Race Project - 944 Spec |
||
|
06-15-2020, 04:24 AM
|
|
|
Registered
|
Quote:
 Skal to that! Skal to that!Looking forward to Singer time John. ps---am profoundly lost looking at 924-44 pics. Enjoying this immensely! .
__________________
Karl ~~~ Current: '80 Silver Targa w /'85 3.2. 964 cams, SSI, Dansk 2 in 1 out muf, custom fuel feed with spin on filter Prior: '77 Copper 924. '73 Black 914. '74 White Carrera. '79 Silver, Black, Anthracite 930s. |
||
|
06-15-2020, 06:27 AM
|
|

|
|
Registered
|
Today I first installed the heater plenum/assembly. This has to be wriggled into place through the dash wiring/cabling, the two hoses and heater valve control cable threaded into their respective holes. Not too bad with a little self-enforced patience. I'd renewed various bits of foam stripping as needed and cleaned all the hoses. No photos ... rather boring.
Then, having first glued on the felt seal along the dash's leading edge (to prevent rubbing against the windshield; I used black 3M Weatherstrip Adhesive), I installed the dash ...  ... and the instrument panel, glove box lid and vents.  John |
||
|
06-19-2020, 06:18 PM
|
|
|
Registered
|
Nice!!! Dash work...Looks good!
|
||
|
06-20-2020, 08:49 AM
|
|
|
Registered
|
Quote:
.
__________________
Karl ~~~ Current: '80 Silver Targa w /'85 3.2. 964 cams, SSI, Dansk 2 in 1 out muf, custom fuel feed with spin on filter Prior: '77 Copper 924. '73 Black 914. '74 White Carrera. '79 Silver, Black, Anthracite 930s. |
||
|
06-21-2020, 06:39 AM
|
|
|
Registered
|
Karl, carpet strips (chartreuse shag) came with the machine, added by the beautiful, sophisticated and highly skilled lady who gifted me the machine, wife of the UCONN professor who risked me working on his 74 Alfa GTV back in 1986. She sewed my wife’s wedding dress. Most of my best friends have been made through the car world. BTW, that gallon jug is genuine sewing machine oil ... this machine has a sump and oil pump. It’s somewhere between a 1940’s Mercedes engine and a Patek Phillipe watch, with some Thomas Edison thrown in.
John Last edited by jjeffries; 06-21-2020 at 07:47 AM.. |
||
|
06-21-2020, 07:21 AM
|
|
|
Registered
Join Date: May 2008
Posts: 1,713
|
yup...some serious stuff going down...only serving to make my own slope even slipperier as the rabbit hole opens...
|
||
|
06-21-2020, 03:31 PM
|
|
|
Registered
Join Date: Jan 2018
Location: Eureka CA
Posts: 42
|
John,
I have uninstalled replacement fuel lines from Len for the engine compartment and they are 32inches long. I have been procrastinating as it looks to be an interesting job. Do you know if that is the same as you have? It looks like the join to the hard lines would be towards being more accessible from below the car with the motor in. You are fortunate to have the motor out for this! Dash looks awesome. Gordon |
||
|
06-27-2020, 09:03 AM
|
|

|
|
Registered
|
Hi Gordon, I will measure and get you results by tomorrow. BTW, post-facto, Len and I agreed that for an "engine-in" job, one would want the hoses made longer than those he did for my car ... BUT please note that Len made mine to my own measurements, taken with an empty engine bay.
Best, John |
||
|
06-27-2020, 12:37 PM
|
|
|
Registered
Join Date: May 2010
Location: Houston, Tx
Posts: 136
|
I have to say that color with the contrasting vents , speaker grill , and the blacked out gauge console loos sharp. Been considering painting the OEM brushed aluminum (plastic) myself.
Sent from my iPhone using Tapatalk |
||
|
06-27-2020, 08:57 PM
|
|
|
Registered
Join Date: Feb 2009
Location: Park Hills, KY
Posts: 2,459
|
empty engine bays make a lot of stuff easier.
__________________
Bob Cox 78 930 clone project car. 87 924S resurrect at some point. 84 928S, Ruby Red linen/brown interior - sold  86 944 turbo my new DE/track car - sold
|
||
|
06-28-2020, 06:48 AM
|
|
|
Registered
|
Quote:
I hope that helps; pls advise if further measurements required. John Last edited by jjeffries; 06-28-2020 at 11:56 AM.. |
||
|
06-28-2020, 08:10 AM
|
|
|
Registered
Join Date: Jan 2018
Location: Eureka CA
Posts: 42
|
John, thanks for checking the measurement. Ill contact Len and ask about changing the length to make the fit easier.
Best regards Gordon |
||
|
06-28-2020, 12:48 PM
|
|
|
Registered
|
I've been a little lazy re the 924S project for various familiar reasons.
I haven't yet ascertained why the original engine from the car is locked-up (I will at some point) but am proceeding with Plan A of transferring its external equipment to the engine I bought last September from HondaDustR aka Greg. I believe it is an 86 944 motor (Greg described this in his thread and F/S ad ... I need to look it up again); it doesn't have the spring loaded tensioner...  ...whereas my car's OG engine does (and I don't think this motor had ever been removed prior to me) ... 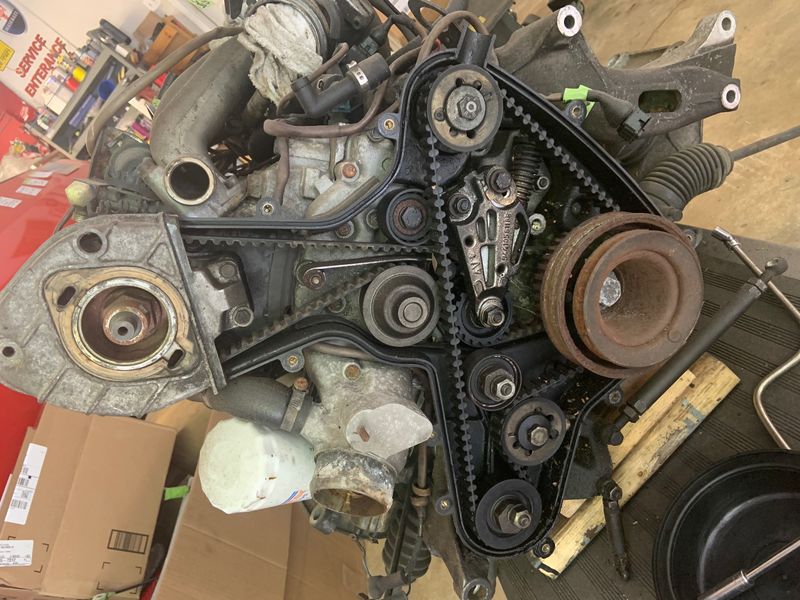 I remember that Greg said I'd need to get a matching timing belt cover because the two halves of the set he was using didn't match and therefore a couple of the screws didn't line up right. I will need to study the parts numbers. Today was hot and humid, so I took the opportunity to scrub down the replacement long-block ... we all like things to be clean. Not that it was filthy, far from it, but it's been a few years since Greg overhauled it so I used my now standard approach of mineral spirits, brush and Bounties on the few areas of oily dirt, then misted Purple Power and deployed my rather pathetic yet better-than-nothing HF air/siphon gun pulling from a bucket a mix of hot water and dish soap. The amount of liquid this thing can pull is minor but the overall lack of oomph is more a function of it running on 150psi of compressed air as opposed to ten times that, as you'd get from a real pressure washer. But this also makes it much safer to avoid water getting into the ports of the head and orifices in the block, which I'd plugged.  The next step was my dental-hygienist-inspired process, described when I cleaned the transaxle, using Fast Orange hand cleaner with these Nyalox abrasive brushes on an electric drill. This combination is pleasingly effective, the Fast Orange capitalizing on the brushes' own capabilities; a good method as long as you're not using it anywhere where the hand cleaner's abrasive could do harm; I was careful.  This was in turn all rinsed thoroughly, blasted with compressed air and toweled-off. It looks better in the flesh than these photos.  The goal is cleanliness; I won't get crazy detailing this engine to kingdom come ... very little in the way of painting anticipated.  Next I will install the new water pump and belt kit; the latter I bought a few months back and is from Continental with new rollers ... what everyone uses, I assume. There were no leaks present so I'm leaving the sleeves along, unless anyone convinces me otherwise. The water pump will be URO's new production version of the "late model" pump, now with an aluminum impeller, as opposed to iron, IIRC. Learning about how URO developed this part is what got me into a conversation with them about their product line in general. As I've stated elsewhere, I'm open-minded about using aftermarket parts on this car and I don't place stock in the "anything made in China is bad" ethos; from my work at an Asian OEM, I know better. I'll also be using their radiator hoses and will report here as to how everything fits and works. To their credit, the guys at URO (in California) solicit this kind of feedback. Kind wishes to all, John |
||
|
06-28-2020, 02:51 PM
|
|
|
Registered
|
The smoking gun ...
I still hadn't definitively figured what took this car off the road 12-13 years ago. Until now:
Snapped timing belt? No, all belts intact, but the motor won't turn. Primordial reversion of fuel system to ferrous oxides? It definitely would not have run now, but was this the root cause or just a symptom of sitting? This afternoon I started stripping the car's engine in order to remove, clean and/or replace its external parts so I can dress the HondaDustR long block I have waiting. To get the bell housing off I had to undo the clutch bolts - couldn't move the release bearing shaft; one of them had to be drilled (thank gawd for genuine RIGID drill bits .... one of those items where you most definitely want to Buy American!) That allowed the housing and clutch to come off into my be-gloved hands, revealing this:  That MUST be it. Its remaining chunks are wedged into the pressure plate. I know this is old hat to the real transaxle folks here, but .... wow. The last few yards must have been rough. John
__________________
82 911SC coupe |
||
|
07-02-2020, 05:04 PM
|
|
|
Schleprock
Join Date: Sep 2000
Location: Frankfort IL USA
Posts: 16,640
|
The infamous rubber damped clutch rears it’s head once again in another residency!!!!!
__________________
Kevin L '86 Carrera "Larry" |
||
|
07-02-2020, 05:23 PM
|
|


 1984 Porsche 944 NA
 2015 BMW 328i XDrive
 2019 MB C300 Coupe 4Matic
 The Beastie
 "The Porsche"
 Endurance Racer
 944 Spec "The green car"
 Scalded Cheetah?
 1974 Carrera
 1979 930
 1980 SC Targa
