|
|
|
|
|
| Author |
|
|
Registered
|
Neat option for real numbers on the oil temp gauge
Found these when I was looking into wiring up some of their gauges in another car. I've always wondered how hot "8:00" and "9:00" were...
New Vintage Gauges: Results for Porsche  
__________________
Ken 1986 930 2016 R1200RS |
||
 07-11-2012, 09:44 AM
|
|
|
Registered
Join Date: Nov 2007
Posts: 405
|
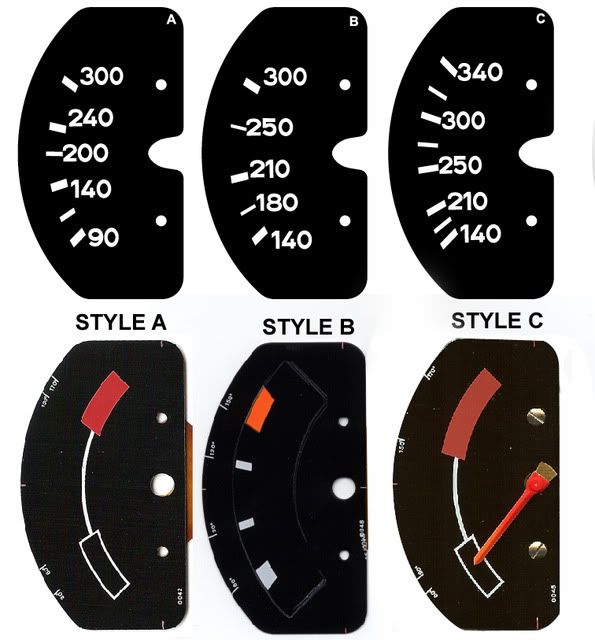
Given that 210 is in three different positions on the three faces, how do you decide which one is correct for the real number?
|
||
|
07-11-2012, 11:44 AM
|
|
|
Banned
Join Date: Nov 2007
Location: Rockwall, Texas
Posts: 8,559
|
|
||
|
07-11-2012, 12:31 PM
|
|
|
River Rat
Join Date: Dec 2005
Location: 1000 Islands NY
Posts: 404
|
Don't mean to pee in your soup, but these have been available for years ... Installed mine when Washington was president.

__________________
1986 930 - K27-7200, Andial Intercooler, Tial Wastegate, Electronic Boost Controller, B&B headers, Bodart Zork, Leask Adjustable WUR, Full Elephant Racing Suspension w/Adustable Spring Plates and Von Shocks, Wevo Transmission Mounts, Fuel Safe Fuel Cell, Forgelines (9"/11"), Hargett Shifter, Innovate AFR, Cobra CF Seats, DAS Rollbar, Coleman Floating Rotors, Lightweight Interior, Forgeline 17" x 9"/11", 2800 lbs. |
||
|
07-11-2012, 12:41 PM
|
|
|
Crotchety Old Bastard

|
If you look along the edge of the original gage overlay you can see the temps written in °C. A small flashlight and a bent neck and you can see them on your mounted gage.
__________________
RarlyL8 Motorsports / M&K Exhaust - 911/930 Exhaust Systems, Turbos, TiAL, CIS Mods/Rebuilds '78 911SC Widebody, 930 engine, 915 Tranny, K27, SC Cams, RL8 Headers & GT3 Muffler. 350whp @ 0.75bar Brian B. (256)536-9977 Service@MKExhaust Brian@RarlyL8 |
||
|
07-11-2012, 12:57 PM
|
|
|
Registered User
Join Date: Mar 2012
Location: NC
Posts: 1,236
|
Quote:
|
||
|
07-11-2012, 02:20 PM
|
|

|
|
Uncertifiable!!!
|
Is the gauge difficult to disassemble for installation?
|
||
|
07-12-2012, 04:00 AM
|
|
|
Registered
Join Date: Jul 2006
Location: S. Florida
Posts: 7,249
|
Not difficult, just takes patience and a short stiff knife blade to slowly work your way around prying up the folded over back edge of the bezel ring a little more than half way around. Then it can be removed along with the screws on the back to get the insides out.
Then blow out dust, put it back together and bend the back side of the bezel ring back over the case flange to hold it on. Then repaint any black paint scratched off the back of the bezel ring while prying. Done well you can't see the pry marks on the back of the bezel ring when it's back in rubber ring in the dashboard. You can also buy new bezel rings from NHS already painted satin black. You can use a factory 930 rear wheel spacer upright in your hand like a roller to smoothly bend the rear side of the new bezel ring over the case flange carefully and cleanly while the gauge is pressed face down with your other hand on a hard flat surface that doesn't scratch the painted ring. |
||
|
07-12-2012, 08:51 AM
|
|
|
I've gone native
Join Date: Sep 2011
Location: Long Island, NY
Posts: 1,695
|
Do you have any pics of that process?
tia c
__________________
'07 997.1tt Blk/blk 600hp, bad to the bone |
||
|
07-17-2012, 08:54 PM
|
|
|
Registered
|
jim is mistaken on this one. i just installed mine and it took all of 20 min. remove guage from dash, remove the temp guage from rear of unit by removing 4 screws, remove the 2 screws that are on the guage face, place the new insert on top of stock face, install all screws and push back into dash. maybe 20 mins
|
||
|
07-18-2012, 04:48 AM
|
|
|
I've gone native
Join Date: Sep 2011
Location: Long Island, NY
Posts: 1,695
|
Thanx, but what's the best way to remove it from the dash without damaging it?
c
__________________
'07 997.1tt Blk/blk 600hp, bad to the bone |
||
|
07-18-2012, 05:48 AM
|
|
|
Registered
Join Date: Jul 2006
Location: S. Florida
Posts: 7,249
|
Quote:
To get inside the tach, speedo, clock, or a VDO boost gauge you have to pry the back of the bezel ring off and then bend the mangled edge back over the lip on the shell to put it back on. Or buy a new bezel ring from NHS. I think they are around $20 each and roll the edge over the lip on the back edge of the shell smoothly with the edge of a wheel spacer or something similar. To remove the gauges grab the edges with your fingers and pull/pry them out or if stuck reach in from the trunk and push one out to get it started and then reach though it's hole in the dash and push the others out. They are pressed into the dash with a rubber grommet holding them in. The early long hong hood cars were different and had a metal bracket on the back like aftermarket gauges that held the gauges in the dash. With those you had to reach in from the trunk to unscrew the bracket from at least one gauge and then pull the gauge out from the dashboard inside the car. |
||
|
07-18-2012, 08:49 AM
|
|

|
|
I've gone native
Join Date: Sep 2011
Location: Long Island, NY
Posts: 1,695
|
Did it, thanx boys!
__________________
'07 997.1tt Blk/blk 600hp, bad to the bone |
||
|
07-18-2012, 09:44 PM
|
|
|
Registered
|
Thought I'd share my homemade version... I added some color to make it easier to see at a glance while on the track.

__________________
Kirk www.olobarennsport.com 1988 930 Daily Driver 1997 Land Cruiser |
||
|
08-13-2012, 04:53 AM
|
|


 911 Turbo

 78 Porsche 911SC 3.0L, 3.3Turbo soon.
 Porschen
 RST
RST Ugly Duck
 friendly
 1988 Porsche 930
