|
|
|
|
|
| Author |
|
|
Registered User
Join Date: Nov 2013
Posts: 21
|
Thanks everyone--that is why I wanted to give it a try on the old block first and post some pictures here for feedback.
I did use oil, but I don't think I used enough in hindsight. I had it in a spray bottle and just sprayed a few squirts in each cylinder. It sounds like I need to really go heavy on the oil, light on the pressure setting, and make sure the pads are kept as clean as possible or replaced regularly. I used 30W oil, while I think you suggested 20W oil (detergentless). I don't think this is a big deal but thought it was worth mentioning just in case. On the real deal I will probably replace the scotchbrite pads every 1 or 2 cylinders to ensure they are clean. I only have a bore or two left to play on, but it sounds like I just need to take it easy on them and it'll work out I'll go back and do some more reading/picture viewing now that I've got a little experience. I do have to say that the ones that looked really rough in the pictures didn't look that bad in person, the light I was using to take pictures really brought out the scratches (not sure if that's good or bad, lol) |
||
 11-11-2013, 05:40 AM
|
|
|
Registered User
Join Date: Nov 2013
Posts: 21
|
For reference, here are the pictures from earlier in the thread. I DEFINITELY went too far with mine based on the outcome here. I also noticed you used a LOT more oil, so that is probably part of my problem. I'll give it another trial run sometime this week. Question for you guys--how big are the cylinders on yalls blocks? I was at the small end of what the hone I was using could even do, so it was squeezed almost all the way in, which was adding a little pressure in my opinion. Just curious, mine are 92mm. I think it was the thickness of the stones + scotch brite pads with the way I had them wrapped around that made it barely fit.
Quote:
Quote:
Quote:
|
|||
|
11-11-2013, 05:46 AM
|
|
|
Somewhat obsessed......
|
Re Ring Alusils
Those look great. I did this to my 911 alusils last august. I didn't use the scotch brite but ended up with cylinder walls that looked just like yours. I have around 4 or so thousand in them now and it uses less than a quart every 2000 miles! So far, so good.
Chris |
||
|
11-12-2013, 09:54 AM
|
|
|
Registered User
Join Date: Nov 2013
Posts: 21
|
Are you talking about pictures in the post right before yours or the ones a few posts back? The ones just posted are from someone else who had great results.
I posted some of my test runs a few posts back which appear to have been over done Just curious. How did you do yours without scotchbrite? |
||
|
11-12-2013, 09:58 AM
|
|
|
Somewhat obsessed......
|
Sorry, I was talking about the lowest pic. For what I did, I stole from my wife's craft kit a sheet of felt. I then tied patches of it onto my three stone hone with strips of the same felt. I then proceeded the same way oil and an-30. Once clean they looked semi dull with barely perceptible scratching.
__________________
Chris '83 Super Carrera ......There are many like it, but this one is mine. |
||
|
11-12-2013, 10:04 AM
|
|
|
Registered User
Join Date: Nov 2013
Posts: 21
|
Great info, thanks
With that I will remember to especially take it easy with the scotchbrite pads. I may modify the hone slightly to reduce the pressure as well Quote:
|
||
|
11-12-2013, 10:09 AM
|
|

|
|
Registered User
Join Date: Nov 2013
Posts: 21
|
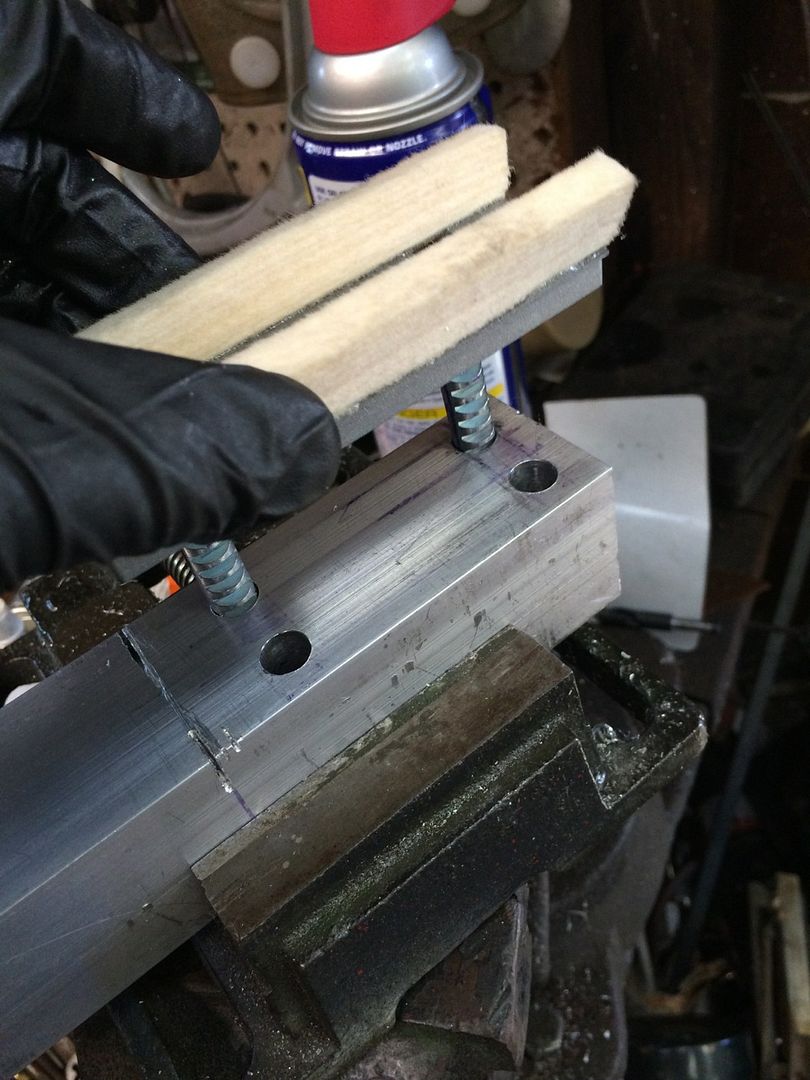
AN30 and "real" sunnen felt pads came in today. The pads when put back to back are nearly 3.5" thick, and the cylinders I'm working with are about 3.6", and they don't fit the regular 'ol 3 arm hones, so I either need to do some modifying or just go with the felt that everyone else has used.. we shall see.
I can def. cut down the posts that are on the back of the felt pads to make them a little smaller--I had originally thought about removing the felt from their current backing and epoxying them on to the pads of a 3 hone stone somehow. I'll have to think about it a little more. Another idea is to modify a set of honing stones that comes with a normal 3 arm hone by removing the stones from the metal backing. Then cover the metal in several layers of duct tape, then glue the felt pads to that (perhaps also making them thinner first so they were less likely to try to be knocked over while being spun around a cylinder..), then also put a zip tie around them pretty tight, tight enough that the zip tie is squeezing the felt such that the zip tie isn't touching the cylinder wall anywhere. Hmm sounds like a possible winner to me. Here are some pictures:       
Last edited by schpenxel; 11-12-2013 at 01:32 PM.. |
||
|
11-12-2013, 01:19 PM
|
|
|
Somewhat obsessed......
|
Felt
I love that hone! How do you even use that?
__________________
Chris '83 Super Carrera ......There are many like it, but this one is mine. |
||
|
11-12-2013, 02:53 PM
|
|
|
Registered User
Join Date: Nov 2013
Posts: 21
|
Need something more like this...
http://images.hemmings.com/wp-content/uploads/2007/10/Greenleesboring_2034_resized.jpg |
||
|
11-12-2013, 02:56 PM
|
|
|
Registered User
Join Date: Nov 2013
Posts: 21
|
Here's a close up of the glue holding the felt on
    And some new tool organization stuff showed up today from Ernst. They are twist lock socket holders--they seem awesome so far. Going to order enough to do most of my sockets this way--this is just the odd ball stuff I didn't have a decent way to store  Here's the AN30 paste--nasty looking stuff  It's a pretty thick paste, seems to have a small bit of sparkly stuff in it 
|
||
|
11-12-2013, 07:05 PM
|
|
|
Registered User
Join Date: Nov 2013
Posts: 21
|
Did you guys run anything special for break in oil??
|
||
|
11-14-2013, 05:19 PM
|
|
|
Schleprock
Join Date: Sep 2000
Location: Frankfort IL USA
Posts: 16,640
|
Regular oil is fine. No need to run something different than what you normally do.
__________________
Kevin L '86 Carrera "Larry" |
||
|
11-15-2013, 08:14 AM
|
|

|
|
Somewhat obsessed......
|
Oil
I ran some less expensive mineral oil and changed it in about a thousand. Not crap oil but not B. Penn or VR1 either.
__________________
Chris '83 Super Carrera ......There are many like it, but this one is mine. |
||
|
11-15-2013, 12:22 PM
|
|
|
Registered User
Join Date: Nov 2013
Posts: 21
|
Thanks, need to do some more reading as I'm not that familiar with current mineral oils. Will find something though.. I've always read change it the first time pretty quick.. then another time at 500-1000 miles, then go to normal'ish interval
|
||
|
11-15-2013, 01:12 PM
|
|
|
Registered User
Join Date: Nov 2013
Posts: 21
|
Alrighty guys and gals, I had some time to play with the AN30 this afternoon. It looks like I need a drill with a little more range to it--mine seems to be either too fast or too slow. The only cylinder I got results like I THINK I'm looking for was the last one where I used the drill at a high speed for probably a minute.
Here are some pictures: I ended up finding some big sheets of felt at work that had a really strong adhesive on them. I just wrapped them around the honing stones and stickied them to themselves--these held up fine for everything I did today  This is the first one I tried--it is def. different from what it looked like in the beginning, but I think this combo was too much scotchbrite last weekend + not enough AN30 time today  Left has been through the felt + AN30 process, cylinder on right has not  Another one after doing some "polishing"  Unpolished cylinder (scotch brite only)  Another unpolished  Polished  Now this is the one I went longer on + sped up the drill. I need someway of getting a speed higher than "low" on this drill, and lower than the speed used in this cylinder. I was afraid it was going to rip the felt off.. This is the one I thought was by far the best  Another shot of it--looks pretty dull grey'ish, much more like what I am after (I think anyways)  And parts going to the machine shop tomorrow. Oh the irony of a Honda hauling a BMW engine to the machine shop.. lol. Even funnier to me is that block couldn't have weighed more than 50-60lbs--I felt like the hulk putting a block in the trunk, haha  Welp, that's it for today. |
||
|
11-17-2013, 03:43 PM
|
|
|
Registered User
Join Date: Nov 2013
Posts: 21
|
Little higher resolution shot:

|
||
|
11-17-2013, 04:10 PM
|
|
|
Redline Racer

Join Date: Jan 2007
Posts: 2,444
|
That last cylinder that you did looks really good. It has that nice smooth chalkboard looking surface without showing much from the scotchbrite. What oil are you lubricating the scotchbrite stage with? I feel like your scotchbrite is still cutting a little on the aggressive side. I would go to a good auto store or Wal Mart (yes, I've seen it at walmart with the motor oil) and pick up some straight 20 or 30 weight non detergent lubricating oil. I used an old can of straight 20 weight API SA/SB oil I found at work. It probably had some historical value, especially unopened, but oh well...
The AN-30 is really thick out of the can. I found it to work best diluted just a bit with oil. The best way to tell is to observe how it is smearing around the cylinder. If it looks like the felt is sort of hydroplaning over a thick layer...too thick. If it's running down the cylinder and dripping out...too thin. I did two runs of lapping each using fresh AN-30 on mine, as the particles kind of start losing their abrasiveness after about 2 min or so, and it yielded smoother results. It is fairly self limiting within reason. Scotchbrite honing you want to keep on as low a tension as the hone will go and don't do it too fast or too long...just enough to "clean up" the cylinder surface. You do want to see a nice cohesive even crosshatch pattern. The closer to that first pic of mine you posted above, the better. Thicker/more oil and less pad tension will help get rid of the "sharper" looking scratches. Make sure you're using standard green scotchbrite pads. Blue "no scratch" pads are useless, as they do exactly what they're sold to do...not scratch soft metals, and red pads are too coarse and aggressive. The bores on the 944 block are 100 mm. I would certainly run that last cylinder without concern based on the picture. Looks like it'll work out pretty well.
__________________
1987 silver 924S made it to 225k mi! Sent to the big garage in the sky Last edited by HondaDustR; 11-20-2013 at 06:24 PM.. |
||
|
11-20-2013, 06:06 PM
|
|
|
Registered User
Join Date: Nov 2013
Posts: 21
|
Quote:
I think my problem on the scotch brite was I had the oil in a spray bottle and was just squiring a few squirts in the cylinder and a few on the hone when I was working on the scotch brite process. From your pictures it look like you all out soaked the cylinders down with it, which is what I'm going to do next time. I also think I had the hone set somewhere around 70% pressure (estimate obviously). I think a lot more oil + I have modified the hone slightly so it's a little looser by default + cleaning the pads thoroughly between cylinders will get me to where I need to be. I had pretty similar results on the AN30 in regards to the thickness--the first time I slathered it on thick without any oil and I realized I was basically just spinning felt around on top of the paste and it wasn't really doing anything. I think this is where a "real" honing machine would come into play as you could put more pressure on the pads so that they actually got some bite into the cylinders. Anyways--then I started adding oil and got some results but not much. I finally found that adding a thin layer of paste, then some oil, then more paste if you need it, worked better so that there was actually some sliding going on and not just a bunch of hydroplaning on top of the compoun (compound'planing? lol,) Thanks for the feedback. I will be back at it this weekend and hope to have some pictures of the results on the last few cylinders I have to play with. The machine shop has my block so it will be a week or two before I can do the real deal |
||
|
11-20-2013, 07:13 PM
|
|
|
Registered User
Join Date: Nov 2013
Posts: 21
|
Made a holder thing for the real Sunnen felt pads today. It worked out to be the perfect size.. would barely squeeze in the cylinders, so when the AN30 was added it was a pretty tight fit
 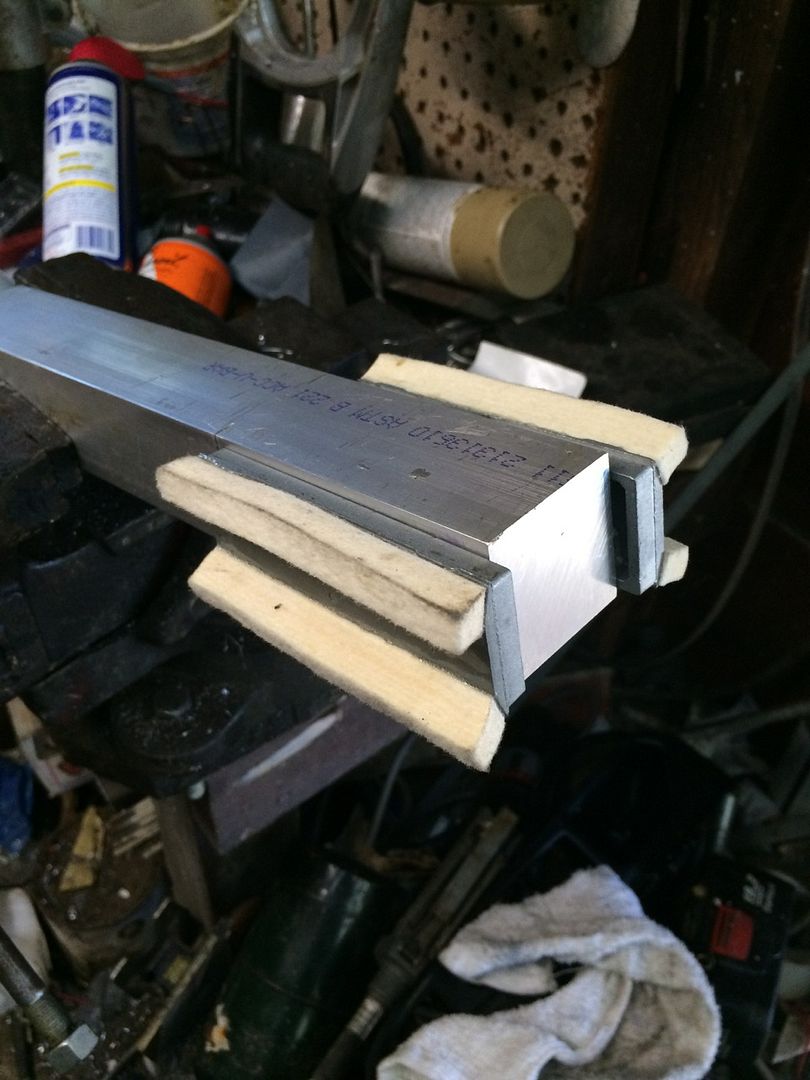 The second from the end cylinder in this pic is the one I tried it on first before: 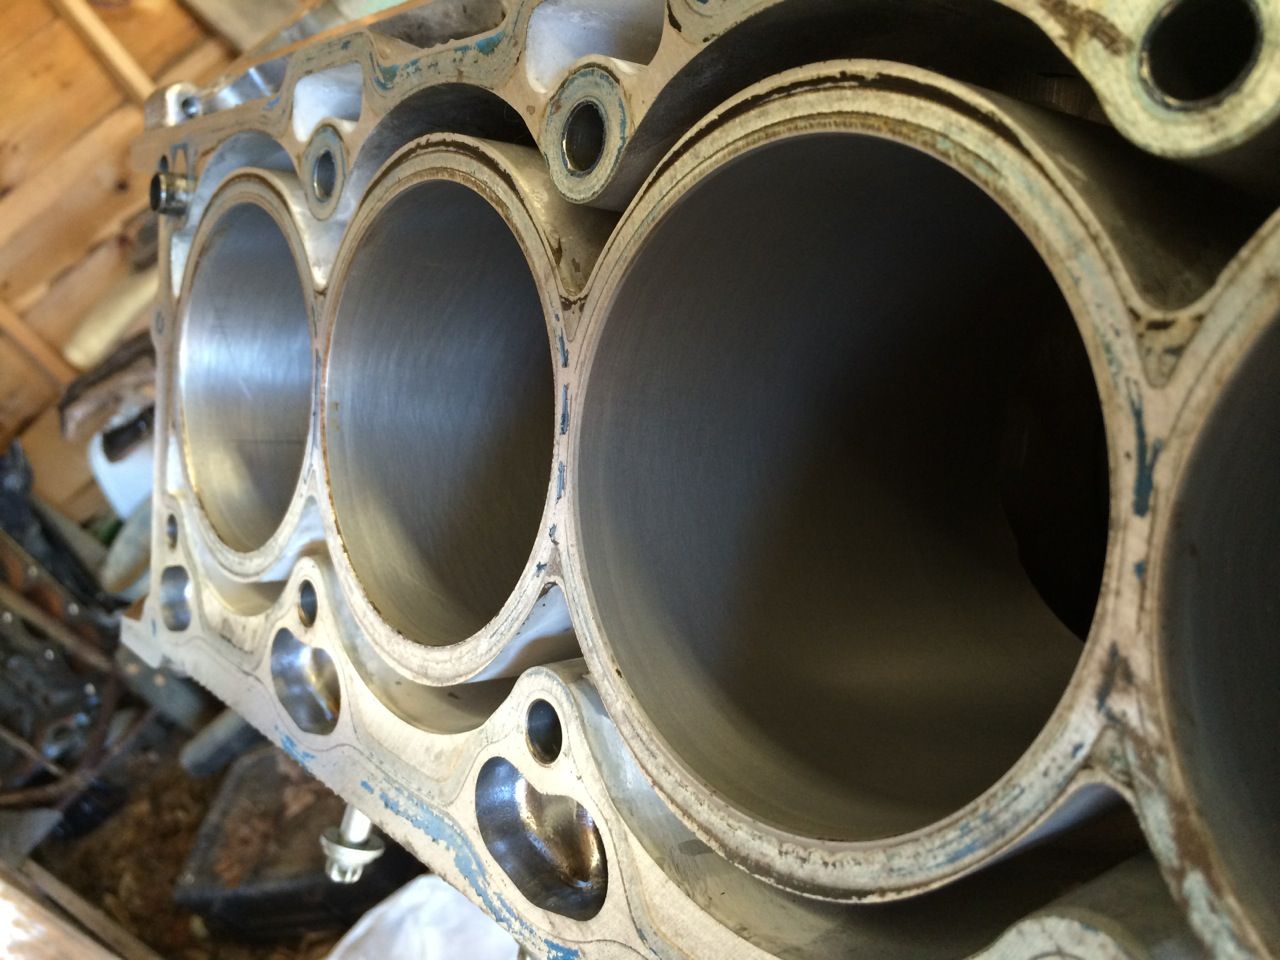 I did not have a way of connecting the holder thing to a drill, so I was literally just spinning it around slowly by hand. After about a minute I decided to peek at the results.. I was quite surprised 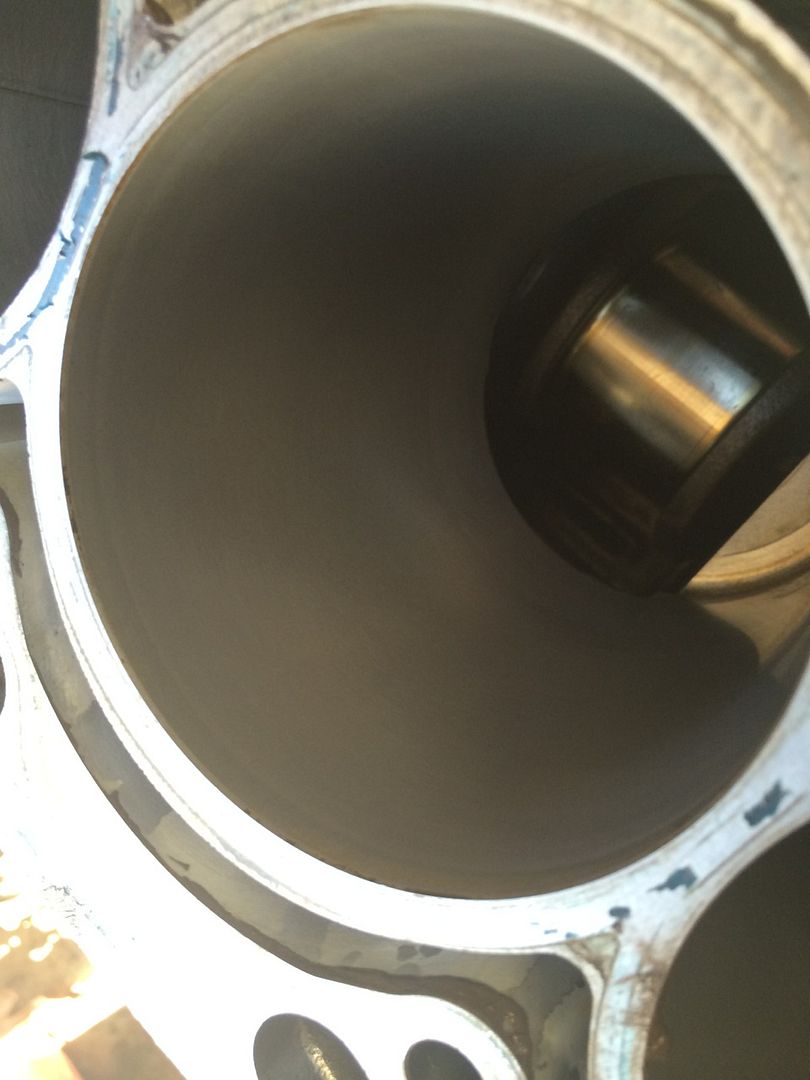 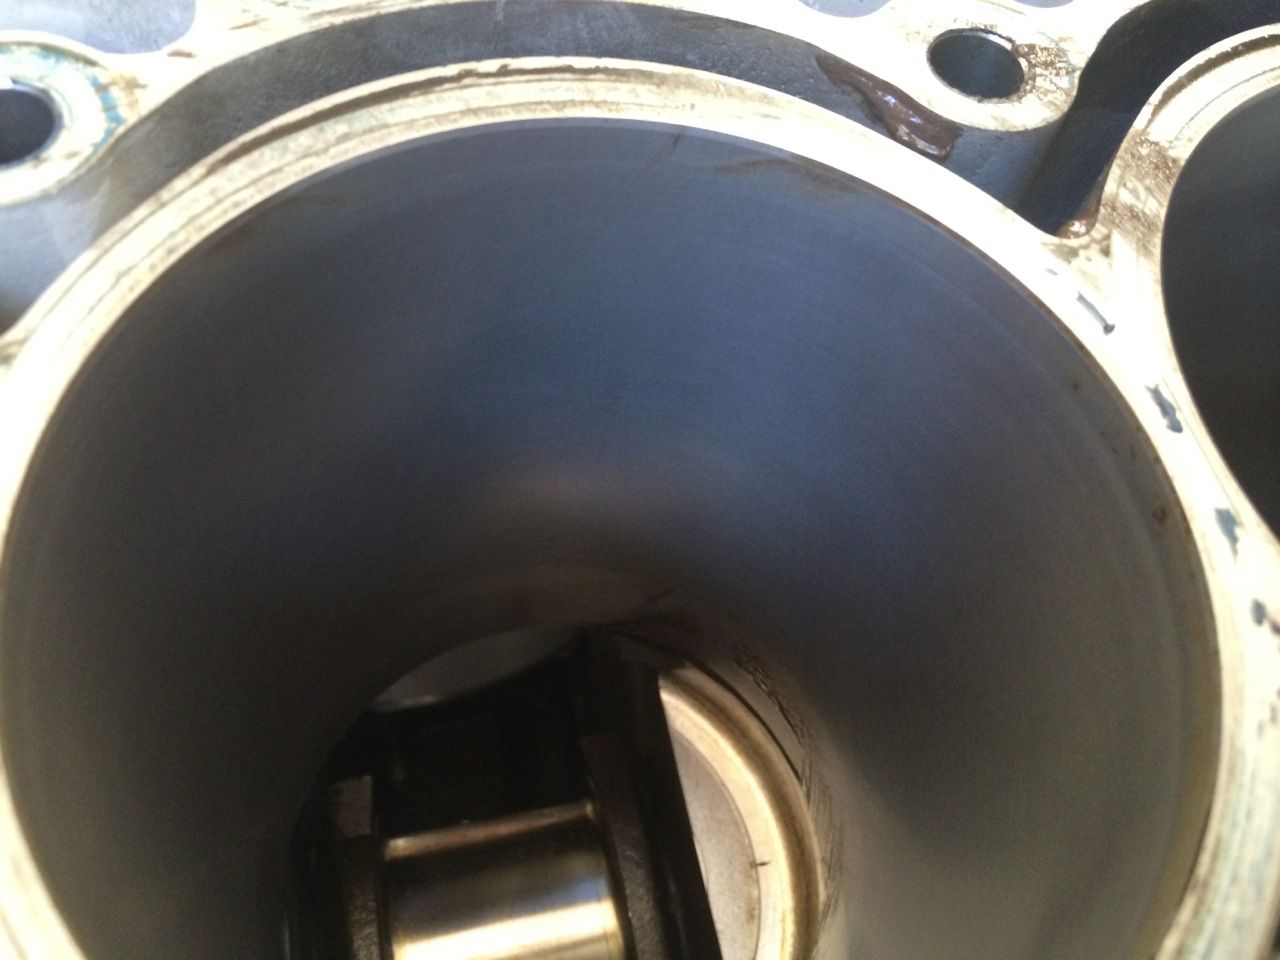 So yeah--next step I am going to drill/tap the top of the aluminum holder so that I can connect it to a flexible shaft off of an old 3 arm hone. I have to say, the results, given I was just barely turning the thing by hand, are as good as anything else I've been able to get and was probably faster. I guess the right tools do indeed help  Block/heads should be done at machine shop by Wednesday. I am missing one main bearing though so it may be another week or two before I can really start putting it back together |
||
|
11-24-2013, 02:23 PM
|
|
|
Registered User
Join Date: Nov 2013
Posts: 21
|
Today was the day!! I deglazed and then "conditioned" the real deal. After I got a process down it went pretty quick.. most of the time was doing the first cylinder and trying not to overdo it, so I kept stopping/cleaning everything to check progress then going again
I ended up going about a minute on the scotch brite step, although I had modified my hone to be a little looser and had it on minimum pressure, so it took a little longer to get some results. For the AN-30 step I did about 2 minutes total, split into two steps. I cleaned them off in between steps. Honestly I could have probably gone twice as long on both steps and gotten the same or better results, but I was afraid of going too far with the scotch brite especially so I called it quits after I had decent results. The key is very light pressure and making sure you have enough oil... Advice to anyone else who ever has to do this: It seemed that the less AN-30 I used, the better. At first I covered the whole cylinder down in it, then tried to mix in the oil. That basically ended up in just having the felt slide around on top of the paste, but didn't really do anything to the cylinders. In the end I was using just a bit of AN30 with at least an equal amount of oil if not more.. That seemed to be the best way to make sure the AN-30 and cylinder walls were really interacting the most Here is a cylinder before. Picture has been edited so it makes it look a little worse than it did in person. Not sure what the black stuff is, I couldn't really feel it with my fingernail but it was in all the cylinders to some degree. Wonder if it was from the cleaning process at the machine shop? 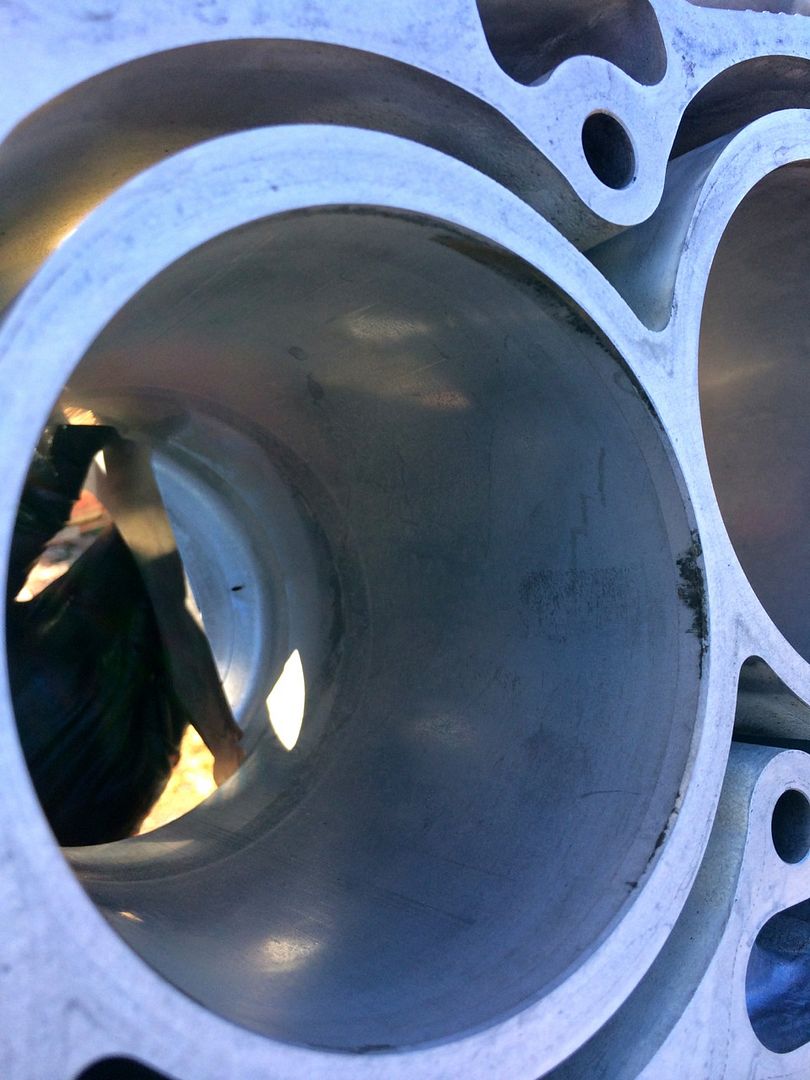 And here is one after deglazing for about a minute. I used scotch brite pads zip-tied to my hone. The hone had felt pads sewn to it as well for later... The streak in the cylinder here is just dirt 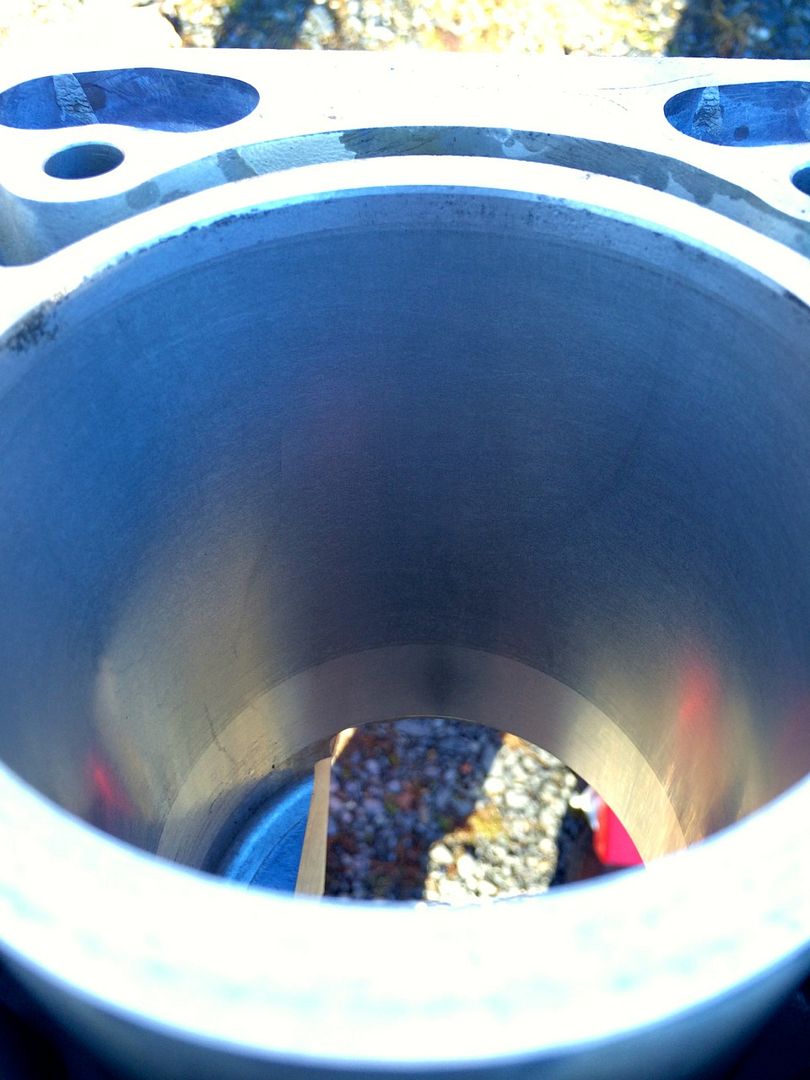 And here are a few after the AN-30 process. Of course ignore the oil that wasn't totally cleaned off..I am pretty happy with these 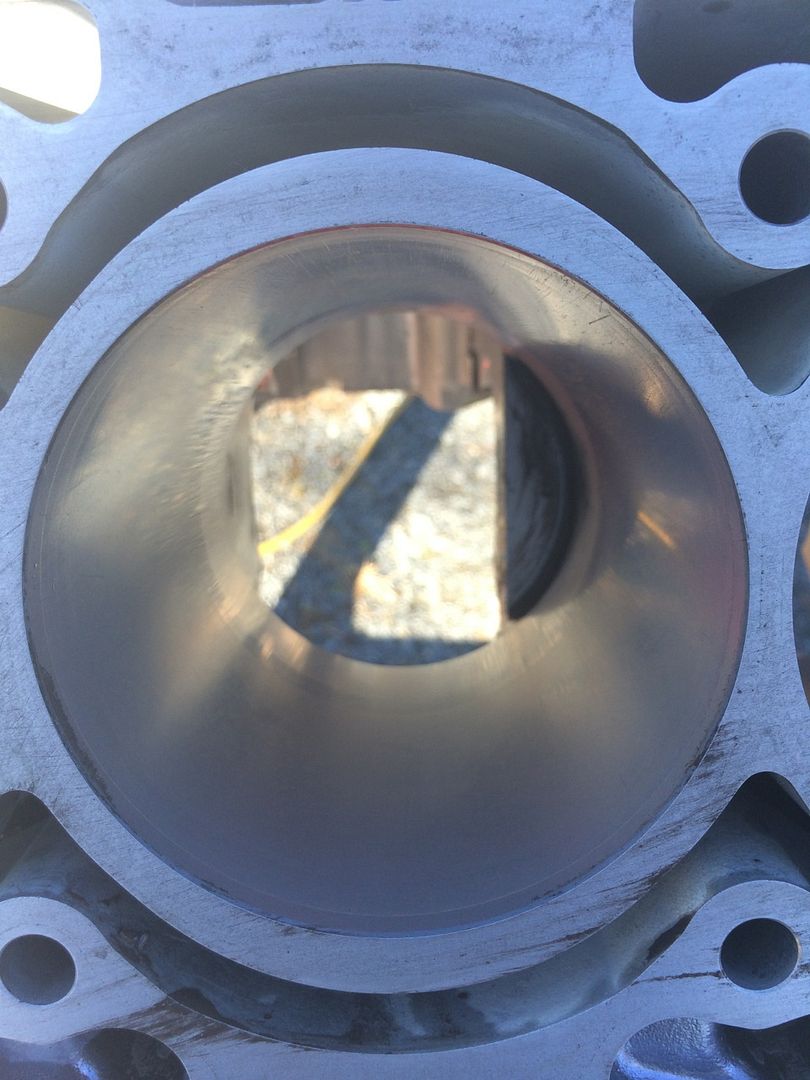 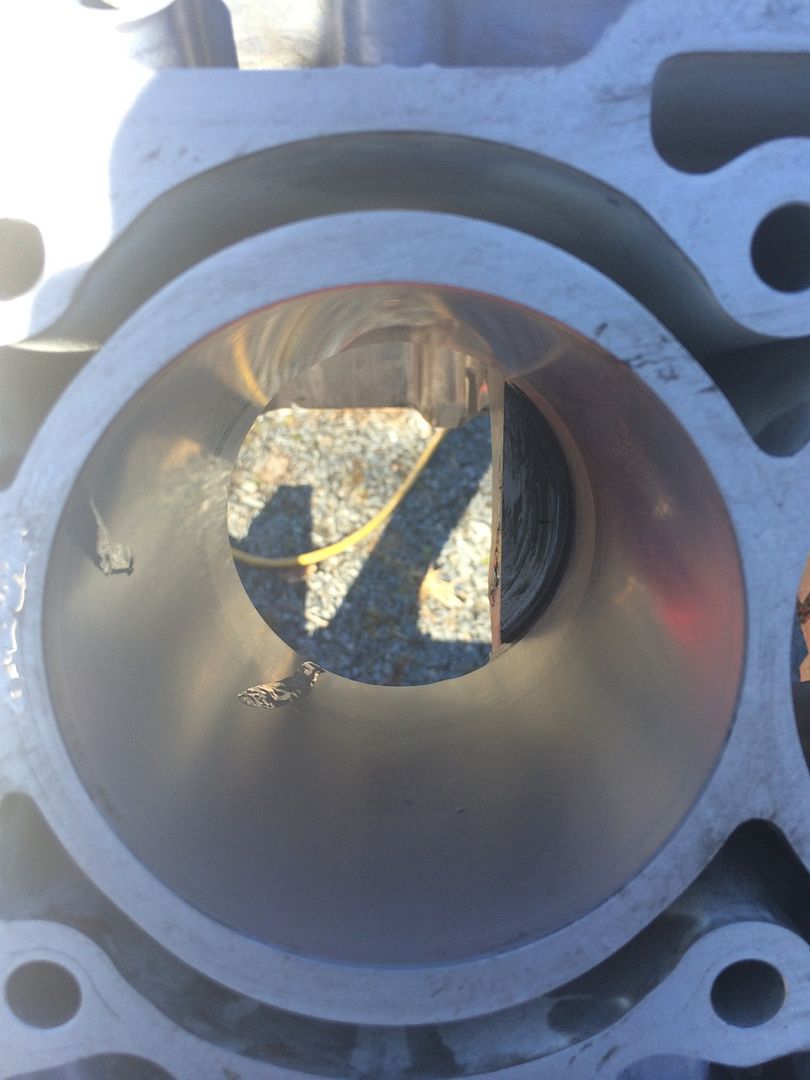 And finished product getting washed (missed a spot on the back cylinder!) 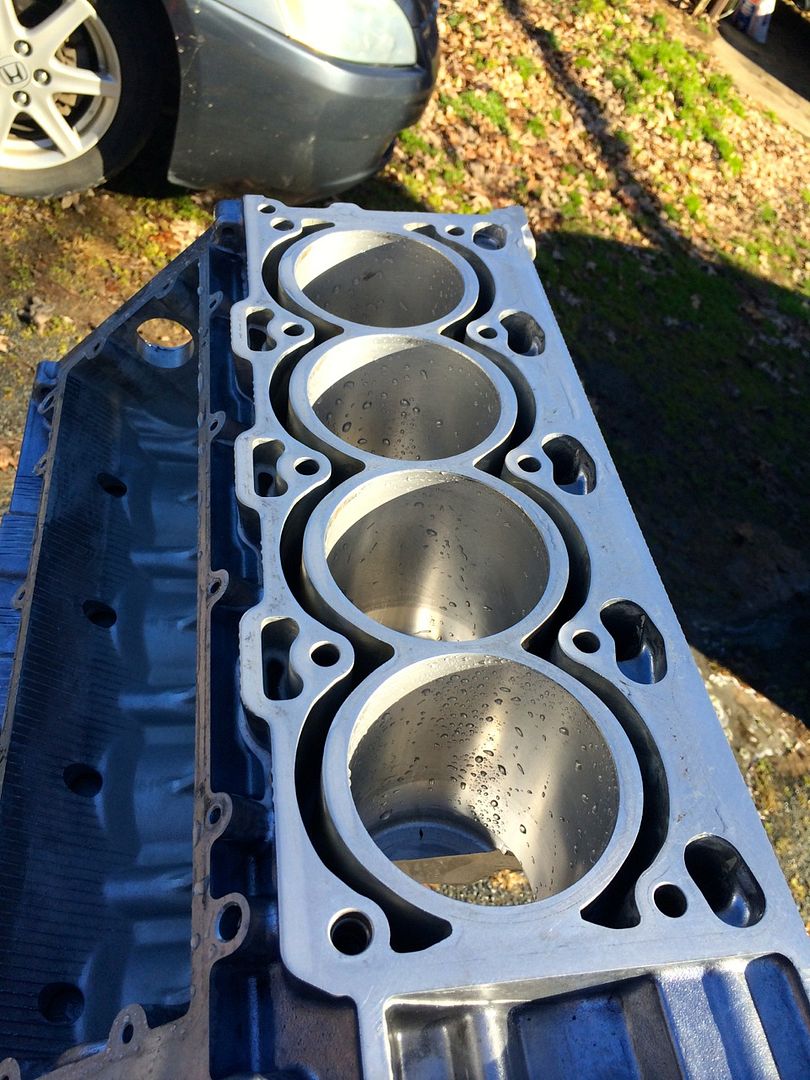
Last edited by schpenxel; 12-16-2013 at 06:47 AM.. |
||
|
12-15-2013, 04:55 PM
|
|


 Stuart (The Kieser)

