|
|
|
|
|
| Author |
|
|
Registered
Join Date: Apr 2008
Location: Miami
Posts: 963
|
Rebuilding and Supercharging 3.0L
There aren't many supercharging threads on 3.0's so I thought it might be a good idea to post. For now, we'll do the rebuild. The supercharging may merit a separate post when we get there.
I started to hear a trrrrrrrrr sound when I accelerated hard. Inspection showed two broken head studs at #1 and #4 (exhaust of course.) The car is a 79. Mileage is unknown (due to a broken odometer- that urethane gear was practically disintegrated) but is over 100k. In 2004 I did a clutch replacement to Sachs Sport, and cleaned up what was nearly 30 years of grime, so I have experience in engine drop (though this is my first rebuild.) I purchased the requisite books and had some from before: Haynes, Bentley, 101 Projects, Bruce Anderson and Wayne's Engine rebuilding. That and the advise from this board should make this a doable project. A friend offered to let me use his garage and lift and there we went. I could kick myself but I forgot to take the picture with myself in the engine bay (my bad.) Maybe I can get that one in as we lower the vehicle before we put the engine back in. The Plan: Install a SOK whipple SC Use Electromotive HPX unit for ignition Updated Carrera tensioners Use Supertec head studs Remove air injection system Split the case (for inspection and to seal correctly and get rid of all leaks) Possibly add water injection Try hard not to go way down the slippery slope! I don't want to change Ps & Cs this go around. In the future, after a couple of years, I may go to the 3.2 short stroke (with lowered compression on the pistons.)   The air pump had been removed in 2004. The drop was straightforward.   Isn't this a lot of carbon deposits on the intake manifold? There was a period of time it was running very rich. Leak from the top of the valve cover?   Anybody know why the top near the breather cover is always so nasty? The oil switch was replaced in '04 and so was the gasket to the breather cover (it did not leak) and so was the o-ring to the thermostat. The exhaust nuts were removed cold with no broken studs. It did go through several days of dousing with PB Blaster. The air injection system will be completely removed.   I had the mechanical tensioners with the collar to avoid collapse. This is being upgraded. As suggested in other posts, I practiced looking at the cam timing. The chain doesn't look stretched. You definitely need the special Porsche tools to remove the cam nut. More pics to come...
__________________
1979 SC, Slant nose wide-body cab conversion. AEM Infinity EFI, COP, supercharged! |
||
 01-13-2009, 07:21 PM
|
|
|
Free minder

|
Quote:
 What shape was the breather hose in? In my case, the hose was dried and cracked from the heat, so oil was leaking from it.
__________________
1978 SC Targa, DC15 cams, 9.3:1 cr, backdated heat, sport exhaust https://1978sctarga.car.blog/ 2014 Cayenne platinum edition 2008 Benz C300 (wifes) 2010 Honda Civic LX (daughters) |
||
|
01-15-2009, 10:58 AM
|
|
|
Registered
Join Date: Apr 2008
Location: Miami
Posts: 963
|
Disassembly continued
Thanks Aurel:
Your rebuild inspired me and provided lots of good info. Hopefully this one will do the same for others. The breather hose was relatively new, since I replaced it in 2004. I bagged the end that connects to the cover when I took it out and did see some oil pool in the bottom. The cover is somewhat oily so that may just be it. Here are other pics. Lower studs (including the two broken ones) are Dilavar (non-magnetic) with a goldish tinge.  The 4-5-6 cylinders, the effect of the broken stud is seen on the bottom left of the leftmost cylinder (the #4).  In the heads, we see it in the mating part on the upper left of the leftmost head.  Next we have the broken stud on the lower right (exhaust #1 cylinder) with cylinders in place.  I lifted the #4 cylinder and took a picture of the #4 broken stud. There is only about 3 mm (1/8 in) left. The number one is about 1/4 in (6 mm) out. I'll take it to a pro to get them out of the case and won't fiddle with them myself. So far the hardest part was removing the piston pins. They were tight. After reading several posts I heated the heads. They went out easier but still had to be banged out. I took a tool to flare tubing and put a bolt through the piston pin then tightened the bolt. This allowed the pin to start moving. then banged the tool until it came out. Here is a picture.  More to come later...
__________________
1979 SC, Slant nose wide-body cab conversion. AEM Infinity EFI, COP, supercharged! |
||
|
01-17-2009, 08:03 PM
|
|
|
Registered
Join Date: Apr 2008
Location: Miami
Posts: 963
|
Update
Here's the second broken stud. There's more there but not a lot:
 Here's the short block:  The dilavar lower studs came out without heating. They were removed with double nuts. Only 3 of the steel studs came out without heating. I used a heat gun to remove the others:  After removing flywheel, pulley, and case bolts, the parts went to JB racing near Orlando, FL. They are cleaning them up and I'm waiting for an update soon!
__________________
1979 SC, Slant nose wide-body cab conversion. AEM Infinity EFI, COP, supercharged! |
||
|
02-09-2009, 06:04 PM
|
|
|
Wer bremst verliert
Join Date: Jan 2005
Location: Toronto, Ontario
Posts: 4,767
|
Excellent project, good luck.
Have you sourced an SOK already? What are your intake and intercooling plans? And is that the heat gun you used? I'm surprised it did anything, I go straight to MAPP gas!
__________________
2007 911 Turbo - Not a toy 1985 911 Cab - Wife's toy 1982 911 3.2 Indiash Rot Track Supercharged track toy 1978 911 3.0 Lichtbau toy "Gretchen" 1971 911 Targa S backroad toy |
||
|
02-10-2009, 04:09 AM
|
|
|
Registered
|
looks very good.
Try to check out this website: http://www.opcon.se/index.asp?sPage=1&langID=1&cID=14 They should make som really good twinscrew superchargers. Best of luck Jesper |
||
|
02-10-2009, 11:24 AM
|
|

|
|
Registered
Join Date: Apr 2008
Location: Miami
Posts: 963
|
John, I already have the SOK kit. At least, based on what I've seen, I'm pretty sure it is a SOK kit. I have not been able to get the manual, the one I found was for the Paxton on a 3.0 and for a Whipple on a 3.2 (which is a more complicated setup.)
I used the heater because there was no gas in the torch and figured I would try the heater since it was handy. I had to use the heater for at least 5 min per stud, and after a while, the whole case was hot. It threw the circuit breaker a couple of times. The bottom ones all came out without heat. As far as intercooling I am not planning to do it, but will use water or water/methanol injection if needed. As far as I know, the previous owner did not use anything. The SC I have has no name or manufacturing ID, so I don't know yet what compression it will provide. As far as intake, I am using the '79 runners on the system pictured below. The throttle body and fuel distributor seem to be from an '81. I may put the parts from the '79 and may need some help on where to connect all of the CIS components on this thing. Here is the intake system:  Here is a partial test fit:  Here is the SC by itself: 
__________________
1979 SC, Slant nose wide-body cab conversion. AEM Infinity EFI, COP, supercharged! |
||
|
02-11-2009, 09:59 PM
|
|
|
Registered
Join Date: Apr 2008
Location: Miami
Posts: 963
|
Jesper, I checked out the website you provided and saw that it was one of the ones I had been looking at to try to determine who made the supercharger I have. Of the different sc manufacturers, mine looks visually like the ones on that site.
I haven't found any clear manufacturer's name on the thing or number. Maybe someone can ID it better. John
__________________
1979 SC, Slant nose wide-body cab conversion. AEM Infinity EFI, COP, supercharged! |
||
|
02-11-2009, 10:03 PM
|
|
|
Wer bremst verliert
Join Date: Jan 2005
Location: Toronto, Ontario
Posts: 4,767
|
Hi John,
I'm fairly sure thats not an Autorotor, unless they changed the design in the last few months. I have one of those, here are some pics of a 419. Externally all the Autorotors look the same, a box with a pulley sticking out and a triangular "out" manifold. Autorotors also have an exposed intake where you can see the concave/convex rotors meshing, which is a different design from a Paxton. Excellent project, keep up the updates! I'm interested in your pulley setup, mine is on the last details now...You definately want to install a boost gauge of some kind so you can monitor it, especially as you dont know the SC output. I did mine with one MAP for the ECU and another MAP for the gauge but its also possible to have one MAP passing the signal to your MS ECU and have the ECU drive in turn drive an output channel to a digital gauge.    
__________________
2007 911 Turbo - Not a toy 1985 911 Cab - Wife's toy 1982 911 3.2 Indiash Rot Track Supercharged track toy 1978 911 3.0 Lichtbau toy "Gretchen" 1971 911 Targa S backroad toy Last edited by JohnJL; 02-12-2009 at 01:47 AM.. |
||
|
02-12-2009, 01:33 AM
|
|
|
Wer bremst verliert
Join Date: Jan 2005
Location: Toronto, Ontario
Posts: 4,767
|
Here's a paxton, also not what you have:
 And a roots/eaton, which is probably what you have: 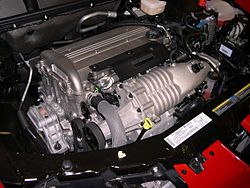 Can you see the rotors? Do they look like this: Lysholm/Opcon:  Lile this (Roots) 
__________________
2007 911 Turbo - Not a toy 1985 911 Cab - Wife's toy 1982 911 3.2 Indiash Rot Track Supercharged track toy 1978 911 3.0 Lichtbau toy "Gretchen" 1971 911 Targa S backroad toy Last edited by JohnJL; 02-12-2009 at 01:48 AM.. |
||
|
02-12-2009, 01:46 AM
|
|
|
Registered
Join Date: Apr 2008
Location: Miami
Posts: 963
|
Other parts
The SC looks more like the ones in Jesper's link (shown a few replies up on this thread.) Here is a picture of some of the other components for the SC setup. As you suggested John, I have a MAP sensor (the little black box roughly in the middle next to the distributor wires) I also have the boost gauge (slightly up and left of center.) I have the Electromotive HPX (lower left) for timing control along with the magnecore wires. You can also see the piping to/from the SC. On the upper right are the turbo valve covers that I also picked up at PP.
For the pulley system, I am using a serpentine belt. I had to replace my crank pulley for a later style pulley that has the inner section for the fan v-belt, and the outer section for a serpentine belt (5 ribs.) Since the crank pulley is too big for the 3.0 motor mount, I had to get a newer Carrera mount (which I picked up a week or so from the used items for sale forum here on PP.) I have an idler/tensioner for the belt (just to the left of the boost/vacuum gage). What I have to do is get a Sanden compressor (to replace my York) and find the appropriate A/C clutch with pulley for the serpentine belt. 
__________________
1979 SC, Slant nose wide-body cab conversion. AEM Infinity EFI, COP, supercharged! |
||
|
02-14-2009, 08:57 AM
|
|
|
Manassas, VA

|
John,
You have a Whipple. It is the same SC that I have on my truck. My kit included two additional fuel injectors (for a V-8) and a box of electronics to control the wastegate. Try: http://www.whipplesuperchargers.com/default.asp Mark
__________________
1991 964 Polar Silver Metallic Turbo Coupe |
||
|
02-14-2009, 11:20 AM
|
|

|
|
Registered
Join Date: Apr 2008
Location: Miami
Posts: 963
|
Thanks for the info Mark. I couldn't find a manual on-line. Does it say anything about maintenance? Recommended oil, etc.?
__________________
1979 SC, Slant nose wide-body cab conversion. AEM Infinity EFI, COP, supercharged! |
||
|
02-17-2009, 08:17 PM
|
|
|
Registered
|
Interesting looking at the Lysholm site. The flow maps that they publish for their 1200 through 3300 series are actually relatively inefficient compared to a modern turbo. I don't know how that will compare to the SOK. It does raise the issue of why a supercharger with its parasitic drive loss and potentially worse thermodynamic efficiency over a turbocharger.
__________________
Steve Sapere aude 1983 3.4L 911SC turbo. Sold |
||
|
02-18-2009, 08:36 AM
|
|
|
Registered
Join Date: Apr 2008
Location: Miami
Posts: 963
|
There are a couple of threads comparing turbos to superchargers that you can search. There are good points on either side. The biggest advantage of the supercharger is the lack of turbo lag. Instant power. I hope to comment on this aspect once it's up and running!
 In fact, I just read this thread where a new 930 user was asking whether the lag he felt was normal. Babysitting an '86 930.. I also ran on a site that looks at turbo vs superchargers: http://imagineauto.wordpress.com/2008/02/24/to-turbo-or-supercharge-that-is-the-question/ On the other hand, I've read that the right combo of newer turbos and exhaust can decrease that significantly (although that means you have to do your share of mods.) In my case, my car looked a lot faster than it drove with only 180 ponies. For it's day, it may have been fast, but not for today. Turbo and supercharger kits for the 3.0 are mighty scarce. As I looked for a BAE or other turbo kit, the supercharger kit practically fell on my hands and I jumped at it. Now it's time to put it on and enjoy it. (Of course, I had to deal with the broken head studs issues...)
__________________
1979 SC, Slant nose wide-body cab conversion. AEM Infinity EFI, COP, supercharged! Last edited by Dr J; 02-18-2009 at 03:46 PM.. |
||
|
02-18-2009, 03:08 PM
|
|
|
Manassas, VA
|
John,
The folks at Whipple recommended synthetic engine oil and that was about it. There is no maintenance on the unit and mine has run for almost 100,000 miles with no problems. Mark
__________________
1991 964 Polar Silver Metallic Turbo Coupe |
||
|
02-19-2009, 06:01 PM
|
|
|
Registered
Join Date: Apr 2008
Location: Miami
Posts: 963
|
OK, time to continue on...
Short block, pistons and cylinders along with the cam towers and heads went to JB Racing and came back like new. Two broken headstuds removed Deck height was adjusted at the case Rods were refurbished and fitted with new bushings ARP rod bolts installed Crank cross-drilled and modified main bearings installed Intermediate gear replaced along with new chains All bearings replaced Pump checked out OK Crank in excellent shape Heads refurbished with new springs, guides, etc. An aluminum piece was welded to use a later motor console (required for the supercharging)       Short block is back sealed and ready for further assembly! Next items: Supertec headstuds and Ps & Cs
__________________
1979 SC, Slant nose wide-body cab conversion. AEM Infinity EFI, COP, supercharged! |
||
|
10-16-2009, 07:27 PM
|
|
|
Registered

Join Date: Feb 2005
Location: New York.NY
Posts: 346
|
subscribe
__________________
pca 30 year member,1977 porsche turbo body targa 56 vw ragtop oval 01 harley sportster 18 Chevy Colorado diesel BIG RED Firetruck and assorted v-dub ,porsche parts hoarder..LoL |
||
|
12-20-2009, 01:51 PM
|
|
|
Registered
Join Date: Apr 2008
Location: Miami
Posts: 963
|
Lots of progress to report. Unfortunately, looks like my computer power supply died. I'll see if I can post stuff over the holidays.
__________________
1979 SC, Slant nose wide-body cab conversion. AEM Infinity EFI, COP, supercharged! |
||
|
12-20-2009, 09:54 PM
|
|
|
Registered
Join Date: Apr 2008
Location: Miami
Posts: 963
|
Getting back on some of the work... deck height was set and a new mount was welded to hold the 3.2 console rather than the 3.0 console.
All rebuilding was performed in an air conditioned room inside the house.     
__________________
1979 SC, Slant nose wide-body cab conversion. AEM Infinity EFI, COP, supercharged! |
||
|
01-04-2010, 08:22 PM
|
|
 |
| Thread Tools | |
|
|
| Tags |
| 3.0 liter , electromotive , rebuilding , supercharging |


 1991 Porsche 964 Turbo 3.3L
 1983 Porsche 911SC


