|
|
|
|
|
| Author |
|
|
Registered
|
Hi Spencer,
Perfect ! 
|
||
 11-10-2015, 01:42 PM
|
|
|
Kartoffelkopf

|
Hi Pat, thank you my friend!
Mini update - The car can now be driven!....
So....we're down to detail/cosmetic jobs that don't affect how the car drives. Gulp. |
||
|
11-10-2015, 04:17 PM
|
|
|
Registered
|
Hi Spencer,
You have to be a happy, very satisfied man for you! I hope that you can make us a small nice video! For my part I am still far from it, patience patience... |
||
|
11-11-2015, 01:37 AM
|
|
|
Kartoffelkopf
|
Well, a short but worthy update....my pal who owns a garage about a mile down the road is going to be doing the MoT on the car (non UK readers, the MoT is the annual test cars >3yrs old have to go through), and in anticipation of this being a chicken-and-egg scenario, very kindly has held 2 slots open for me; the first is tomorrow morning, the second is for Wednesday.
Now, the reason it's a chicken-and-egg challenge, is that when I first fired up the engine in the car a couple of months ago, I noticed that it didn't return to idle correctly after a quick blip of the throttle. This isn't something that's part of the agenda for engine dyno tasks, more a work item that goes onto the "driveability" list when doing low-speed mapping. For one thing, the dyno adds a load to the engine that isn't there when the car's sitting on idle. Without this being sorted out, however, it shouldn't be driven on the public highway, especially without a proper diagnosis from Steve as to what needs adjusting. Apart from anything else, it wouldn't pass the idle emissions test. The fallback plan was to get Steve down here on Wednesday morning, tweak the map and hopefully rectify it (assuming there's nothing hardware related), then get it to the MoT centre to make it road-legal, then go and do low speed mapping in the afternoon.....but that's a good 1.5hrs out of the day, so an extravagant use of "not inexpensive" mapping time....would be far better to have the whole of Wednesday doing this, plus dialling in the traction control, and playing about with a new feature, a G-sensor which hooks into the ECU and will add another parameter to the TC, that being yaw control. So...after work this evening, with some maps being emailed back and forth, then me on the phone to Steve describing what's happening, editing some settings and trying again, we now have a car that should get through the test fine (or rather, well enough to get us to Wednesdays session), but more importantly, safely for me and the engine. Idle is now super smooth and return to idle is vastly better (but I'm sure Steve will play around with this again). We do need to play about with the 2500-3000 range, there's a fair amount of Lambda trim control going on, and not feeling particularly smooth. Again, not worried, that's the whole point of Wednesdays activities. My mission, long term, is to get Steve out of "luddite mode"  and using things like TeamViewer....which Craig and I have tested and it works great....On the flip side, I confess to being not-very-good with the MBE Easimap s/w...so infrequently do I use it, that it takes me forever to navigate my way through the various maps and settings! and using things like TeamViewer....which Craig and I have tested and it works great....On the flip side, I confess to being not-very-good with the MBE Easimap s/w...so infrequently do I use it, that it takes me forever to navigate my way through the various maps and settings!Back tomorrow with another update, and possibly a video of the first drive out. Last edited by Spenny_b; 11-13-2015 at 02:37 PM.. |
||
|
11-13-2015, 01:26 PM
|
|
|
Kartoffelkopf
|
So, today was the big day for me and the car. Ollie, my Brother, was up with me at just after 8am helping to shuffle the fleet around (not helped by the battery in the Lotus being flat)....then it was time to get K-FARt rolling under its (her?) own steam....
Then off to the other side of town with Ollie following a safe distance. Of course, we went the long way around so I could get the brakes used a few times. So how did it feel? Veeeery strange. Completely alien, in fact. First of all, (and Steve and I were completely expecting this), the transition from idle to pulling away at a junction, is very sharp. The symptom is like a flywheel with no inertia - this isn't the cause at all, but it will often stall when doing parking manoeuvring, for example. Not concerned, as this was last nights hurried and remote solution to try and get emissions and idle set up. The brakes feel great, very progressive with lots of feel. Definitely not like a VAG/BMW type over servo'd feel. The clutch, which I was half expecting to feel ridiculously heavy, doesn't strike me as any less usable than before...albeit that it was a long time ago that I last used it. I wouldn't want to sit in London traffic in a daily commute, but it doesn't have a pre-requisite of needing leg strength of 100m Olympians. It also occurred to me after we returned, that the pedal-hanging issue that I had experienced previously, now appears to have gone. Which is great, as potentially this saves me from having to do the "last resort" solution and strip the pedal box down to fit the latest clutch kinematic plates (as mine is a late model 965, I *should* have these fitted already....) The transmission felt less than stellar...worst part of the run. In fairness, with the short runs to and from Matts garage, the transmission oil temp didnt really get chance to come up to temp completely, so maybe I'm a little premature in my thoughts. But I think first on the list of things to do, is remove that rose-jointed stabiliser bar that I made a while ago, and re-install the newly re-plated OE item. I'm not convinced the replacement shift rod I've now got is quite right; the throw to the top gears (1,3,5) seems to be shorter and less positive than that to 2 & 4, almost like the cross gate is off-centre. Trouble is, the original shift rod was returned as a core item. I'll remove the tunnel cover and have another look, but it did crunch into gear a number of times. Headlights are now adjusted following their rebuild, and so the trim rings can be refitted (although I think I've lost one of the screws....have got one, but not seen the other for months, dammit) A couple of shots that Dad took - the building that Matt has was actually a radar station during WW2, one of the very first in the world; the main part of the building was the control and operations room, the radar itself was outside on a hard-standing area....   After all that, did the car pass the MoT?.....Nope. A couple of niggly things; a brake bulb was out and the windscreen washer isn't working; Brake bulb has now been replaced and I did test the washers last night, but assumed it was because the fluid lines hadn't been primed that it wasn't squirting. Closer inspection this morning revealed that the washer motor wasn't even operating. The emissions was also a fail. Again, for non UK guys who aren't familiar with the test, there are 2 x points at which it's tested; the natural idle and the Fast Idle between 2,450 and 2,850 rpm The parameters measured are CO, Hydrocarbons @ Fast Idle (HC) and Lambda @ Fast Idle. With my car, the hydrocarbons count was extremely low, about as low as you're going to get at 5ppm versus a max of 200ppm. This is very good news, shows an efficient engine and gives us latitude to try and dial in the CO element. After 2 runs, the CO count halved from 2.233 down to 1.140 due to the cat really heating up (100 cell cat)...however, the max limit is only 0.300, so we're way out. The plan of action is to return on Wednesday and see if we can extend our time using the gas analyser to dial-in the perfect blend of MoT pass and drivability. 95% of the MoT is done now, so that's good, we just need to nail this part without haemorrhaging the whole day. Overall it can't be anything other than a positive day....like the dyno week earlier in the year, there are now so many validated elements to the project not least of which, it made it there and back with no dramas or breakdowns! As Ollie my Dad have reminded me a couple of times today, this isn't a project where everything gets nailed on Day 1 - there are simply too many moving parts and interdependencies. It's very much going to be an iterative approach; a quick tweak here, a subtle adjustment there. Last edited by Spenny_b; 11-14-2015 at 08:32 AM.. |
||
|
11-14-2015, 08:02 AM
|
|
|
Kartoffelkopf
|
Quote:

|
||
|
11-14-2015, 08:09 AM
|
|

|
|
Kartoffelkopf
|
Vacation - Daily update #1
Evening gang....I'm now on vacation for the week; needed to use up some holiday entitlement before losing it, and it seemed an opportune time to combine this with Steve's work this Wednesday. Initially I thought I would be doing nothing other than polishing it, as everything will be done....hahaha....not a chance. Just when I think I'm done, I find something else that needs attention! Had a couple of really productive days work since Saturday, I've clearly pleased the resto-Gods, things have gone my way completely. First off, yesterdays schedule was to address the malfunctioning windscreen washers. Decent weather meant the car could be worked on outside, wheel off, tank partially out and a good look/see. Everything buzzed through ok on the DMM, and then worked perfectly when I reconnected and tried it! I'll "take it", but I really dislike things suddenly working for no apparent reason other than perhaps a dodgy connection. Which it rarely is, it's just a great catch-all explanation. Moving on, time to work on the headlight washers....classic case of having not used the car for so many years, I'd forgotten the function of some of the more eclectic switches that Porsche decided to chuck-in-there in the 90's...."ergonom-what?". Some searching on here and Rennlist, where folk are talking about the headlight washer switch being "under the pod"...and sure enough, the 964 has a rocker switch under the gauge pod. (yeah, wait for it...). So, I'm randomly operating this momentary switch...with and without the lights on....with and without the windscreen wipers going...can't hear the relay operating but connecting a spare 12v battery directly the pump soaked me nicely. Hmmmm. I was just about to buy a new relay (not cheap) but decided to go and make a cuppa instead. Went back out the garage, then realised what an utter donkey I'd been; that switch was being talked about on a 928 topic...on the 964 it (of course) adjusts the time on the clock. Directly above it. Ok....so where the hell is the headlight washer (yes, I can hear you all shouting at me, thanks...)....didn't think to look at the stalk...pull back for windscreen, push forward for headlight wash...with headlights ON. I did laugh to myself. Then went to bed. This mornings plan was to address a brake warning light that persistently lights each time the ignition is switched on. Don't know why, but I assumed that it was the handbrake light, inspected the handbrake, and lo-and-behold, I find that my unit has a snapped off sprung connector at the back...the electrical contact that makes and breaks the circuit with the switch unit and lights/extinguishes the warning light. Thankfully a new contact spring can be ordered as a separate part, £8'ish but it does mean that the lever has to be disconnected and the old "stub" removed by drilling out a pair of rivets. A job for later on in the week. But that wasn't what the warning light was for; it was only when I Googled for a PDF of the owners handbook (I don't have a copy, and baulk slightly at paying £150 on eBay for one), that I find out that this particular lamp is for the brake fluid level....EH?!? I only just filled and bled the brakes?! What I then noticed, moulded into the plastic header tank, is the warning to fill up to the desired level only once the reservoir had pressurised (presumably the reservoir used for emergency ABS assistance?). Sure enough, upon checking it was down to the minimum recommended level. A quick top-up and it's another item off the list. Easy. Next up, change (what I refer to as) the stabiliser bar on the transmission; If you remember a few months ago, I made a very nice looking rose-jointed item that bolts to the main housing at one end, and via rubber isolators to the chassis cradle at the other. I only made it in anticipation of the original one not successfully re-plating. Plus I like to mess around on the lathe and "make stuff". Anyway, the OE bar did re-plate perfectly, so I put it back to stock. Next job, while I was under the car, I thought I'd see if I could adjust the alignment of the gearstick, to bring the neutral position aft, and hopefully give a more positive feel to the 1-3-5 engagements. What I'd completely overlooked was that there is an adjustment on the forward shaft that attaches between the underside of the gearstick and the forward crossmember.  TK Chris had helpfully suggested some months ago, that I replace this with another rose-jointed item from FD Motorsports. I will at some point, just to prevent the plastic inner bush from failing. For the time being, by loosening the locknut and screwing in the joint as far as possible, it has resulted in the lever moving back, and a lot nicer feel to the 1-3-5 shift....albeit only a static test, the proof of the pudding will obviously come on Wednesday. So, I thought that while I'm on a roll, and the transmission tunnel cover is off, I'd have another attempt to fit the brand new gearbox undertray. I must have hoisted the car with the arms of the lift in a *slightly* different position, as this time, I was able to slot it into place, interlock the tangs with the tunnel cover and get it bolted into place. Another job done! And then the job I just noticed that needs urgent attention first thing in the morning....oil....dripping off of one of the wastegate control hoses on the RH side. WHAT?!? I could see it coming from the tinware, and running down the heatproof sleeving. A quick inspection under the hood revealed a nice pool of oil laying on the tinware skirt, however, with the IC in place and the AC hoses there (reminds me, I can get Matt to recharge the AC system on Wednesday...) I can't get to it well enough to see exactly where it's coming from; my initial thought was (naturally) the valve cover. But....I can see evidence of oil spitting on other parts in that area....a drip/run from the valve cover wouldn't do this. Lightbulb moment....the PS pump. Sure enough, a contorted wipe of the finger under the pressure hose, and it's wet. Jeeeesus. Mega flammable. Baffled how this can be leaking, as I specifically remember tightening that banjo bolt to the required torque. Anyway, the plan is to remove the tinware skirt and access everything from under the car, give it all a good clean, inspect, tighten or replace the copper washers and re-test. Am rather glad I caught that before any serious driving... 
Last edited by Spenny_b; 11-16-2015 at 03:43 PM.. |
||
|
11-16-2015, 03:28 PM
|
|
|
Registered
|
Good evening Spencer!
I have just seen your small video, that it is pleasant to hear it again to hum!
|
||
|
11-17-2015, 08:38 AM
|
|
|
Kartoffelkopf
|
Quote:
|
||
|
11-18-2015, 02:38 AM
|
|
|
Kartoffelkopf
|
Vacation - Daily update #2
Sorry, a little late posting this, as I needed to get an early night last night, ready for D-Day today. So, yesterday was another pretty good day with progress. The most urgent issue was of course to identify that oil leak. Thankfully, once I had the tinware removed (a lot easier than reaching in from above, despite needing to removed a few other hoses to allow it to be freed), it was pretty clear to see where the oil was coming from. Not the PS pump at all....which was really good news. Turns out, it was the camshaft oil feed banjo onto the cam carrier housing - which makes sense, as this is a pressure line as well. Actually, more specifically, it was the hex feed restrictor union that interface the banjo to the cam carrier. I confess to being a little surprised by this, as we saw no leaks from here whilst we spent a week on the dyno a few months ago, but there you go, stuff happens. A few minutes spent thoroughly cleaning everything and replacing the plain copper washers with some of the crush-type washers, and it all looks to be ok now. Next job was to swap out some of the ally washers on the crankcase perimeter studs. I never have liked these and the way they distort so much when torqued (John, we were talking about this in London a few weeks ago - turns out they were the pukka Wurth items rather than Victor Reinz). I swapped these out for some steel ones, and re-torqued...another niggly little job off the list. Unfortunately, the day didn't end quite so well....I noticed the other day that some pillock in the cars previous life had fitted a 15" wiper blade on the rear windscreen. Standard fitment is 13"...but when combined with the high level brake light I have, it's a recipe for the blade wedging itself under the brake lamp. Which it did the other day when I tested it (forgetting from 4yrs ago that this was something I needed to address). No harm done - I thought - I'll just replace with a 13" blade. Went to fit it, and the wiper arm snapped clean in half. Dammit!!....Only option is a genuine Porsche part....at £165+VAT. This bloody car…. |
||
|
11-19-2015, 05:31 AM
|
|
|
Kartoffelkopf
|
Vacation - Daily update #3
A very busy day yesterday hence the lack of immediate update. Steve arrived at 7.30 in the morning at my house, so we were able to really get started early, tweaking and honing the various maps before waiting for a socially aceptable time to fire up the car, upload the maps, and then play with idle settings, fast idle (2450-3450rpm) settings, and then taking it for a spin around the block so that Steve could see how it feels in real life. Some harshness in the 3k area (see further comment below), and a very fragile pulling away transition from idle map to low speed driving map meant that it was stalling at the slightest provocation, but this is all good stuff to find out early in the day, to address once its fully road legal with an MoT certificate. Hopefully. Over to Matts for just after midday, and Im starting to wonder whether we have a repeat of the issue we had on the dyno a few months ago, specifically the Bosch ignition amplifier (3-way unit) that at the time had gone offline, leaving us with only 1 spark on 4-5-6 (ie., it was the top bank of CoPs that werent firing). At the time, we had a second issue and a rapid loss of hours left to do the mapping, so when we discovered the issue, we fixed and just got the hell on with it. We never did understand the failed ignition amplifier. So, we were hoping we could use some of Matts Bosch diagnostic tools (hes a Bosch certified shop got loads of really nice bluetooth enabled diag kit) to see whether we have a bank of plugs down .he had the kit - a magic wand that you sit on top of the plug lead or CoP and it can detect the pulses .but only on CoPs that arent deep where the high tension part buried in the head. Bugger .got to do it old-skool and pull each CoP to test. We re-ran the MoT emissions test, and after making a very subtle (0.2º) change to the ignition advance sites in 2400-3400 area, it swung the CO reading from >1.140% down to 0.097% (not a typo) .Steve was amazed at how this made such a significant difference, but also equally amazed when I revealed to him how small the integrated exhaust silencer and catalytic converter were, and also that its a 100cell cat! I think he was only half a step away from throwing his arms up in bewilderment! (I told him this before we got the emissions pass, haha). With the official paperwork now done, Steve spent another hour or so merging maps, making adjustments, but crucially re-checking the emissions to ensure that whatever he had subsequently done, didnt a) affect the test and b) make sure itll pass again next year. Time for more driving, but by now were starting to lose the light, its raining, the HVAC isnt charged with AC gas and its misting up inside .and frankly Im more than a little nervous with the beginning of rush-hour and school traffic (think Kamikaze mums in SUVs, buses, coaches and hundreds of wayward kids walking into the road with no regard for self preservation ) Stalling at junctions is the next issue to address, so we found a very quiet private road, dead straight and flat where we could stop/start/repeat as many times as we liked. It also has speed bumps and table-top ramps to contend with, plus one quite steep incline to simulate a hill-start. More refining and we now have a REALLY nice feel, where the engine catches itself but critically not with a tonne of advance where it shoots off like a mad greyhound. One thing that was revealing for Steve is just how many things you need to juggle with air cooled cars; no consistency at all with temperature control with temps shooting up all over the place .not helped by the discovery that my front oil cooler fan wasnt coming on in either low or high speed. A quick removal and bridging of 30 & 87 to kick the fan in, and alls good again, but a test later reveals that it appears the relay (R04) is knackered. Even switching the AC relay (R14) which is identical, doesnt fix it and test that relay indicates its also shot .I find that hard to believe, but will investigate further. When Simon and I were determining the requirements for the ECU wiring loom, he did accommodate a low-side drive output form the ECU to trigger a relay for this oil cooling fan. At the moment, its just tied out of the way (albeit enabled in S/W) so Ill look into running this in parallel with the CCU control of the fan. It should be the case that the ECU will always determine the fans operation, as its detecting the actual oil temp in the engine gallery, rather than behaving reactively to the temp measured in the oil cooler radiator. Steve spent a while running me through the algorithms for the traction control system, with the speed differential maps across the 4 corners, and then the multiplying factor that is applied to either reign in or soften the control. Then, just when I thought my head was going to melt, we move onto the G-sensor and its effect, essentially adding a 3rd dimension to the road speed vs throttle position graph .THEN .a 4th dimension, where the G-sensor also has built into it a yaw sensor, the 4th axis then becomes the rate of rotation in degrees/second. Head boom. So, Ive got to find a suitable flat space to mount this in the correct orientation. I have to say, this all seems completely irrelevant at the moment, I dont even have the courage to give it 100% throttle with the lowest boost map (0.7bar) activated! Mind you, thats mostly to do with the fact that the chassis setup feels about as distant from good as you could hope to be if, if you were challenged to set something up badly in order to win a lottery amount of money. Its comically awful and with 40mph gusting crosswinds on the roads we were driving, I was a nervous wreck each time we got home. Polar opposite to how the Exige feels, if Im honest. Apart from diving into how to perform data logging in the Easimap software, that was were we left it for the day no doubt some more tweaking will be needed, as the car is only truly cold once in a day like that. |
||
|
11-19-2015, 05:32 AM
|
|
|
Kartoffelkopf
|
Vacation - Daily update #4
Today I’m giving it a rest - I’ve had enough of playing with this car for a few days, it’s been intense to make sure everything was as good as it could’ve been for yesterdays mapping mission. But there were a few niggles that require another list to be made: Oil cooler fan Relay fix - described above Oil cooler fan ECU control - three, or maybe four ways of doing this: First is to route the output from the ECU to the fuse/relay board in the frunk, obtain a relay and the captive female spade receptacles and make it look factory Second would be to install a separate relay by the oil cooler itself, but this would need a +Ve feed from somewhere (probably a spare fuse slot in the fusebox) Third could be to bifurcate the signal wire from the temp sensor on the oil cooler, essentially hijacking the signal to the CCU Fourth could be to tap into the relay coil connection of the stock oil fan relay (R04) and override this with the ECU signal. Clutch pedal Requires the pedal to be virtually pushed through the floor, to ensure a smooth shift. I only remembered yesterday that the workshop manual for the 964 does say that there are 2 dimensions that need checking and adjusting on the clutch pedal assembly; first off, there needs to be a 6mm gap between a screw and a pivot for the boost spring. Secondly, the pedal travel needs to be adjusted to 145mm +/- 10mm. I’m also going to re-bleed the hydraulics, just in case the first part of travel is actually just compressing trapped air…it feels good and not soft/squidgy like brakes do with trapped air, but in fairness I don’t have a huge amount of experience with this clutch system. Oil leak….again The work I did on Tuesday to fix the cam line banjo leak doesn’t look to have worked. Only had time for a quick cursory glance, but I did see a small pool of oil on the tinware skirt when we were doing the emissions check. Time to do it again, but this time I’m going to buy some self-sealing washers, the ones with a rubber gland bonded to the ID of the steel washer. Investigate the dump valve Actually, not the dump valve at all. There’s oil spitting evidence on the cold charge (exit) pipe of the intercooler directly above where the BOV is mounted, hanging upside down. Hmmm…why is there oil being sprayed? It can’t be *that* much oil, as it would’ve been detected in the emissions test, or rather, it wouldn’t have passed by such a strong margin….but there is oil nonetheless and I can’t help feeling it’s my oil tank breather catch-tank. A guess would be that under load, the vacuum in the inlet tract (where the catch-tank vents into) is drawing oil up and into the intake system. Arggghhh!!! This is the real pain in the arse problem to look into, as it’s going to be a significant rework to fix it, unless I say “screw it” and vent the catch-tank to atmosphere. I was going to dismantle the IC and associated pipework at some point, in order to rework the cold pipe and weld it a little more accurately to the IC….but I wasn’t planning on doing it this side of Xmas. Looks like I now need to remove everything, and presume that I’ll see oil in the inlet pipe, in the turbo compressor housing and through the intercooler. FU*K IN HELL. Ignition amplifier As mentioned previously, source another Bosch unit (good idea to treat it like the old DME relay, and keep a spare in the frunk), then swap it with each of the 4 existing units, test drive and see if it makes a difference to the harshness I can feel (through the seat) in the middle rev range. Again, lack of seat time with air cooled engines is my downfall here, but it really doesn't feel smooth at all. Once on boost, it flies, and all the readings that Steve was monitoring on the ECU yesterday show nothing untoward....it just feels....crap...like a washing machine that's out of balance. Is that business as usual? One explanation could be that the geo is so out of shape that we've got some side-to-side toe issue that's manifesting itself as a scrubbing vibration? The geo really does need addressing before I can stretch the legs of the engine (safely) so another job on the "must get done soon" list. So, I’m not even touching it today, I’ve had a gut-ful, frankly (as if that wasn’t obvious). Not an enjoyable experience finding yet more stuff I need to do, and am feeling very broke having spent another £2k in the last day alone….going to go and play with the Lotus instead, see if I can't go and break something expensive on that as well. Last edited by Spenny_b; 11-19-2015 at 06:18 AM.. Reason: Edited to remove grumpy rant...not productive... |
||
|
11-19-2015, 06:00 AM
|
|

|
|
Moderator

Join Date: Dec 2001
Posts: 9,569
|
Spencer, I wouldn't use the aluminum/rubber washers on the spray bar banjo fitting. This calls for aluminum crush washers on both sides of the banjo and another between the case and the fitting itself, if I remember correctly. The solution is to check the mating surfaces for any defects, then use new crush washers and torque the whole thing to the proper setting. It's a pretty high torque value so don't be shy about using the big wrench on it. I am afraid that using a rubber/metal composite won't stand up to the torque AND will put bits of shredded rubber into the oil system.
The Bosch ignition amplifiers are pretty stout, you could hit them with a hammer (or like 20V overvoltage) and they still work. So you're using four of the 203 three channel units. Did you use heat conductive paste between the modules and the aluminum mounting plates?
__________________
'66 911 #304065 Irischgruen 96 993 Carrera 2 Polarsilber '81 R65 Ex-'71 911 PCA C-Stock Club Racer #806 (Sold 5/15/13) Ex-'88 Carrera (Sold 3/29/02) Ex-'91 Carrera 2 Cabriolet (Sold 8/20/04) Ex-'89 944 Turbo S (Sold 8/21/20) |
||
|
11-19-2015, 05:56 PM
|
|
|
Kartoffelkopf
|
Ok advice heeded re the washers John, thanks. They were originally installed with the ally crush washers, all torqued appropriately. The mating face on the cam carrier looked fine, no damage with knicks or scores...maybe I'll spin the hex adapter up in the lathe and re-face it with a spring cut, just to give it a clean.
Yeah those amps have never let me down before, and generally I hate fixing something without understanding why it now works, but back on the dyno at 5.30 in the evening, a £6k bill already and a hard stop to get the engine off at 8.30, for once I didn't give a toss, and we just cracked on to build the rest of the maps! Indeed, I'm using 4x 3-channel units, with a pair mounted on one plate, and the other pair on it's own plate....decent thickness material to act as a sink, and indeed, the thermal transfer compound was applied under each one. The other measure we took when building the loom, was to ensure that each amp wasn't firing 2 coils in quick succession, to minimise as much as possible the duty cycle heat of each unit. ...I'm aware that I may be chasing ghosts on this one, and that there are other things that need addressing before a meaningful or correct diagnosis can be made. It could be my very limited experience of running/driving air cooled motors....this may well be just one of those characteristics that they do....give me an M09x or Mezger-based watercooled lump, and I'll tell you if it's running right or not! |
||
|
11-20-2015, 01:23 AM
|
|
|
Kartoffelkopf
|
Quote:
I was using a setting from Waynes book, which I'm not 100% of in terms of its description...and iirc it was 35Nm? (am not at home at the moment, so the book isn't to hand...I could be misquoting) |
||
|
11-20-2015, 01:49 AM
|
|
|
Registered
|
Quote:
Good week-end ! Last edited by Pat RUFBTR; 11-20-2015 at 12:05 PM.. |
||
|
11-20-2015, 10:33 AM
|
|
|
Kartoffelkopf
|
Hi Pat, really appreciate you asking your guy, thank-you.
My memory was correct, the book does say 35Nm, which is what I would have done it up to earlier in the week, so further work needed to see where exactly this leak is coming from and what I can do to fix it. I also noticed that there's another leak on the 1-2-3 side as well, same place I think, but it's harder to see with the intake pipework there. Something isn't adding up - I had none of these leaks on the dyno when the engine was being fed by the oil system in the dyno cell (rather than the cars oil supply system). The oil pressures seem to be reading ok on the dash gauge though; 4.5bar at 5,000 when warm, drops to between 2-3 when idling. I wonder whether there's something amiss with the plumbing somewhere in the system, maybe creating excessive pressure? |
||
|
11-21-2015, 12:22 PM
|
|
|
Registered
|
Hi Spencer,
In fact my mechanic told me to pay attention on the quality of slices aluminum "joins"("closes","contacts"), she(it) differs if they come from Victor heinz or directly from Porsche, those of Porsche are more qualitative, thus we can squeeze(tighten) them with no problem at all to 30 Nm otherwise is better to squeeze(tighten) to 25 Nm. Otherwise, as for the oil leaks, I think that they can come from the junction (crankcase of distribution(casting) / support(medium) ACC). I also arrest(dread) the flights(leaks) in spite of all my efforts, nothing more irritating!!! Good Sunday! ;-) |
||
|
11-22-2015, 12:58 AM
|
|
|
Kartoffelkopf
|
Yup, I'm now pretty sure (although now I'm not 100% certain) that the crush washers I used were from the Victor Reinz gasket set I bought when I first stripped the engine. I have an order in-progress with my local OPC at the moment, so I think I'll add these to the shopping list and get genuine parts.
Another lesson learnt with Victor Reinz, perhaps....I should've binned that kit and bought a Wrightwood kit...ho-hum...next time. Another big shout out to Chris @ TurboKraft, a very long email over the weekend with very helpful suggestions regarding oil system breathing. Complete stand-up guy...as we all know already. I'll start to look at the car again during the week |
||
|
11-22-2015, 08:44 AM
|
|
|
Kartoffelkopf
|
After a busy week and just wanting to leave the car alone for a while, it's been a productive day back on the project.
First order of the day is to carefully strip the intake system, being cautious not to remove any tell-tale signs of where oil is coming from. Report so far....
Other findings: 1) The oil evidence I can see on the cold exit pipe from the IC is, I'm sure, excessive oil from the air filter when is adjacent to it. I'm not 100% convinced, as the filter is the opposite side of the pipe, but it looks possible that the BOV is blowing surface oil off from the filter, when dumping excess boost. It does feel stickier, much like the retention oil that's used on new foam filters. There's no trace of oil in the pipe that the BOV is mounted to, so it's for sure nothing in the intake air supply. Great news, and I'll try and remove as much oil as I can from the filter now that it's had chance to cover all the foam cells.  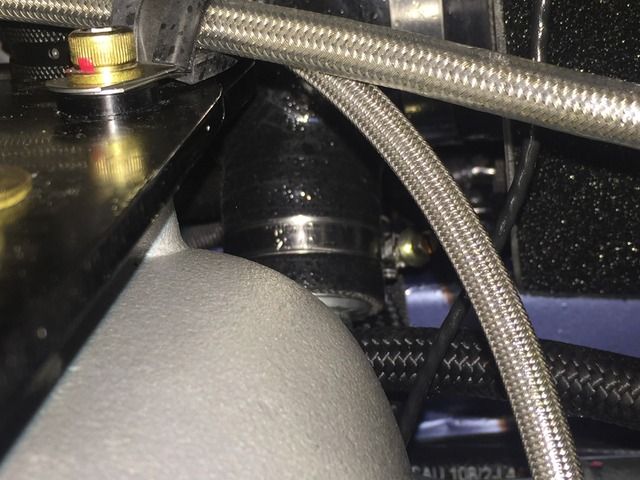 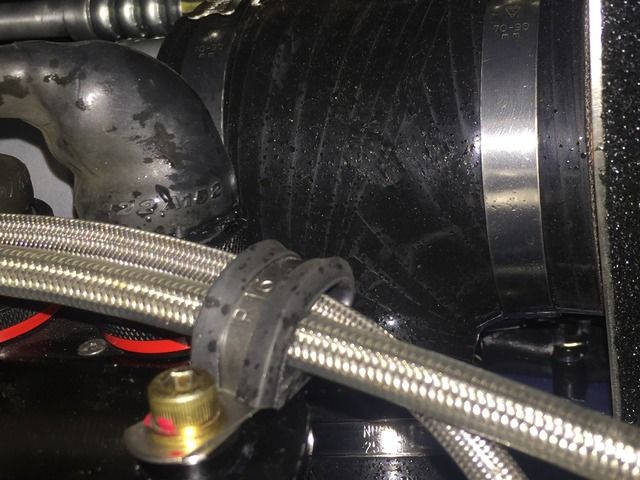 2) (talk about airing your mistakes in public)....The oil return from the air/oil separator tank is a small -3AN hose, feeding from the tank to a spare union on the crankcase breathers chimney plate. I installed a -3 adapter, which is still nipped-up tight, but the 90º -3AN union was less than finger tight. I remember that I struggled to get this lined up, so perhaps once I did manage to get it on and finger tight, I maybe got distracted and made a cuppa, and never tightened it fully....no signs of my red paint-pen.... Clearly, this is the source of the oil on the shroud...and everywhere else. What a stupid error, and has only been added to (although tiny by comparison to the crankcase breathing) by the oil return from the source separator tank. 3) The pooling of oil on top of the timing chain housing, I'm pretty sure, is where oil has run along the -4AN hose that is used to lubricate the turbo. It snakes slightly downwards from the top right corner, under the intake over to the front left hand corner, over the top of the timing chain casting (and resting upon it), before disappearing down through the tinware to the turbo. (you can just about make out a faint yellow-y path of oil down towards where it's pooled, and wetness under the -4 hose) 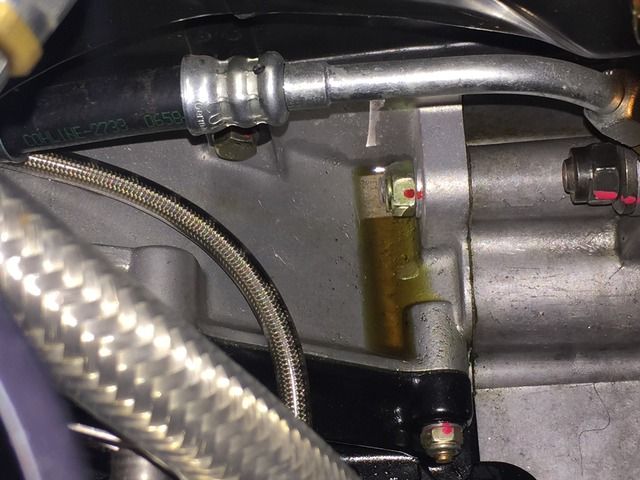 I can see no other possible source for the oil; the line that runs to the cam housing (new) is bone dry, the uppermost nut between the casting and the crankcase is also dry, and there is no other tell-tale wetness in the surrounding area apart from oily residue from where the oil supply line to the turbo rests on the housing. It's basically been used as a conduit. Or the housing casting is porous!? (joking). So in addition to some cleaning up of the oil, that's where I'm up to before breaking for a well-deserved fry-up lunch. And to document this. So, best I disappeared back into the garage and carry on. Will report back later with more findings. |
||
|
11-28-2015, 08:21 AM
|
|
 |
|
|
| Tags |
| 964 c4/c2/turbo , efi conversion , life racing , syvecs , turbokraft |


 930
930
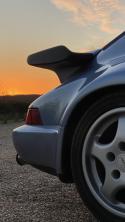 1993 Porsche 911 (964) Turbo 3.3
 2006 Lotus Exige Cup 240 (#45 of 50)
 BMW M2 Competition
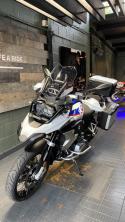 BMW R1250 GS Rallye HP
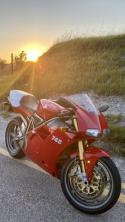 Ducati 748R

