|
|
|
|
|
| Author |
|
|
Slippery slope skier

|
Hey Spencer,
Glad to hear your project is progressing. Very curious about your new ignition mod....waiting patiently to hear more  Very tempted about your FS pencil coils and amplifiers.....I will need them in my next phase. But I have to manage the budget to get the car running 1st.......already tumbled way too far down the slope! Cheers PS. I really really like your ethrottle implementation. I have started looking for the same Bosch/Audi unit for my project.
__________________
'85 930 ...the oil leak rebuild which mutated into more than I could chew... then came back to my senses and climbed "back up" the slippery slope! A stock 930 is far better than an incomplete project car! 930 rebuild The revival of my mothballed project |
||
 12-07-2016, 08:17 PM
|
|
|
Kartoffelkopf

|
Hey Costa, I'll shoot you a PM later. The throttle is from a 997.1 Carrera
In the UK, folk like Porsche-Apart sell such things, it was a long time ago now, but iirc, I bought from them via their eBay store.
|
||
|
12-08-2016, 01:00 AM
|
|
|
Kartoffelkopf
|
Time for another update, it's all about the ignition system at the moment while Chris is looking after the cylinder reworking.
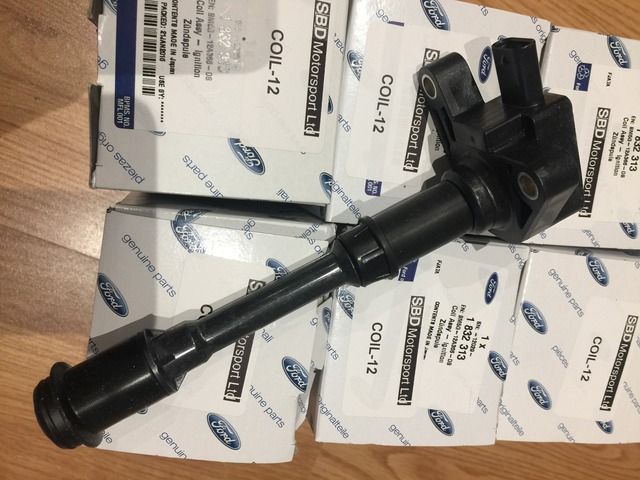
The plan was to look at using some Ford Ecoboost coils, from the Fiesta 1.6, a direct injection lean-burn engine. I'll confess, I thought this was going to be a lot easier than it's turned out to be, and had the coils not already been ordered in specially (miscommunication), I probably would've scrapped the idea and kept everything as-is. But. That's not how it turned out, and the curious side of me wanted to press on and see what could be done. It took a good month or so of me scratching my head, staring at the head/valve assembly for inspiration, trying different things, experimenting and prototyping until I was happy to then commit to the project by making some permanent changes to the valve covers, and ultimately selling the original Denso units I had been using. The Ecoboost coils as they arrive from Ford look like this..... 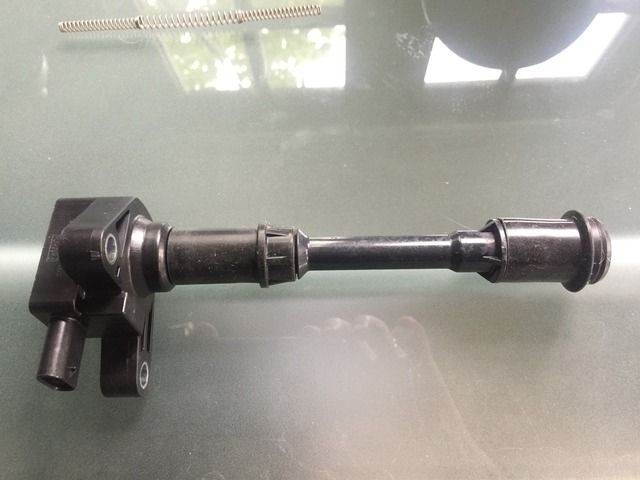 Clearly they're too long for Porsche use.... 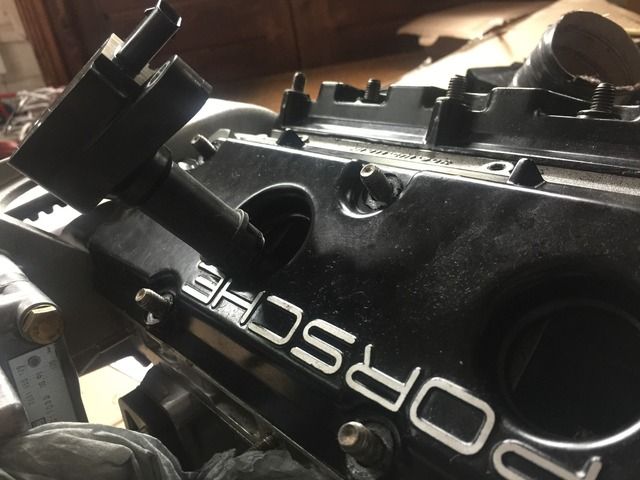 ...but they are easily broken down into their component parts..... 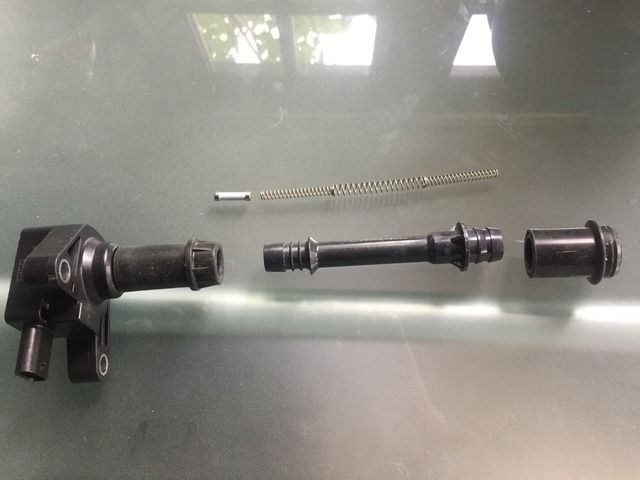 Having bought one unit to play with, I set to and started cutting the centre section to length. 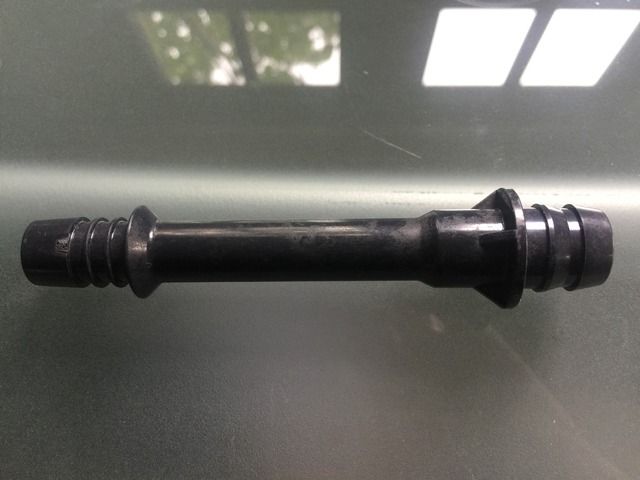 This bit is the part that caused me the most thinking....what plastic is it (for glueing)? What temperature do I need to be thinking about? How best to shorten them? Is it something that I can get a mate to 3D print, as a whole new centre section? Is it financially viable to get 12 made by a machining shop on a CNC lathe? Do I want to make new ones myself on my lathe? In the end, the option of chopping a section out of the middle was the way I've gone, and then sleeving and glueing. Having tried a number of glues, I've now found one that is super tough, I can't separate the prototype unit without potentially snapping the tubes. This option means I don't need to think about messing about with the rubber boots at each end, they just pop back onto the barbed ends of the tube, as usual. 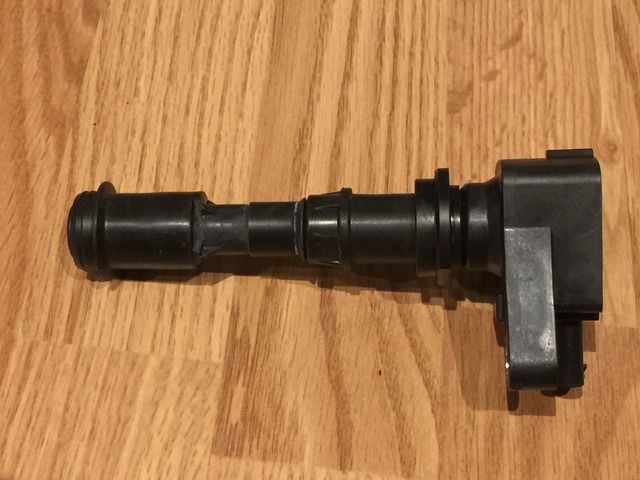  However, there are 3x lengths that need to be considered. The inlet side valve covers are all the same, and 5 of the exhaust lengths are the same, but #1 exhaust is shorter than the other 5 (a detail that I hadn't noticed on the valve covers before, strangely). Once the tube has been shortened, the centre spring then needs to be cut, in a way which still allows good electrical contact with the in-line fuse but removes enough length to prevent any coil binding. The spring has a fat centre section which engages with a shoulder in the ID of the tube to prevent the spring falling out, so the spring can only be shortened from one end, otherwise it won't make contact with the spark plug. |
||
|
12-21-2016, 06:23 AM
|
|
|
Kartoffelkopf
|
Next consideration was how to bolt them down. Each unit has 2 lobes with holes for M6 fixings. A couple of thoughts; I could remove both lobes from each coil and use RSR style fingers to hold them down, but these are quite top-heavy coil units; the drivers are pretty chunky, far more so than the previous Denso units which are super-small and compact.
On the other hand, do I really need 2x M6 fixings per coil? I think that's a little excessive, and it also means that one of the fixings would be on the "wet" side of the valve cover, meaning more work to make sure its oil tight. So, removal of the longer lobe from each unit means that the shorter lobe can be used, and on all 12 they are on the dry-side, no oil leaking to worry about. Coil with one mounting lobe removed . 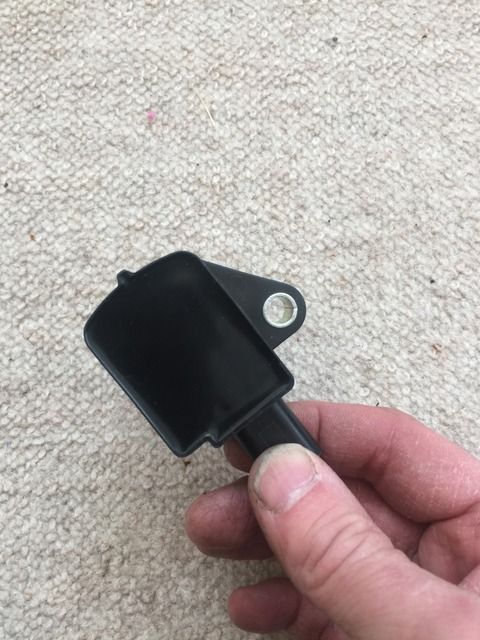 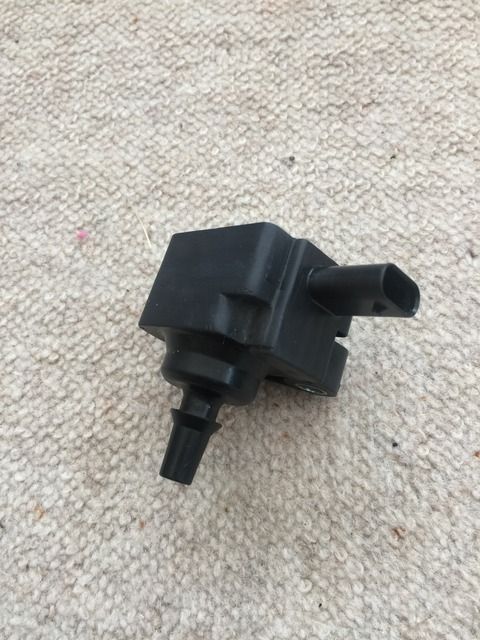 I wanted to keep each unit as tight as reasonably possible to the valve covers, so for each one I needed to make spacers, and think how to hold them....do I go for bolting down the coils into a tapped spacer (how do I then retain the spacer into the cover?)...or do I use a flange nut onto each coil, on studs? I've gone for the latter, making 12 spacers (in 3 different lengths) to sit the coils as low as possible without actually touching the covers. A length of 13mm AF hex bar was used, and essentially each acts as a locknut to the caphead stud, screwed in from the underside. The valve cover material is thick enough to also M6 tap, with 3 threads just to act as something to tighten against. All will be Loctited in place. The spacers will be black anodised, the bolts will be gold passivate plated, all to match the other engine fixings. This is just a quick reassembly, no polishing or deburring had been done for these pics 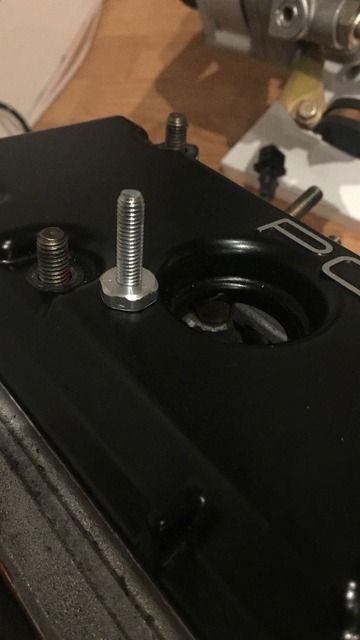 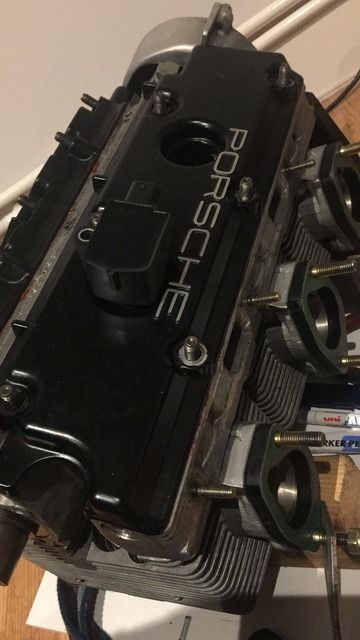 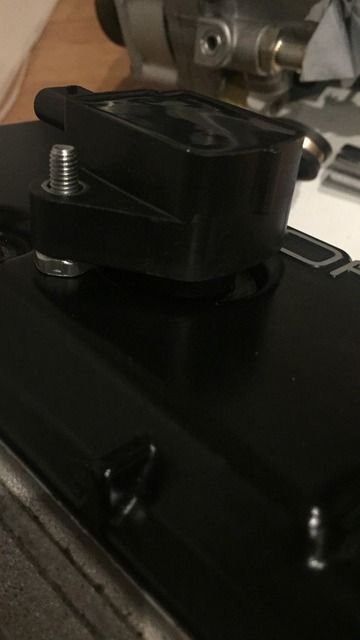 Final challenge is the coil for #6 inlet, which sits inside the tower casting for the power steering pump. This is tight, but by chopping a corner out of the lobe, it *just* about fits in the diameter of the original plug lead hole, sitting nice and square to match the others. Thankfully not a very large notch required, still leaving plenty of material on the lobe. 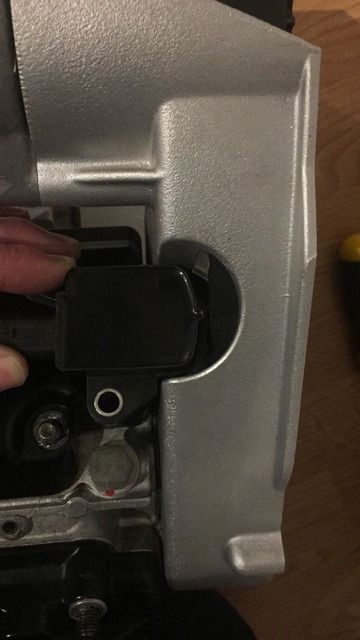
|
||
|
12-21-2016, 06:25 AM
|
|
|
Kartoffelkopf
|
So, with all that established, time to get the remaining 11 coils....
  Now I've got the task of modifying each of the remaining coils, both the mounting lobes and the 3 different lengths. All the mounting posts are made, capheads and flange nuts need to be ordered, then the plating work needs to be done after Xmas. Loom is already with Sileck, ready to rework for the new coils. |
||
|
12-21-2016, 06:32 AM
|
|
|
Registered

Join Date: Mar 2005
Location: Phoenix, AZ
Posts: 2,862
|
Continuously in awe of your ingenuity, skills, and perseverance.
Plus positive attitude in the face of setbacks -- even if some are self-inflicted ex: re-engineering an ignition system from scratch. ;-)
__________________
Chris Carroll TurboKraft, Inc. Tel. 480.969.0911 email: info@turbokraft.com http://www.facebook.com/TurboKraft - http://www.instagram.com/TurboKraft Last edited by TurboKraft; 12-21-2016 at 11:10 AM.. Reason: edit |
||
|
12-21-2016, 10:01 AM
|
|

|
|
Kartoffelkopf
|
Quote:
|
||
|
12-21-2016, 11:14 AM
|
|
|
Kartoffelkopf
|
Last update for 2016...
Plodding along with the ignition system - this has truly GOT TO BE the most tedious job of the whole project so far....I guess that 12x "anything" is going to wear thin very quickly, but glad to report that all 12 new coils have been amputated of one of their lobes. All have come out very nicely, no scarring or mishaps. Once you get a couple done, you soon figure out what techniques and tools work; by the end I was knocking each one out in about 25-30mins - quite a production line! A nice sharp Stanley knife was definitely the way to go, steadily shaving off the plastic right into the nooks and crannies of the moulding. In fairness, they look a little dull where the excess plastic has been filed back with steadily smoother grades of file, then finished with wet'n'dry (lightly wetted), then finally with a metal polish to try and bring some OE sheen back. I may have to spin on some polishing mops onto my offhand grinder to see if I can improve upon this. Todays job was to get the car up on the lift, to remove the front half of the wiring loom. This was far easier than expected, only a 10min job to snip some cable ties that were routing it along with the clutch line. Two SureSeal connectors to the front wheel hall-effect sensors for the TC, and it's now just a case of removing the transmission tunnel carpet inside the cabin, and pulling it through. Finally, with the car up in the air, I want to rebuild the oil cooler thermostat behind the RH sharkfin. I did test the thermostat years ago when rebuilding it, but it niggled me that I didn't just replace the unit at the time. All the parts have been sitting in a box for over 6mths now. As it was only fitted 300-400miles ago, removing it was a doddle, none of the huge nuts were corroded on. Any remaining contaminated oil also drained out of the tank, and the next job will be to either flush through the pipes to the front of the car and the cooler rad (using flushing oil and a pump I have) or to remove everything, rocker panels, hoses, pipes, front bumper and cooler rad, to clean it out thoroughly. I'll sleep on it, it may be a bit OTT to do that - there were no fragments in the engine after-all. Once that part has been done, it's back to ignition coils, this time shortening them. This shouldn't been too much of a pain, 3 different lengths, rinse-and-repeat with making the joining tubes on the lathe and waiting for the glue to set. The cylinders have now been reworked, and should be arriving back with Chris on Monday/Tuesday, then it'll be time to get the thinking caps on, re-check the maths and order the new Carrillo pistons. More later - wishing everyone a very happy New Year! Hoping it'll be a little more successful than '16 (for me, at least) Cheers Spencer Last edited by Spenny_b; 12-31-2016 at 11:37 AM.. |
||
|
12-31-2016, 11:34 AM
|
|
|
Slippery slope skier
|
Hey Spencer,
It is nice to hear that things are progressing well. 2017 is the year Before you know it, she will fire up again. Cheers Costa
__________________
'85 930 ...the oil leak rebuild which mutated into more than I could chew... then came back to my senses and climbed "back up" the slippery slope! A stock 930 is far better than an incomplete project car! 930 rebuild The revival of my mothballed project |
||
|
01-02-2017, 12:23 PM
|
|
|
Kartoffelkopf
|
Quote:
Yeah I'm really hoping that it'll be done this year. I used to have hair when I started this adventure - and I was in my 30's. Mid-30's. I'm sure we'll get there, by hook or by crook. Maybe I'll host a "wrap party" - everyone's invited, haha! (warning - I'm worse at cooking than I am at engine building. I'm sure you're braai's are a little more worthy of eating than my BBQ's) S |
||
|
01-04-2017, 08:16 AM
|
|
|
Slippery slope skier
|
Quote:
We could have chosen an addiction with much less pain and suffering but no other hobby is as satisfying as wrenching on these gems. ....as for braai's and BBQ's....the meat always tastes good after plenty of beer So cheers to completing this project....and then starting the next one  Costa
__________________
'85 930 ...the oil leak rebuild which mutated into more than I could chew... then came back to my senses and climbed "back up" the slippery slope! A stock 930 is far better than an incomplete project car! 930 rebuild The revival of my mothballed project |
||
|
01-04-2017, 10:04 AM
|
|
|
Kartoffelkopf
|
Quote:
|
||
|
01-19-2017, 02:36 PM
|
|
|
Kartoffelkopf
|
Another ignition update. Sorry.
Yep, it's probably as tedious for you as it is for me, but I'm almost there. Another good productive couple of evenings in the workshop, heater going full blast, TV on. Over last weekend, all of the plastic centre sections were chopped. Some careful measuring of the 3 different lengths had to be done; - 5 of the 6 exhaust side plugs are the same depth, but... - #1 exhaust is shorter by a good margin. - All six inlet-side plugs are somewhere in-between the 2 exhaust lengths, but they are all of equal length. Can't hold either of the ends in the chuck of the lathe, quite a brittle plastic (ask me how I know - the prototype I did before Xmas got a little damaged), so it was a case of hacksawing each tube in half, then using the lathe and hoping my maths was correct to shorten and face each half. You end up with lots of component parts.... 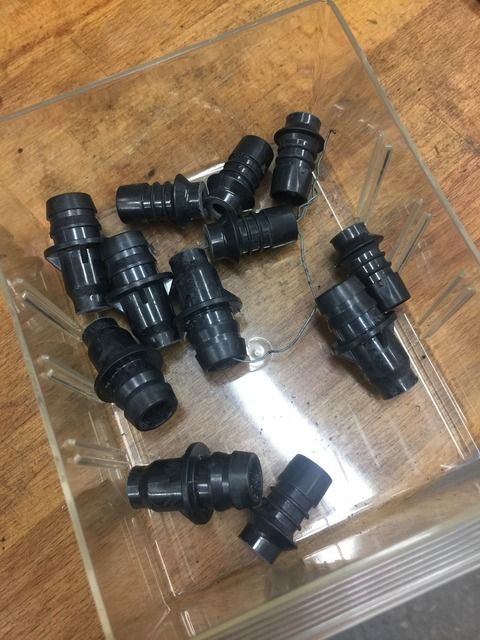 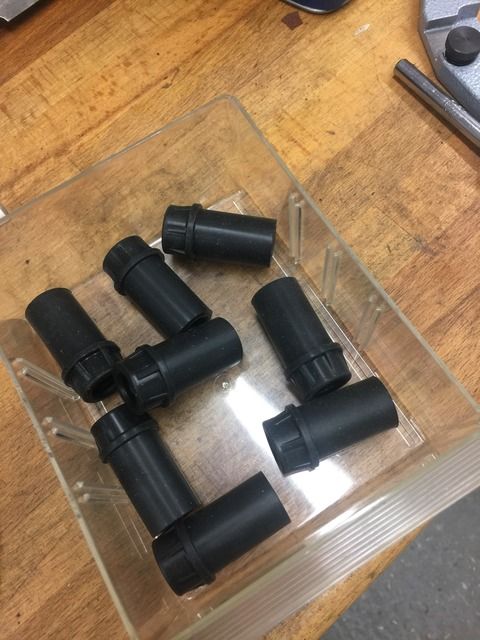 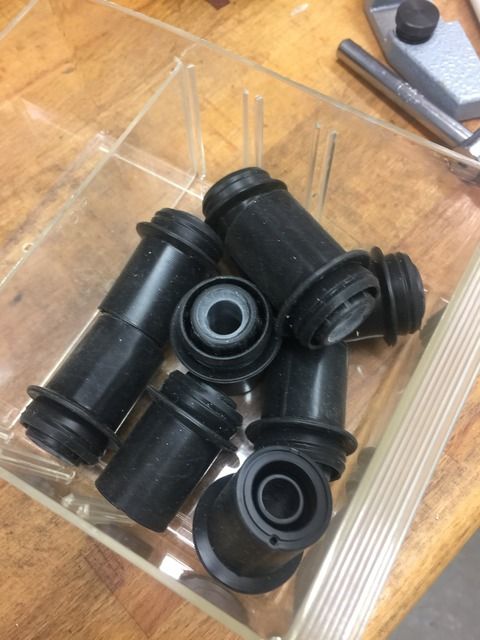 Two of the valve cover stand-offs I ended up remaking - wasn't happy with them, so that's also now finished. The stainless steel hardware which I'm using for the mounting studs arrived last week, so time to mock up each of the valve covers, and dummy mount each coil pack (no tube or rubber fittings at this point).... 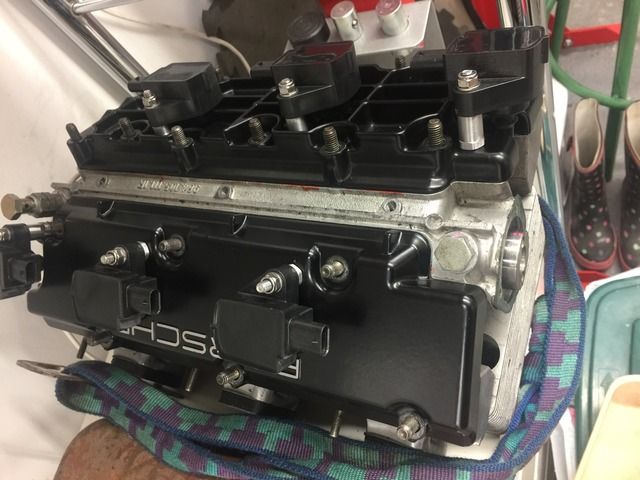 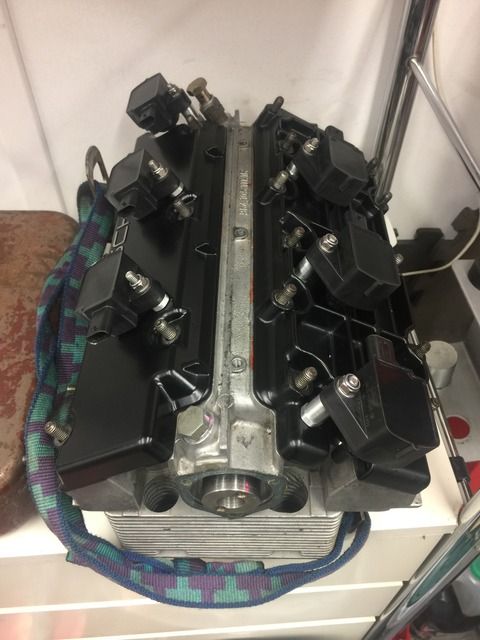 All good, they're sitting nice and level with each other (apart from #1 exhaust, which would've looked stupid floating in mid-air). Next job for this evening, was to start making the sleeving tubes which join each half back together. Again, some careful measuring to ensure that they're not too long (preventing each face from butting up to each other, thus a stronger joint), nor too short, which would prevent the sleeve from being glued to the chamfered faces on each end of the tube. Some before and after vernier measurements were taken with and without the sleeves in place, to make sure that this is spot on. 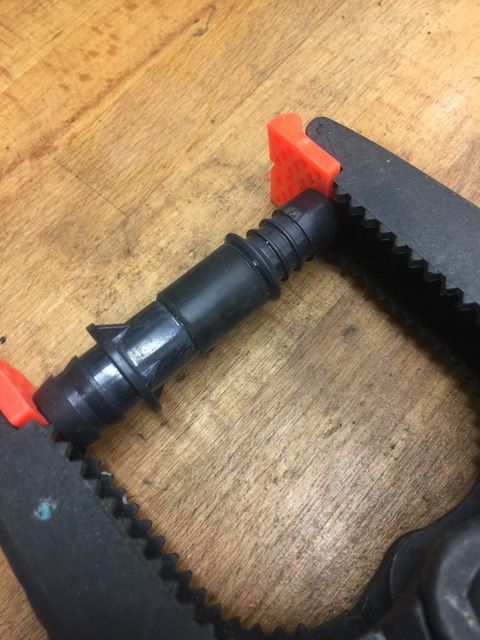 Next task, dead easy, was to Dremel cut each of the internal electrical springs. The springs are symmetrical, but the chopped end will sit coil-side, and actually now has a stronger pressure onto the internal fuse. 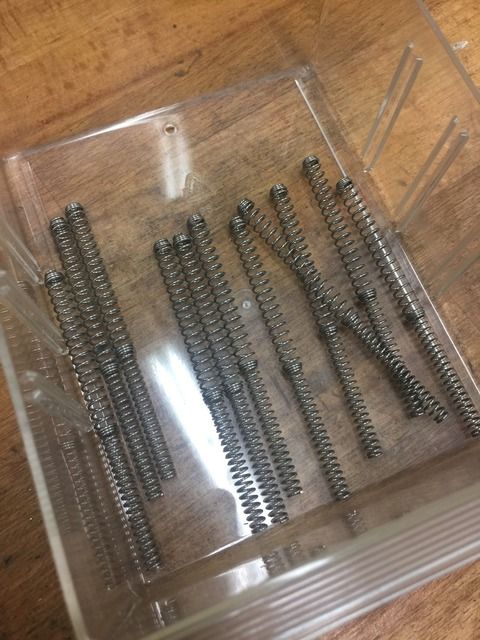 A few hours later, we have 5x completed exhaust coils. Glue is going to harden for 24hrs, before I attempt to install onto the heads. 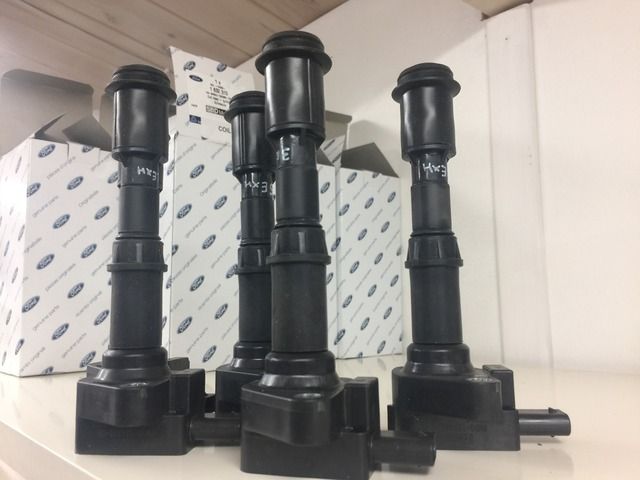 All will be marked up to ensure they go onto the right plugs. The coils themselves are universal apart from #6 which sits in the middle of the power steering pump assembly (see last pic on post #804). I'm really pleased how they've come out. Not the work of a moment, and I'll be honest, I much prefer the look of the original Denso CoP's, but nonetheless, quite rewarding seeing months of thinking and making, come to fruition. I've got a few outstanding days vacation to take from work - use it or lose it - so I'll be cracking on tomorrow to get the inlet side coils finished. Next job then will be to finally glue the centralising sleeves that sit within the collars, to the correct position. Last job is to send the stand-offs out for anodising in black. Aside from the ignition, another job I want to do is finish rebuilding the oil thermostat, and then disassemble the front bumper, remove the oil cooler and flush everything through, to rid the whole system of the petrol contaminated oil. Last edited by Spenny_b; 01-31-2017 at 03:48 PM.. |
||
|
01-19-2017, 03:10 PM
|
|
|
Slippery slope skier
|
It is looking very smart (as always) Spencer.
How do you plan to do the flushing? (Some sort of pump and tank arrangement?) Cheers Costa |
||
|
01-21-2017, 01:31 PM
|
|
|
Kartoffelkopf
|
Thanks mate!
No, I did consider using a pump on one length of pipe, and catching it from the other but the pressure needed to flush that through the whole circuit, especially with a top entry/exit oil radiator, would be more than my pump could do. So...Mondays job will be to remove the front bumper and remove the radiator, wash it through and re-install. I may be able to clean the pipes and hoses in-situ - I'll give it a go before removing the rocker panel. Although to be honest, that's a quick job, and would make life easier to flush if I were to just get on and remove everything. |
||
|
01-21-2017, 01:38 PM
|
|
|
Kartoffelkopf
|
A quick update on stuff....no pics, this has all been shown before in previous pages.
Per the above intention, I did get the front oil cooler out, and in the end I just decided to bite the bullet, remove the sill trim panels and get the oil lines removed; I was kind of right with it being easier to flush once they're removed, but I had forgotten how ungainly they are to handle! Picture the scene....a funnel with brake cleaner being poured into one end, the other end precariously balanced vertically on garden furniture, then a thumb over each end, arms at 90º and doing some strange rotating windmill yoga move to get the cleaner flowing from end to end. I'm glad my back garden has 100% privacy! Anyway, it's all done, and the oil cooler has also now been flushed twice, given a good external clean and is ready to be refitted now that it's also been heated using a hot air gun (from a decent distance) to evaporate any residual cleaner. The oil lines are now loosely fitted to the chassis, and will be nipped up once connected to the thermostat unit. The thermostat unit has been stripped, thoroughly cleaned and rebuilt using a new thermostat module and spring. I read in another thread that it's been observed that the internal springs do weaken over time - perhaps why they're sold as a complete rebuild pack from Porsche, rather than an individual item. Tomorrows job is to finish the installation and get the bodywork refitted, out of harms way. I'm also going to follow Chris's advice and remove #2 & #5 con-rods to investigate the shells. There would be nothing worse than going to this trouble and then finding there was an oil starvation or contamination issue that had damaged the bearings, which had gone unaddressed. Meanwhile, I'm going to continue to be lazy this evening and watch the Daytona 24hrs.
|
||
|
01-28-2017, 02:33 PM
|
|
|
Kartoffelkopf
|
Just a quick update this evening; the final job over the weekend (after much swearing at the front bumper and trying to get it aligned correctly - and then deciding to leave it), was to remove the #2 rod to inspect the bearings.
Quite easy to do in-situ. A quick dab of the paint pen to make sure the rod and cap go back together in the same orientation, and it's just a case of some gentle tapping with a nylon faced hammer onto the rod bolts, in order to separate the halves. Literally, a few light-as-possible knocks, and there was separation. A magnetic stick from the 4-5-6 side of the crankcase made sure that the cap didn't drop. Remove the rod, then rotate the cap around the journal, and extract. Thankfully, all looks good, no oil starvation. And breathe. 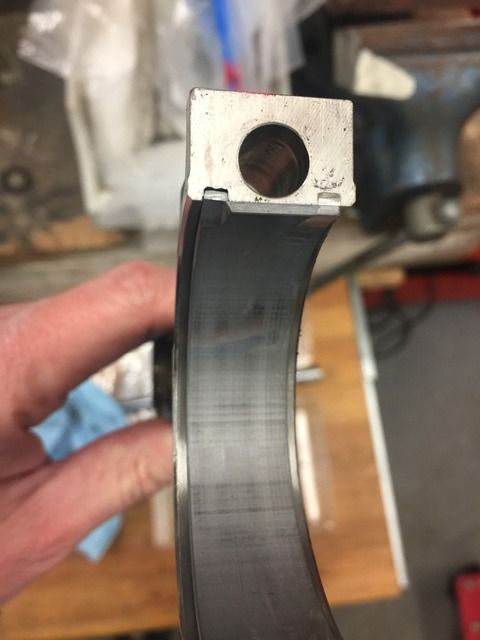 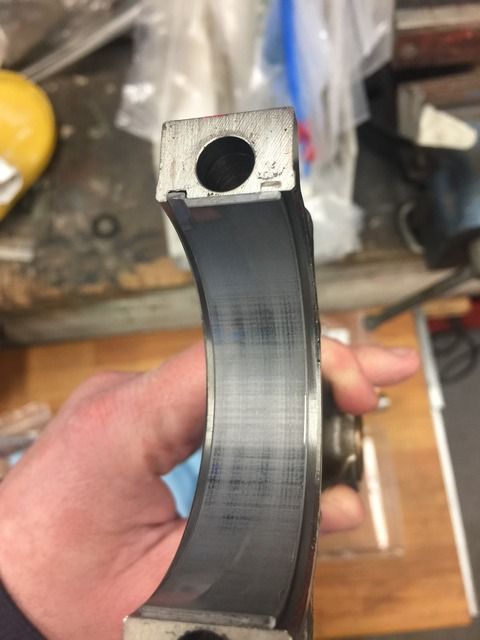 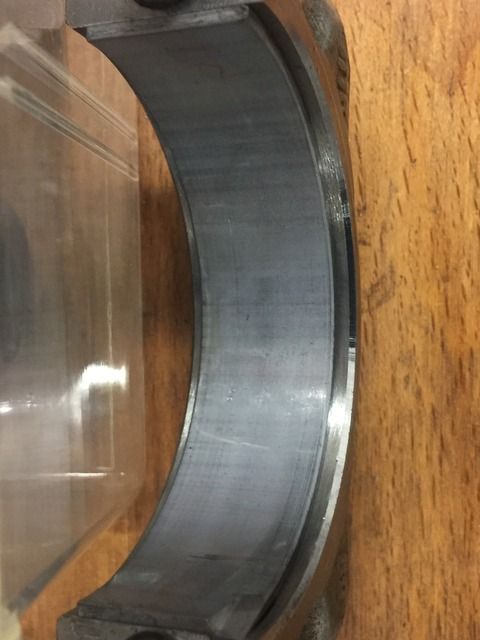  I'll reassemble at some point over the next day or so, using Red Line assembly lube and ARP moly under the heads of the nuts. Had a long chat with Chris last night - always a pleasure - but amongst the general chit-chat, the cylinders have now arrived back with TK, looking resplendently new again. Time to start looking seriously at getting the pistons on order. Approx a 6wk leadtime, plus the time it will take for the additional heat coatings to be applied. We're getting there! |
||
|
01-31-2017, 03:04 PM
|
|
|
Registered
|
Courage Spenny!
|
||
|
01-31-2017, 03:18 PM
|
|

|
|
Kartoffelkopf
|
Cheers Pat - Are you well?
|
||
|
01-31-2017, 03:21 PM
|
|
|
Registered
|
Personally I am well Spenny, thank you, on the other hand he(it) is there otherwise(differently) for my car, anything bad but his(its) restoration(catering) takes an infinite time, it is always at the coachbuilder's in Belgium! I know that the car is redone from A to Z but maintaining it has been 3 years since it drove... I take my evil in patience and I do not lose hope to present her(it) to you one day! I cross fingers also for your!
|
||
|
02-01-2017, 02:26 PM
|
|
 |
|
|
| Tags |
| 964 c4/c2/turbo , efi conversion , life racing , syvecs , turbokraft |


 1993 Porsche 911 (964) Turbo 3.3
 2006 Lotus Exige Cup 240 (#45 of 50)
 BMW M2 Competition
 BMW R1250 GS Rallye HP
 Ducati 748R
 930
930
