|
|
|
|
|
| Author |
|
|
Registered
Join Date: Feb 2004
Location: UK
Posts: 2,230
|
Per,
It all seems potentially to be going the wrong way. If only one journal is damaged and you are trying to rectify the crank by grinding one journal you will need to be very careful. Depending on how the damage has occurred I think you will need to check carefully that the crank is still straight particularly if there is any 'blueing' of the journal. There are several techniques used for repairing journals. TIG welding is used to repair damage such as gouges which are localised. Submerged Arc Welding is more commonly used to re-surface journals and sometimes metal spraying could be considered. If the crank has deformed when it was damaged the Submerged Arc process is likely to allow these stresses to relax and this could increase the distortion. Crankshaft Welding After welding some form of stress relief may be a good plan but this would be a relatively low temperature process compared to annealing which would almost certainly cause significant deformation and even in a vacuum wouldn't be good for the surface of the remaining journals. If you grind it carefully and if it hasn't 'bent' then I am not sure you need to re-balance. If you have to grind it correct some bending them you will need to check the balance. The cost of 0.5 oversize Rod bearings here in UK is about $250 a set. Good used 3.2 Cranks make about $1000 each. If you do the re-grind and Tuftride it isn't a great deal different, the only issue is the time to find a good crank and the risk that it isn't perfect when it arrives. I would have to say that my inclination would be to do it 100% correct or change it for another crank. You find 3.2 cranks on EBay Germany that need a 0.25 re-grind for 700 Euros so your crank must still have some value. |
||
 02-11-2015, 03:01 AM
|
|
|
Schleprock
Join Date: Sep 2000
Location: Frankfort IL USA
Posts: 16,639
|
The guide sleeves are important at the #1 bearing location because they (obviously) pin the case halves together. At the #8 side of the case, the bearing insert provides the support for the case.
Sleeving or doweling of all the case main saddles is typically reserved for race engines that see regular high rpm usage. However, a lot of engine cases with typical street use show that these main saddles "shuffle" because we can see what looks like a shallow knurled surface on the saddles. This is the very slight shuffling that creates the knurled-looking surface texture. A common recommendation is to use the Loctite 574 sealant on the saddle surfaces because 574 has some actual shear strength, in addition to being a sealant. Give David Eden at Marine Crankshaft a call. Very nice guy to speak with and i'm sure he'd be glad to explain to you how they weld the crank for repairs. Crankshaft repair, outboard marine, motorcycles, circle track, quarter mile and imports, billet crankshaft - We Fix Crankshafts - Marine Crankshaft, Inc. I was really pleased with the work Marine did on my crank and they did the work in exactly the time promised. Another crank cross drill question Another reputable machine shop for 911 crank work is Ollies. They too can give you some feedback on how they repair the crank journals. Home Page
__________________
Kevin L '86 Carrera "Larry" |
||
|
02-11-2015, 08:20 AM
|
|
|
Registered User
Join Date: Nov 2014
Posts: 24
|
  With regards to straightness of the crank, I measured the crank in a lathe the other day. I measured an unevennes of 0,001 inch. But this was accross the crank from bearing #1 through #8. Only exeption was #2 bearing. This moved the needle 0,002 inches. This leads me to belive that the 0,001 was related to the fixing in the lathe, and the #2 bearing to have an actuall unevennes of 0,001 inch. I would call this straight! The #2 babearing can be related to the missing sleeves on eace side of the thrust bearing. The halves in the case allso shows a different wear than the others. I'll try to post a picrure of this tomorrow. Now the pictures. Today when I had another look on the crank I noticed something I had overlooked so far. There is no material to build a radii of. Is there a chance to rebuild? Or is this off to the bin for this crank? |
||
|
02-11-2015, 09:02 AM
|
|
|
Registered User
Join Date: Nov 2014
Posts: 24
|
Quote:
! Well whats going on with my crank? I`ve finally managed to find a domestic company that «speaks my language» when it comes to the hardening process. The machinist had a look at the crank, and he said that it`s not uncommon that the beat up rod bearing digs out the radii. He allso said that the cranks are so strong that if the engine is kept close to stock this damage would not make the crank fail. He however did not belive grinding it down to 0,5mm would be sufficient because of the deep scratches and the lower measurement being just a fiew hundereds over the 0,5mm oversize. So we will go for 0,75mm oversize. With regards to the hardening process if you google tenifer process, a whole lot of weapons pop up, so I guess this process is used in that industry. A domestic weapon factory will be able to perform the process. The bungs will be replaced with set screws as mr. Tacobill mentioned. I hope Porsche can keep their promise and supply the oversize¬ bearing halves. ") So in the name of science I will procede and get the engine repaired. If it blows up the rest of you can learn from it ..  It however appears that the engine has been «legoed». The left case shows evidence of a P/C #5 going «kablamsky» at a point in time. find something funny with this picture eehhh?  But there aren`t any marks on the P/C#5 or rod #5, nor right case halve or the crank that would indicate souch history. As I tried to wrap my head around this it finally sunk in that: «of course these parts come from different engines » (Note the different case numbers...  this is allso the case for the P/C`s. So a real lego engine it is! But I have no fear! (Fear is the path to the dark side lol  ) )I`m going to make this engine work. And since there are so many variables I think I`ll have to get the crank assembly balanced, so I can create a «common ground» and take it from there. Sorry folks that was a really long post Pelle |
||
|
03-04-2015, 01:23 AM
|
|
|
Registered

Join Date: Jul 2001
Location: Lawrenceville GA 30045
Posts: 7,376
|
Sounds like a plan. Good luck and keep us informed!
__________________
Mark '83 SC Targa - since 5/5/2001 '06 911 S Aerokit - from 5/2/2016 to 11/14/2018 '11 911 S w/PDK - from 7/2/2021 to ??? |
||
|
03-05-2015, 07:29 PM
|
|
|
Registered
|
Pellesin,
Which machinist are you using in Norway? Thanks, Wade
__________________
-Wade 1972 Targa, nothing matching. Looking for motor 6124265 and transmission 7720299 |
||
|
03-06-2015, 09:11 AM
|
|

|
|
Registered User
Join Date: Nov 2014
Posts: 24
|
Quote:
I gave mr Alf Rønning a call, and he recomended østlandske motorverksted in Hamar. The machining is performed there, balancing and hardening is outsourced, but handled from there. You have a similar project? Best regards pelle |
||
|
03-11-2015, 10:27 AM
|
|
|
Registered User
Join Date: Nov 2014
Posts: 24
|
setback!
Hello again folks! I guess it's time for the obligatory setback. I was supposed to pick up the parts from the machinist today. He gave me a call just before I arrived to inform me that there is trubble... the bearings are making the rods pinch the crank...
 blks blkshe said that he has seen this only once before - and that was a long time ago.. well the oversize bearing is performing as it should. The standards though - not. When torqued down they either deform where the shells butt up, or it's the way they have been cut that is the issue. I did not get a photo - but I'll try to post one. So I'm a bit in the fog on how to procede. My machinist said that hell give kolben smith a try and see if they got bearings for the engine. He said that the bearings he has seen from kolben smith have had marks on the surface indicating measurement (quality control). Not so for the glycos... well not much of happy happy joy joy - but I'm confident I'll get the wheels to spin again... |
||
|
03-31-2015, 01:14 PM
|
|
|
Registered

|
Dude,
Just bite the bullet and find a used Standard crank. Use standard bearings and be done with it. It's the most important part of the engine. Personally I value that engine at $00.00 with that jerry rig. I bet it suffers from low oil pressure or catastrophic failure within 20k miles. Just my opinion Chris |
||
|
03-31-2015, 04:53 PM
|
|
|
Registered User
Join Date: Nov 2014
Posts: 24
|
Quote:
How is finding a standard crank going to help me when it's the standard bearings that have the problem? I'm definetly not an experienced engine builder - so this might be the reason why I do not understand. Catastrophic engine failure: using standard bearings that pinch the crank - that would lead to a failure not an oversize bearing with clearanses within spec. Really I don't understand youre argument. |
||
|
03-31-2015, 09:53 PM
|
|
|
Registered
Join Date: Jan 2012
Location: Erehwon
Posts: 3,369
|
I am also not very experienced, but it seems like the threads on problems with Glyco bearings, in particular the pinching you describe, are being discussed in other threads such as this:
Glyco vs clevite rod bearings - with data And from my limited knowledge base, yes, the issue with bearings is not going to be corrected by crank grinding....I think you need new/better bearings. Dennis |
||
|
04-01-2015, 04:10 AM
|
|
|
Schleprock
Join Date: Sep 2000
Location: Frankfort IL USA
Posts: 16,639
|
Quote:
I disagree that his repair method is a rigged solution. The journal has been ground to a suitable diameter to provide acceptable clearance for one pair of oversize bearing shells. What's wrong with that? You're saying it's rigged because only one journal is sized for oversize bearings? Plus anybody in the future doing a proper rebuild should check the journals by measuring. That person measuring the crank will instantly find one journal undersized and should recognize that one pair of oversize shells is needed. That's why there are oversize bearings made available- for just this reason. Ain't no law that says ALL journals have to be cut for oversize bearings. As long as the crank balances out fine, and the rod weight is within acceptable tolerance (9 grams, in this instance with bearings installed) between rods in the set, it's all good and move on. Do you realize how many oversize types there are to choose from? If oversized bearings are such a hack, why so many to choose from?  Your comment about low oil pressure and eventual catastrophic failure is based on what? If the clearance is fine, then there's no compelling reason to have any problems. It's the other untouched rod journals with the standard bearings that have a problem and that's a matter of the crappy Glyco aftermarket rod bearings that have found their way into people's hands, as Dennis has pointed out with his thread link.
__________________
Kevin L '86 Carrera "Larry" |
||
|
04-01-2015, 11:06 AM
|
|

|
|
Registered User
Join Date: Nov 2014
Posts: 24
|
Just starting the rebuild
Hey everybody!
Just starting to rebuild my crank after I collected the parts from the machinist the previous week. ( wife on trip this weekend - so no chance to get anything done with the "ninja kids" around). I however started the rebuild this evening. Ended up in a "tie" with the score: pelle-1 / crank 1. I managed to get the drive gear in place. The crank however resisted when I was installing the spacer. So I'll have to pull it off tomorrow - and see if I can win. Question: has anyone got an experience to shear with regards to which temp to heat the spacer up to? Mr Waynes book suggests 150°c - I went for 175°c - but still the spacer won. 225°c ok? Its of steel so should be no prob. The distrobutor gear is of a different material - looks like brass? Mr Eaynes book states 100°c. Would something go wrong with 225°c on that one As well? 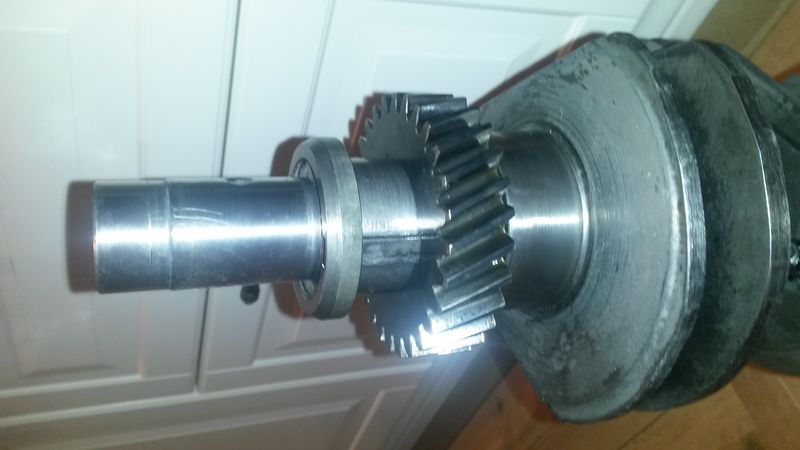
|
||
|
04-12-2015, 02:05 PM
|
|
|
Schleprock
Join Date: Sep 2000
Location: Frankfort IL USA
Posts: 16,639
|
The spacer just needs some more heat as you're pushing it down on the crank. As soon as you put the spacer on the crank, the colder crank "sucks" the heat out of the spacer and you lose the expansion effect. Use a heat gun to heat up the spacer and you can get it to move again.
The brass distributor drive gear is much easier to do because it doesn't have as much distance to travel on the crank. Heat it up and work quickly to push it down the crank. The brass will heat quickly and expand very easily. No reason to overheat it
__________________
Kevin L '86 Carrera "Larry" |
||
|
04-13-2015, 10:11 AM
|
|
|
Registered
|
make sure either gear is not upside down.
I "helped" the machine shop guy put them on my crank and I asked if he was he sure they were right side up. His response was "this is not my first time to the rodeo" as he has done hundreds. Needless to say he then took the distributor gear off and flipped it over and correctly installed. Chris |
||
|
04-13-2015, 11:14 AM
|
|
|
Schleprock
Join Date: Sep 2000
Location: Frankfort IL USA
Posts: 16,639
|
I've always been curious what determines the orientation of the distributor drive gear. Because the gear is symmetric and the tooth cut remains the same regardless of orientation
The image below is from the '84-'88 spec book. Flip the image over and the angle of the gear teeth stays the same. I've looked at the gear in hand and see no glaring difference between either orientation of the gear 
__________________
Kevin L '86 Carrera "Larry" |
||
|
04-13-2015, 12:45 PM
|
|
|
Registered
|
I think if its upside down the distributor will trun backwards.
Chris |
||
|
04-13-2015, 12:52 PM
|
|
|
Schleprock
Join Date: Sep 2000
Location: Frankfort IL USA
Posts: 16,639
|
I understand what you're getting at. But if the gear pitch/angle is the same direction, regardless of orientation, then the gear is going to drive the distributor the same direction with the gear oriented either way.
__________________
Kevin L '86 Carrera "Larry" |
||
|
04-13-2015, 01:12 PM
|
|
|
Registered User
Join Date: Nov 2014
Posts: 24
|
Quote:
Mr Waynes book argues that you will not be able to adjust the distributor if you got it wrong. It is to be fitted with the markings (part numer etc) facing toward the pulley - as youre attachement states. Heated both spacer and distributor drive gear up to 225°c and hurra!   Plastigauge of the ground cournal:  Rods are now installed, and I'll pick up on the final cleaning of the case on friday hopefully. Rods are tightened i.a.w this service bulletin:   Here is a closeup of the damaged radii and the new oversize bearing halve. As one can see the bearing stays well clear of the damaged area  Pelle |
||
|
04-15-2015, 02:04 PM
|
|
|
Registered
Join Date: Jul 2012
Location: Simi Valley, Ca.
Posts: 265
|
Years ago I got a 78mm stroked crank for my VW from Gene Berg. The rod journals were submerged welded and ground to 78mm stroke with a Porsche 912 rod journal, and counterweights added.
When I installed the 912 rods, they bound up immediately, even before I tightened the nuts. Called Gene and he told me that he puts a large radius between the journal and counterweight for extra strength, and all I had to do was mount the bearings in the rods to hold them and scrape the bearing material off the outer edge of the bearing until they would turn free on the crank. Seemed a little extreme to me to modify a brand new bearing like this, but that engine (2000cc, Weber carbs, etc.) still runs strong today after about 50K miles. Bob B |
||
|
04-15-2015, 02:38 PM
|
|


 1972 911T Targa


