|
|
|
|
|
| Author |
|
|
Registered
|
This may seem simple for those of you that are electrically inclined. But for some of us this is a foreign language. I'm looking for a plug & play option. Dennis (Timmy2) could you make me one of these?
Thanks David Last edited by Harpo; 08-21-2019 at 02:31 AM.. |
||
 08-21-2019, 02:28 AM
|
|
|
Registered
Join Date: Jul 2003
Location: Glorious Pac NW
Posts: 4,184
|
Quote:
Resistor == restrictor. Drops voltage/gets hot (a 5W resistor probably wirewound, like a small heating element). 2 leads, works the same fitted either way round. Ensure resistance and power rating are correct and you can't go wrong. Your biggest problem for either will likely be sourcing only one of each... I know I've got 9 1N4001's around here somewhere... They're like $1.50 for 10, so 15c each or so... Reading the bulletin, you only need the resistor if your alternator warning light doesn't go out at idle, and you can't fit a 4W warning light bulb (82 up bulb holder won't fit earlier instruments, i guess you can't get a 4W in the form factor to fit the older bulb holder). In that case, add the resistance to the 2W bulb to force more current through the alternator exciter circuit, which makes it work. The diode is only needed if your motor runs-on after the ignition is shutoff. Seems the resistor might also address that. My '77 was converted to internal VR before I got it. It's had 3 alternators (original VR committed suicide & boiled the battery, the Bosch that replaced that, and the CR I fitted recently). I just checked again; I don't have either a diode or a resistor, and my alternator warning light has always gone out at idle. So give it a try without fitting either? Not like you have to remove the alternator again...
__________________
'77 S with '78 930 power and a few other things. |
||
|
08-21-2019, 12:45 PM
|
|
|
Exotic Vehicles are here
|
Thank you spuggy, just to keep all in the one place :-)
Just wanted to add 2 things, if you have any opinions on them: -1- it seems the - brown wire originally comes from the Alternator a bit skinny, compared to Classic Retro offerings -2- the ground strap that connects engine to the alternator is connected to alternator stud with plastic air cone in between nut and strap, so it makes a weak ground there, unless to modify it and cut out that plastic ear around that stud so nut tighten the strap As always - HUGE THANKS! Last edited by 1-ev.com; 08-22-2019 at 05:44 AM.. |
||
|
08-22-2019, 05:37 AM
|
|
|
Registered
Join Date: Jul 2003
Location: Glorious Pac NW
Posts: 4,184
|
Quote:
Quote:
There's a nut on each of the studs that takes the black or red cables. This is the base, and should be proud of any insulator. Snug it up. The lug on either the black or red cables goes against that nut, plus any smaller cables, then use flat/spring washers as you see fit, and use another nut on top to clamp it all together. Tighten to an appropriate torque. That's as good as it gets. I placed the plastic air diverter in the shroud, ran the cables through the snout, lined up the alternator, fitted the cables to the back of the alternator and then assembled the air cone to the back of the alternator whilst it was half-in, half-out, of the fan housing and restricted by the length of the attached cables. Slow, fiddly and awkward because of the restricted space you're jamming your ham hands into to start the nuts with your fingertips. Just breathe and take your time. Then seat the alternator into the fan housing, bolt it up. And then you get to play with the fan strap. If re-using the original strap (I was kind of at a loss to see how you'd even remove the old one, much less replace it), be very sure you get it seated in the original position it was in before, when it took up its shape around the pins it bears on. Otherwise, if you just torque it to spec, that won't be enough force to make a new shape/bend in the strap and it WILL re-align itself to the original position while you're driving along, resulting in lots of slack in the strap - and the fan housing will be now only very loosely restrained. If you're running a serpentine belt, you'll hear it shriek as it shreds 90% of the belt due to the resulting pulley misalignment... Yeh, BTDT.... 
__________________
'77 S with '78 930 power and a few other things. |
||
|
08-22-2019, 08:02 AM
|
|
|
Exotic Vehicles are here
|
Sorry for confusion,
I am not sure if it suppose to be this way or somehow PO had engine strap connected to 1 of the alternator mounting studs that holding plastic air cone as well, so it was not tight due to the fact that plastic air cone was acting as a washer Hope this not confuse more. Where engine - ground strap should connect to Alternator - stud or 1 of the mounting bolts around alternator? Thanks !!! |
||
|
08-22-2019, 08:41 AM
|
|
|
Registered
Join Date: Jul 2003
Location: Glorious Pac NW
Posts: 4,184
|
Quote:
__________________
'77 S with '78 930 power and a few other things. |
||
|
08-22-2019, 10:19 AM
|
|

|
|
Exotic Vehicles are here
|
Hi guys,
I've a question, and just to clarify the way to mount air cone. It looks to me that #1 way is what was mounted before, but this way with plastic cone in between, I will not be able to put some torques on the 6 nuts around the alternator. So, my thought is to do it as on #2 - to cut out the plastic around each nut as shown by 2 arrows so it fit around the nut, then put set of another nuts with larger washers to hold plastic cone in place. Here on Pelican “Figure 2” shows air cone connected as #1 on my picture https://www.pelicanparts.com/techarticles/101_Projects_Porsche_911/20-Alternator_Replacement/20-Alternator_Replacement.htm Please let me know your thoughts... HUGE TXS. 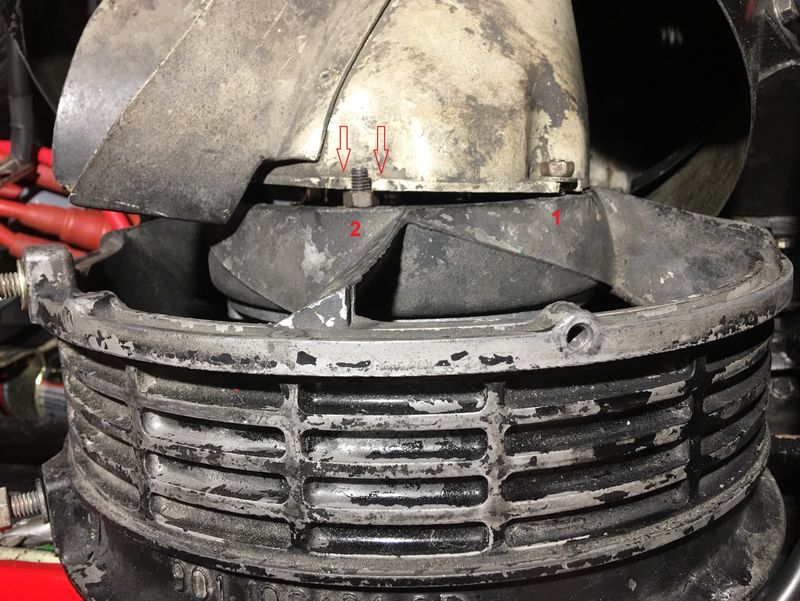
Last edited by 1-ev.com; 09-29-2019 at 11:31 AM.. |
||
|
09-29-2019, 09:55 AM
|
|
|
Registered
Join Date: May 2004
Location: Boulder, Colorado
Posts: 7,275
|
The nut (and a washer)should be on top of, not under, the plastic.
If I remember rightly, the long thin bolts screw into the aluminum housing, and don't rely on nuts to keep the alternator snug and in place. They are made longer so you can put a washer and nut on what sticks out to hold that air deflector piece on. So you don't need to tighten the nut a whole lot. |
||
|
09-29-2019, 11:03 PM
|
|
|
Registered
Join Date: Dec 2014
Location: Cork- Ireland
Posts: 271
|
Quote:
C |
||
|
10-02-2019, 04:06 AM
|
|
 |
|
|
| Tags |
| alternator placement , porshe 911 , wosp |


 Porsche 911 - then
 Porsche 911 - now

