|
|
|
|
|
| Author |
|
|
Registered

|
Lars - what kind of glue did you use for the carpet installation ??
__________________
Robert Williams 70' 911T |
||
 12-01-2008, 08:03 AM
|
|
|
Registered

Join Date: Nov 2004
Location: Raleigh, NC
Posts: 1,681
|
Not sure what Lars used, but I had a great experience with 3M General Trim Adhesive. $15 a can from your local McParts store and it was very clean and easy. 1 can almost finished a complete carpet kit. They make a super duty for $5 more, but the one I used is still holding up. Bonds well to metal, carpeting, and vinyl. Since you need 2 cans, I would suggest getting 1 of each and using the Super duty stuff where it may be warranted, such as the rear seat pads, reworking the vinyl on your door pockets, etc..
__________________
Regards, Olin 1972 911T w/Carrera 3.0 - Light Yellow  1994 964 30 Jahre 911 - Viola metallic |
||
|
12-01-2008, 06:58 PM
|
|
|
Registered
|
Getting close to engine installation.
I was waiting for these...
  I installed my custom scavenge oil line  And after fussing a bit with the new exhaust studs...it looks happy  Right side up. Nothing warms the Christmas spirit more than a fresh engine with new SSIs   i I still have some upholstery to redo. The door top rails were awful...I peeled off the dry rotted covering to find surface rust everywhere  I cleaned the oxidation up and por15'd them  and recovered...before and after  
|
||
|
12-18-2008, 05:56 PM
|
|
|
Registered

|
Man those SSI's sure are looking purty!!
|
||
|
12-18-2008, 06:02 PM
|
|
|
Registered
|
I have given up on shaping the 3/16 lexan
For the rear window. My racecar has 1/8 lexan and it required no shaping...cut to size and installed. 3/16 lexan is exponentially stiffer. I have tried three seperate times to create a 300 degree "environment" for the lexan to shape to the existing rear glass...I will not bore the board with the details. To get it done...I need a pizza oven, and I am not buying a pizza oven. So, the rear glass goes back in and I will suffer the additional 10 lbs. I usually end up with one of my vehicles having a rock chipped windshield almost every winter. When the insurance guys come up to repair the windshield , I throw them some $$ and have them install the windows in my project car at the same time. I had ordered clear glass for the project windshield, which they were bringing along with the rubber gasket. Before the glass gets installed, I needed to mount the chrome trim underneath the rear quarter windows. The later cars installed this trim with countersunk screws. Early cars trim has bayonets that go through the window sill and use speed nuts to secure them from underneath. No problem on the drivers side
 Passenger side is different...remember the oil tank behind the lockpost? And the three oil lines from the top of the oil tank that are snugged up against the top of the rear inner fender? There is no room to access the bayonets. Only way to secure the trim is to drill through the trim (avoid the bayonets) , countersink the holes and use screws  These will be covered by the rubber window gasket  Ready for the installers...or not. The clear front windshield was a modern adaptation with the large blue sun block running across the top of the glass. Nope...not going to happen. They explained that this was the only way that the glass can be procured these days. I checked around and found them almost correct. Dave at TRE has a shipment coming in January of clear windshields, and I may be able to source one. Bottom line...the glass didn't get installed. I sent the installers home, to return when either they, or I had the correct clear glass. Then, the front side and rear glass will get installed. I have plenty to do...and a couple weeks won't kill me. I have a long punch list. |
||
|
12-18-2008, 06:17 PM
|
|
|
Registered
Join Date: Oct 1998
Location: Denver, CO
Posts: 1,335
|
Lookin' sweet lars. SSIs, yumm.
__________________
- '72 911T - '81 911SC Euro |
||
|
12-18-2008, 06:23 PM
|
|

|
|
Registered
Join Date: Oct 2005
Location: Western Massachusetts
Posts: 214
|
subscribe
__________________
1965 911 #301069 Light Ivory, 1965 911 #301983 Silver 1966 911 #302963 Polo Red, 1966 911 #302222 Irish Green 1967s, 1968 912 ,1969t, 1970s, 1970t, 1970 914-6, 1971e, 1972t, 1973.5t, 1976 914, 1987 911 Targa, 1991 Cabriolet |
||
|
12-21-2008, 06:24 AM
|
|
|
Registered
|
belts
The early cars had seat belts afixed to the seats...lap belts...great invention, and great way to ruin a good wooden steering wheel while removing front teeth at the same time. I'm not going that way. I picked up a later SC /Carrera retraction belt system from the board and welded in the heavy duty pickup points during my "welding days". Word of note...if you let the retraction mechanism swallow as much belt as it can...it will bind on the top and bottom bars that hold the retraction mechanism together. Mine was confused thinking that it was in "emergency mode" and would not release the belt. It took me an hour of delicate manuvering ...letting the retaining mechniasm recock...tapping the retractor on its side and slowly getting it to release the "swallowed belt" a half inch at a time. I was beginning to think that the mechanism was toast. As the assembly would bolt up easily once I trimmed the B pillar trim and carpet away from the attach points, I set about anchoring the important receivers that need to attach to the tunnel. I created a steel "u" bracket that would sit on the top of the tunnel, and a wider reinforcement that would sandwich the steel surface of the tunnel from underneath...kind of a 1/8th inch thick,1 1/4 inch wide "fender washer". Shaped
 Primary fit to the belt receivers  Bolted to the tunnel, with the reinforcement inside the tunnel  Everything bolted in place...drivers side...works very well  I can still run a harness off the roll bar, but if the roll bar is removed, I can still use the car safely as a driver. I took a moment to install the powder coated heat ducts   I reinforced the fuel return line by adding a couple more metal straps under the left side rear seat buckets and suffered reinstalling the rubber engine tin seal at the front of the engine compartment under the crossmember. That was hard...now I have to install the two pieces that make up the sides and back. They are soaking to soften and clean them up. I need to make up a shorter oil tank breather for the engine compartment. This is for the tank breather that normally would be vented into the OEM air cleaner housing which went away in favor of K and N rain shields...which I am still looking for...used pair anyone? |
||
|
12-21-2008, 06:31 PM
|
|
|
Happiest when Tinkering
Join Date: Jun 2007
Location: Missouri
Posts: 4,694
|
Quote:
__________________
" Porsche there is no substitute" I always liked that saying. Air cooled is the only way to go! 76 911 C.R.A.P. Gruppe #2 BIG time TURBO C.R.A.P. Bitz EFI/EDIS Now MegaSquirt 3 76 Blazer also restored by me |
||
|
12-21-2008, 06:59 PM
|
|
|
Registered
Join Date: Sep 2002
Location: Bend, Oregon
Posts: 1,167
|
Lars...
I'm awestruck. Any thoughts of publishing this as a book? Cheers, JohnA
__________________
John Audette - Porsche Lighting Specialist Vintage Porsche Light Restoration - LED Headlights Site: www.AudetteCollection.com Store: www.911Bestinclass.com |
||
|
12-21-2008, 08:55 PM
|
|
|
Porsche Enthusiast
Join Date: Aug 2008
Location: Monterey, CA
Posts: 811
|
Quote:
__________________
sold - 1978 911SC. Best car I have, and will ever own. Current moving scraps of metal: 2010 Nissan Titan 2009 Buell Firebolt XB12R |
||
|
12-21-2008, 11:30 PM
|
|
|
Registered
|
Glass in...well mostly
Every third item I order these days is the wrong part when it arrives...I'm getting frustrated. The bonehead that ordered my rubber for my rear window , ordered the wrong gasket. I don't know what car this was supposed to be for, but it was not for a 66. The quarter windows are in with their polished trim (formerly black anodized) as well as the windshield
   I now have to reorder the rear glass gasket, and swap out the wrong one for the right one. The glass reinstall on this car has been a major PITA. But, I am liking the bling against the blue...this is unusual for me...I tend to black the trim out. |
||
|
01-01-2009, 04:42 PM
|
|

|
|
Registered
|
Oil breather cannister
I use one of these on my racecar up front near the three gallon oil tank in the smugglers box. My crankcase breather hose comes into the cockpit at the rear shelf, follows the cage along the inside of the roof, through the dash, and vents my oil tank. Made by Peterson Fluid Systems in Denver...very nice.
 For this car, I run my breather from the top of the engine over to the right side fender wall to a 70 degree fitting that then passes through the inner fender to a hose that goes to the oil tank in front of the right rear wheel. Then oil tank vents back to that same fitting in the fender wall, back into the engine compartment, and normally would attach to the front of the air cleaner, for the gases to be absorbed and burned with the fuel being sent through the carbs. This breather cannister is too tall to mount in front of the right bank of webers, and won't allow itself to be drained. I need something shorter. It has been suggested that in the early days, Porsche used an early water reservoir bottle, and simply ran the breather hose into the bottle. It would work, but these early water reservoir bottles are becoming a little pricey, and I didn't want to destroy the early ones I have for this purpose. Peterson would be happy to modify my extra breather, but I think I can come up with something myself. I found the correct size K and N filter online and ordered one. I went to a local muffler shop and grabbed a 6 inch piece of 3 inch od exhaust pipe, as well as the drain cock from the local hardware store. The start  I'll use 1 inch od steel round tube for the inlet and neck for the filter...first effort on the top and bottom pieces  To accomodate the drain, the bottom needs to be conical so that it actually...drains like this  A lttle progress...looks like how the Tin Man in Wizard of Oz started  I slot the bottom and tighten the circumference   Trim and ready to weld 
|
||
|
01-01-2009, 05:07 PM
|
|
|
Registered
|
halfway
The parts getting ready to be assembled...top neck is welded, bottom cone is done and the cannister, not yet cut to size. Top goes on first
  Jigged in place  welded   Trial fit after being cleaned up  Brackets made from flat stock to mount to crossmember  These will mount to the front and top of the crossmember at the front of the engine compartment Last edited by speedo; 01-01-2009 at 05:33 PM.. |
||
|
01-01-2009, 05:18 PM
|
|
|
Registered
|
Done
At least this part is...braces welded
 Assembled for fit  As the engine compartment is black...I wanted a little bit of non-black. The cannister got painted aluminum, and the braces black. I did reuse the mounting bracket from the larger cannister. Cleaned,trimmed painted and assembled 3 1/2 inches shorter....and the drain will be accessible  Where we started...with one less un-needed inlet 
Last edited by speedo; 01-02-2009 at 05:13 PM.. |
||
|
01-01-2009, 05:25 PM
|
|
|
Unsafe at any speed
Join Date: Feb 2001
Location: East of Seattle
Posts: 662
|
This is a fun thread, but I have trouble reading the text. The last word of the commentary is displaced from the rest of the text and jammed up against the bottom corner of the pic. Hitting return before uploading a pic would fix that.
I'm enjoying these resto-mod threads. Keep up the good work.
__________________
87 Carrera Coupe |
||
|
01-01-2009, 09:37 PM
|
|
|
Max Sluiter
|
 Your metal working/fabrication skills are stunning! Great work.
__________________
1971 911S, 2.7RS spec MFI engine, suspension mods, lightened Suspension by Rebel Racing, Serviced by TLG Auto, Brakes by PMB Performance |
||
|
01-01-2009, 09:40 PM
|
|
|
gearhead
Join Date: Nov 2007
Location: Loverland, CO
Posts: 23,623
|
Lars,
I think you missed your true calling by about 150 years. You could have been a master blacksmith in the 1850's...
__________________
1974 914 Bumble Bee 2009 Outback XT 2008 Cayman S shop test Mule 1996 WRX V-limited 450/1000 |
||
|
01-02-2009, 05:42 PM
|
|
|
Registered
|
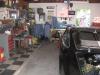
truth and consequences...will it fit
Its been a while since the 912 engine mounts were swapped out for donor 911 mounts. I was reasonably confident everything would bolt up, but a number of things were "different", meaning not originally from this vin number..
engine and tin engine mount trannie front trannie mount/crossmember oil lines going everywhere SSIs carb fuel return lines and etc I installed a new engine compartment sound proofing...I think after 40 years Porsche could come up with a better product...this didn't fit well and was weak at best. It would crack at the slightest opportunity. I was hoping for a mildly quiet car for the street...if the soundproofing gives me the slightest issue, I'll yank it out and deal with the decibels   So the engine came down off the stand and was introduced to the 901 AFMSX trannie. No issues, I had cleaned up and supplied the shift fork with a new nylon cup. Bolted up my best of three starters. They look happy.   The install was pretty quick with the motor cycle jack allowing the engine to be "shimmed " backwards to equal the slope if the longitudinals.  Electrics hooked right up  I need to install the R rear bumper so I can mount the muffler and measure where the sport exhaust "cutouts" want the real tailpipes to sit. I'll then mark the 2 in 1 out muffler, pull it off and weld up a correct muffler. I have a volunteer muffler waiting.  I did have an issue (which I had anticipated) with the new trannie mount/crossmember. I needed to oval the four holes that bolts up to the trannie, so I could line up the two 12 mm mounting bolts that supprt the front of the trannie and bolt up into the control arm brackets. Everything was extremely tight, and the trannie was already as far forward as it could go. No big deal, jacked up the trannie, put a jackstand underneath, pulled off the support and opened the holes up. After that, everything bolted up nicely. The 911 mount is so much nicer than the 912 mount, which if you have never seen one...uses 2 large rubber blocks to absorb the vibrations induced by the little 4-banger. When the 911 came along, I guess they figured that the smoother revving engine no longer needed the massive rubber mounts. |
||
|
01-04-2009, 05:50 PM
|
|
|
912 Geek
|
Quote:
By the way, if you want to do a book, which would offset your expenses for this project, I volunteer to be the editor! Bet I could find you a publisher, too. Frank Toad Hall Motorbooks 303/237-0911 |
||
|
01-04-2009, 06:30 PM
|
|


 1970 Porsche 911T

 1974 Porsche 911 2.7
 1978 Porsche '78SC Coupe 3.0


 1971 Porsche 911S
 1965 Porsche 912 Coupe
