|
|
|
|
|
| Author |
|
|
Recreational User
Join Date: Mar 2004
Location: A Mile High
Posts: 4,159
|
Thanks for all the encouraging comments guys! Most of the work will only happen on weekends, so that's when most of the new pics will show up.
90% of this stuff isn't very challenging, just mainly time consuming. The big things left to do are putting in the carpet, installing the door windows and window frames, mounting the bumpers, painting the hard oil lines black (decided against braided SS lines for now), upgrading the torsion bars to 22/29 and getting the car corner balanced and aligned. And painting the wheels. And installing the decals (I might need a helper with this one). And a couple dozen smaller things on a list that seems to keep growing! I'm still shooting for first week in May but I may need to take a week off work to make that happen. Last edited by porschenut; 03-29-2010 at 08:49 PM.. |
||
 03-08-2010, 05:55 PM
|
|
|
Registered
|
muffler question
Say,
What kind of muffler do have, and do you like the sound. My stock one is wearing out. Thanks, Terry |
||
|
03-08-2010, 06:42 PM
|
|
|
6 cylinder symphony
|
Great read and looks like it is coming along nicely.
After re-doing the interior of two different rolling restorations, I have to say that my least favorite part was doing interiors - carpet, headliners etc...
__________________
'84 3.2 Targa '89 964 Coupe "What do you mean NEXT project?" - my wife |
||
|
03-08-2010, 06:50 PM
|
|
|
Recreational User
Join Date: Mar 2004
Location: A Mile High
Posts: 4,159
|
Terry, it's a 5 year old GHL sport muffler, 1 in 1 out, modified to fit the RS bumper cutout. It sounds fantastic but I think GHL is history. If I were in the market for a new muffler I'd be looking at offerings from M&K or RarlyL8.
|
||
|
03-08-2010, 06:53 PM
|
|
|
Registered
|
Maybe this build is making you "certified loonie" ?
At any rate, the car really looks super. Can't wait to see your finished product. Thumbs up on painting the oil lines black....I really don't like the braided look up the sides of these early cars. Hang in there and keep up the great work. It will be an incredible looking car when you have finally finished it. ps... will you be taking it to the Parade outside of Chicago this summer?
__________________
"Are you out of your Vulcan mind?" Doug 2022 Carrera 4S, 1989 Delta Integrale, 1973 911T CIS |
||
|
03-08-2010, 10:58 PM
|
|
|
Recreational User
Join Date: Mar 2004
Location: A Mile High
Posts: 4,159
|
Doug, I was loony before I ever started this project. No plans to go to Parade this year, but I might change my mind.
|
||
|
03-09-2010, 06:45 AM
|
|

|
|
Recreational User
Join Date: Mar 2004
Location: A Mile High
Posts: 4,159
|
Man, this was a tough week but I made a lot of progress. Before I mounted the rear bumper and bumper/body seals (what a pain in the neck those were!), I needed to attach some doo-dads to the bumper. First, the stock early 911 license plate bracket. Next, a heat shield that I got from Summit Racing. I read some stories of the paint melting off of these fiberglass bumpers without proper heat shielding from the muffler, so I didn't want to take a chance.
  After that, I decided to go ahead and put the vinyl stripes on since they're short and it'll be easier to do it before the bumper is on the car. I didn't use any water or soap solution, I just put them on dry. After the stripes were on, I installed the reflector units. The most difficult part of the whole process was putting the bumper/body seals on. The sticky side wasn't sticky enough to stay in place, so I used 3M black weatherstrip adhesive. I also needed to mark the locations on the seals where the mounting screws were going to go through, and drill holes in the rubber seals before mounting them. It took half a day to do all this stuff, but then the bumper went on the car and it looks great!   
|
||
|
03-14-2010, 06:43 PM
|
|
|
Recreational User
Join Date: Mar 2004
Location: A Mile High
Posts: 4,159
|
Then the front bumper went on. This was a thousand times easier because I didn't have to put anything on to it before mounting it up, the bumper/body seal had much better double sided tape that actually stuck, and all the mounting points were already there and aligned. I decided not to put the vinyl stripe on it first. In retrospect, I probably should have.
The center section of the bumper seal was a little bit of a pain to install, as there's a round bead that has to fit into a groove in the latch panel. It's a very tight fit and I had to use a metal spoon to feed it in. The center section also doesn't want to lay flat very well, but maybe it will relax a bit as it gets older and wears in.   And the windshield wipers are back on....notice anything missing from the cowl area below the wipers?  
|
||
|
03-14-2010, 06:52 PM
|
|
|
Recreational User
Join Date: Mar 2004
Location: A Mile High
Posts: 4,159
|
Next up was to install the door glass and window frames. I was nervous about this because I didn't disassemble any of it - the body shop did. For most of the other stuff that I removed before sending the car to be stripped and painted, I had detailed notes and pictures to use as a guide during reassembly. I had never removed or replaced windows or door frames before, so I had to rely on the Bentley manual, a couple old articles in Up-fixin Yer Porsche, and some threads I found here.
The first step was easy - putting the new felt seals into the window frames. Aren't these nice looking frames? I'm still mad at King of Trim for taking so long to reanodize these, but jeez they do good work...   Another pic after installing the felt. I didn't use any adhesive whatsoever - it's a nice snug fit, and with the windows installed there's no way it's going anywhere. 
Last edited by porschenut; 03-14-2010 at 07:24 PM.. |
||
|
03-14-2010, 06:59 PM
|
|
|
Recreational User
Join Date: Mar 2004
Location: A Mile High
Posts: 4,159
|
After getting the felt channel in the frames, it was time to lower the window glass into the doors and attach them to the regulator rollers. I followed the procedure according to my research and they went in smooth as silk. Before putting them in, I lubed the sliders at the bottom of the windows with white lithium grease. The regulators were already greased up before I had installed them a few weeks ago.
Then things started to get interesting. I lowered the window frames into the doors and installed all the fasteners, but found that the frames needed to be adjusted in order to fit the door openings. There are ways to do this, but none of the documentation I have is very clear. I struggled for a couple hours on the passenger side door before giving up and moving to the driver's side. The driver's side was much better fitting from the start, and I finished that fairly easily. It was late and I was getting tired, so I started this thread to see if I could get help from the gurus on the board, and called it a day. This morning, with their help and a decent night's sleep, I managed to get it passable and both doors now will close nicely, although it requires a harder slam to get them to close all the way than it used to. This is probably because all the door seals and weather stripping are new and still a little stiff. Even after opening/closing them about 10 times, they're starting to close a little easier already. So - all the bright trim is on now - and looking pretty good!  
|
||
|
03-14-2010, 07:14 PM
|
|
|
- Self Moderating -
Join Date: Jun 2003
Location: Sk, Canada
Posts: 1,151
|
Looks awesome. Great job!
__________________
Tim Present: 57 Intermeccanica Speedster Ivory on Brown Past: 85 911 Carrera Coupe Silver on Black, 57 Intermeccanica Speedster White on Tan |
||
|
03-14-2010, 07:20 PM
|
|
|
Recreational User
Join Date: Mar 2004
Location: A Mile High
Posts: 4,159
|
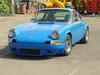
So with that bit of drama completed, I put some brake fluid in the new master cylinder and bled the brakes. Then added 3 gallons of gas to the tank, put the wheels back on, and lowered it to the ground. It's really starting to become clear what it will look like when it's all done. I'm getting really excited now. I'll take some pics tomorrow with it sitting on the ground.
The last thing I did was reinstall the steering wheel, the DME relay, and a new distributor cap and rotor. I also cleaned out the airbox to make sure none of the blasting media got past the air filter. Tomorrow I'll put the driver's seat in, and see if the engine will fire up. If it does, I'll take it for a spin around the block. If it doesn't, more drama will ensue. |
||
|
03-14-2010, 07:22 PM
|
|

|
|
zugelassener benutzer
|
I love this car. My '86 aspires to this level of cool.
__________________
Team Fee '86 Carrera 3.2 Coupe blk/blk, no wing 7&9x16s BFG GForce SS 205/55 & 245/50s, SW Chip, Maxspeed catbypass, B&B, Sachs Power Clutch, Turbo mounts, oil cooler scoop, RS door panels, Momo Prototipo, Rennline fully adj gas pedal & floorboard, RS replica dead pedal, Weltmeister yellow h/l lenses, factory short shift, custom speedo 32C #7 |
||
|
03-14-2010, 07:36 PM
|
|
|
I hate freight charges
|
Car looks beautiful!
What part numbers did you use for the window guide felts? I'm at the same point in my build practically and I ordered the one piece p/n 911-542-905-00-M260 felts. Thanks. Again, great looking car 
__________________
Tom 78 911SC SC to 73RS imposter SCWDP crew #50 and 51 1969 Camaro "The new project" 
|
||
|
03-14-2010, 08:13 PM
|
|
|
Recreational User
Join Date: Mar 2004
Location: A Mile High
Posts: 4,159
|
Tom, yes that's the part number for the window frame felt. I just checked out your RS progress threads and your car is looking great too! Mine's been a lot easier for me since I didn't have any rust issues to deal with, and somebody else did all the bodywork and paint. I love your brakes!
|
||
|
03-14-2010, 09:06 PM
|
|
|
I hate freight charges
|
Thanks for the confirmation and the compliment. The brakes were almost a must buy. After driving a customers 930 I had to have them.
Man I tell you, it's a good thing I don't make a lot of money or I'd buy every longhood I can get my hands on.
__________________
Tom 78 911SC SC to 73RS imposter SCWDP crew #50 and 51 1969 Camaro "The new project"
|
||
|
03-14-2010, 09:14 PM
|
|
|
Bird. It's the word...
|
Wow that looks like my car
__________________
John Forcier Current: 68L 2.0 Hotrod - build underway |
||
|
03-14-2010, 09:46 PM
|
|
|
Recreational User
Join Date: Mar 2004
Location: A Mile High
Posts: 4,159
|
Another week or two gone by, and more progress being made. In fact, the interior is in...and done. I pretty much live and breathe this car right now.
Back on her feet....  Got the RSA door panels mounted. I opted for the black opener straps instead of the usual red ones. Panels are from Appbiz. They're actually black but they look grey in the pic because of the flash.  Then I turned to the dreaded carpet installation. I glued the first piece in, which was an easy one and a confidence booster. Then I turned my attention to other tasks as the weather turned cold and my garage isn't heated. It's hard to work with fabric and glue when it's cold. 
|
||
|
03-29-2010, 08:14 PM
|
|
|
Recreational User
Join Date: Mar 2004
Location: A Mile High
Posts: 4,159
|
I did a bunch of stuff that didn't warrant pics, like changing brake light switches and bleeding the brakes. We had great weather this past weekend and I took Monday off from work so I could get more stuff done.
I removed the front hood shocks and installed the carbon fiber Ultimate Strut from Seine Systems, which will neve wear out. Unfortunately, once relieved of the pressure of the shocks, my hood set about 1/8" lower than the cowl so I had to do some hood adjustment to get it back to resting flush with the surrounding panels.   The carpet installation. Ugh. What a major effort. but it's done. Not perfect, but done. Some of the pieces didn't fit properly (off by as much as 2.5 inches) which required some improvising. The end result is satisfactory though.   
|
||
|
03-29-2010, 08:35 PM
|
|
|
I hate freight charges
|
Looking good! You're way ahead of me and I've been working on mine for 4 years
__________________
Tom 78 911SC SC to 73RS imposter SCWDP crew #50 and 51 1969 Camaro "The new project"
|
||
|
03-29-2010, 08:36 PM
|
|


 1982 Porsche 911SC 3.0
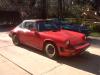 Hester
 Kermee
 1986 Porsche 911 Carrera Coupe 3.2
 1978 Porsche 911SC 3.0
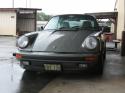 My Carrera
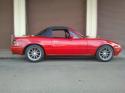 Miata of Doom!
 1969 Porsche 911T 2.7RS Spec with Webbers
