|
|
|
|
|
| Author |
|
|
Registered
Join Date: Dec 2002
Location: So Cal and So Oregon
Posts: 2,203
|
Ultimately, I will put in a frunk blower tied to the center vents. For now I need to block of the fresh air vent and provide a way for rain to drain. This is ABS drain pipe blocked off on each end and a simple niplpe glued in:
 I need to put two long screws to tie it into the original attachment points in the grill area. Installed it is barely noticeable except for the drain nipple (arrow): 
|
||
 09-28-2017, 10:45 AM
|
|
|
Registered
Join Date: Dec 2002
Location: So Cal and So Oregon
Posts: 2,203
|
Got the right hand side trim on and bumper installed....the oil tank makes it a bit messy in there.
   I think it looks better trimmed out. I ordered the end trim pieces for the front bumper as well. I think that will balance out the look. I am still not sure if I will do rocker trim. I will wait for that until the front end is done. While I ponder the muffler situation and the front bumper trim, I will move to the front fenders. |
||
|
09-28-2017, 02:21 PM
|
|
|
Registered
Join Date: Dec 2002
Location: So Cal and So Oregon
Posts: 2,203
|
Oh, I finished off the latch enough that it works reliably. This may not be my final solution, but it is one that works for now - using the interior pull handle. It still needs a return spring though. I have to manually return the bellcrank prior to closing the hood.
  Not yet quite as elegant as I wanted but...easy enough to work on once everything else is "done". |
||
|
09-28-2017, 02:28 PM
|
|
|
Registered
Join Date: Dec 2002
Location: So Cal and So Oregon
Posts: 2,203
|
I applied the terrastat seam sealer and worked on installing the right fender. It had a bit of a tight gap uneven gapt to the hood line, so I doubled up the sealer in the middle three feet or so. That evened things out. It went on pretty easy and lined up well.
    
|
||
|
10-03-2017, 01:14 PM
|
|
|
Registered
Join Date: Dec 2002
Location: So Cal and So Oregon
Posts: 2,203
|
Then I installed the right fender. After doing this I needed to recenter the hood a bit for best fit and matching gaps to fenders left and right.
      I have always had an uneven door gap with the driver's door being a larger gap by a mil or two. I am not sure I want to deal with this just yet.  I then did some final latch adjustments to get the hood to land just right to the fenders. While awaiting hardware and seals to install the headlights, turn signals and horn grills I think I will prep the bumper with deco trim, foglight covers and mount brackets. |
||
|
10-03-2017, 01:20 PM
|
|
|
Registered
Join Date: Dec 2002
Location: So Cal and So Oregon
Posts: 2,203
|
Tidying up a few things. I got a new fuel filler area gaskets set and installed those:
   It was relatively easy to install the gaskets first and then run the fuel pipe in. I used a flat blade screwdriver to pull the gasket over the small fumes/expansion tank pipe that exits the main pipe. |
||
|
10-03-2017, 04:21 PM
|
|

|
|
Registered
Join Date: Dec 2002
Location: So Cal and So Oregon
Posts: 2,203
|
Then I set about installing the fuel filler door release cable pull to find I have an issue.
The tube from the cockpit is offset and at a different angle than the tube into the fender (red arrows). The stock hard wire cable will just saw at the tubes over time. I may need a sheathed cable. In the meantime, I found a small flexible cable that I can use through that hole in the font of the filler door area. I just reach under the lip of the fender and pull. Not elegant, but it works.   Maybe I should just put a small hole in the plug for that larger sheetmetal hole and run the cable through it. Last edited by SpyderMike; 10-03-2017 at 04:44 PM.. |
||
|
10-03-2017, 04:36 PM
|
|
|
Registered
Join Date: Dec 2002
Location: So Cal and So Oregon
Posts: 2,203
|
I did find a spring laying around that is perfect for returning the hood latch when actuated. Now the handle, when pulled, feels just like the original and it snaps back into position. This is why I rarely throw odds and ends away.
 I also ran the wires into the light buckets...only to come to the realization that I will probably de-loom the wires in the trunk and split out the turn signal and running lights that go to the turn signal assemblies from the low and high beam wires. I would rather make all my electrical connection in the frunk and the new turn signal assemblies I bought come with a fairly long sheathed cable pigtail and I have unused grommeted holes in the chassis to run them through. Oh well. 
Last edited by SpyderMike; 10-03-2017 at 04:45 PM.. |
||
|
10-03-2017, 04:42 PM
|
|
|
Registered
Join Date: Dec 2002
Location: So Cal and So Oregon
Posts: 2,203
|
Today I started with something easy. I have been in two accident with this car - both times I was rear ended. I think one time might have been related to teh brake switches not activating right away, and I swear the other was because even when the brake lights are on they are dim and small. I read about the LED brake light upgrade by Spoke and decided that I had to try it. In about five minutes of hands on time, both light were upgraded. What a difference. It looks to be a quality product:
 Can you tell which side in original and which is LED in this shot? Hint, it is a huge difference in light output. 
|
||
|
10-04-2017, 08:04 PM
|
|
|
Registered
Join Date: Dec 2002
Location: So Cal and So Oregon
Posts: 2,203
|
Next I started the wiring for the new turn signal boxes. I decided to jumper from the headlight bucket back into the frunk where I will mate up to the new turn signal box pigtails. I will run a common ground to the frunk grounding point in the front left corner. I got one side done and ran out of faston connectors. I am using the same color wiring scheme on both sides. Red for turn signal, blue for park lights, and black for the ground....because those are the colors of the wire I had.
|
||
|
10-04-2017, 08:07 PM
|
|
|
(man/dude)

|
I've been considering looking into a red LED brake light that could be mounted in the ventilation slots above the rear window. Might keep a 3rd rear-end from happening? These cars (and their brake lights) are so low, that without the 3rd brake light they are pretty vulnerable.
|
||
|
10-05-2017, 06:04 AM
|
|
|
Under the radar
Join Date: May 2007
Location: Fortuna, CA. On the Lost Coast near the Emerald Triangle
Posts: 7,129
|
What was your source for those LED brake lights? I need something like that.
__________________
Gordon ___________________________________ '71 911 Coupe 3,0L outlawed #56 PCA Redwood Region, GGR, NASA, Speed SF Trackrash's Garage :: My Garage |
||
|
10-05-2017, 09:29 AM
|
|

|
|
Registered
Join Date: Dec 2002
Location: So Cal and So Oregon
Posts: 2,203
|
www.spokeworksled.com he is a pelicanite user name spoke and here is his main thread on his products:
LED Brake Lights |
||
|
10-05-2017, 01:51 PM
|
|
|
Registered
Join Date: Dec 2002
Location: So Cal and So Oregon
Posts: 2,203
|
Some small details done last evening. Finished installing my fresh air water catcher and drains system...except for the drain tube. I used neoprene roofing screw washers on both sides of the hole the screw passed through and nice closed end acorn nuts for the top side. I may tap into this plenum in the future for actual fresh air. Then again, I might install a variable speed blower where the front A/C condenser blower was and use that to drive the air into the cabin.
 I then installed my fuel filler door buffer:  and I finished up jumpering some wires from the headlight buckets back into the frunk where they will connect to the turn signal housing pigtails (waiting for the seals for the turn signal housings right now). 
|
||
|
10-06-2017, 11:14 AM
|
|
|
Registered
Join Date: Apr 2014
Location: PA
Posts: 512
|
I've been struggling with the fuel door cable too. I like your solution and might steal it!
__________________
youtube.com/bennyobscene |
||
|
10-06-2017, 12:30 PM
|
|
|
Registered
Join Date: Dec 2002
Location: So Cal and So Oregon
Posts: 2,203
|
I have extra cables if you want me to send you a couple. They came from light fixtures I bought at Home Despot. PM your address if interested.
|
||
|
10-06-2017, 02:45 PM
|
|
|
Registered
Join Date: Dec 2002
Location: So Cal and So Oregon
Posts: 2,203
|
I got some more fender fasteners in and was able to finish off the installation of the fenders (why they don't sell enough in the kit to cover all needed in the fender is a mystery to me):
 I got some work done on the front bumper - installing the fog light covers and the deco trim. The trim was a battle as it needs to be reshaped to fit the shape of the bumper closely all the while the seal wants to fall out. Let's not even talk about keeping the seal in place at the tips. A couple of hours later it meets my expectations:    I am awaiting the end caps and seals before installing it. I am also still awaiting the hardware to install the turn signal housings and horn grills. Looks like I need some plugs for the overrider holes. |
||
|
10-09-2017, 12:10 PM
|
|
|
Registered
Join Date: Dec 2002
Location: So Cal and So Oregon
Posts: 2,203
|
I had some time so I took care of some more open items:
I found a spare pass through grommet and modified it for the secondary fuel latch pull.  I glued new seals on the the turn signal housings.  and finally installed the driver's side door panel and bits.  
|
||
|
10-13-2017, 10:12 AM
|
|
|
Uncertifiable!!!
|
My oh my SpiderMike!!! Been away from this wonderfull thread for a while. What great progress you have made. That chrome bumper and end cap detail is outstanding. I’m drooling.
Johan
__________________
🇨🇦 The True North Strong and Free 🇨🇦 Living well is life's best revenge- George Herbert (1593-1633) 2006 C2S, 2024 WRX GT, 911 hot rods on Pelican . Evolution of a Carrera RST, and Sweet Transplant |
||
|
10-14-2017, 07:18 PM
|
|
|
Registered
Join Date: Dec 2002
Location: So Cal and So Oregon
Posts: 2,203
|
Thanks Johan! I am gaining momentum now. The front bumper goes on this weekend and the front end will hopefully be done soon. I need to come up with a muffler solution yet. That is the last real challenge.
|
||
|
10-15-2017, 10:14 AM
|
|


 My Garage
 1971 Porsche 911
 Baja Bug
 Porschen
 RST
RST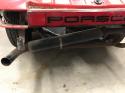 Ugly Duck
