|
|
|
|
|
| Author |
|
|
Registered

Join Date: Jun 2011
Location: Placerville, CA.... You know, the only place on Highway 50 between Sacramento and Lake Tahoe the you find signal lights. Above the fog most of the time and I can see the stars of the Milky Way 8 out of 10 nights. Kinda cool.....
Posts: 6,329
|
Daniel Stern headlight relay assembly and installation thread
Purchased the Daniel Stern headlight relay package in anticipation of assembling it and installing it into our 78 911SC.
When the package arrived and all of its parts and components, my search began of the assembly instructions. His web site explains the reasons why we should install relays in our older vehicles and he has personally responded to by emails so I have no complaints there.  the bag-o-parts the bag-o-partsI have searched the forum utilizing a multitude of search phrases and key words but have yet to discover the thread I have been looking for. Therefore, leading into my question. I have found countless threads referring to the relay kit as well as other kits. Has anyone documented the assembly process and installation steps to the Daniel Stern headlight relay and if so, could you kindly point it out with a link to the post? I am looking for confirmation to my assembly of the components as I progress and installation. I am trying to prevent a major meltdown due to something rather trivial or stupid on my part as well as any possible pitfalls a first timer could do out of plain ignorance. Things like wire length commonly used to navigate around the fuse block or the best way to attach the relays to the fuse block. Does it matter if I plan to upgrade my fuses to the standard automotive fuse system at a later date, etc... Thanks
__________________
"What the hell is an Aluminum Falcon??" -Palpatine (Robot Chicken) 1978 911SC Targa Working Projects: 1968 912 Last edited by bugstrider; 04-19-2015 at 08:41 PM.. |
||
 04-19-2015, 08:34 PM
|
|
|
ROW '78 911 Targa
|
J-West relay kit comes pre-wired with very simple instructions. Do a search for it. Just build yours the same.
|
||
|
04-19-2015, 08:58 PM
|
|
|
Registered

Join Date: May 2002
Location: Portland, Oregon
Posts: 12,712
|
If you can read a wiring diagram, you can wire it up from this schematic.
(note) the fuse positions are for my 1973, your fuse positions are different and you will need to look them up).  Others may be able to give specifics.
__________________
Harry 1970 VW Sunroof Bus - "The Magic Bus" 1971 Jaguar XKE 2+2 V12 Coupe - {insert name here} 1973.5 911T Targa - "Smokey" 2020 MB E350 4Matic |
||
|
04-19-2015, 09:09 PM
|
|
|
Registered
|
Most threads on relays for headlights here are on the Sucro relay setup, followed by the Jwest. Although I have used the Sucro kit in the past, personally, I think that I now prefer to use the factory style round relays and holders and mount them in the fuse panel (although they are quite a bit more expensive).
__________________
74 Targa 3.0, 89 Carrera, 04 Cayenne Turbo http://www.pelicanparts.com/gallery/fintstone/ "The problem with socialism is that you eventually run out of other people's money" Some are born free. Some have freedom thrust upon them. Others simply surrender |
||
|
04-19-2015, 09:26 PM
|
|
|
Registered
Join Date: Jun 2011
Location: Placerville, CA.... You know, the only place on Highway 50 between Sacramento and Lake Tahoe the you find signal lights. Above the fog most of the time and I can see the stars of the Milky Way 8 out of 10 nights. Kinda cool.....
Posts: 6,329
|
In reviewing past saved emails, I found this. I will try to document my travels as I go in order to show the steps I am taking. At least it will be cheap entertainment for those that have a solid understanding of this topic.
Relay kit component identification: -Red wire "bracelet": Fuseholder. Simply snip the wire to give two wire ends (one from each side of the actual fuse receptacle). -Cubical devices with metal pins: Relays. Each of these has five terminals as follows: 85 (trigger ground), 86 (trigger feed), 30 (power input), and two of 87 (power output). When you turn on the headlamp switch, the car's original headlamp circuit will be putting 12v across the 86(+) and 85(-) terminals, which will turn on the relay, causing it to complete the power circuit from 30 (input) to 87 (output), through the wires connected from 87 to the headlamps. *Each relay has two 87s: one for the left headlamp and one for the right headlamp.* One relay controls both low beam filaments, one controls both high beam filaments. -Metal chain : String of terminals for wire ends. Simply twist/bend each terminal off the chain as you need to use it. Install terminals on the ends of all wires that will go to the relays. -Black hollow plastic devices with mounting tabs: Relay holder/terminal blocks. After installing the terminals on the wire ends, push each wire end into its correct relay holder slot from below. It will snap lock into place. Then the relay can simply be plugged onto the relay holder. -Black square object with brown backplate, central rivet, and three protruding tabs: New high-heat headlamp sockets. Phenolic body and backplate, phosphor bronze contacts and clamps. Strip no more than 1/4" of insulation from the end of each wire. Squeeze one tab at a time, insert the applicable wire, and release the tab to clamp the wire. *OR* your kit may contain, instead, white ceramic "H4CF" socket housings with three terminals; these are Cermax high-heat headlamp sockets. Terminals can be secured to wires by crimping and/or soldering. Headlamp terminal configuration is as follows (as you're looking at the bulb's terminals, glass pointing away from you): Left vertical pin = Common ground Top horizontal pin = Low beam Feed Right vertical pin = High beam Feed Therefore, the socket's slots and wire entry points are: Left vertical slot (56a) = High beam feed Top horizontal slot (56b) = Low beam feed Right vertical slot (31) = Common ground -Plastic object packaged with three brass terminals ("H4CM"): Male plugs to connect your harness to the vehicle's original headlamp circuit without cutting wires. Crimp or crimp/solder the terminals onto the ends of your relay trigger wires, max 14 gauge, push the wires terminal-first into the plastic shells, where they'll snap-lock in place, and then snap the shells onto the vehicle's existing headlamp sockets. This gives you individual wires to work with, to trigger your relays, without cutting off the vehicle's original headlamp sockets. If your kit contains two of these, it is so that one can be used for low beam and common ground, and the other can be used for high beam and common ground. General relay installation instructions and diagrams are at Daniel Stern Lighting Consultancy and Supply . Yours is a 4-lamp system.
__________________
"What the hell is an Aluminum Falcon??" -Palpatine (Robot Chicken) 1978 911SC Targa Working Projects: 1968 912 |
||
|
04-20-2015, 10:35 AM
|
|
|
Registered
Join Date: Jun 2011
Location: Placerville, CA.... You know, the only place on Highway 50 between Sacramento and Lake Tahoe the you find signal lights. Above the fog most of the time and I can see the stars of the Milky Way 8 out of 10 nights. Kinda cool.....
Posts: 6,329
|
I know this is the basic of questions, however.
In reviewing the different posts and threads on these relays, is there a heavier gauge "NEW" wire being run to each headlight, or are we just tying into the existing harness using the factory wire that runs to each headlight? In some of the relay threads, it looks like the localized area around the fuze block is the only wires being manipulated? Just trying to clarify
__________________
"What the hell is an Aluminum Falcon??" -Palpatine (Robot Chicken) 1978 911SC Targa Working Projects: 1968 912 |
||
|
04-20-2015, 10:53 AM
|
|

|
|
ROW '78 911 Targa
|
The wires running to the lamps are not normally replaced when installing the relays.
Tying into existing and all work is localized to the fuse box area. |
||
|
04-20-2015, 11:22 AM
|
|
|
Registered
Join Date: Jun 2009
Location: Manhattan Beach, California. Factory Delivery-Original owner-Retired engineer
Posts: 5,238
|
Headlight relays for our '86.
   ^^^^^ JWest kit. Hope this helps. Good luck, Gerry
__________________
1986 911 Targa. Per Road and Track magazine: Only in L.A.: In the window of a bar in Hermosa Beach, California. "Happy Hour prices during all car chases." |
||
|
04-20-2015, 11:44 AM
|
|
|
Registered
Join Date: Jun 2011
Location: Placerville, CA.... You know, the only place on Highway 50 between Sacramento and Lake Tahoe the you find signal lights. Above the fog most of the time and I can see the stars of the Milky Way 8 out of 10 nights. Kinda cool.....
Posts: 6,329
|
Daniel Stern headlight relay assembly and installation thread
Finally got around to building the DS headlight relay. Used the posted pics of the JWest relay and advise posted to construct the relay. A bit overkill on the gauge but took my time on the fittings, followed by a touch of solder with a shrink tube chaser.
This is what I started with:   Finished product:     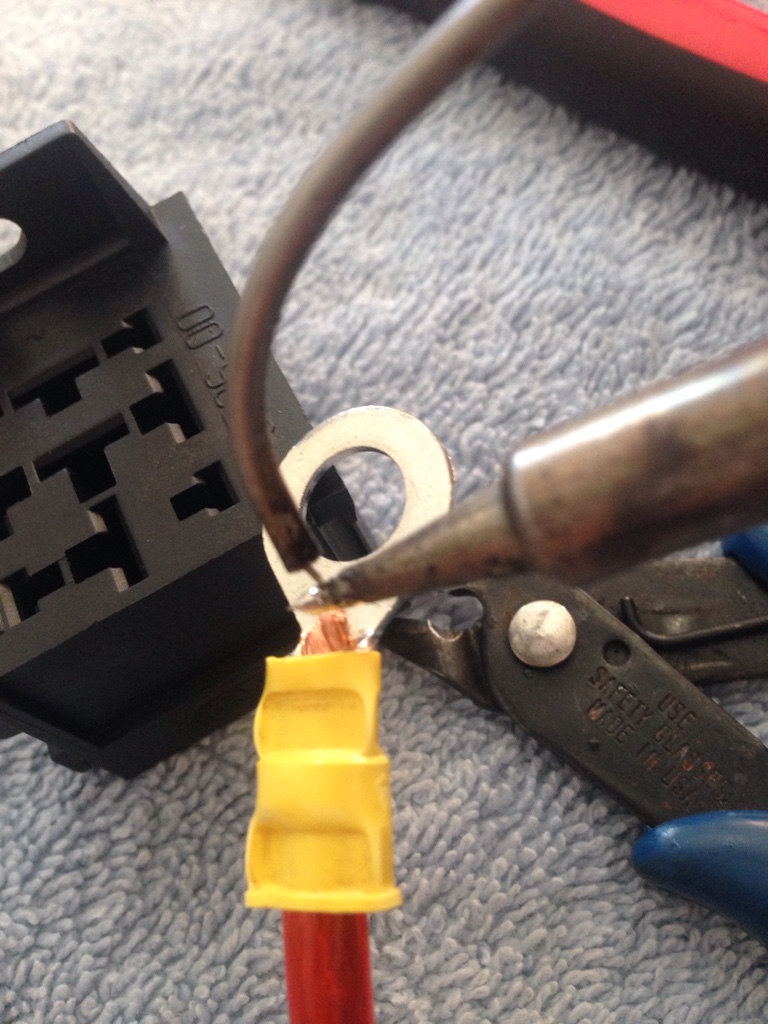 Now the fun part begins with installation. Since this is going into a 78 SC, wiring looks a little off from some of the pictures I've seen. Hoping to clarify with the Bentley Service manual. I also installed new used H4's supplied by GraigD and media blasted and powder coated the headlight mounting. All of this to increase headlight efficiency and take the load of the already tasked headlight switch. Sent from my iPhone using Tapatalk
__________________
"What the hell is an Aluminum Falcon??" -Palpatine (Robot Chicken) 1978 911SC Targa Working Projects: 1968 912 Last edited by bugstrider; 05-27-2015 at 04:58 PM.. |
||
|
05-27-2015, 03:33 PM
|
|
|
Registered
Join Date: Jun 2011
Location: Placerville, CA.... You know, the only place on Highway 50 between Sacramento and Lake Tahoe the you find signal lights. Above the fog most of the time and I can see the stars of the Milky Way 8 out of 10 nights. Kinda cool.....
Posts: 6,329
|
Daniel Stern headlight relay assembly and installation thread
Started the install but got called off for the son's pre-birthday dinner. He will turn 25 tomorrow.
Here is the progress so far. Independant power and ground wires per relay.  Total harness    Starting fuse block  Feeding the wires, also discovered why my fog lights weren't working.... My relay pulled leg bail and apparently went on a walkabout holiday...    Decided to cover the wires for a cleaner look.   Relay in place. Had to use a longer sheet metal screw due to the added thickness of the plastic mounting plate. Sent from my iPhone using Tapatalku
__________________
"What the hell is an Aluminum Falcon??" -Palpatine (Robot Chicken) 1978 911SC Targa Working Projects: 1968 912 Last edited by bugstrider; 05-28-2015 at 09:48 PM.. |
||
|
05-27-2015, 07:42 PM
|
|
|
Registered
Join Date: Jun 2011
Location: Placerville, CA.... You know, the only place on Highway 50 between Sacramento and Lake Tahoe the you find signal lights. Above the fog most of the time and I can see the stars of the Milky Way 8 out of 10 nights. Kinda cool.....
Posts: 6,329
|
In order to attach the ground wires to the chassis where the battery attaches, I discovered the generally poor condition of the strap and some corrosion that needs addressing.
   Sent from my iPhone using Tapatalk
__________________
"What the hell is an Aluminum Falcon??" -Palpatine (Robot Chicken) 1978 911SC Targa Working Projects: 1968 912 |
||
|
05-27-2015, 08:00 PM
|
|
|
Registered
Join Date: Jun 2011
Location: Placerville, CA.... You know, the only place on Highway 50 between Sacramento and Lake Tahoe the you find signal lights. Above the fog most of the time and I can see the stars of the Milky Way 8 out of 10 nights. Kinda cool.....
Posts: 6,329
|
Daniel Stern headlight relay assembly and installation thread
   Trimmed the factory yellow and white wires, touched up the ends with some solder, then crimped them into place with the corresponding relay wires. Sent from my iPhone using Tapatalk
__________________
"What the hell is an Aluminum Falcon??" -Palpatine (Robot Chicken) 1978 911SC Targa Working Projects: 1968 912 Last edited by bugstrider; 05-27-2015 at 11:36 PM.. |
||
|
05-27-2015, 11:33 PM
|
|

|
|
Eng-o-neer

Join Date: Dec 2011
Location: Los Angeles
Posts: 3,108
|
That ground strap is garbage. If I were you, I'd replace it with something fresh. Maybe 2awg welding cable. Maybe even 4awg, considering these alternators can put out about 90A max. Never hurts to have a biggass battery-ground-to-chassis connection...
I'm surprised that, with the skill of crimping, soldering, and shrink-wrapping being displayed, that you would need a kit or directions at all. It seems like you know what you're doing. |
||
|
05-28-2015, 12:23 PM
|
|
|
Registered
Join Date: Jun 2011
Location: Placerville, CA.... You know, the only place on Highway 50 between Sacramento and Lake Tahoe the you find signal lights. Above the fog most of the time and I can see the stars of the Milky Way 8 out of 10 nights. Kinda cool.....
Posts: 6,329
|
Quote:
Thanks, I am going to do exactly that. I didn't even consider the angle of welding cable. That makes complete sense., thanks for the suggestion. I had a good teacher on electrical connections. However, since I am new to the relay concept, I just wanted to make 200% sure I did this job right. It has been my experience that with this car that if I look at a connection cross eyed, I will find a new short somewhere. Although, that crappy ground strap probably caused a few issues. Cheers
__________________
"What the hell is an Aluminum Falcon??" -Palpatine (Robot Chicken) 1978 911SC Targa Working Projects: 1968 912 |
||
|
05-28-2015, 03:56 PM
|
|
|
Registered User
Join Date: Nov 2013
Location: Main Line, PA
Posts: 1,226
|
Check out Ron Francis Wiring for some very nice quality replacement cabling. Also would be prudent to check some of the other grounding points, like the one below the driver's side hood strut. I found that a steel brush and wire cleaner went a long way.
__________________
1985 911 3.2 Carrera Coupe - Constant Project - 2550lbs 2005 E46 M3- Daily Beater - 3350lbs |
||
|
05-28-2015, 04:09 PM
|
|
|
Registered
Join Date: Dec 2008
Location: San Antonio, Texas
Posts: 3,591
|
very nice installation
__________________
1973 911S (since new) RS MFI specs 1991 C2 Turbo |
||
|
05-28-2015, 05:46 PM
|
|
|
Registered
Join Date: Jun 2011
Location: Placerville, CA.... You know, the only place on Highway 50 between Sacramento and Lake Tahoe the you find signal lights. Above the fog most of the time and I can see the stars of the Milky Way 8 out of 10 nights. Kinda cool.....
Posts: 6,329
|
Thanks guys!
Sent from my iPhone using Tapatalk
__________________
"What the hell is an Aluminum Falcon??" -Palpatine (Robot Chicken) 1978 911SC Targa Working Projects: 1968 912 |
||
|
05-28-2015, 06:26 PM
|
|
|
Registered
Join Date: Jun 2011
Location: Placerville, CA.... You know, the only place on Highway 50 between Sacramento and Lake Tahoe the you find signal lights. Above the fog most of the time and I can see the stars of the Milky Way 8 out of 10 nights. Kinda cool.....
Posts: 6,329
|
Daniel Stern headlight relay assembly and installation thread
Wrapped up the finishing touches. Now just a matter of fixing the battery ground strap and checking the other grounding points as recommended.
 Then hook up the battery and hope for the best.  Unfortunately, since I work until Sunday and then have to travel down to LA that evening for a weeks worth of training starting on Monday. It will be the 8th or 9th before I can fully test the system. I was also able to score a replacement foglight relay from my friend Gary at Renntech who also provided me with the proper relay for the fuel pump too. Next step is to install the updated headlight plugs for a better connection and higher wattage H4 elements. All of this in hopes of yelling "Darkness be DAMNED" as I travel the deer infested 49 between Placerville and Auburn. Sent from my iPhone using Tapatalk
__________________
"What the hell is an Aluminum Falcon??" -Palpatine (Robot Chicken) 1978 911SC Targa Working Projects: 1968 912 Last edited by bugstrider; 05-28-2015 at 09:59 PM.. |
||
|
05-28-2015, 09:22 PM
|
|
|
Registered
Join Date: Jun 2011
Location: Placerville, CA.... You know, the only place on Highway 50 between Sacramento and Lake Tahoe the you find signal lights. Above the fog most of the time and I can see the stars of the Milky Way 8 out of 10 nights. Kinda cool.....
Posts: 6,329
|
Daniel Stern headlight relay assembly and installation thread
Fabricated a heavy #2 cable as a new grounding cable in order to eliminate the originL ground strap that was in poor condition.
Installed the new headlight plugs as well as the adapter so that I did not need to cut the original harness. Pre and post crimp and solder.     The new adapter that allows the new headlight plug to utilize the factory headlight plug without any cutting of the harness.   New plug connected to the adapter wires.   Plugged the new headlight plug into the new used H4's. Sent from my iPhone using Tapatalk
__________________
"What the hell is an Aluminum Falcon??" -Palpatine (Robot Chicken) 1978 911SC Targa Working Projects: 1968 912 Last edited by bugstrider; 06-10-2015 at 10:23 PM.. |
||
|
06-10-2015, 10:20 PM
|
|
|
Undocumented User
|
I'm all for quality and stuff and it seems like this kit uses Hella components throughout which is great. However this is an hell of a lot of work in assembly when compared to stuff that you can get off the shelf and install in 20 minutes with nearly the same quality.
The original Porsche design really left a lot to be desired so any one of the kits available does away with the limitation in that design. I will say though; and this is coming from an old school back in the day alarm installation guy with hundreds of cell phone and alarm installs under my belt, you do good work. |
||
|
06-11-2015, 05:17 AM
|
|


 Porsche 912
 1968 Porsche 912
 1978 911SC
 Heinz
Heinz
 1974 Porsche 911 3.0
 Yellow 911

 1986 Porsche 911
