|
|
|
|
|
| Author |
|
|
Registered
Join Date: Dec 2001
Location: Cambridge, MA
Posts: 44,192
|
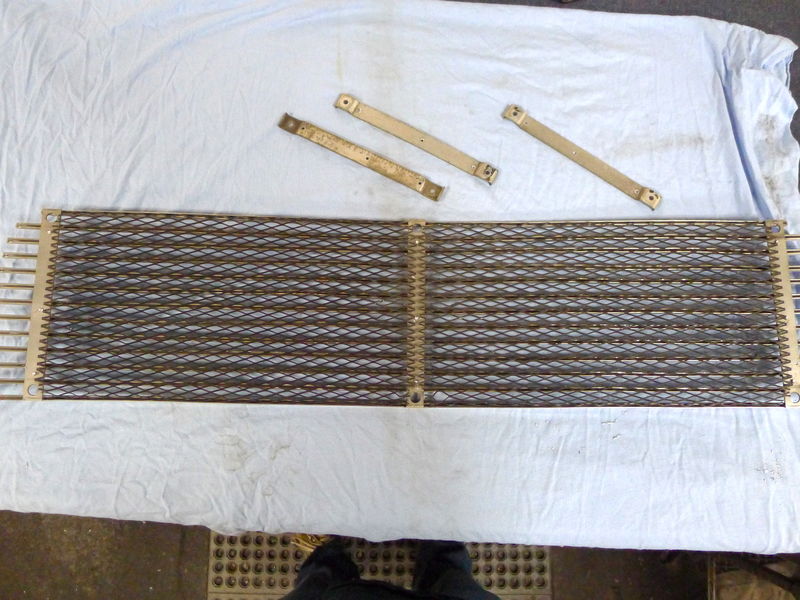
Restoring a 3-bar grille
Just finished restoring a 3-bar grille. These were only on late 68 and 69 cars, Porsche had to add in the 2 extra bars for 70 with these things getting wavy just with butterflies landing on the ribs. Long process but really rewarding.
Grille I started with.       
__________________
Tru6 Restoration & Design |
||
 08-26-2017, 04:03 PM
|
|
|
Registered
Join Date: Dec 2001
Location: Cambridge, MA
Posts: 44,192
|
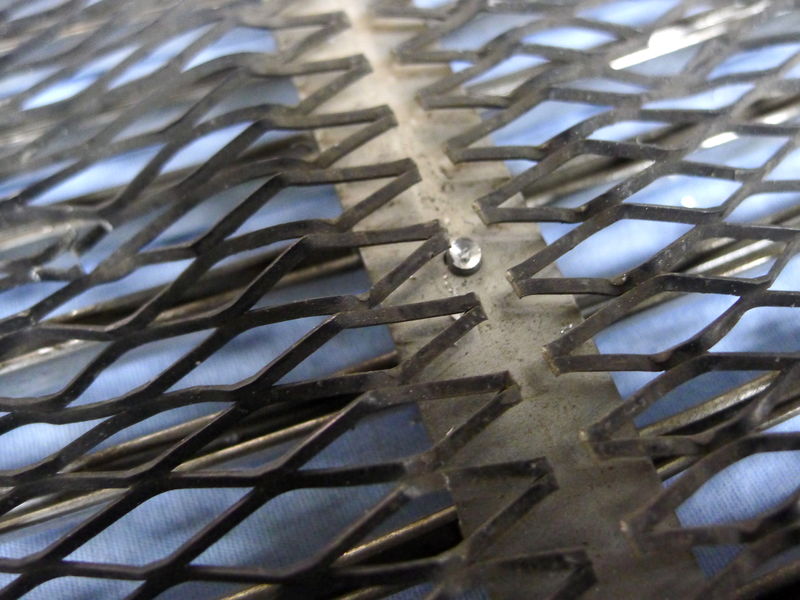
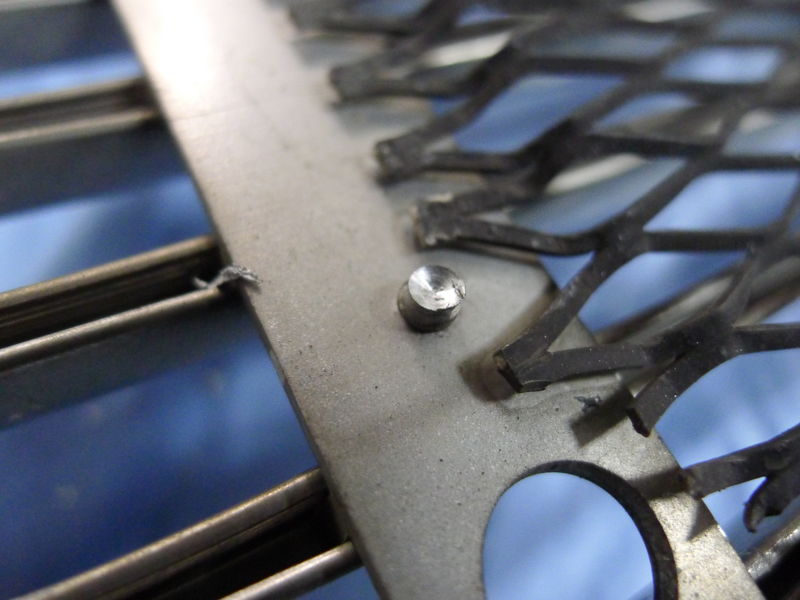
The bars are held together with solid rivets. I found the best way to separate them was to drill them out from the back.
__________________
Tru6 Restoration & Design |
||
|
08-26-2017, 04:08 PM
|
|
|
Registered
Join Date: Dec 2001
Location: Cambridge, MA
Posts: 44,192
|
Here you can start to see how bent and wavy these grilles can get. The bars have tabs with little ridges that the ribs press onto and get locked in place. Porsche was very helpful by numbering each of the ribs so you can't mix them up.
To get the ribs off the bars I made a little pry tool to widen the rib slightly on either side of the tabs.  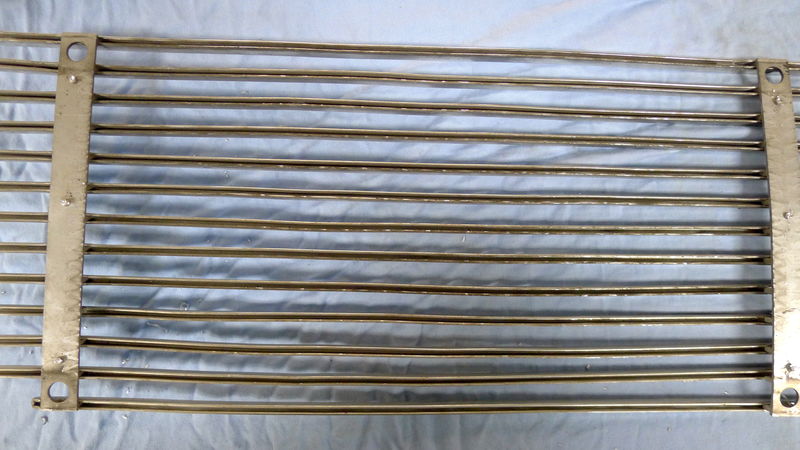   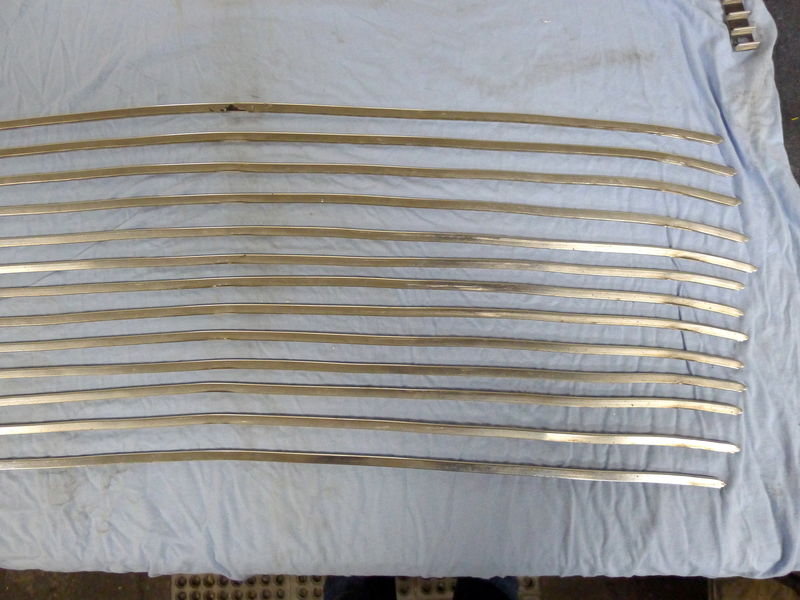  These "grab marks" were on several of the ribs and were too deep to sand out.  
__________________
Tru6 Restoration & Design |
||
|
08-26-2017, 04:18 PM
|
|
|
Registered
Join Date: Dec 2001
Location: Cambridge, MA
Posts: 44,192
|
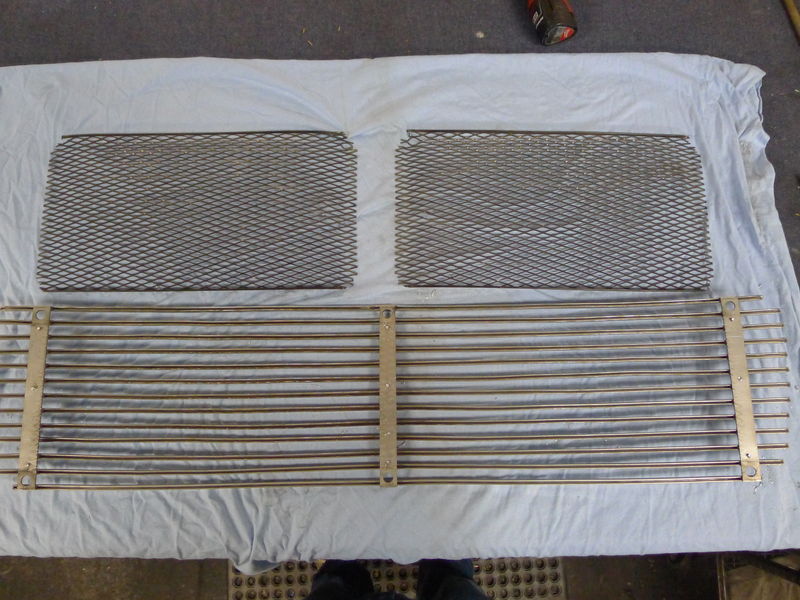
Some pics of the bars with the tabs and ridges. Center bar was bent from close to 50 years of pushing down on it to close the decklid.
Black is just paint. Oddly enough the top bar was anodized and then painted. The bottom bar was left bare aluminum, it wasn't anodized.    
__________________
Tru6 Restoration & Design |
||
|
08-26-2017, 04:33 PM
|
|
|
Registered
Join Date: Jan 2001
Location: So. Cal.
Posts: 9,097
|
Interesting. I have a three bar grill somewhere, and it's not in too good of shape. If I remember right, it has some ribs missing. I also think I have another old grill - five bar - that's also not in too good of shape I think I have four to six grills total somewhere. I'm wondering if I can add ribs to the three bar from the five bar to make a complete three bar. My car is a '69, but I think the original grill was an aluminum silver, five bar grill. Going to watch this thread.
__________________
Marv Evans '69 911E |
||
|
08-26-2017, 08:36 PM
|
|
|
Registered
Join Date: Sep 2005
Location: So. Cal.
Posts: 11,239
|
How will you true up the ribs?
__________________
David 1972 911T/S MFI Survivor |
||
|
08-26-2017, 09:23 PM
|
|

|
|
Registered
Join Date: Feb 2012
Location: California
Posts: 88
|
Somewhere on here I saw a guy make a single wooden jig thin enough with the correct arc. He then slide the rib over and straightened with light pressure.
|
||
|
08-26-2017, 09:42 PM
|
|
|
jjsjws
|
Shaun, just wondering what aluminum rivets you used to reassemble repaired grill. I used aircraft rivets (aircraft is other hobby) AN930 rivets . Had to use a rivet squeeze tool as was concerned about applying a rivet gun to such easily malleable aluminum ribs.
|
||
|
08-27-2017, 01:06 AM
|
|
|
Registered
Join Date: Dec 2001
Location: Cambridge, MA
Posts: 44,192
|
Quote:
Quote:
Quote:
Quote:
__________________
Tru6 Restoration & Design Last edited by Shaun @ Tru6; 08-27-2017 at 03:55 AM.. |
||||
|
08-27-2017, 03:52 AM
|
|
|
Registered
Join Date: Dec 2001
Location: Cambridge, MA
Posts: 44,192
|
Here are the ribs straightened and recurved. I had some male/female tooling made and pound on each rib with a 2lb sledge hammer. It's not for the faint of heart. Even with pounding these out, you can see they still aren't perfect. Part of that is I don't try to make them perfect as these are worked on a lot after being recurved and the law of diminishing returns kicks in.
Then the anodizing is stripped off and they are all sanded by hand on a jig I made to hold them. For days, can be 2-3 days of solid sanding the tops and sides. You have to pay very close attention to and feel the gentle curve of rib's profile which is not symmetric. The "front" of the rib has a different edge than the "back" of the rib. And then they are polished, tops and sides, for a day or two. What I've found is you can get most scars and pits out by sanding but there are some that are too deep and will never come out. And of course you can't locally sand out a scar or pit, the length of the rib must be evenly sanded otherwise you'll have localized low points. A perfect grill is attainable but you may have to add and subtract some ribs.      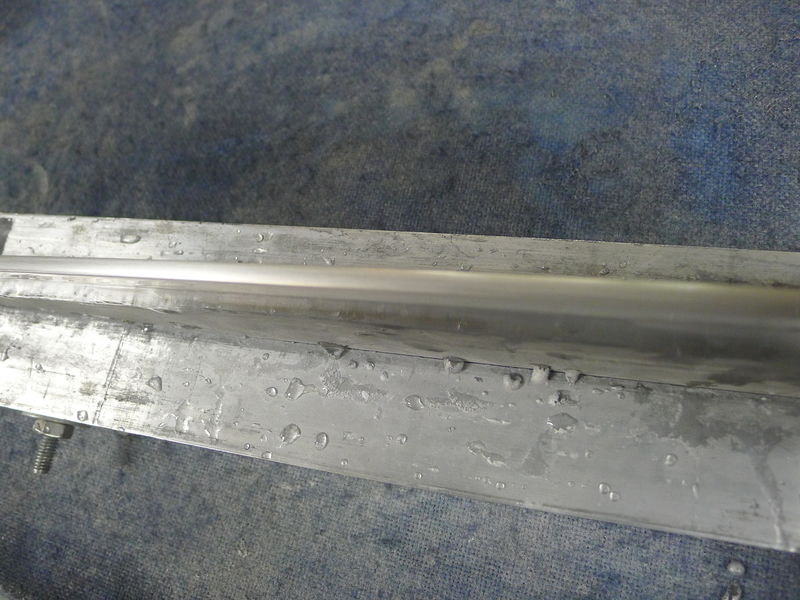    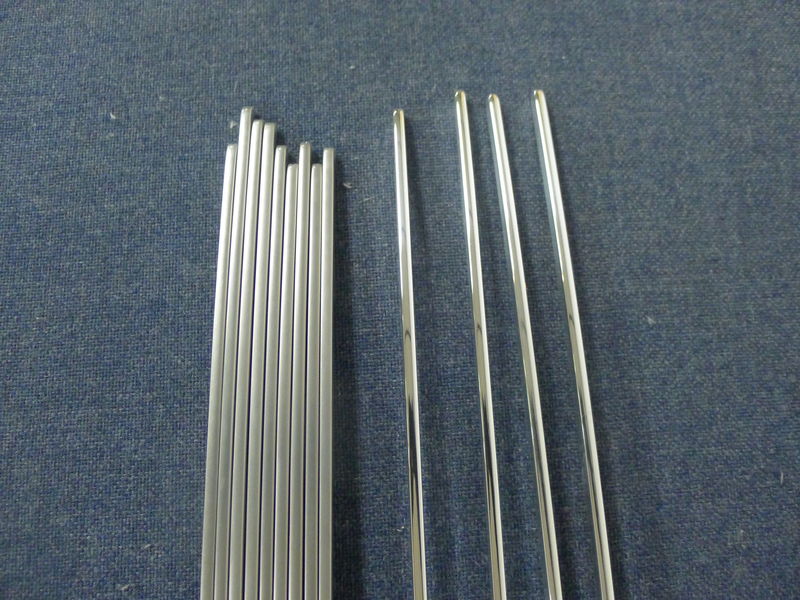
__________________
Tru6 Restoration & Design Last edited by Shaun @ Tru6; 08-27-2017 at 04:10 AM.. |
||
|
08-27-2017, 04:07 AM
|
|
|
Registered
|
Very impressive Shaun
|
||
|
08-27-2017, 05:36 AM
|
|
|
Registered
|
This level of work shows what separates the men from the boys in terms of understanding the materials and knowing how to apply **just** the right amount of force to get the desired result from fragile old parts; real restoration....in the strict/proper sense of the word. John in CT.
|
||
|
08-27-2017, 05:53 AM
|
|

|
|
Registered
Join Date: Dec 2001
Location: Cambridge, MA
Posts: 44,192
|
Thank you Gentlemen, I think it just comes down to loving what you do.
__________________
Tru6 Restoration & Design |
||
|
08-27-2017, 09:18 AM
|
|
|
Registered
Join Date: Dec 2001
Location: Cambridge, MA
Posts: 44,192
|
I go through 3 rounds of polishing. What's always fun is finding a few pits that get hidden in the sanding stage. Here I have to make a determination to go back and sand them out or they are too deep and have to leave them. 9 times out of 10 the fact that they are hidden in the sanding stage means I can get them out so I have to.
Once the ribs are polished they have to be anodized so I made a rack that the ribs fit over dog-eared tabs for good conduction. This warps the ribs sometimes but well before plastic deformation so they spring back. My anodizer likes because they don't have to tough the ribs. Took a month to get a procedure down for handling door frames. The anodizing layer is very thin as anodizing gets cloudy the thicker it is like the outer lips on Fuchs.    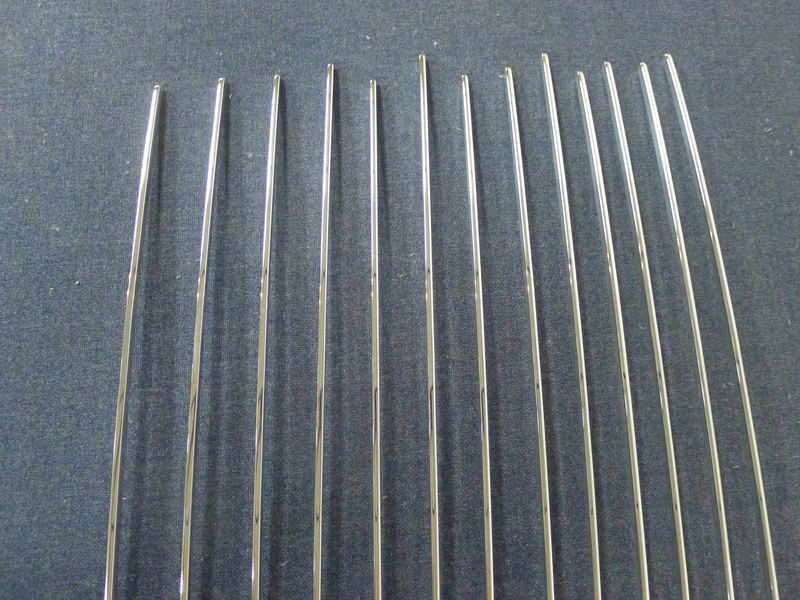   
__________________
Tru6 Restoration & Design |
||
|
08-27-2017, 09:27 AM
|
|
|
Registered
Join Date: Dec 2001
Location: Cambridge, MA
Posts: 44,192
|
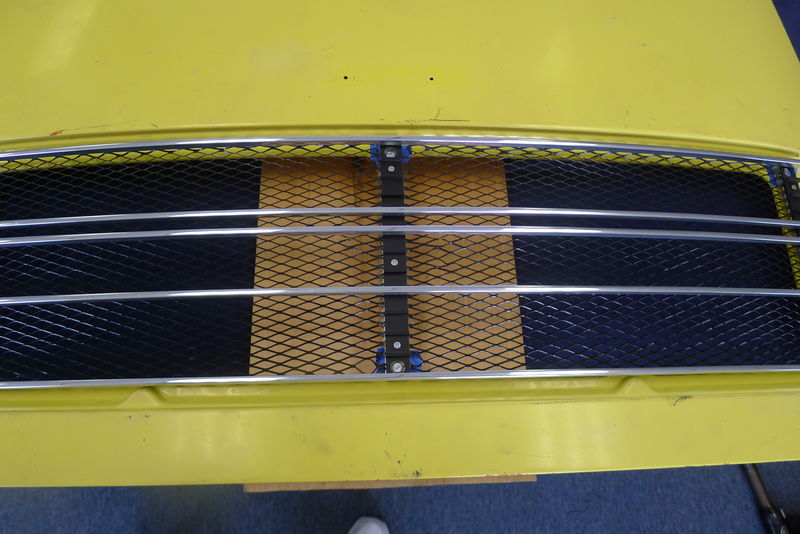
Screens get de-anodized and I try to fix localized imperfections. Problem is the aluminum is so old and thin you end up breaking the mesh some times. It is interesting that Porsche painted the bars but anodized the screens. This grille I Cerakoted the bars, rivets and screens but I will try to brighten up the screens and then anodize them on the next grilles in line.
Even though these are anodized I am still careful so the pics of all the ribs together and the numbers shows some gaps which is more due to pressing them together very lightly. Some of the assembly is on done on a nice decklid.     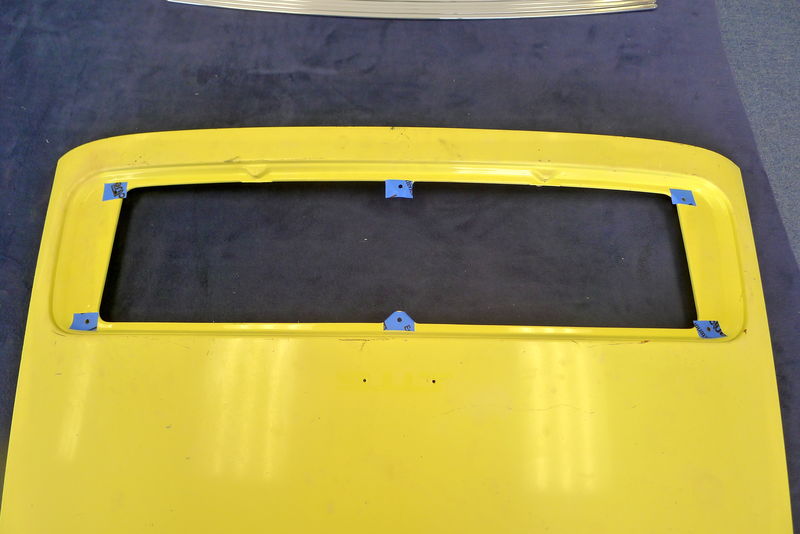
__________________
Tru6 Restoration & Design |
||
|
08-27-2017, 09:37 AM
|
|
|
Registered
Join Date: Jan 2004
Location: CT
Posts: 11,538
|
Artisanship at it's best. You may be on your way to the Hall of Fame along with Harvey Weidman.
__________________
Tom Butler 1973 RSR Clone 1970 911E 914-6 GT Recreation in Process |
||
|
08-27-2017, 12:59 PM
|
|
|
ptrsbtrs
Join Date: Mar 2006
Location: Monroe, Wa.
Posts: 1,339
|
Hi Shaun.
That looks great! Did you find or create the correct rivets? Is this a service you're gonna offer? Thanks Peter |
||
|
08-27-2017, 01:03 PM
|
|
|
Registered
Join Date: Dec 2001
Location: Cambridge, MA
Posts: 44,192
|
Quote:
Quote:
__________________
Tru6 Restoration & Design |
||
|
08-27-2017, 01:51 PM
|
|
|
Registered
Join Date: Dec 2001
Location: Cambridge, MA
Posts: 44,192
|
Assembling a grille takes close to a full day though if I welded up a jig I think I could do one in about 2 hours. First you have to bolt the bars to the decklid and make sure they are even. For 5-bar grilles I made wooden measuring sticks which makes it easy. I marked each bar pair so they went back in the same spot. Then lay the screens on, again, I marked each so they went back on the same side. The top bars go on and are screwed in place. Here you have to make sure the bar pairs are lined up and that the mesh isn't in the way in the rivet holes so it takes a little time to line everything then snug the screws down without marring the bottom bars with the nuts. Once they are all in place and secure, you can start to attach some ribs.
__________________
Tru6 Restoration & Design |
||
|
08-27-2017, 02:03 PM
|
|
|
Registered
Join Date: Dec 2001
Location: Cambridge, MA
Posts: 44,192
|
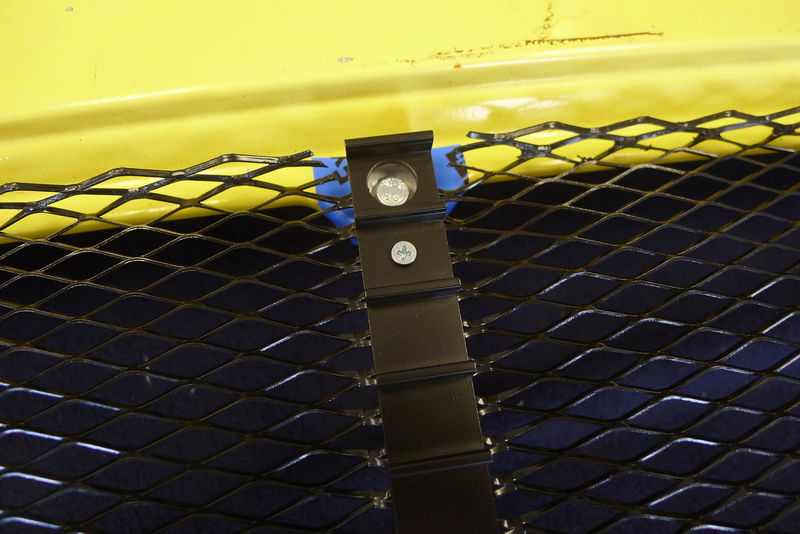
You want to just get the ribs snugged on but not locked in place mostly because you want to get all of the ribs on and get them centered before you hammer them in place. That's right, you have to hammer the ribs over the ridged tabs. And you aren't tapping. If they go on with just tapping, they will pop off.
Once the ribs are snugged as above, you take the grille off of the decklid and rivet it together pulling one screw out at a time. I use a 4X gun with a set I made and a bucking bar with another set I made so the end result is as close to factory rivets as I could get. Correct size and shape rivets aren't available so I get dome rivets and cut them down on a lathe. From start to finish, each rivet takes about 10 minutes to make. 3-bar grilles are great...6 less rivets than 5.  Once everything is riveted in place, the grille goes back onto the deckid. 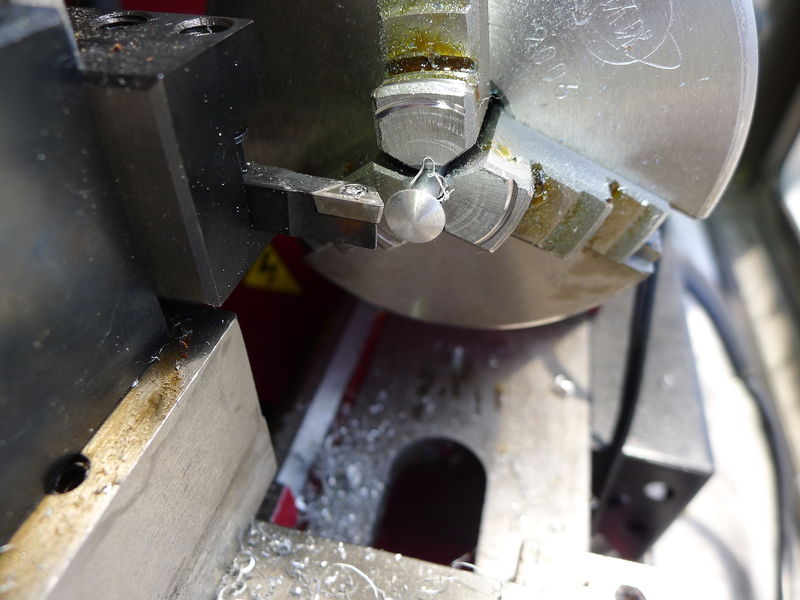    
__________________
Tru6 Restoration & Design |
||
|
08-27-2017, 02:20 PM
|
|
 |
| Thread Tools | |
| Rate This Thread | |
|
|


